[Tip] Get Imagery Update Alerts For Your Favorite Places In Google Maps And Google Earth

Follow your world imagery update Google Earth

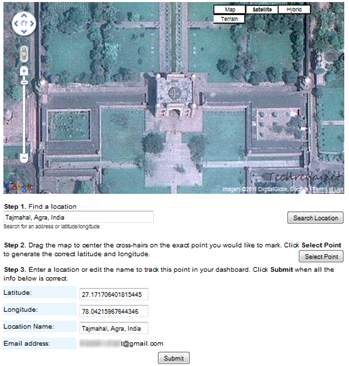
We all love to  follow our favorite places our hometown, our college, places where we used to play with our friends etc. on Google Earth and Google Maps. But we don’t really know when the imagery in these applications gets updated. Wouldn’t it be good if we get notified as and when there is an update in the imagery? Google has just done that! They have released a new app, called “Follow Your World” which lets you track of your favorite places in Google Maps and Google Earth and lets you notify any physical changes in your corresponding subscriptions.

To get started, visit the Follow Your World homepage, set your location for which you want to get imagery update (you can manually search and locate it or you can do it through longitude and latitude values). Scroll down and you will see your email address to which these updates will be delivered, check the details and click the “Submit” button when you are done.  You will receive email whenever there is a physical change in the imagery of the places that you have subscribed. As Google Maps and Google Earth make use of the same imagery, you can then see the changes in both the products.

Check USB Flash Drives For Errors With H2testw

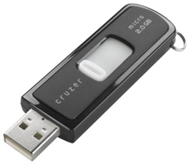
usb flash drive

Portable flash memory storage devices like USB flash drives (pen drives) and SD cards are in increasing demand these days, owing to their simple usage and portability. This has also lead to foray of many fake devices resembling the actual ones. They even outdo the original in looks but it is while using it actually only that you would come to know it is fake. A good USB flash drive should both read and write the data. But the fake device would fail either in writing or reading data from the device.

But until now there is no way to detect these corrupted devices. However, there is a small freeware (Windows only) that checks for write/read errors in storage media like USB flash drives, memory cards, hard drives and network cards for errors.

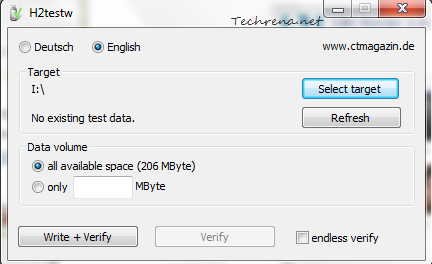
The usage is pretty much simple: Just download the H2testw zipped file, extract and run H2testw.exe. Select the target, the drive which you want to check for errors. Choose the amount of available space for which you want to verify the disk and hit “Write + Verify” button. You might want to free up the occupied space by formatting the device and choose the “all available space” option under the Data Volume section for more precise check.

H2testw

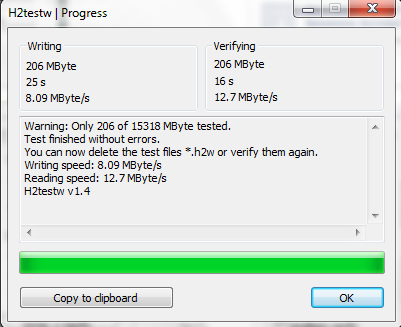
H2testw scan complete

Even if you have some files on your drive before running the scan, the files won’t be damaged or altered by the program if the drive is not malfunctioning. The program will create a “.h2w” file whose file size would be equivalent to the data volume you chose while scanning, You can manually delete these files after the tests are completed. If you click on “Verify” which would be enabled after the initial test, the option actually uses these .h2w files instead of running all over from the beginning again, so harm in deleting these files created by the program.

Download H2testw

If you have got a USB flash drive (pen drive), learn how to install Windows 7 from your USB stick.

[Tip] Know The File Size Before You Download It In Firefox

Firefox logo

Knowing the file size before you could actually start downloading it is good practice as you can plan your work accordingly. For instance if you want to download a relatively bigger file, you might want to postpone it to later without interrupting your current work. Most of the sites especially download portals always show the information about the size of the file before the download. However it is not the same case always. There are times when you download a file and come to know about its size only after the actual downloading begins in Firefox.

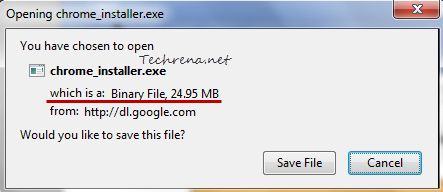
Thankfully there is a Firefox ad-on called “Show File Size” that allows us to view the file size information before you download it. Once installed, the extension show information like the type of the file and the size of the file you are downloading it in a separate row just below the name of the file row in the download window as shown:

firefox file download size

It is a basic, lightweight extension (just 4KB !) that just serves the purposes justifying the name. Show File Size add-on works fine with Firefox 3.6 to Firefox 4 versions.

Install Show File Size

Download HP Media Card Reader Drivers for Windows 7

Well I have a HP Pavilion dv-5000 series notebook PC. There has been a problem since I had upgraded from Windows XP to Windows 7. The problem is that, my Media Card Reader is not working. I have been trying to find the driver but all in vain, until today.

I have downloaded the driver from HP Website, where they have given the driver is meant for Windows Vista. Well I have tested it in Windows 7 Ultimate and it works perfectly fine.

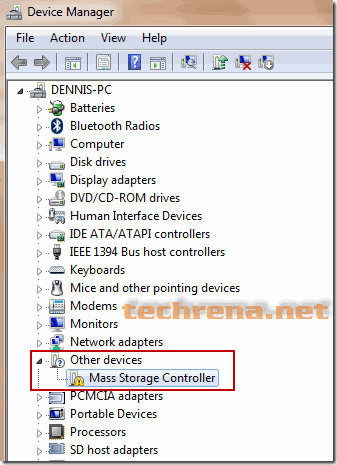
The problem I faced looked like this:

Mass Storage controller

There it is seen that, in Computer Properties->Device Manager->Other Devices, The Mass Storage Controller Driver is missing. The Automatic Driver update eventually fails.

The Solution steps are as follows:

1. Download the Texas Instruments Media Card Driver from the link given below:

Operating System: Windows 7 32 bit
Tested in HP dv-5200tx
Size: 6.31MB
Link: Click here to Download from HP

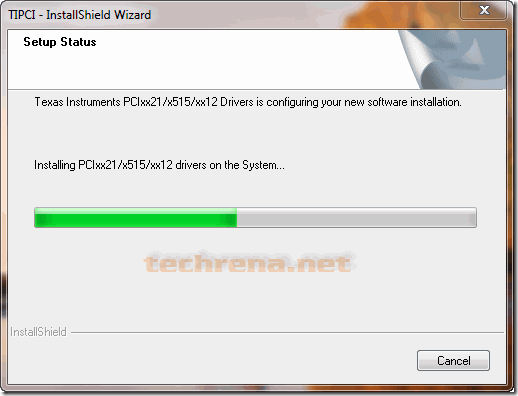
2. Install the driver.

install-texas-instrument-pci-drivers

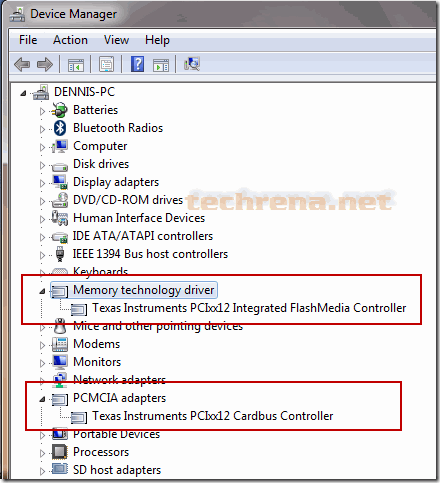
3. Now check the Device Manager. The Missing Driver in Other Devices should be gone. The Texas Instruments PCI Devices should be visible.

texas-instrument-card-bus-controller

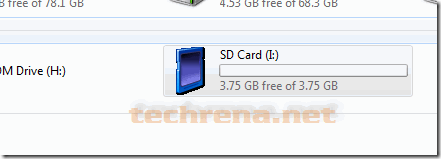
4. Test by inserting a compatible card to your reader.

HP-card-reader

Hope this will solve your card reader problem in your HP Laptop.

[Download] Firefox 4 Beta 10

Firefox 4 beta

We have a new beta release for Firefox 4 available for download. Firefox 4 Beta 10 has been released with minor improvements.

The improvements in the beta 10 version include better compatibility and stability improvements of Adobe Flash on Mac OS X, improvements in the browser memory usage, support for graphics driver blacklist.

For more details about the improvements in this version, read the Firefox 4 b10 release notes.

While we are nearing the final polished version of the Firefox 4, Mozilla is requesting users to send their feedbacks as much as they can. To provide a feedback to Mozilla, you can either click on the “Feedback” button present at the top right corner of the browser or alternatively, you can enter this feedback page and share your feedback. If you ate on Mac OS X, download the beta update and watch some videos to see the Flash performance improvements.

Download Firefox  4 Beta 10

[via]

Chrome Gmail Desktop Notifications For Email And Chat Messages

gmail desktop notifications sample

We always want to get notified for new emails (read Gmail), right? Probably because we can’t always stay online or even if we are online, we just can’t keep the Gmail window open and keep looking at it. That’s why there are so many services out there offering these kind of email alerts (both offline and online). We had earlier covered how you can get free Gmail SMS alerts whenever a new email arrives. When you are online you can just install one of those widely available desktop notification application to get alerted for new emails and chat messages.
But, wait! Google has listened to us, Google has recently integrated the desktop notifications for email and chat conversations into Gmail. But the catch? You should use Google Chrome to make this thing work. The Gmail desktop notifications is based on HTML5 and even though the most of the modern browsers support HTML5, it’s just available for Chrome! But as a Gmail fan, I would like to see this feature extended to other browsers in near future. Okay, lets get into the details about how to enable the desktop notifications in Gmail if you are using Google Chrome.

1. Login to your Gmail using Google Chrome.

2. Click on the Settings link found towards the top right corner of your inbox.

Gmail settings link

3. Under the General tab, locate the settings for “Desktop Notifications”.

4. Choose the right options for you. You can get notifications for both chat messages as well as usual email messages or for just important mails.

Gmail desktop notifications settings

5. Click the Save Changes button once you are done.

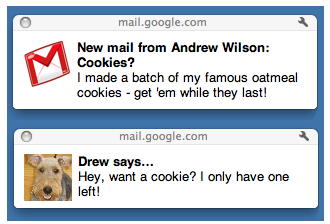
Gmail desktop email alert

That’s it! You will get the notifications for  new emails or chat messages like the one shown above. In case, if you want to turn these desktop notifications off for your Gmail account, select the respective options in the step 4. Note that desktop notifications isn’t available for Google Apps users yet.

[via] Official Gmail blog

[Tip] Edit The Firefox Maximum And Minimum Zoom Levels

Firefox logo

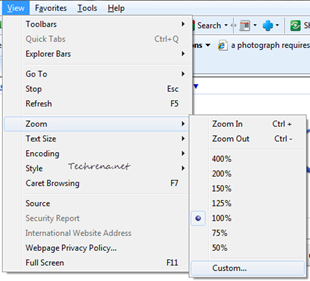
Readability level is one of the important aspect the modern day browsers stress upon. Different users need different readability levels for various elements on a webpage. The browsers let users to zoom in or zoom out of any webpage and adjusting them according to their comfort. Hence all the browsers including the Internet Explorer, Mozilla Firefox, Google Chrome, Opera etc. have incorporated the settings for adjusting zoom levels into the menu settings making them easily accessible. Firefox zoom levels range from a maximum zoom in level of 300% to a minimum zoom out level of 30%. While these are satisfactory for most users, there would still be some users who want to zoom in a page for more than 300% in order to see a particular element of a page like text, image or vide to more precisely, at which they feel comfortable reading it. Some people like web developers would want to zoom out to a level more than 30% to just see how all the elements in a web page are fitting into the screen. Whatever may be the reason, you need to have a choice. Internet Explorer allows you to enter a custom zoom level as you can see in the following screenshot:

Internet Explorer zoom levels

You can edit the Firefox default zoom levels via the about:config settings. Follow the steps to configure your Firefox.

1. Type about:config in the Firefox address bar and hit Enter.

About:config in the Firefox address bar

2. Accept the warning and continue.

Firefox this might void your warranty alert

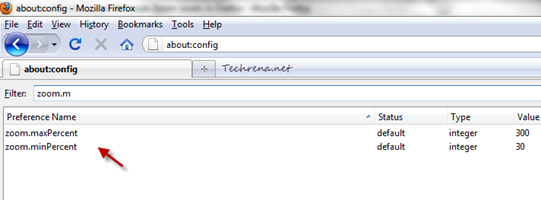
3. Now search for “zoom.maxPercent’ and “zoom.minPercent”. Both of these should appear as soon as you enter “zoom.m” as search string.

Max and min zoom level settings in Firefox

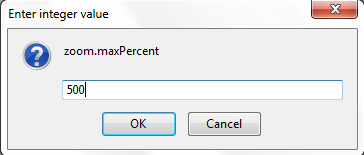
4. Double-click on each item to change the default values. For instance, you can change the maximum zoom percent to 500 from the default value of 300 p.c. Similarly you can edit the default value for minimum zoom out level as well.

Changing Firefox zoom levels

Click OK when you are done. Restart your Firefox for the changes to take effect.

[Tip] Lock Your Desktop With Transparency

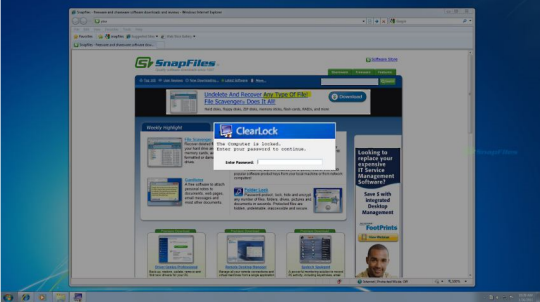
We, all the Windows users are very much used to the famous Windows + L shortcut to lock the computer when we are moving away from the system. This is just fine and serves the purpose. I have just come across a small Windows freeware that lets you lock your computer while keeping a transparent layer of your desktop screen at the background.

So you would still see the the desktop as it is, the same way as it appears if it had not been locked. But the only catch is that you need to provide the password to actually get into the system. Thus you may even tease others by allowing a sneak peek at your desktop while not allowing them to enter into it.

ClearLock screen

Download the ClearLock from the link that I have added below and run it. It will ask your for a password. When you confirm the password, the screen gets locked.

Download ClearLock [Link: Official site]

via [Digital Inspiration]

[Fix] “Windows Setup could not configure Windows on this computer’s hardware” Error

Windows 7 logo

When you are installing Windows 7 or Windows Server 2008 R2 on an advanced 512-byte emulation
(512e) format disk drive that is configured to emulate like a RAID disk will most likely encounter the following error:

Windows Setup could not configure Windows on this computer’s hardware.

Microsoft has now addressed this issue in a dedicated KB article, suggesting a possible resolution.

According to Microsoft, the issue can be fixed with either of the two methods mentioned here. Follow these suggested solutions before installing the Windows 7 or Windows Server 2008 R2.

>> Method-1: Downloading The Appropriate Drivers For Hard Disk

Download the latest drivers for your hard disk drive (32-bit or 64-bit) from the Intel website and copy them to a flash drive or burn onto a CD or DVD and then use the media during the Windows 7 or Windows Server 2008 R2 setup phase.

>> Method-2: Changing The BIOS Settings

Warning: Working with BIOS settings could lead to a serious problem with your computer if you apply incorrect settings. Use this option at your own risk.

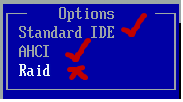
Open the BIOS settings by pressing the appropriate key just after your turn on the computer, and under the SATA Configuration (hard drive setting) to either AHCI or IDE. That is it, you don’t need to install the driver that you got through the method-1.

Hard disk drive SATA BIOS settings

[Via] Windows KB article

[How To] Create A Shortcut To “Safely Remove Hardware”

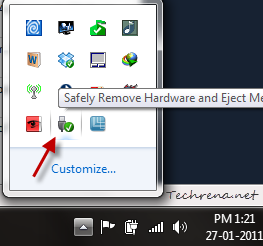
What do you do to remove your plugged in USB device like flash drive? You need to move your mouse to the system tray and locate the small USB icon “Safely Remove Hardware and Eject Media” (in case of Windows 7 and Vista) and click on it and confirm that you want to remove or stop a particular USB device.

Safely-remove-hardware-media-tray

But even though it is simple, it is often tiresome as you need to expand the arrow in the tray and locate the small icon (Windows 7). This where you wish you had a shortcut at some other easily accessible place. A desktop shortcut for this “Safely Remove Hardware” dialog would be much more handy. If you are like me, get to know how to create a Safely Remove Hardware shortcut in Windows 7 and Vista by following these steps.

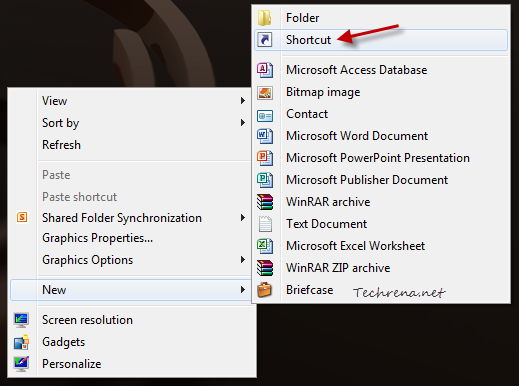
1. Right-click on your desktop, choose New > Shortcut.

New shortcut on desktop

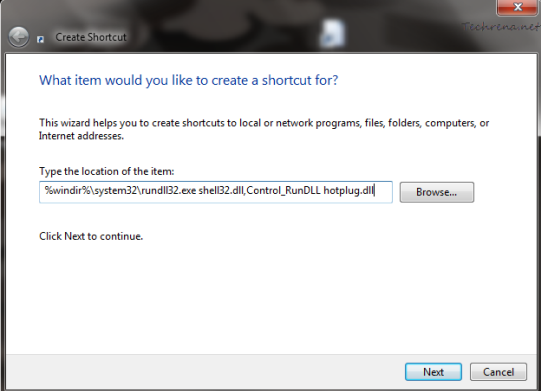
2. In the next window, paste the following code in the “location of the item”

%windir%\system32\rundll32.exe shell32.dll,Control_RunDLL hotplug.dll

Safely remove hardware shortcut code

Click the “Next” button to continue to the next step.

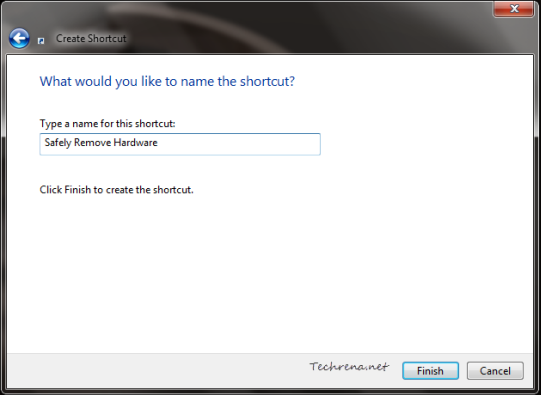
3. Give the shortcut a meaningful name and click the “Finish” button to complete the setup.

Shortcut name

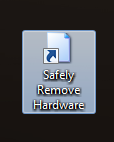
4. The new shortcut icon appears on your desktop.

Safely remove hardware shortcut

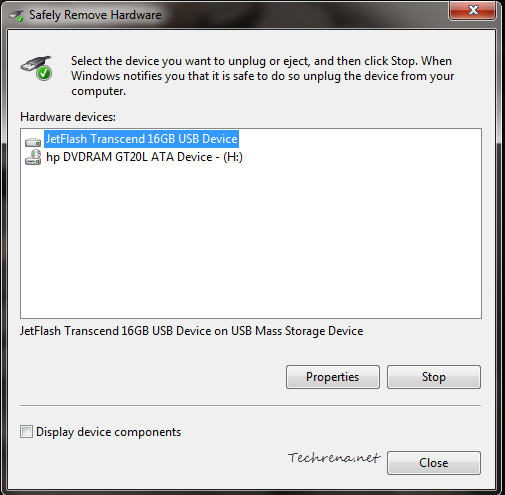
If you have plugged in the USB flash drive, double-click on the shortcut icon to see if it works. It should open the Safely Remove Hardware window, showing you the list of currently plugged in devices (USB and non-USB as well).

Safely remove hardware window

Select the particular device that you want to unplug or remove and click the “Stop” button to stop the device.

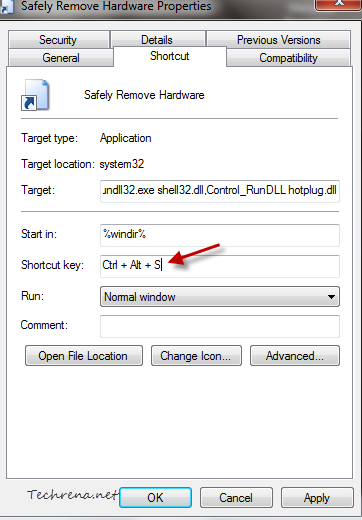
The advantage with this kind of shortcut trick is that you can choose to have a shortcut key setup for even more quicker access.

To assign a shortcut for the Safely Remove Hardware shortcut, just right-click on the shortcut and choose a unique keyboard key combination to assign as hotkey.

Safely remove hardware shortcut key