
With the increasing technology day by day, our computers, laptops and every equipments are becoming obsolete. I bought my Laptop with 1GB RAM and 100 GB Hard Disk at a price with which I can buy a fully featured Tablet PC now.
So to deal with the developing technology, we need to upgrade our PCs and laptops to fit and to support the currently available software and operating system. I felt its high time that Techrena dot Net give you a tutorial to upgrade the most basic and most needed hardware upgrade –your Laptop’s Physical Memory or RAM (Random Access Memory).
What You Need to Upgrade your RAM?
- Find out the type of RAM your Laptop PC Supports ( DDR1, DDR2, DDR3, SD, etc.)
- Find out the Maximum amount of memory size your Laptop Supports( 2GB, 4GB, 8 GB, etc.)
- Buy a suitable RAM for you Laptop PC
- A suitable screwdriver (Mostly Philips Type)
How a Laptop RAM Looks Like?
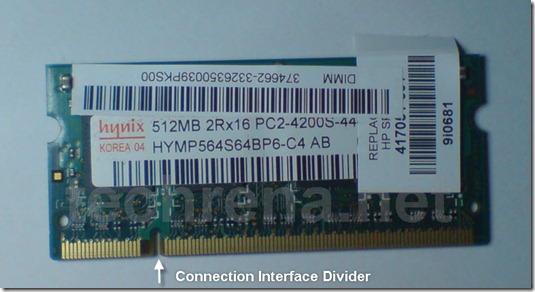
Laptop RAMs are smaller in size as compared to Desktop RAMs. A HYNIX made 512MB DDR2 RAM is shown below. As you can see it has a connector for the RAM slot in your laptop and it has a divider. This divider is to indicate the correct side while connecting it.
Click on the images to enlarge
Opening your Laptop Ram Container:
Shutdown your computer and disconnect all the cables and wirings. Turn your Laptop over, be careful and keep a protection under the laptop.
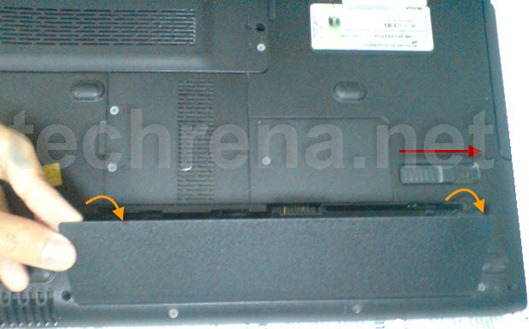
Now Remove your Laptop battery. To remove release the lock and pull the battery out.
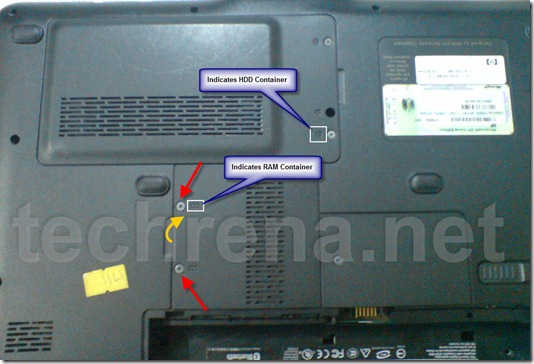
Now see which section contains the RAM in your laptop. Do not confuse with the other device containers. With a suitable screwdriver, start unscrewing the screws in the section which contains the memory devices. See the image below:
Removing the old RAM (not required if empty slot is available):
After opening the cover of the RAM container section, you need to remove the old RAM which needs to be replaced. Note that many laptops have more than one RAM slot. Which means that if you have an empty slot you can put the new one in the empty one. This will add your new RAM size to your old one.
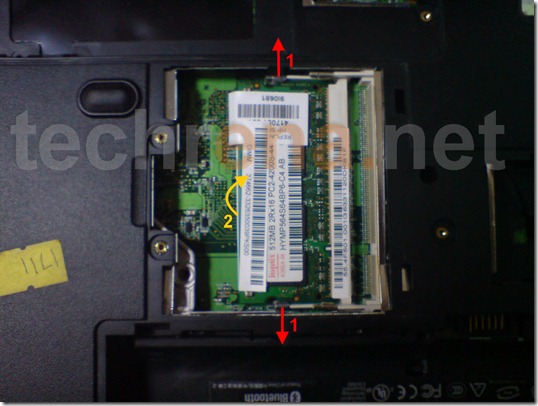
First pull out the RAM holder as shown, the Device will come out automatically. Take it out smoothly.
Installing a New RAM:
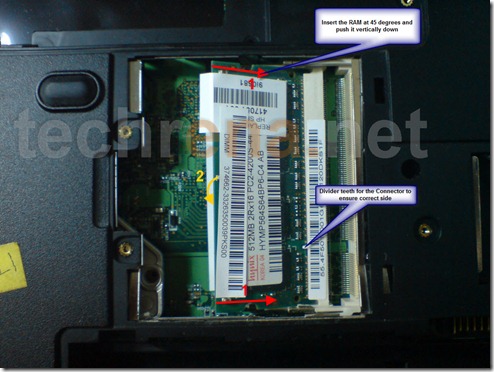
Before inserting the new one, find out the correct side to which you need to connect to. Slide in the Device smoothly to the slot. Most RAM slots need to insert the device in 45 degrees and push it vertically down after it has been inserted fully into the slot. Refer the image below:
Now place the covers and screw it back. Place the battery back to the battery slot. Power it up and start the computer.
Installation of RAM has been successfully completed and you can check the Physical Memory at:
Right Click on My Computer—> Properties—> Memory or
Task Manager –> Performance—> Total Physical Memory
Important:
- Do not try any forceful methods to remove the screws or devices. If anything is not getting removed, do contact a professional.
- Be careful while installing the new device. Make sure you insert it correctly and firmly.
- The above tutorial is based on HP DV1502 TU Model. It may be different in your case.
Disclaimer: This tutorial is for your information only. Techrena dot Net is not responsible for any damage in property or lives resulting from the use of the information given here. You are responsible for all the actions you take.

Very good tutorial! I didnt have any problem upgrading my laptop’s memory! thanks