[How to] Install Google Android OS In Your PC

Google is giving us the opportunity to use Google Android OS for free in out x86 PCs. LiveAndroid is a live CD or Live USB with which you can try Android even without installing it to your PC. This Live CD/USB is available for free download.

More than that, the LiveAndroid disc image can be used in virtualization software like VMware and Microsoft Virtual PC.

Google LiveAndroid  is an open source project which will allow you to download the different releases and versions of the Google Android Operating System.

LiveAndroid

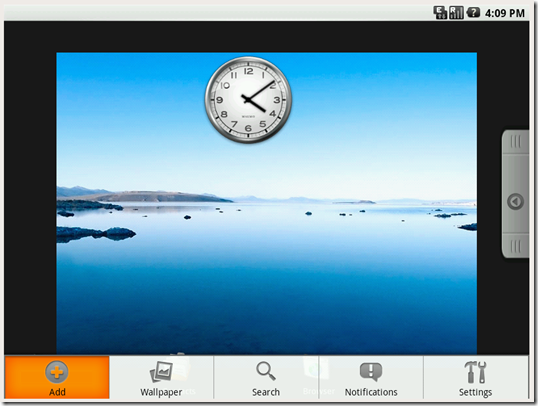
Google Andoid OS in x86

LiveAndroid Screenshot

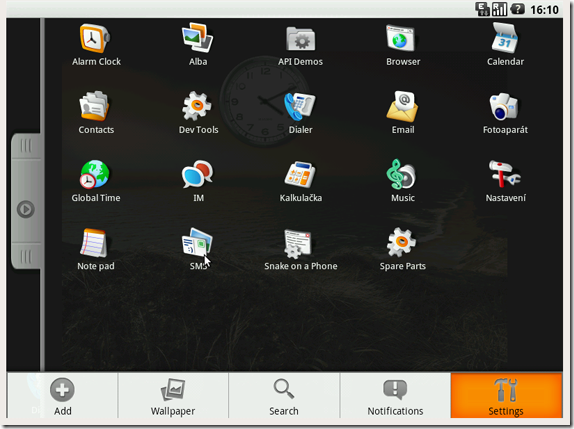
LiveAndroid Screenshot

To download the Live CD or Live USB visit:

Link: http://code.google.com/p/live-android/

Once you have done downloading the image file you can burn it the Image to a CD or use a USB and boot it in your PC. You can use VMware to use this OS. You can follow the steps given in this post Install and Run Windows XP in Windows 7 Using VMware Player

.

Run Multiple Versions of Firefox On Your PC

firefox logo

How I can run two (or multiple) versions of Firefox on my computer?”

This is the common questions asked by many of the Firefox, especially web developers who need to test their applications in various versions of Firefox.

It also might be a case that you liked an earlier version of Firefox and just want to run it as the secondary version (it’s always recommended to run the latest updated version to avoid any security risks).

While this question has no absolute solution, I’m posting a tip that at least gives us a chance to run two different versions of Firefox (but still won’t serve the purpose fully).

Update: Read How To Run Two Different Versions Of Firefox On The Same Computer, the updated version

One way we can two different versions of Firefox is to install and use a Portable Edition of the Firefox. Just install the version of the Firefox that you want to use on portable device, install it on your USB flash drive. Plug it in and start using the portable version. However you please note that you cannot run these two versions simultaneously. Supposing that you have installed a new Firefox v3.6 on your PC and a portable version 2.0.0.20 on your USB disk, if you are running Firefox v 2.0.0.20 from your USB and you click on the Firefox icon shortcut to open a new window, you will be surprised to see that it’s the v2.0.0.20 that runs and not v3.6 and vice-versa.

Download Firefox Portable Edition

How To Open IE In Private Browsing Mode By Default

Internet explorer logo

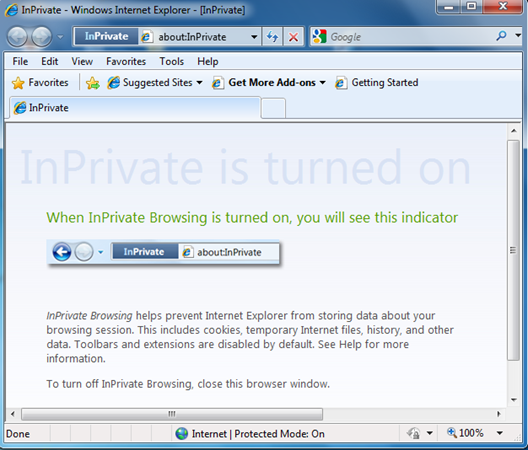
In Private Browsing Mode IE

Private browsing mode” is idle for those who don’t want other users on the same computer to see sites that he had visited and other information. In private browsing mode, the browser will not store your browsing details in cookies or in browsing history.

But for some reasons this private browsing mode is hidden in the browser windows and is not that easy to access (even though you can use a keyboard shortcut to open it, I’d still want a better way) this mode. Even if we create a desktop shortcut for Internet Explorer, it’ll only create a shortcut for normal browsing mode, not the private mode. But here’s a tutorial for you which explains you how to add a private browsing mode desktop shortcut.

1. Create a desktop shortcut as you would do normally.

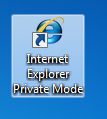
IE private mode shortcut

[I just renamed the shortcut to “Internet Explorer Private Mode” to reflect its purpose]

2. Right-click on the shortcut now and you will be under “Shortcut” tab by default. You can find a field “Target” under the Shortcut tab.

3. Append the following string to the target location present in the filed:

-private

Now the string will look like:

IE private mode shortcut

"C:\Program Files\Internet Explorer\iexplore.exe" -private

4. Click OK to save the settings.

You can now use this shortcut to start Internet Explorer in “Private Browsing Mode” by default.

Windows 7:

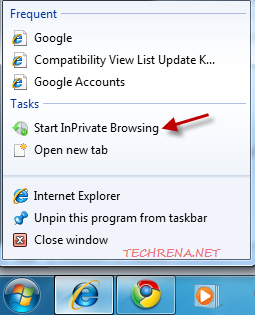
If you are using Windows 7, you need not worry about going through all the above listed steps to create a shortcut as Windows 7 by default will have a shortcut to start InPrivate Browsing. Just right-click on the IE shortcut present in the taskbar and choose “Start In Private Browsing option” from the list.

Windows 7 IE start inPrivate Browsing

Change Address Bar Search Provider In Firefox

Firefox logo

Address bar search is the feature that allows you to search for a keyword entered in the address bar (location bar) without entering the search engine homepage. Firefox by default will look for the keyword entered in the address bar in Google search as it is usually set as the default search engine to manage address bar keywords.

However, you might want to change it to suit your personal interest. It may sometimes can also be a case of hijacking: You install some programs that they change your search bar address bar search provider without asking for your permission (ex: so many toolbars like Alexa, Yahoo etc.). For some reasons, if you want to change the Firefox address bar search provider, you can do it by following the steps below:

1. Type about:config in the Firefox address bar. You will be presented with a warning, if you are using Firefox 3.5 + version, just click “I’ll be careful, I promise”!” to continue to the about:config page.

Firefox_about_config_warning

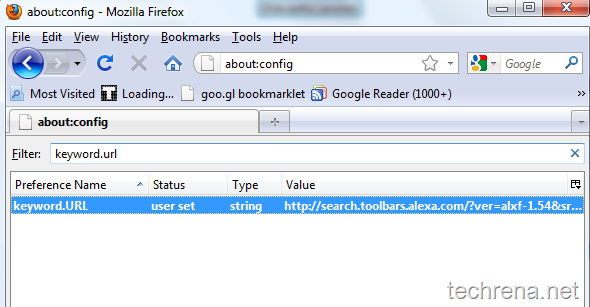
2. In the Filter search box, type “keyword.url” and the result returns only one result as shown in the screenshot below.

keyword.url_firefox

And as you can see here, the address bar search engine provider in my case has been changed to Alexa, when I installed it’s toolbar sometime back. Now I want to change it to a different provider, back to Google may be, or Bing? Well I can even test how it works with Twitter search.

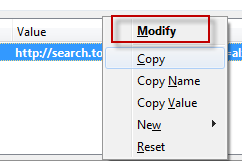
3. Right-Click on the field value and click “Modify”.

change_firefox_keyword.url_string_1

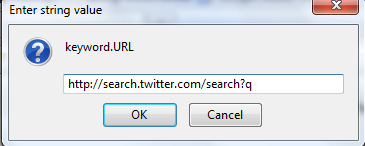
You will now be asked to enter a string value for the keyword.URL, choose the values according to the provider, as listed in the table below.

change_firefox_keyword.url_string

List of  string values of various search engines:

Google http://www.google.com/search?ie=UTF-8&oe=UTF-8&sourceid=navclient&gfns=1&q=
Yahoo http://search.yahoo.com/search?p=
Bing http://www.bing.com/search?q=
Ask http://www.ask.com/web?q=

Click OK to save the settings and checkout the result yourself with typing a keyword in the address bar of the Firefox.

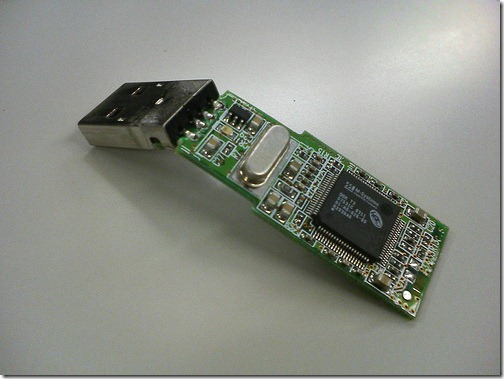
Think Before Using USB Flash Drives To Run Applications or OS: Advisory

I am writing this post on an advisory note. With the extensive use of USB flash driven in our day to day activities, now we have been aiming to make even our Operating System(OS) portable by installing it in a USB Flash Drive and carrying around in our pocket. Moreover we can run applications such as Mozilla, Anti Viruses etc. from a USB pen drives. Here I am going to explain, why you need to think twice before using your USB Flash Drive to run an Operating System from it.

Why you should think twice before using a USB Flash Drive to run an OS or applications for prolonged period?

All flash memory devices can sustain only a limited number of write and erase cycles before failure. While running a normal OS or an Application from a Flash drive, the system will write and erase a huge number of files and data in the flash drive. With prolonged use, the write/erase cycles of your flash drive may come to an end and may eventually fail.

The write/erase cycle performed while running an Operating System(OS) such as Windows XP or 7 will be very much more than what we can perform manually, by copying and deleting data. So this should be a consideration as it may make your flash drive run out of Write/erase cycles much faster than expected.

a failed usb flash drive

Another usage of USB is Windows ReadyBoost. Windows 7 and Vista can make use of a USB flash drive as a cache memory to improve the performance.  In this case also the cycles are be used a high rate.

Points to be Noted:

  • Flash memory devices have a limited number of write and erase cycles before failure
  • Running an OS or an Application from a Flash drive will write and erase a huge number of files or data in the flash drive per second.
  • Running an Operating System(OS) will perform these cycles much more than what we can perform manually
  • Prolonged use will make your flash drive run out of write/erase cycles and may eventually fail much before expected

How to address this issue?

To address this, as well as space limitations, some developers have produced special versions of operating systems such as Linux in Live USB or portable applications such as Mozilla Firefox designed to run from flash drives. These are typically optimized for size and configured to place temporary or intermediate files in the computer RAM rather than store them temporarily on the flash drive.

Compared to other portable storage devices such as external hard drives, USB flash drives still have a high price per unit of storage. But Hard drives have a higher minimum price.

Alternatives:

  • Run applications or OS which are configured  for Flash Drive use only
  • For Prolonged usage, try buying an external Hard Drive
  • If you are using your USB Drive as a Cache device to improve performance, why not upgrade your RAM size?

Notes:

1. Manual usage of your USB Drive will take years to use up the Write/erase cycles available, so no need to worry.

2. Most Failures in USB Memory Devices are due to wear and tear

How To Install or Upgrade Your Laptop’s RAM (Physical Memory)

techrena logo

With the increasing technology day by day, our computers, laptops and every equipments are becoming obsolete. I bought my Laptop with 1GB RAM and 100 GB Hard Disk at a price with which I can buy a fully featured Tablet PC now.

So to deal with the developing technology, we need to upgrade our PCs and laptops to fit and to support the currently available software and operating system. I felt its high time that Techrena dot Net give you a tutorial to upgrade the most basic and most needed hardware upgrade –your Laptop’s Physical Memory or RAM (Random Access Memory).

What You Need to Upgrade your RAM?

  • Find out the type of RAM your Laptop PC Supports ( DDR1, DDR2, DDR3, SD, etc.)
  • Find out the Maximum amount of memory size your Laptop Supports( 2GB, 4GB, 8 GB, etc.)
  • Buy a suitable RAM for you Laptop PC
  • A suitable screwdriver (Mostly Philips Type)

How a Laptop RAM Looks Like?

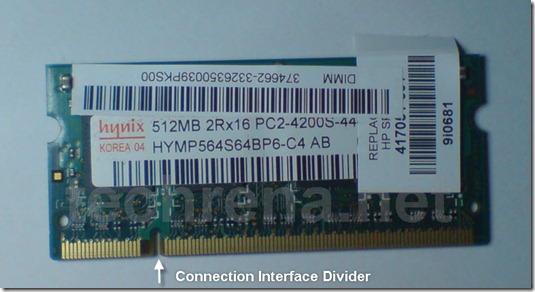
Laptop RAMs are smaller in size as compared to Desktop RAMs. A HYNIX made 512MB DDR2 RAM is shown below. As you can see it has a connector for the RAM slot in your laptop and it has a divider. This divider is to indicate the correct side while connecting it.

Click on the images to enlarge

512MB RAM

Opening your Laptop Ram Container:

Shutdown your computer and disconnect all the cables and wirings. Turn your Laptop over, be careful and keep a protection under the laptop.

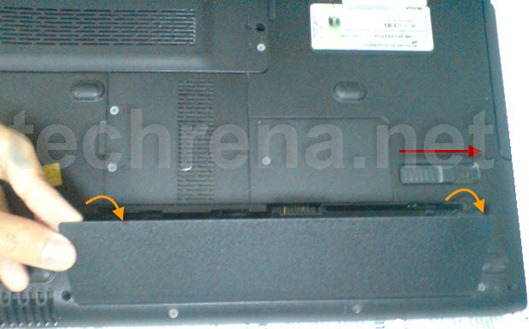
Now Remove your Laptop battery. To remove release the lock and pull the battery out.

Remove the battery

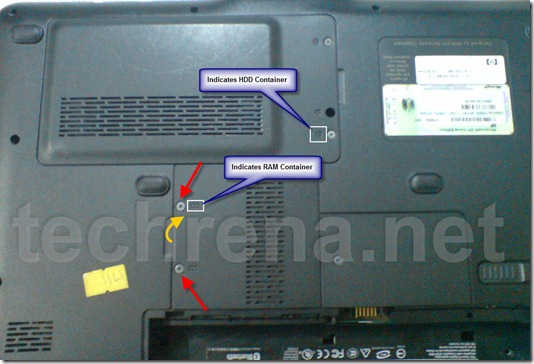
Now see which section contains the RAM in your laptop. Do not confuse with the other device containers. With a suitable screwdriver, start unscrewing the screws in the section which contains the memory devices. See the image below:

Open Container Screws

Removing the old RAM (not required if empty slot is available):

After opening the cover of the RAM container section, you need to remove the old RAM which needs to be replaced. Note that many laptops have more than one RAM slot. Which means that if you have an empty slot you can put the new one in the empty one. This will add your new RAM size to your old one.

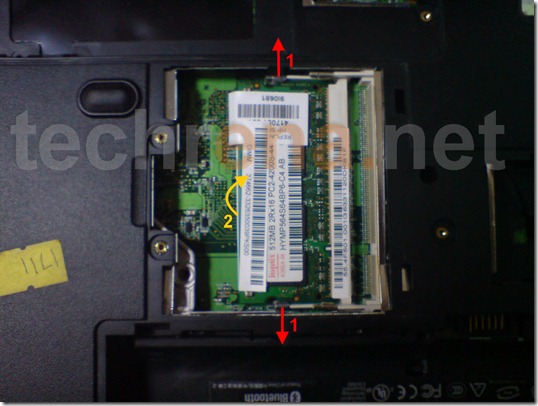
First pull out the RAM holder as shown, the Device will come out automatically. Take it out smoothly.

Remove Old RAM

Installing a New RAM:

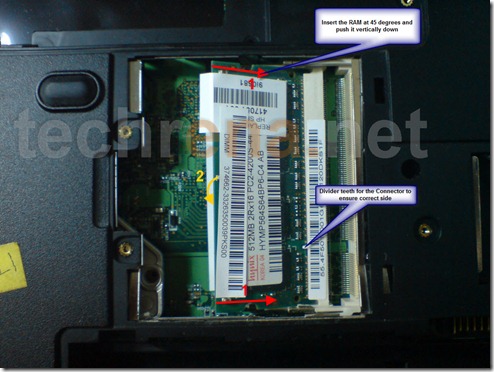
Before inserting the new one, find out the correct side to which you need to connect to. Slide in the Device smoothly to the slot. Most RAM slots need to insert the device in 45 degrees and push it vertically down after it has been inserted fully into the slot. Refer the image below:

Install New RAM

Now place the covers and screw it back. Place the battery back to the battery slot. Power it up and start the computer.

Installation of RAM has been successfully completed and you can check the Physical Memory at:

Right Click on My Computer—> Properties—> Memory or

Task Manager –> Performance—> Total Physical Memory

Important:

  • Do not try any forceful methods to remove the screws or devices.  If anything is not getting removed, do contact a professional.
  • Be careful while installing the new device. Make sure you insert it correctly and firmly.
  • The above tutorial is based on HP DV1502 TU Model. It may be different in your case.

Disclaimer: This tutorial is for your information only. Techrena dot Net is not responsible for any damage in property or lives resulting from the use of the information given here. You are responsible for all the actions you take.

HP Compaq Web Cam Driver & Application For Windows 7

COMPAQ_logo

For HP Compaq Laptop users, if you are migrating to Windows 7, then you need to have some of the drivers compatible to Windows 7.

If you see, unlike Windows XP, Windows 7 supports most of the basic devices with its inbuilt drivers like the sound card. And even if it doesn’t support the device, it tries to download the driver from the internet and installs automatically.

For the Web Camera, the driver can be directly downloaded using device manager of Windows unlike in the case of Acer Laptop PC where you need a different driver download. But the Web Cam needs an additional application to run. Here we have given both how to download the driver and the Web Cam application.

Note: Connect your Compaq PC to the Internet before performing these steps.

Downloading the driver:

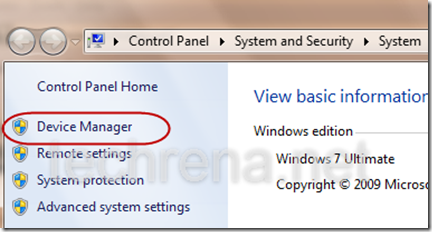
Open Device manager. Right click on Computer and select properties. In the properties click Device manager.

open_device_manager

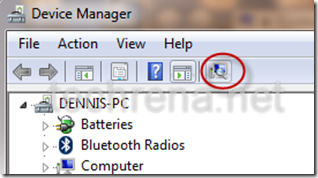
Now Click on Scan for hardware changes button as shown below:

device_manager

scanning_hardware_changes

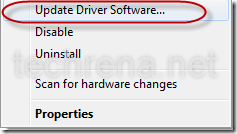
Under the Imaging devices section if your Web cam is already present then no need to download the driver. If it shows as an unrecognized device with a yellow exclamation symbol then, right click on it and select Update Driver Software…

update_driver_software

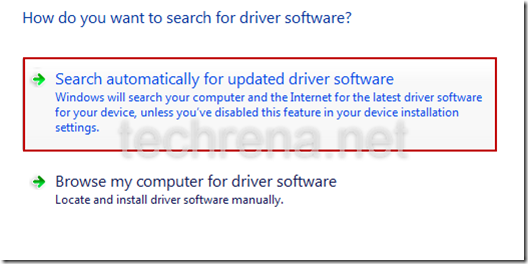
Select Search automatically.

update_driver_from_internet

It will automatically download and install the Driver software to your Compaq PC.

Install Web Cam Application Software:

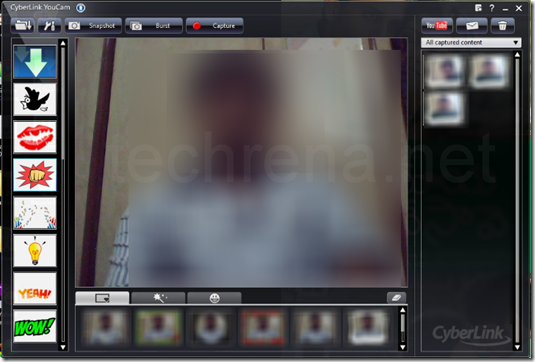
You have to download the Cyberlink YouCam application software to run your Web camera. You can download it from the official hp link:

ftp://ftp.hp.com/pub/softpaq/sp37501-38000/sp37849.exe

Size: 49.5 MB

Extract it and install it. You can run your web cam and use it.

cyberlink youcam

The updating of the driver software is applicable to all the hardware devices in your computer. If any unrecognized device is found, then you can try updating the driver software.

The above given method has been tested successfully in Compaq Presario C783TU. Hope it will work for other models also. Any feedback can be posted as a comment below.

Apple iPad Fever: Much Anticipated iPad Goes on Sale in America

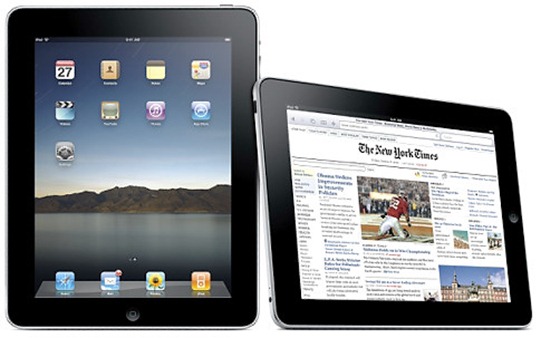
Apple’s iPad tablet computer has gone on sale in America. The first generation model has wi-fi but no 3G connectivity. It is not yet available outside the US. The price in US is $499 – $829 (£328 – £545).

apple_ipad

Reports of iPad Fever:

iPad fever
Source: BBC

Apple took pre-orders online but some early adopters began queuing outside stores the day before its release at 0900 EST (1400 BST) on 3 April. As you can see in the picture above people camped outside the Apple store in New York overnight.

Critic and user reviews of iPad:

There has been a lot of feedbacks from the consumers as well as the critics. There has been a lot of mixed reviews. Some tell that iPad may change the face of computers while some say its just a no.

Consumers Dissatisfied:

The first generation model has not included 3G connectivity which has become a hot topic of discussion. Some of the consumers are dissatisfied why 3G was not included in this world of third generation.

With the release of iPad in the US, other parts of the country like UK are also waiting impatiently for iPad’s sale.

How To Speed Up Your Windows PC Using MSCONFIG

In Windows system configuration is done using MSCONFIG. MSCONFIG is very useful to the Windows users to configure their system properties. We can configure all the system properties from boot up, startup till services to be run in your computer. A properly configured system will have optimal performance and proper memory usage.

This tutorial is about Speeding up your PC and increasing the performance level by removing unnecessary programs from startup and stopping unused services. By doing these things you can see the difference in startup time and the amount of physical memory used and even CPU usage.

This guide consists of two main parts:

1. Removing unnecessary programs from startup.

2. Stopping unused or rarely used services in your system.

Please note that this tutorial is just a guide. You need to analyze properly by yourself which programs or services to be stopped, which are required and which are not required.

We will start with the first one:

Removing unnecessary programs from startup

Step 1: Open System Configuration. Press Start + R, Type msconfig and click OK.
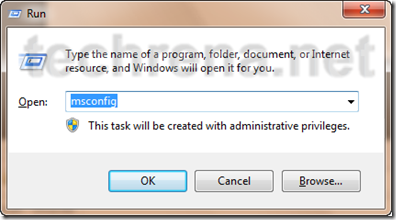
run_msconfig

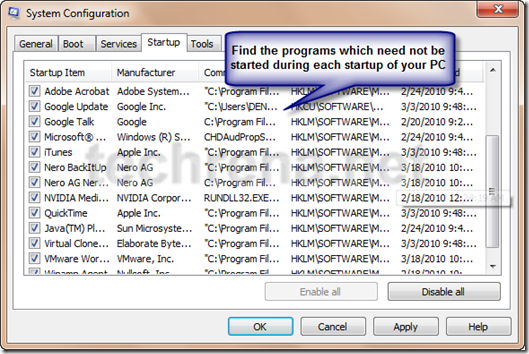
Step 2: You can see the General Tab in Systems Configuration. Go to Startup Tab.
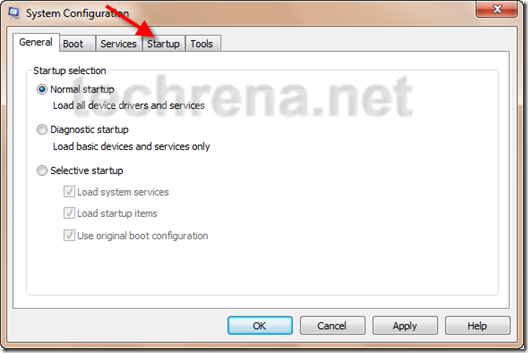
msconfig_home

msconfig_startup

You need to study the requirement of the programs, whether you need to start them during startup or not. You need to start your Virus Protection programs compulsorily. Remove any program which doesn’t have a proper description and which you do not know the functionality of the program. IF you know some programs which you rarely use, you can remove them as well. Do not forget to remove any suspicious program which may be a virus.

Step 3: After the analysis, uncheck the programs which you need not start during the startup of your computer.
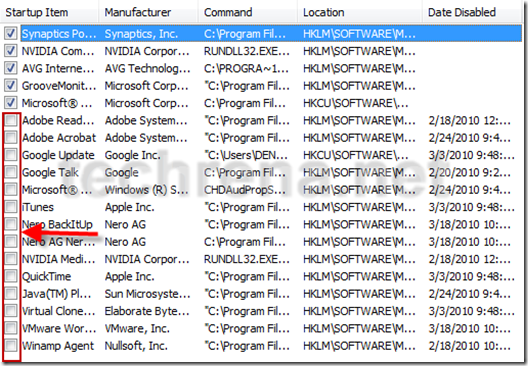
msconfig_startup_programs

Now you have successfully configured your startup programs according to your needs.

Stopping unused or rarely used services in your system.

Step 1: Go to the Services tab. There you can see the various services which can run in your system. Again you need to analyze which services are not used or which are rarely used and not required.
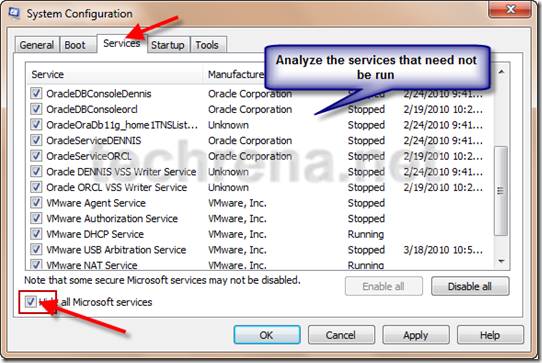
msconfig_services_tab

For example, I use the Oracle Database and VMware very rarely, but both of them are huge services which takes a lot of resources in the CPU and Memory. So, i choose not to start them. As I stopped these services then my Oracle Database and VMware will fail to run. So whenever I want to use any of these programs I will go to msconfig and check to start these services again. Then restart the computer and run the program. So keep in mind that you stop the services only which you rarely use.

Step 2: After detail study and analysis, you can stop the services by unchecking them in msconfig.
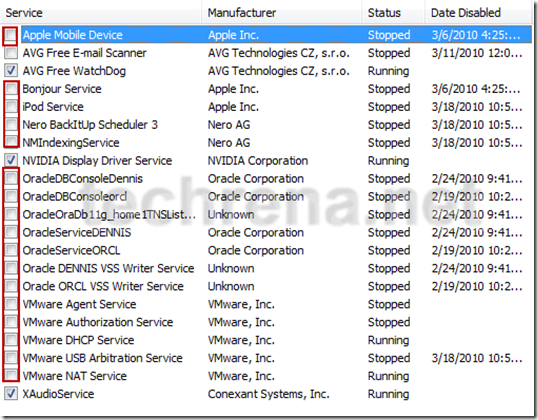
msconfig_services

Finally you can Click Apply and OK, which will ask for restart. You need to restart if you want the changes you have made to be applied.
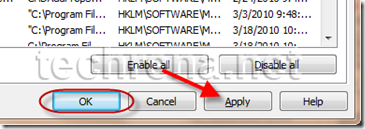
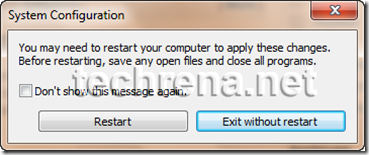
msconfig_apply_ok

msconfig_restart_exit

Important: Please note that removing a Program from startup and Stopping a service is very different. The Startup programs can be manually started, but services are not programs which can be run. Services are required to run the Programs installed in your computer. When a program which requires a services is started, only then the program’s service will be started For example, if VMware Player is started, then VMware services will also be started. But some essential services are always running in the system. Services which have been stopped by you cannot be started manually. Only by re including it in the starting services using msconfig, and upon restarting the system, the services can be started again by its programs.

You can definitely see the decrease in startup time and increase in performance of your system after applying the changes you have made using msconfig. If you have any doubt please leave a comment.

PS: The programs or services which I have removed from startup as shown above  need not be same as yours. It all depends upon your needs.

Acer Crystal Eye Web Camera Driver for Windows 7

There has been a lot of problem for Acer Laptop users while migrating to Windows 7. But if you see almost all of the drivers inbuilt in Windows 7 can handle the drivers for most of the devices except for devices like the Web Camera.

Today, we have faced the same problem while trying to upgrade the Acer Aspire PC to Windows 7 from XP. While, all of the other drivers will work by default and some of the drivers like the Intel Graphics Accelerator, Ethernet drivers can be seen in the Windows Update list as optional Updates which can be downloaded and installed automatically.

The only problem I faced is with the Acer Crystal Eye Web Camera driver. I have almost tried all of the available drivers but none worked. Most of the forums provided solutions to use the SUYIN NB Cam drive:

C:\\Windows\\SUYIN NB Cam\\LiveCam.exe

This one works but it was not the perfect solution.

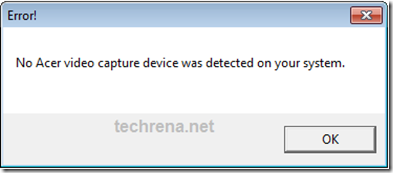
Most of the drivers and applications available gives the same error out:

No Acer video capture device was detected on your system

Acer Cam Problem

After a lot of trial and error finally i have found the perfect solution for this problem. I have got this Acer Camera Suyin v.5.2.5.3 which is made for Windows 7. After installing this, I restarted the system and it worked against all odds.

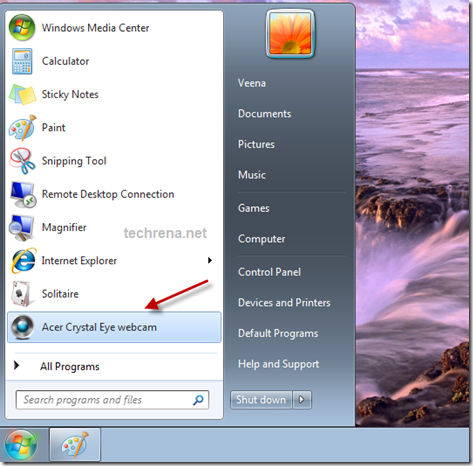
Download the Driver from the link below. Install it and restart the system. Once successfully done, start the Acer Crystal Eye webcam. It should work. No other drivers are required.

Download:

File: Acer_Camera_Suyin_v.5.2.5.3_Win7x86x64.zip

Size: 3.29 MB

Link: http://www.techrena.net/downloads/Acer_Camera_Suyin_v.5.2.5.3_Win7x86x64.zip

Screen Shots:

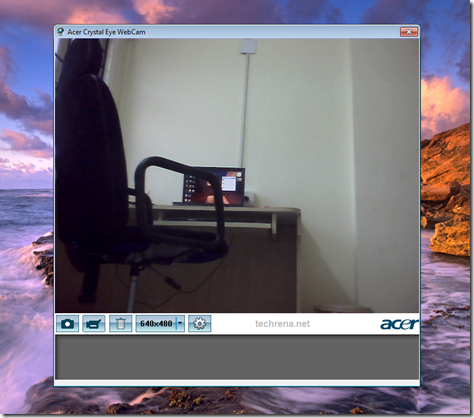
Acer Cam Driver Win 7

Acer Cam Crystal Eye Windows 7

We have tried this driver in Acer Aspire 5570Z and Acer Aspire 4925G and it worked successfully. I hope it will work for other models also. If any problem occurs, do comment.

Featured: Heard of the New Windows 8? You can download the Windows 8 Pro 32 or 64 Bit version from Microsoft and it is completely legit. Check out the details here.

Windows 8 Download