Windows 8 Pro Download, Upgrade, and Clean Install FAQs

In my last post you had seen how to download the newly released Windows 8 Pro version from Microsoft. Yes, there are a lot of other question on how do we install it etc. But first of all let me clear some questions which I had in my mind for all of you to see.
Will Microsoft allow Installation of the Upgrade version to any other PC instead of the Windows PC you used while buying the Upgrade key?

YES! Well it is very good in the part of Microsoft that they allow you to keep both Windows 7 and Windows 8 PCs! The FAQs in the Upgrade Offer page says:

“The upgrade offer is tied to a Windows 7 PC purchased between 2 June 2012 and 31 January 2013, but you can choose to redeem the offer and install the upgrade on any compatible Windows-based PC with a qualifying base operating system.”

The last part says “with a qualifying base operating system.” Well this is not necessary when you go for a clean install using the backup media. FYI, the base operating systems Microsoft is talking about is Windows XP, Vista, and Windows 7

Selecting “Keep Nothing” while running Windows 8 Upgrade program mean Clean Install?

NO. Clean install means installing the Windows to a formatted partition, meaning there will be no Data present before. “Keep Nothing” is an option during the Upgrade install where none of your Apps or files will be retained while Upgrading to Windows 8 from your previous Windows.

I selected Keep Files or Keep Apps instead of Keep Nothing while purchasing the Key. Will I be able to do a clean install from the backup media?

YES. Those options are valid only if you upgrade using the Windows 8 Upgrade program. Once you choose to create media instead of Install, those options are no longer  relevant.

I want a 64-bit Windows 8 Pro, but my eligible PC is running 32-bit Windows. Will I be able to get and Install a 64-bit with the upgrade key I purchased?

YES. The upgrade is common for both 32-bit and 64-bit, meaning it works for both. You can download a 64-bit Windows 8 Pro with your key but only from a 64-bit Windows PC. This is because the Upgrade/Setup program will downloads the version which is only compatible to your Base OS. You can follow my last post on How to download Windows 8 Pro.

If you have any other questions while Installing or upgrading to Windows 8, do let me know. Just leave a comment below.

[How To] Download Windows 8 Pro 32/64-bit from Microsoft with Upgrade Key

The new shiny Windows 8 featuring Tiles and all is here. Windows 8 was officially launched last week on October 26 along with Microsoft’s Surface Tablet which runs Windows RT. Windows 8 seems to be getting good reviews from users except from few. Well many of us are still thinking whether to upgrade or not.

For all those who are not aware of the Windows Upgrade program, Microsoft is offering you a Windows 8 Pro (32/64-bit) for only $39.99 (USD). This offer is valid for many countries. The criteria is you should be running Windows XP, Vista, or Windows 7. Additionally if you bought a Windows 7 PC after June 2, 2012 you can get it for $14.99.

Windows 8 Logo

Well for those who are aware and have already purchased Windows 8 key(s), you might have already downloaded it or you might be still waiting to download. We just wanted to inform everyone through this post that you need not worry about the download. You can do it whenever you are free or if you are in a limited internet plan, you can do it during your next billing cycle.

Requirements to Download Windows 8 Pro Legit from Microsoft:

# Operating System: Windows XP, Vista, or 7
# Of course an internet connection and
# Your Windows 8 Pro Upgrade Key you purchased earlier

Step 1: Download Windows8-Setup.exe from here. it is 5.2MB in size.

Step 2: Decide which Windows Pro version you want – either 32-bit or 64-bit. Well do note that you can install 64-bit only if your processor supports it. you can check if your CPU supports 64-bit OS here.

Step 3: Run the “Windows8-Setup.exe” you have downloaded  from a PC which has a 32-bit Windows if you want to download Windows 8 Pro 32-bit. Similarly run from a 64-bit PC if you want 64-bit version.
Size Details:
# 32-Bit Windows 8 Pro: 2.01GB
# 62-Bit Windows 8 Pro: 2.63GB

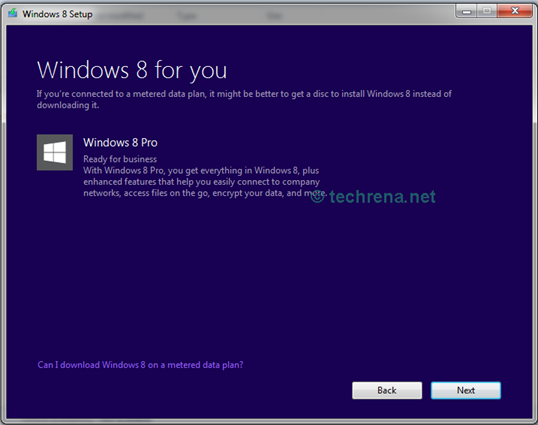
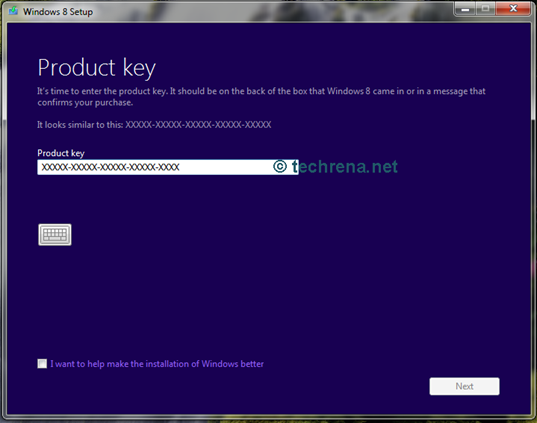
Step 4: When the Setup program starts, it will ask for your Windows 8 Pro key. Just enter your keys and viola, your download will commence.

windows 8 download

windows 8 download2

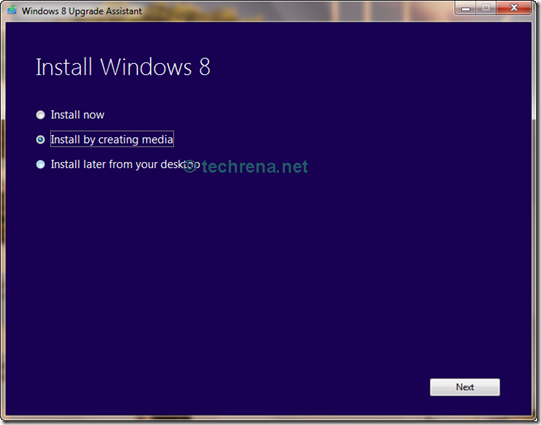
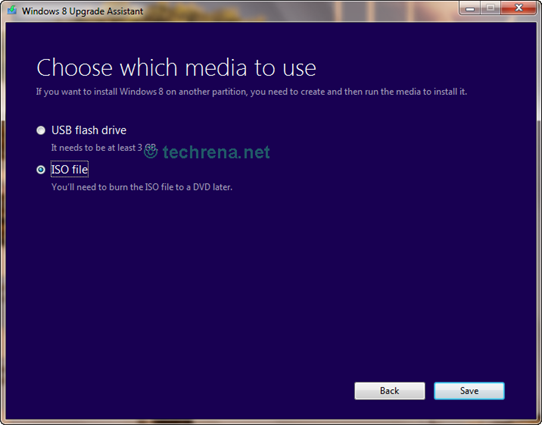
Step 5: After the download is completed, before installing the upgrade, we suggest you to create an iso or a USB drive backup for future setups. You can exit the setup program after that. Don’t loose the backup!

Windows 8 Pro Install

Step 6. While closing the setup program, it automatically creates a desktop icon(if it doesn’t you can re-start the program and it will start where you left off). So if you want to install Windows 8 as an upgrade to your existing OS, you can proceed to ‘Install’. But if you want a clean install, make use of the iso or USB drive backup. I personally recommend clean install over any upgrade install. Its up to you.

Windows 8 Pro Install by media

Important Notes:
# The back up you created to a USB drive or a DVD after download is similar to a retail version, meaning it is not linked to any key. You can use it for installing to any compatible system with any other legit key.
# The same product key can be used for downloading ether 32/64-bit Windows 8 i.e. the key is common for both versions.
# The Upgrade program will ask for your choice if you want to keep files, apps, or none. This choice is irrelevant if you are going for a clean install using a media device (USB/DVD)
# The language will depend on your location. You can install your preferred languages after installing windows 8.

If you have any questions or updates please leave a comment.

[How To] Track Your Train in Google Maps In India with Rail Radar

Indian Railways is one of the largest rail networks in the world it operating more than 10,000 trains everyday. Today Rail RadarTM has been launched in order to make Rail travelling a little easier. The  new web app uses Google Maps to track trains on a real-time basis. Currently the service is only available on 6,500 trains.

Rail Radar for Indian Railways

To find out where your train is, simply visit railradar.trainenquiry.com and search for your train name or number and Rail Radar will spot it for you with the exact location details. You can also find trains by entering the name of the station.

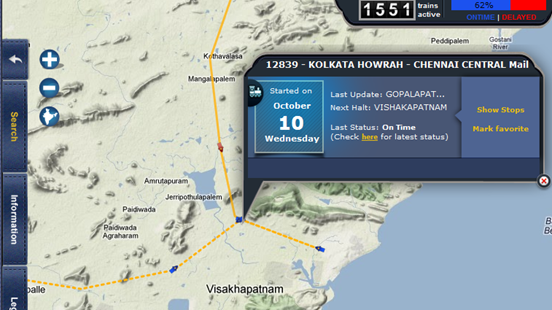
For example I searched for the Howrah Chennai Mail Train No 12839, you can see the result below.
Howrah Chennai Mail Rail radar

As you can see my train is currently at Vishakhapatnam and it is On Time.

Blue highlights indicate trains that are on time while red means it’s behind schedule. If you click on a train, it’ll show its entire route from start to finish.

We are thankful to the railway ministry and Indian railways for working together to bring up such nice technology up-to-date project. We hope Indian Railways should also launch a mobile application soon so that we can beat the train on the go.

[Download] Microsoft Internet Explorer 9 Security Fix (KB2744842) – Critical Update

We had issued and advisory earlier that the Internet Explorer 9 and lower versions are facing a security flaw where the attackers may exploit the bug, targeting hundreds of millions of computers, to infect the PC of somebody who visits a malicious website and then take control of the victim’s computer. Well this issue has been fixed.


Internet Explorer 9

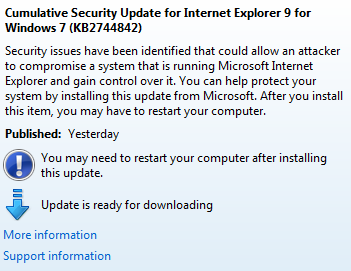
Microsoft promised that the fix will be available by Friday, 21 September. Well they kept their promise but with some variations. Microsoft had said that this is an easy fix and it will not even require a reboot. Well that’s not true. The Critical update details say:

Security issues have been identified that could allow an attacker to compromise a system that is running Microsoft Internet Explorer and gain control over it. You can help protect your system by installing this update from Microsoft. After you install this item, you may have to restart your computer.

windows-security-update

The Cumulative Security Update for Internet Explorer 9 for Windows 7 (KB2744842) will be fixing the issue. This update is available in Windows Update. You can directly update it from your Windows PC.

If you don’t use Windows Update service. you can still  download it from Microsoft. Choose the correct Windows Version while downloading.

Download from Microsoft

[How To] Check if your CPU Supports 64-bit OS or not–The Easy Way

Well we use to program for an 8-bit microprocessor, then 16-Bit some years back. Currently most of the CPUs are 32-Bit architecture. Now the latest one is the 64-Bit CPU. With this advancement of technology in the hardware sector, certain advancements needs to be done in the software sector that will be running on these CPUs.

Here we are talking of System Software that is the Operating Software in your computer, which are the basis for all other user level application software to be installed. If we come to the latest version of Microsoft’s Windows OS, now we see Windows 7. Windows 7 has two versions in terms of hardware compatibility, one for 32-bit architecture CPUs and another for 64bIt architecture CPUs. All 64-bit CPUS can be installed with 32-Bit OS but not vice-versa.

Suppose you have a PC running 32-bit Windows 7, and you want to know if your CPU will support the 62-bit Windows 7, then how will you find it out the easy way? Well we will tell you how.

You can follow the steps:

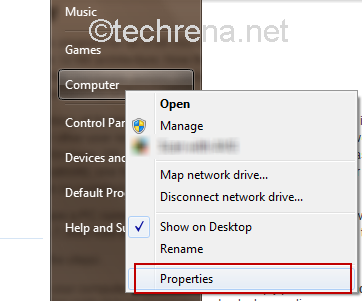
Step1 Open your computer properties. You can simply press the Windows Key + Pause/Break or you go to start then right click on Computer and select properties.

open-Computerproperties

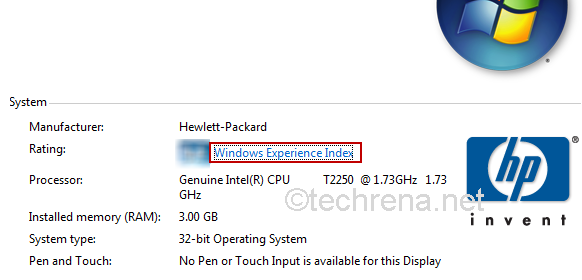
Step2 In you’re the computer properties, click on “Windows Experience Index”. You can find this under System –> Rating

Windows-computer-properties

Note: First two steps can also be performed via Control Panel as “Control Panel –>Performance Information and Tools” (You can see this option if you set the “View By” as “Large/Small Icon” only)

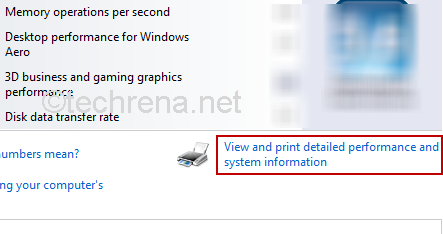
Step3 In the windows experience index windows, Click on “View and print detailed performance and system information”.

Windows-Experience-index

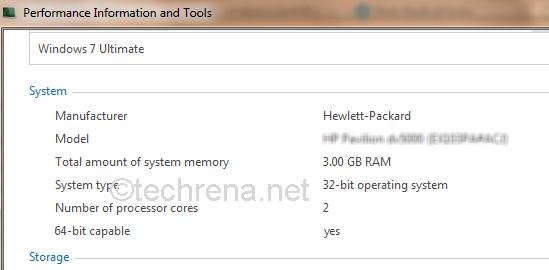
Step4 In the “View and print detailed performance and system information” windows you can find “64-bit Capable” under System. It will be yes if your CPU supports 64 Bit else No.

64-bit-capable-yes

There you are it is as easy as I had promised. Now as you know the capability of your CPU, you can go for 64-bit OS or not!

Microsoft Internet Explorer 9–Security Flaws, Bugs and Fixes? Use or Dump? [Advisory]

The German government urged the public on Tuesday to temporarily stop using Microsoft’s Internet Explorer after a bug was discovered which is yet-to-be repaired. The German government’s Federal Office for Information Security, or BSI, said it was aware of targeted attacks and that all that was needed was to lure Web surfers to a website where hackers had planted malicious software that exploited the bug.

This security flaw in IE may enable attackers to exploit the bug, targeting hundreds of millions of computers, to infect the PC of somebody who visits a malicious website and then take control of the victim’s computer.

ie9-logo

Our advisory in using the IE browsers except IE10 are:

  • Though IE browsers are considered to be most secure ones, we advise for now you look at others
  • The IE big fix will be released in the next few days by Microsoft and will be available for download only then
  • There have been a few attempts to exploit the bug, but German officials claim that this issue can be misused in large scale hacking
  • Users should take proactive actions to ensure that their PCs are well protected
  • For time being we advise all users to download and install the Enhanced Mitigation Experience Toolkit (EMET) version 3.0 which is designed to help prevent hackers from gaining access to your system

Microsoft claims that the Fix will be an easy-to-use, one-click, full-strength solution any Internet Explorer user can install and it won’t even require a reboot of your computer.

We hope that the Fix is releases ASAP and we are sure that Microsoft is working on it.

[How To] Connect Your IDE PATA HDD, CD/DVD Drive to SATA Motherboard and Vice Versa

We all used the Parallel ATA (PATA) Hard Drives or Optical Drives with the IDE interface. With the rapid advancement of technology, currently we shifted to the Serial ATA (SATA) Drives which does not require the IDE Interface and which have faster data rates. This means that all our IDE HDDs, Optical Drives etc. are obsolete to the current world. But, do you need to throw it or dump with your Old Desktops?

The answer is no! Your old 40GB, 80GB HDDs can be still useful now. Here we will show you how to interface these obsolete devices to your brand ne computer using a very cheap interface available in the market.

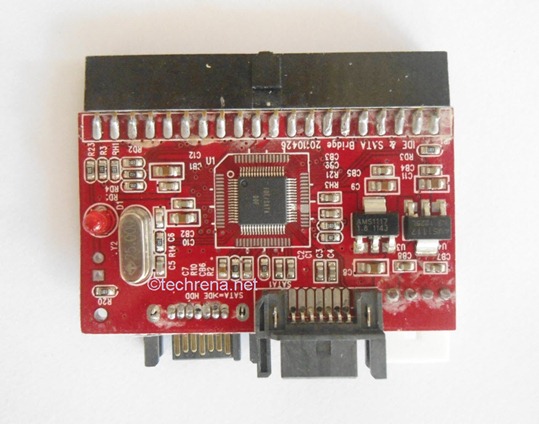
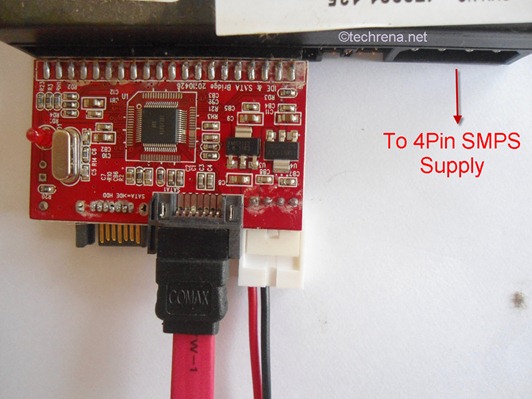
All you need is the device shown below. It is the “IDE to SATA” or “SATA to IDE” 2 in 1 Converter. It is easily available in the market. You can find one in eBay or Amazon for less than 5 bucks.
IDE to SATA Converter

Connecting Old PATA HDD or IDE Optical Drives to your new SATA Motherboard


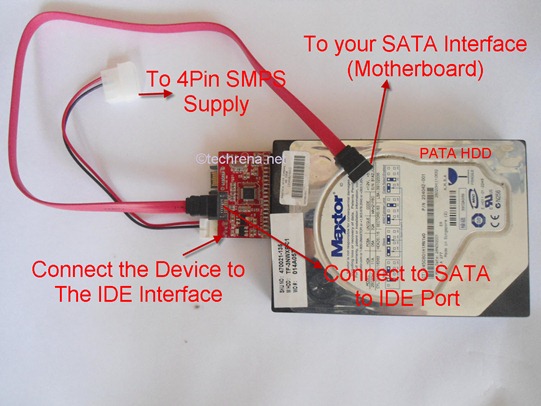
Suppose you have a PATA HDD with IDE Interface, Then connect the IDE interface (Female) to your HDD’s Male interface. Connect the power supplied to the standard 4 Pin supplied. Connect the SATA interface cable to the SATA to IDE marked port in the device. The other end of the SATA cable to your CPU’s motherboard. That’s it, now use can use some extra disk space instead of throwing the HDD. The connection process has been shown as follows.

SATA-to-PATA-HDD

Make sure you do not forget the Power supply to the drive.

SATA-to-IDE

The same procedure is applied for Optical drives too.

Connecting new SATA HDD or Optical Drives to your Old IDE interface Motherboard

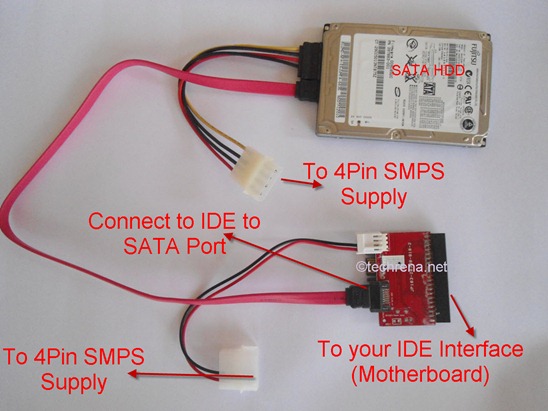
What about the reverse, that is if you have a SATA HDD and you want to connect to your OLD Computer? Then connect the IDE interface (Female) to your Motherboard’s Male interface. Connect the power supplied to the standard 4 Pin supplied. Connect the SATA interface cable to the SATA HDD and the other end to the device’s port marked as IDE to SATA. That’s it, now use can use some extra disk space instead in your old Computer. The connection process has been shown as follows.

IDE-to-SATA-HDD

Note: Please turn off your Computer completely, i.e. even the power plug is to be disconnected in order to prevent any hazard or damages.

We hope you have found this post useful. Like us on Facebook or leave a comment!

[How To] Enable Sharing Files And Folders In Windows 7


Windows 7

Well most of us are aware how to enable network files and folder sharing in Windows XP. It was comparatively easier in Windows XP performing this procedure. Windows 7 has more secure features with network user groups, password protected sharing etc.

Sharing Folders and Files in Windows has been very useful where you can access files in some other computer in the same network. Another advantage is the data transfer rate is very much higher than other connections like USB. In a wired LAN the speed has reached 1Gbps. With these speeds you can transfer data quite faster than before.

The process of sharing folders and files is as follows:

Step 1:

Go to the Control Panel location given below. You can copy and paste it in your address bar.
Control Panel\Network and Internet\Network and Sharing Center\Advanced sharing settings

network and sharing center

Step 2:

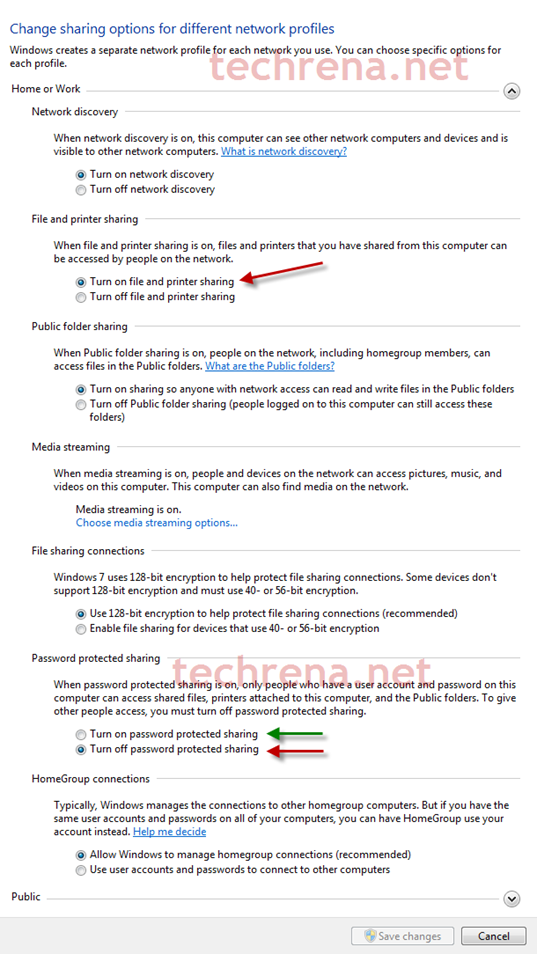
Select the specific group profile you want to share your files with. For example I have selected Home. Change the settings as shown in the picture below and save the changes.

network and sharing advance settings

For the password protected sharing, you can select any. If you select Password protect on, you need to use our username and password to access the files.

Step 4:

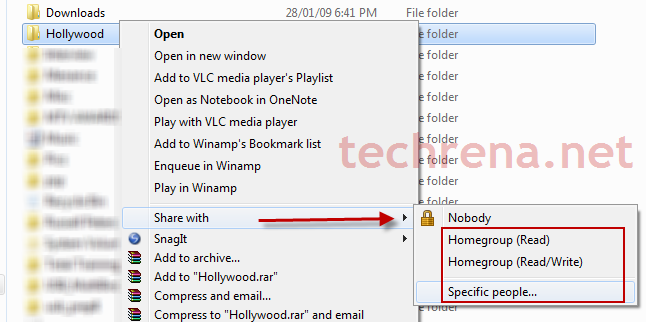
Now go to the folder you want to share, right click on it and select Share with. You can select the people you want to share.

share a folder to share

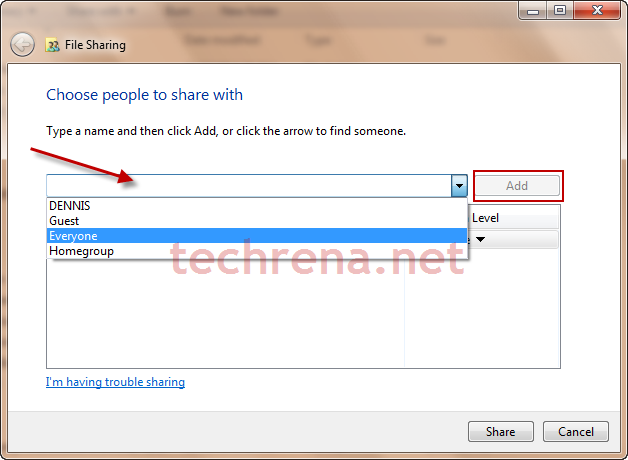
If you select Specific people, you need to select and add the Computer Name.

file sharing

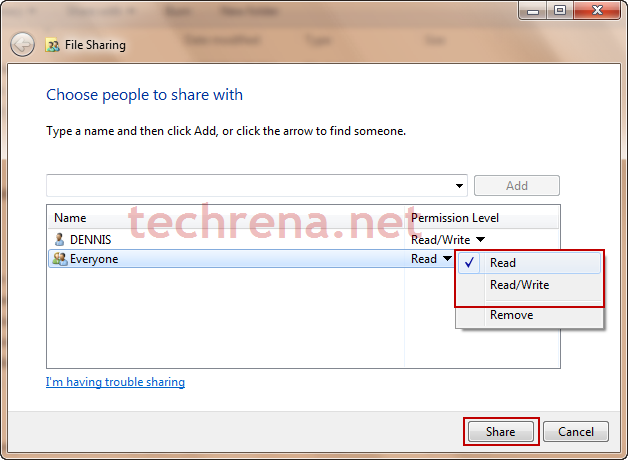
You can also change the Permissions for the people who wants to access your folder.

file sharing permissions

Step 5:

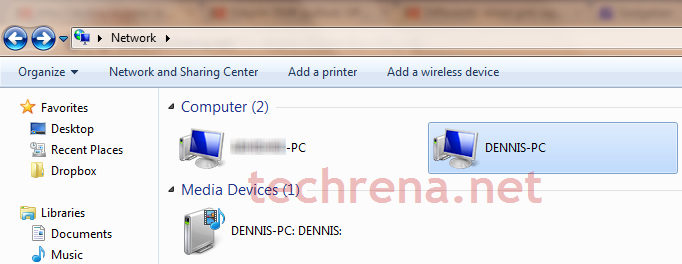
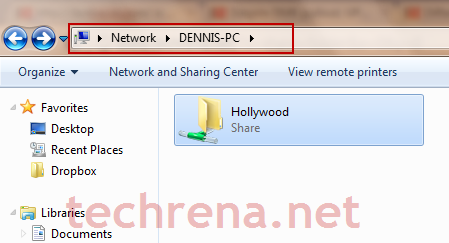
Now you can check in the computer who wants to access your files. Go to Computer->Network. Your computer name should be visible.

network discovery

Open your computer name and the folder(s) you shared should be visible. Now you can perform what you want according to the permission you have given.

open system in a network

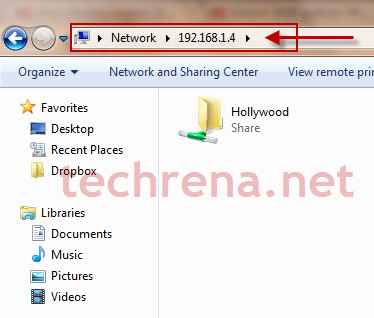
If you can’t find your computer name in the Network, you can use your IP address to access the files.

You should know your IP to perform this. For example, type: \\192.168.1.4 in the address bar.  That is my IP. Your IP will be different. See the Notes below to view your IP.

use ip to open network computer

Now the sharing has been completed and the data can be shared.

Important Notes:

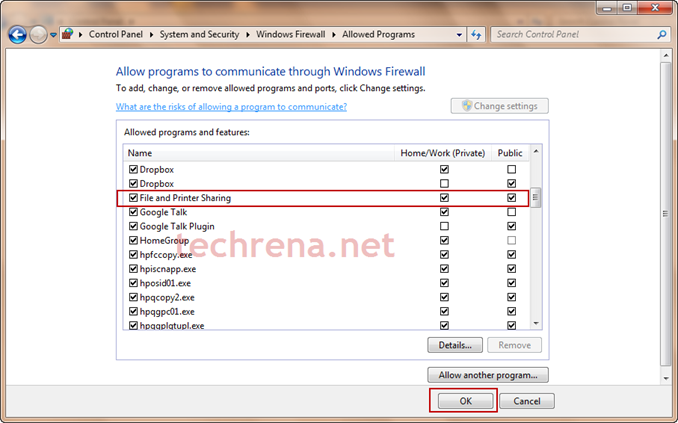
1. Firewall. If you have Windows Firewall enabled you should have allowed File and printer sharing. To allow, go to: Control Panel\System and Security\Windows Firewall\Allowed Programs

Check the File and Printer sharing Check Box.

file and printer sharing firewall

If you have a third party Firewall installed, you need to check these settings there.

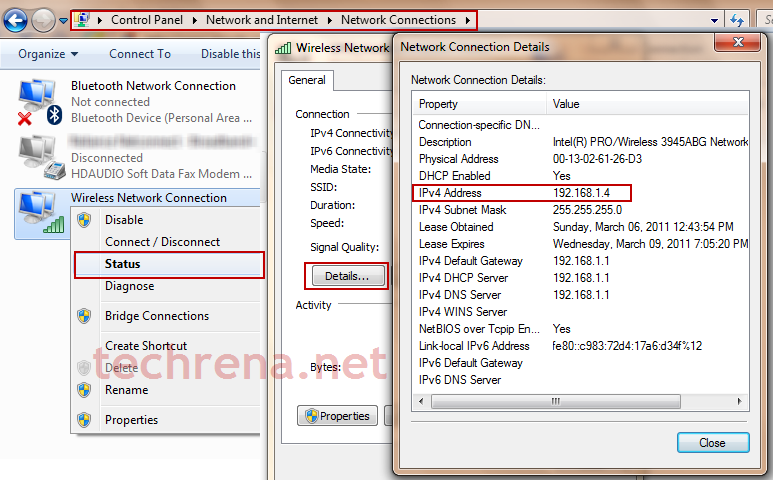
2. IP Address. To find out your IP Address, please go to this location:

Control Panel\Network and Internet\Network Connections. Right click on the Adapter you are using for sharing. Select Status. Then go to Details.

view ip address

If the Host and the Client does not have a same Level of IP and profile, you may no be able to access each other. To change the IP Address Follow: Change IP Address of Your Network Adapters in Windows 7.

[How To] Change IP Address of Your Network Adapters in Windows 7

Windows 7 logo

Changing the IP(Internet Protocol) address of your computer is a basic thing we do at times. Well the IP address we see in our local computer network adapters are mostly for a local networking purpose. There is always a global Internet IP provided by our Internet Service Providers(ISP).

But why do we need to change the IP address? It may be required when you want a local connection be done with no DHCP(Dynamic Host Configuration Protocol) servers. It is because of the DHCP servers are present in most of our systems, we need not provide an IP for every connection, the DHCP host takes cares of the IP allocation. But when you are in your own custom network without a DHCP host, we definitely require to set the IPs of our own to fit in the network.

Here I am going to demonstrate changing an IP address of a local network adapter. This can be used to change the IP Address of any adapter like Wireless LAN, Local Area Connection, Bluetooth Adapters or even virtual Network Adapters.

Step 1:

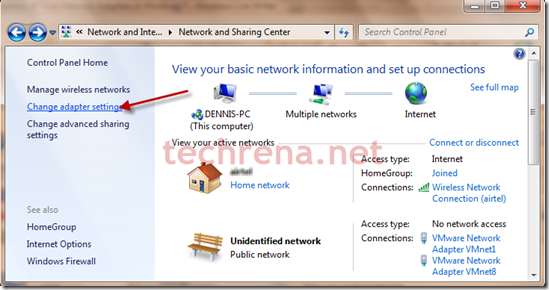
Go to the following location: Control Panel—>Network and Internet—>Network and Sharing Center

Click on Change adapter settings in the top left corner.

network-and-sharing-center

Step 2:

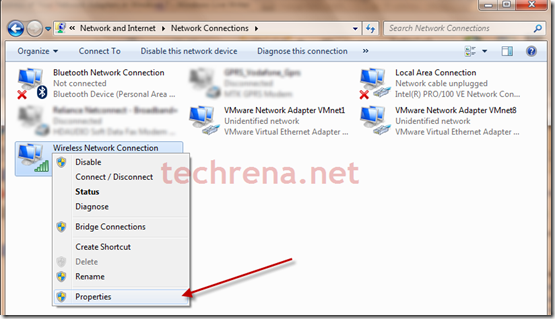
In the next window, you can see all your adapters. Right click on the adapter you want to change the IP, say Wireless Network Connection. Click on Properties.

adapter settings

Step 3:

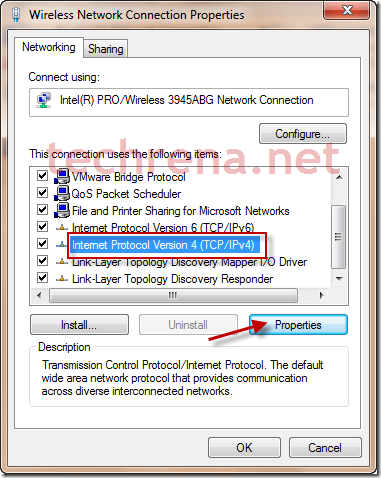
In the properties window, select Internet Protocol Version 4(TCP/IPv4) and click on properties.

network adapter properties

Step 4:

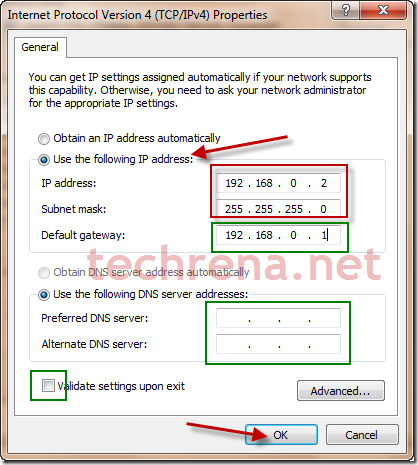
Now Select Use the following IP address. Type the IP address details you need. and Click OK.

TCP IP v4 properties

Your IP address has been successfully changed.

Notes:

1. Default gateway is required when you have to connect to the internet using a router or another computer.

2. DNS servers may be required in case of a direct connection to the internet through you adapter.

3. Validate settings upon exit can also be used to validate the IP if you want.

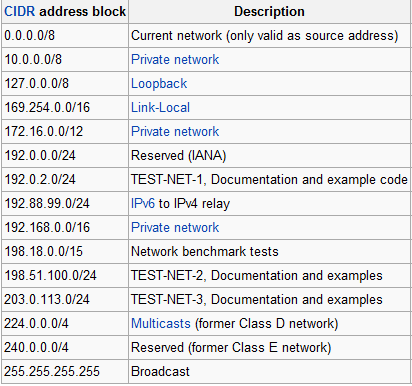
Given below is some of the IP address formats that we use. You can always use a private network format for your personal use.

ipv4 address format

IP formats source: Wikipedia

Important Note: Once you set your IP address manually, the DHCP host will not allocate the IP address for your network adapter. Make sure you set it to Obtain an IP address automatically in Step 4 in order to use DHCP host addresses.

Why Do Adobe Reader Need So Many Updates? – An Open Question To Adobe

Adobe-Reader-Updater

I am writing this post as an open question to Adobe. Well my questions is “Why do Adobe Reader need so many updates?”.

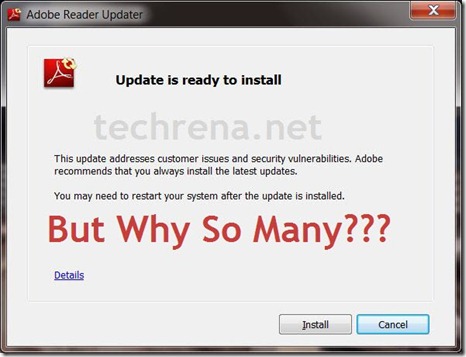
Today morning, I was in a hurry to book an online ticket. So, I just started my computer in a hurry. Well I expected it to start quickly, but the first Window I saw is what the image above. I thought of canceling  the update and click cancel. But by mistake, I clicked Install and there it goes. After the updation process, it restarted my PC. Quite a frustration for me in such a hurry.

I would not have freaked out so much if it was once a lifetime update but it is not. If I remember correctly, I had updated my Adobe Reader few weeks back.

I can understand why something like adobe flash player might need a few updates, but what I cannot understand is why would a PDF file reader need so many? Do the way of reading simple PDF files gets changed so many times? And why would a PDF reader update need a system restart? Well if my OS is updating then it is quite normal, but a restart for my reader update?

Well I am not the only one asking this question, I am sure that most of the users feel the same and I myself have seen such questions in many computer forums.

adobe-logo

I think we need some kind of real good explanation from Adobe regarding the frequent updates. They should be reminded that there are other good PDF readers around for free.

This is just a plain simple question from an end user of Adobe Reader, unaware of the internal functionality of the product. Hope Adobe can keep up to bring light to us.