[Download] Yahoo Messenger 11 Final Full Standalone Offline Installer

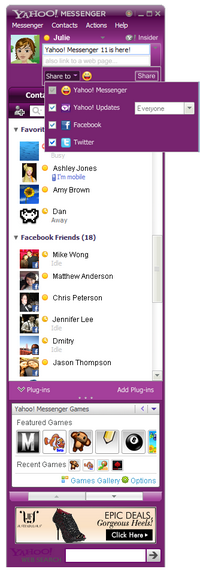
Yahoo Messenger 11 final screenshot

The final version of the Yahoo! Messenger 11 has now been officially released and is available for download. Version 11 of the popular instant messaging software Yahoo Messenger has been in beta development since last November. The build number of the latest version is 11.0.0.2009 which can be downloaded from the links added towards the end of this post. Improvements in the Yahoo Messenger 11 according to the official Yahoo Messenger blog include:

>> Social gaming: Users can invite and play social games like Mafia Wars, Fishville inside the Messenger.

>> Social Integration: Receive and post updates from all your social network sites like Facebook, Twitter and Flickr etc. from right inside the Messenger.

>> Facebook chat

>> Chat history: All your conversations will be saved on the PC from where you signed into the Messenger.

Yahoo Messenger 11 Direct Download Links:

Follow the below mentioned direct links to download the full offline installers for the Yahoo Messenger 11 final. The

Offline version (US) 18.1 MB

You may also want to install the Yahoo Messenger using the following online installer. Keep in mind that, you need to have active internet on the PC where you wish to install Yahoo Messenger using this particular version.

Online Installer – 414 KB

[Tip] Change The Date And Time Picture Was Taken In Windows 7

Date picture taken in Windows 7

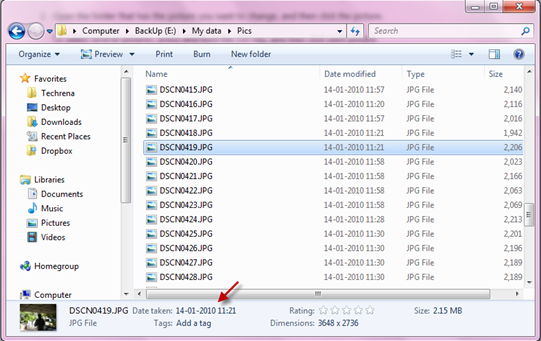
The modern day digital cameras include the time and date of the picture when you take snaps with them. This is very useful, when you see the pictures in future and want to know when it was taken. These details can be seen from the information along with the picture’s metadata when you transfer them to the PC. Fine, everything is good. But what would happen when you travel to a different time zone and forgot to reset the time and date in your camera’s settings? The digital camera would then stamp incorrect time and date onto your pictures. This is a common problem but fortunately, there is a great workaround available if you are using Windows 7. To see the “Time Taken” data of the picture, select the picture and then notice it on the details pane at the bottom of the window.

Let’s now see how to change the date when a picture was taken, on the Microsoft Windows 7 in 5 simple steps. Follow the steps briefed below.

I. Changing The Date When A Picture Was Taken:

Steps:

1. Open the folder where the target pictures reside.

2. Select the picture for which you want to change the date.

3. Now move your focus to the details pane at the bottom of the window.

Picture Taken Date Change in Windows 7

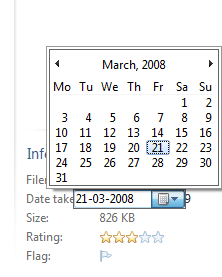
4. Click next to the “Date taken” and then click on the calendar icon to choose another date.

5. Click Save to change the settings that you have just changed.

Tip: You may also choose multiple pictures in the step 2 by holding down CTRL while selecting one or more pictures.

Note: If you don’t see any details pane, it might have been disabled. Read our earlier tutorial to enable the details pane in Windows 7 explorer.

II. Changing Both The Time And Date When A Picture Was Taken:

The aforementioned method changes only the date on which the picture was taken but not the time when it was captured. Follow these steps to change both the time and date when the picture was taken.

Steps:

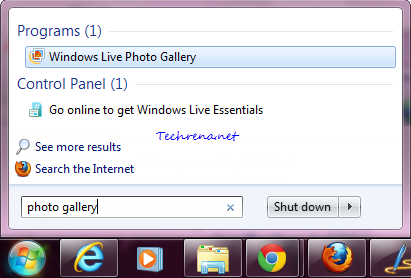
1. Press the Windows key on your Windows 7 machine and type photo gallery in the search box and open the “Windows Live Photo Gallery” from the results under the ‘Programs’.

Photo Gallery Windows 7 start menu search

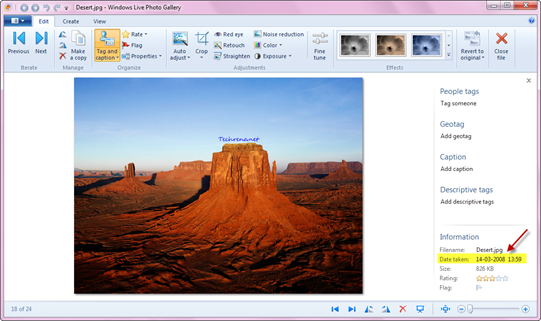
2. Import the picture for which you want to change the date and time metadata and double-click on it to open it.

Windows Photo Gallery Picture info

3. On the right hand side pane (Tag and caption pane), notice the “Information” section. You will see the ‘Date Taken’ data being listed there.

4. Click on the corresponding date and time values which you want to change.

Windows Photo Gallery picture info edit

That is it. The picture will have new values for “Date Taken” metadata. Isn’t that simple?

[Via: Microsoft]