[How To] Connect Your IDE PATA HDD, CD/DVD Drive to SATA Motherboard and Vice Versa

We all used the Parallel ATA (PATA) Hard Drives or Optical Drives with the IDE interface. With the rapid advancement of technology, currently we shifted to the Serial ATA (SATA) Drives which does not require the IDE Interface and which have faster data rates. This means that all our IDE HDDs, Optical Drives etc. are obsolete to the current world. But, do you need to throw it or dump with your Old Desktops?

The answer is no! Your old 40GB, 80GB HDDs can be still useful now. Here we will show you how to interface these obsolete devices to your brand ne computer using a very cheap interface available in the market.

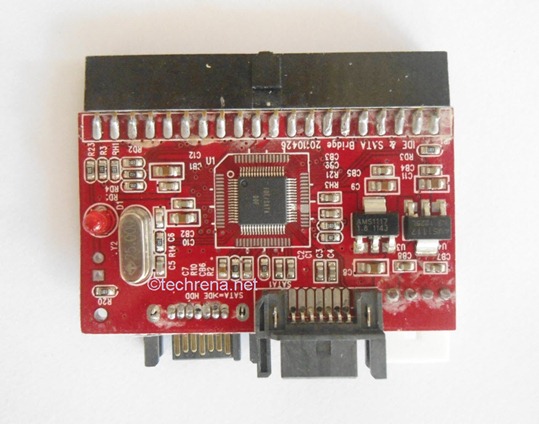
All you need is the device shown below. It is the “IDE to SATA” or “SATA to IDE” 2 in 1 Converter. It is easily available in the market. You can find one in eBay or Amazon for less than 5 bucks.

IDE to SATA Converter

Connecting Old PATA HDD or IDE Optical Drives to your new SATA Motherboard


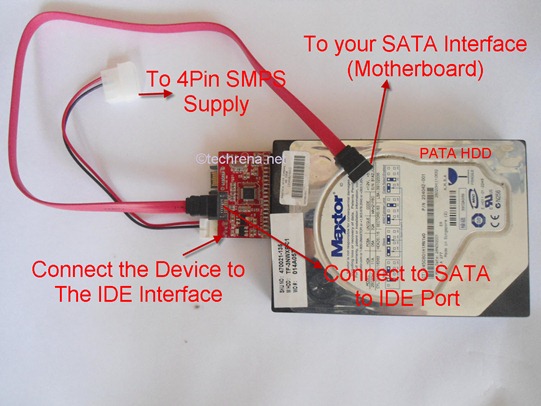
Suppose you have a PATA HDD with IDE Interface, Then connect the IDE interface (Female) to your HDD’s Male interface. Connect the power supplied to the standard 4 Pin supplied. Connect the SATA interface cable to the SATA to IDE marked port in the device. The other end of the SATA cable to your CPU’s motherboard. That’s it, now use can use some extra disk space instead of throwing the HDD. The connection process has been shown as follows.

SATA-to-PATA-HDD

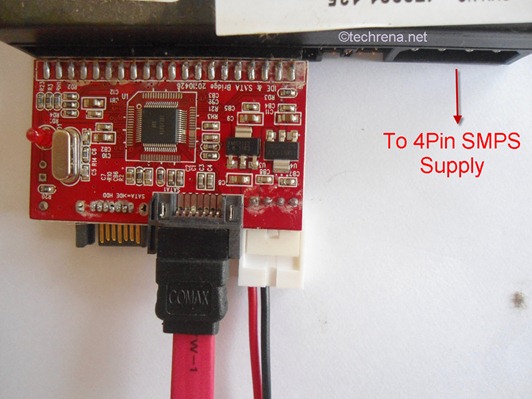
Make sure you do not forget the Power supply to the drive.

SATA-to-IDE

The same procedure is applied for Optical drives too.

Connecting new SATA HDD or Optical Drives to your Old IDE interface Motherboard

What about the reverse, that is if you have a SATA HDD and you want to connect to your OLD Computer? Then connect the IDE interface (Female) to your Motherboard’s Male interface. Connect the power supplied to the standard 4 Pin supplied. Connect the SATA interface cable to the SATA HDD and the other end to the device’s port marked as IDE to SATA. That’s it, now use can use some extra disk space instead in your old Computer. The connection process has been shown as follows.

IDE-to-SATA-HDD

Note: Please turn off your Computer completely, i.e. even the power plug is to be disconnected in order to prevent any hazard or damages.

We hope you have found this post useful. Like us on Facebook or leave a comment!

Facebook Timeline Is Now Available For Everyone; Here’s How To Get It For Your Profile

Back in September this year, Facebook announced the new feature called “Timeline” and made it available to the developers initially. Facebook Timeline is basically a new way to list your entire activity of your life in a Chronological order, right from your birth to the present moment. With a neat and visually appealing interface, the Timeline lists all your major events in your life in the chronology. No wonder some call it as your virtual biography (though we differ!).

Facebook timeline

The Timeline, which up until a few days ago was in “beta”, got its public rollout to the users in New Zealand last week. And today the social networking giant has announced that the Facebook Timeline will be available to the users across the globe starting today. The company has also said that those who activate the feature will initially get a 7-day review period during which they can review and choose what content should appear to their friends.


How To Get The Timeline For Your Profile:

We have published a detailed guide earlier on how to activate the Facebook Timeline for your Facebook profile. But this feature was in “beat” stage at that time and it we had to use a hack to get it enabled. Now that this feature is available for all, the process is much simpler and straightforward.

Navigate to this page on Facebook, and click the “Get Timeline” button that you see at the bottom. This will automatically activate the Timeline for your profile.

Get TimeLine

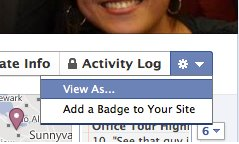
Facebook Timeline View As

The next thing you have to do is to view your Timeline and manage the content that is visible to your friends. To do this, find and click on the gear menu which will be present near your profile name in the Timeline view. Select “View As…” from the dropdown menu. This will show how your profile will appear to a specific friend or public once it gets published.

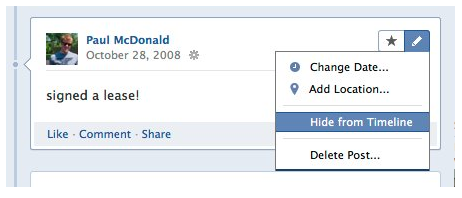
Go through the events/posts on your profile. Should you decide to hide a particular post from your friends (or specific friends) or public, all you need to do is to click on the “Edit” pencil icon right next to that post and choose “Hide from Timeline”.

Hide Post from Facebook Timeline

Supposing that you have activated Facebook Timeline today i.e December 15th, you are allowed to edit, finalize and publish your Timeline to your profile. In case you choose to wait, your Timeline will get published automatically on December 22nd (i.e., on the seventh day). If you feel your Timeline is ready to go public, you can always hit the “Publish Now” button to publish it.

Facebook timeline publish now button

We suggest you watch this video to make yourself acquainted with the features of the Timeline.

Changing Google Chrome’s Default Search From Regional Google To Google.com

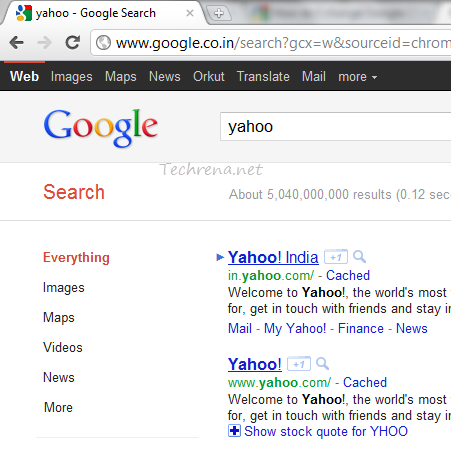
If you use Google Chrome much and love searching right from the address bar, you might be knowing that any search you perform from the address bar will take you to a regional Google search like Google.co.in or Google.co.uk etc.

Google Chrome Addess bar Search regional

In case you want the search results from the more generic version of the Google (i.e google.com) and are looking to change the settings so as to reflect the same in the Google Chrome’s address bar default search, here are the steps you need to follow:


Steps:

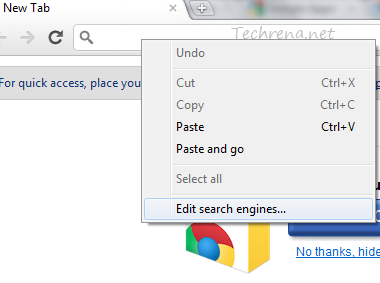
1. Right click on the address bar and choose “Edit Search Engines”.

Google Chrome Edit Search Engines

Alternatively you can access the search engines settings by typing the following URL in the address bar:

chrome://settings/searchEngines

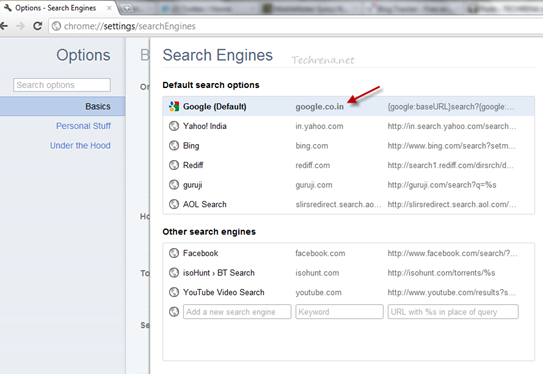
2. You will notice that the regional version of the Google search engine has been set as your default search engine under the ‘Default Search Options’ as shown in the following screenshot.

Google Chrome Search Engines list

3. We need to add a new custom search engine (in our case the international version of the Google) and then make it the default search engine.

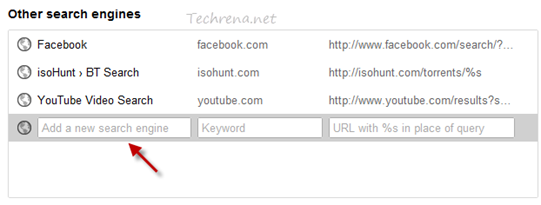
Google Chrome add a search engine

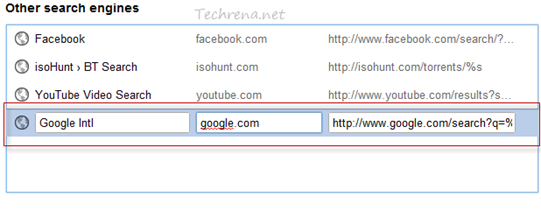
To do that type the name of your new search engine in the empty box and then type the keyword (There are no rules in filling these two boxes). That now leaves you with the URL box which holds the key. As we need a international version of the Google to serve us, key in this value (and hit Enter):

http://www.google.com/search?q=%s


Google Chrome Search Engines add new Google

4. Now that we have added a new search engine, we are now left with making it the default search engine. Hover your mouse over the newly added search engine and you will now see an “Make default” option right next to the search engine entry. Click the ‘Make default‘ button as shown in the screenshot:

Google Chrome Search engines newly added


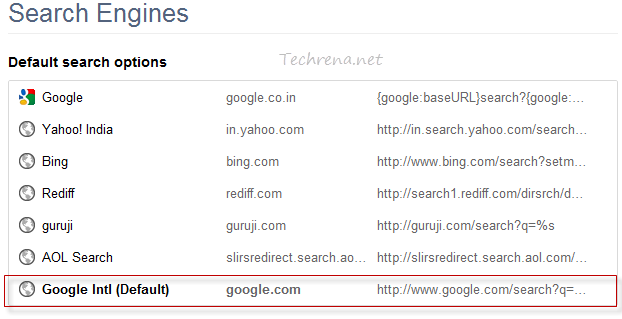
5. You will now notice that your newly created search engine has been made the default search engine and is found under the ‘Default Search Options’ listing.

Google Chrome Search Engines new default search options

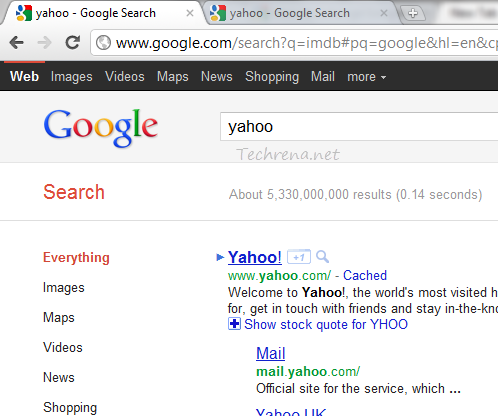
6. You have successfully changed the default search engine of your Google Chrome and you might want to test it.

Google-Chrome-Addess-bar-Search-international

Perfect! Isn’t it?
[Tip] Change The Date And Time Picture Was Taken In Windows 7

Date picture taken in Windows 7

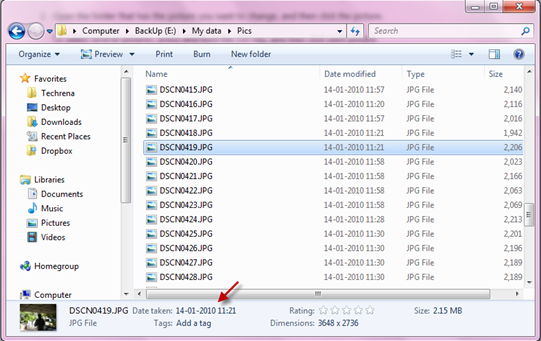
The modern day digital cameras include the time and date of the picture when you take snaps with them. This is very useful, when you see the pictures in future and want to know when it was taken. These details can be seen from the information along with the picture’s metadata when you transfer them to the PC. Fine, everything is good. But what would happen when you travel to a different time zone and forgot to reset the time and date in your camera’s settings? The digital camera would then stamp incorrect time and date onto your pictures. This is a common problem but fortunately, there is a great workaround available if you are using Windows 7. To see the “Time Taken” data of the picture, select the picture and then notice it on the details pane at the bottom of the window.

Let’s now see how to change the date when a picture was taken, on the Microsoft Windows 7 in 5 simple steps. Follow the steps briefed below.

I. Changing The Date When A Picture Was Taken:

Steps:

1. Open the folder where the target pictures reside.

2. Select the picture for which you want to change the date.

3. Now move your focus to the details pane at the bottom of the window.

Picture Taken Date Change in Windows 7

4. Click next to the “Date taken” and then click on the calendar icon to choose another date.

5. Click Save to change the settings that you have just changed.

Tip: You may also choose multiple pictures in the step 2 by holding down CTRL while selecting one or more pictures.

Note: If you don’t see any details pane, it might have been disabled. Read our earlier tutorial to enable the details pane in Windows 7 explorer.

II. Changing Both The Time And Date When A Picture Was Taken:

The aforementioned method changes only the date on which the picture was taken but not the time when it was captured. Follow these steps to change both the time and date when the picture was taken.

Steps:

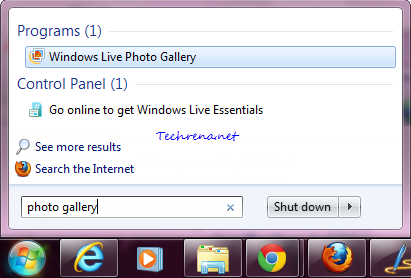
1. Press the Windows key on your Windows 7 machine and type photo gallery in the search box and open the “Windows Live Photo Gallery” from the results under the ‘Programs’.

Photo Gallery Windows 7 start menu search

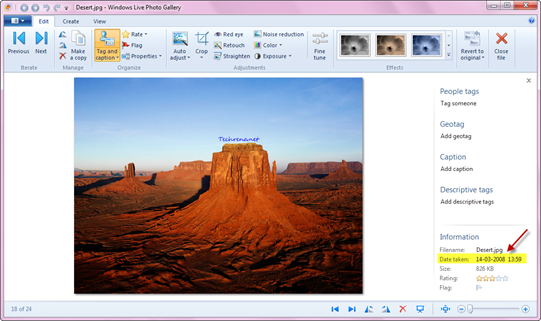
2. Import the picture for which you want to change the date and time metadata and double-click on it to open it.

Windows Photo Gallery Picture info

3. On the right hand side pane (Tag and caption pane), notice the “Information” section. You will see the ‘Date Taken’ data being listed there.

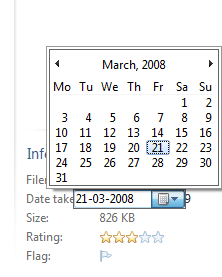
4. Click on the corresponding date and time values which you want to change.

Windows Photo Gallery picture info edit

That is it. The picture will have new values for “Date Taken” metadata. Isn’t that simple?

[Via: Microsoft]

Top 10 Advanced Windows 7 Search Tips

Windows 7 logo

Microsoft has always been keen to improve the search feature in Windows. With the launch of every new version of Windows, there have always been incremental improvements to the Windows Search. If you are using Windows 7, here are some advanced search tips and tricks to make the most out of the Windows Search.

Tip #1:

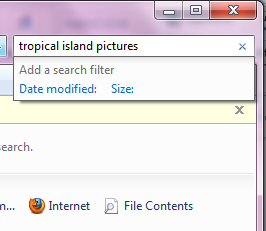
To search for files containing multiple terms (in any order) from your search query, just type all of those terms in the Search box:

For instance, if you want to search for multiple files or folder containing the terms “tropical”, “island” and “pictures” in any order, just type “tropical island pictures” in the Search box.

Windows 7 search any terms

Tip #2:

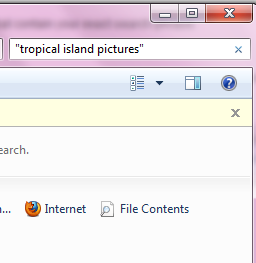
If you want to look for files or folders in your computer containing a particular exact phrase, type your query within quotation marks in the Search box:

Example: “john holiday pics”

Windows 7 search exact match

The above query will list all the files (or folders) that contain your exact search phrase.

Tip #3 – Using Boolean Operators:

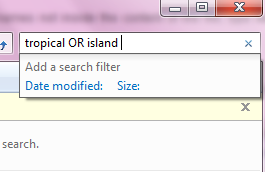
If you want to find that contains at least one of the terms from your search query, use the Boolean operator OR in between the terms.

If you want to search for files that contain a certain term but not the other term, use the operator in between the terms.

Ex: tropical NOT island

Windows 7 search boolean

Please note that the above said Boolean operators have to be used in uppercase.

Tip #4:

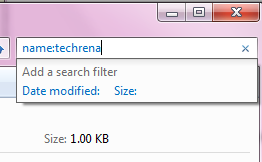
If you want to look for match only in the file names not inside the content of the files, type name: followed by the search keyword(s).

Windows 7 search name operator

Usage:

name:techrena

Tip #5:

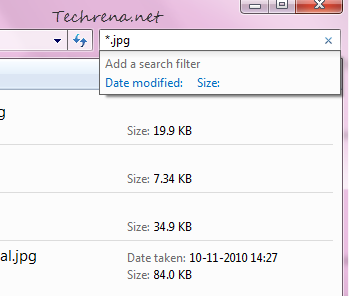
If you want to search for a particular file type, type *. followed by the file extension for instance type “*.jpg” info you only want to search JPEG pictures present on your computer.

Windows 7 search file type

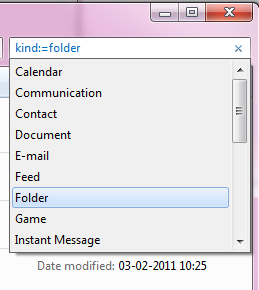
You can also make use of the “kind” operator to search for files of particular type. There are several types to choose from like games, movies, music, pictures, folders etc.

Windows 7 search kind file type

Usage:

kind:=folder

Tip #6:

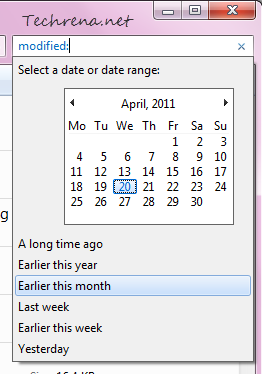
If you want to search only for the files that have been modified after a certain date, you can make use of the “modified:” (or “datemodified:”) search filter.

Windows 7 search modified operator

Tip #7:

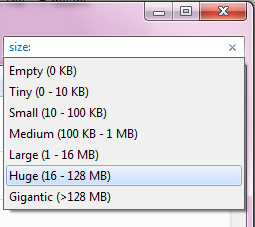
Another search filter that can help you narrow down your search is “Size:”. Type ‘Size:’ in the Search box and choose the size limit so that the search can be limited to all the files under that limit.

Windows 7 search size operator

Usage:

Size:>10mb

Tip #8:

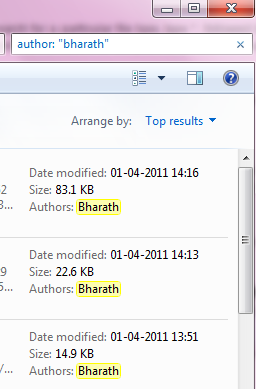
If you want to search for files that are authored by specific person, use ‘”System.Author:” or just “author:” search filters.

Windows 7 search author operator

Usage:

System.Author:Bharath

Author: “Bharath”

Tip #9:

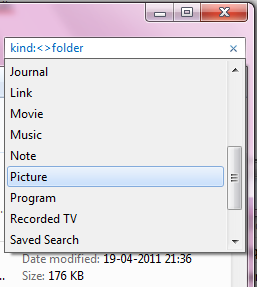
This is to just achieve the opposite result of the tip #5 i.e. to search for files that aren’t of specific type. Here the operator <> means “not”.

Windows-7-search-kind-not-keyword

Usage:

kind:<>folder

Tip #10:

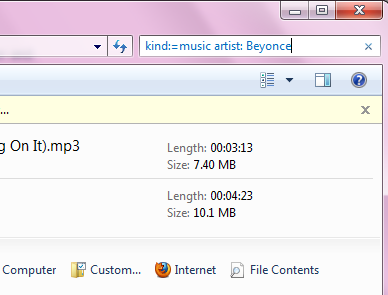
To search for music tracks composed by a particular artist from your music folder, you can make use of the advanced “kind” operator.

Windows 7 search artist operator

Usage:

kind:=music artist: Beyonce


If you know some more Windows 7 search tips, let us know through comments.


Reference: Microsoft

Slow Performing Add-ons In Firefox

Firefox add-ons

Firefox became popular when the internet was ruled by the Internet Explorer because of the whole lot of add-ons that users can install to get extra features that aren’t built natively into the browser. Since then, all other browsers had to provide similar support for extensions/add-ons to stay alive in the competition. Agree that add-ons in Firefox are a boon to browser but often they are criticized for slowing down the performance of the browser.

As Mozilla says in a blog post,

there are some add-ons that cause extreme slowdowns in Firefox because of poor coding practices, in extreme cases adding 30 seconds to start-up time.i

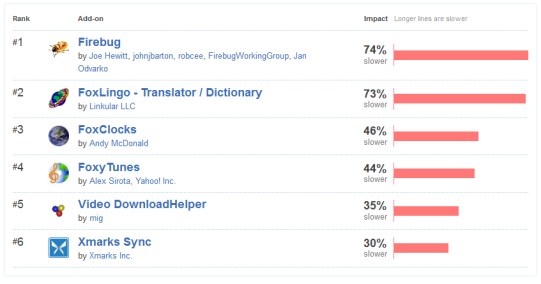
So if you install 10 such add-ons, Firefox start-up time may even slowdown by some minutes in extreme cases. Mozilla noticed the importance of spotting such add-ons that are causing significant performance issues in the Firefox and they even made the data public. Head over to this page where you will see a list of few top add-ons that are slowing down the start-up time of your Firefox.

firefox slow add-ons

As you can see, if you are a web developer and installed the popular “Firebug” add-on, it slows down Firefox start-up time by 74%. As of now, the list also includes other popular add-ons like “FoxyTunes”, “Video DownloadHelper”, “Xmarks Sync”. If you are a developer, you don’t want your own add-on to be featured in that list, right? Don’t worry, Mozilla wants to work with developers to solve the issues and has even listed some best practices for improving startup performance. If you have installed one or more add-ons that are listed under the slow performing add-ons page, try disabling them to improve your Firefox start-up time and performance.

Save Web Forms And Refill Data Easily With Simple Form Filler User Script

Simple Form Filler Userscript

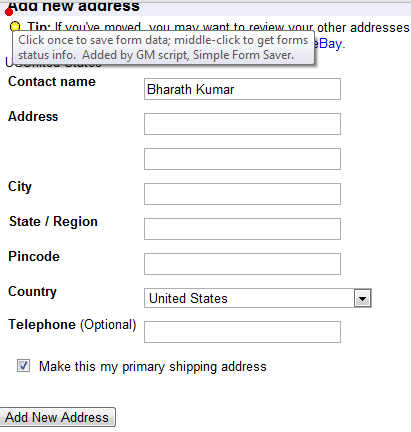
When you are browsing the internet, quite often you need to fill out web forms. Modern day browsers have become more intelligent and most of them offer an option to ‘auto-fill’ the web form using the data you previously entered while filling out the web form. But then, the in-built browser’s auto-fill option (for most of the browsers) is not complete and can easily ditch you when you need it the most.

Thankfully, there are many web form savers available as browser add-ons but  ‘Simple Form Filler’ just beats out the rest in serving the purpose. Simple Form Filler is a userscript that you can install on supported browsers like Firefox, Chrome etc. and it adds a small red dot-like button to all the webpages that you browse. The usage is pretty much simple; Just fill out the form on any webpage and click on the red button and it will save the entire form. So in case if you need to comeback and fill the form again by re-entering the data, just click on the button again and it will fill out the form with your saved data and thus saving you a lot of time, particularly when you are in a hurry.

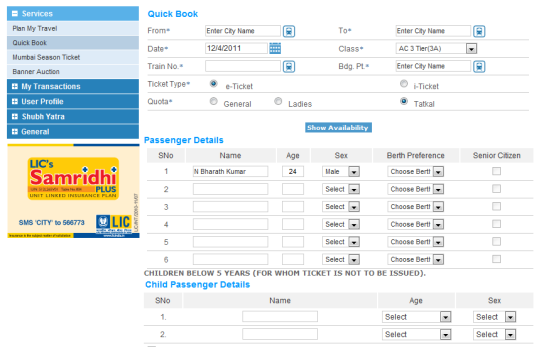
IRCTC ticket reservation

And if you live in India, you might know how hard it is to book a train ticket under ‘Tatkal’ scheme just after 8 AM. The server crashes, webpage doesn’t load properly and so on. You need to re-enter the data in the web form all over again and again. And here is where this userscript saves you. All you need to do is fill in the form for the first time and click the red button to save the data. In case of any failure, you come back to the form and hit the small red button again and it automatically fills in the form for you with the data that you entered previously. That way, you can save time in filling in the form multiple times.

Install Simple Form Filler GreaseMonkey Userscript [Userscripts.org] Via [LifeHacker]

[Tip] Enable HTTPS In Twitter

Twitter logo

Enabling and using HTTPS mode for websites that require logins is pretty much important particularly if you are accessing the internet via unsecured public Wi-Fi connections.  Understanding how important it is for users to use HTTPS, we have earlier covered several articles explaining how to enable HTTPS mode for Facebook and Gmail. Now it is Twitter’s turn. Twitter has just added an option to enable HTTPS mode for everyone who uses the site. Until now, to use HTTPS on Twitter, users had to visit https://twitter.com/ manually. Thankfully it’s automated now with a simple option. Let’s get into details about how to turn on the secure HTTPS mode for your Twitter account.

Steps:

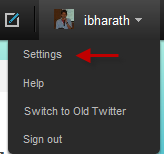
1. Login to your Twitter account and click on the “Settings” which can be found by clicking on the dropdown arrow next to your account name (if you are using the new Twitter). You may also use the direct Twitter account settings page link to get onto the page.

Twitter settings link

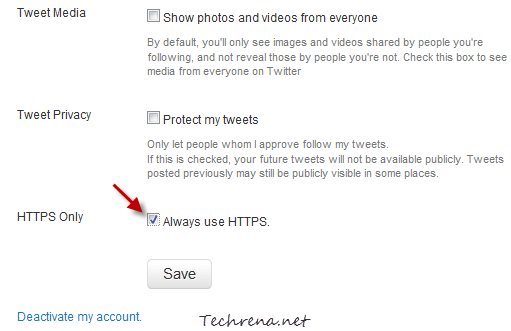
2. Scroll down to the bottom of the page and locate the HTTPS settings:

Twitter-https

Check against “Always use HTTPS” and click Save button

Twitter https settings

That is it. You have now enabled the HTTPS mode for your account. Twitter from now on, will send and receive data from its servers using secure HTTPS. So now you can just use Twitter on any public Wi-Fi hotspots without worrying much about eavesdroppers. If you are using Twitter app on iPhone and iPad, this has already been enabled for you so you do not need to adjust this setting.

Don’t forget to follows us at @techrena (even better if you follow me @ibharath !)

[Tip] Enable Gmail Smart Labels

Gmail smart labels

Gmail has just added new “Smart Labels” feature to its labs section that helps you to ‘classify’ and ‘organize’ your email messages. Gmail users already have features like ‘filters’, ‘labels’ and ‘Priority Inbox’ (launched last year).

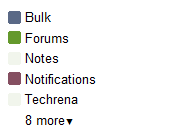
Smart Labels works this way: Smart Labels automatically organizes your mail into Bulk, Notification and Forum messages (labeled as ‘Bulk’, ‘Notifications’, ‘Forums’ respectively). All the newsletters and other promotional messages would under the ‘Bulk’ label. All your social networking notifications, credit card statements etc. would go with the ‘Notifications’ label and finally all the email messages coming from online groups or forums that you have joined would go with the ‘Forums’ label.

Enable Smart Labels In Gmail:

Smart Labels is available as Gmail Labs feature. To enable this for your Gmail account, go to Mail Settings > Labs, locate “SmartLabels” and choose “Enable” radio button against it. Click “Save Changes” button to save your settings.

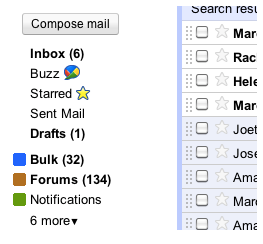
You should now see the new labels in your inbox.

Gmail smart labels inside inbox

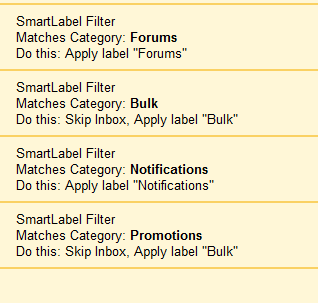
If you have been using Gmail filters, you must find really easy to edit these new Smart Labels as well. To edit any of the Smart Labels (Bulk, Forums or Notifications), just visit “Filters” tab under your Gmail settings and you can edit these labels as you do with usual filters.

Gmail Smart Labels in filters

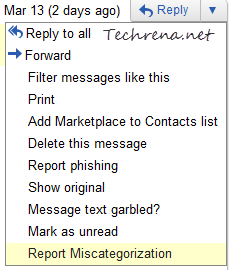
In case you feel any email message is wrongly labeled, you can report it by hitting the dropdown menu next to the message and choosing “Report Miscategorization”.

Miscategorization Smart labels

Search Subtitles Faster With TinySubs

TinySubs realtime search

If you are searching for a subtitles to watch a a foreign language film and still not able to find it, try TinySubs.com next time, it should do the work for you. TinySubs.com is a dedicated search engine for subtitles and  fetches the results in realtime. But TinySubs doesn’t host any files on its serves, it only searches for the subtitles from the host sites.

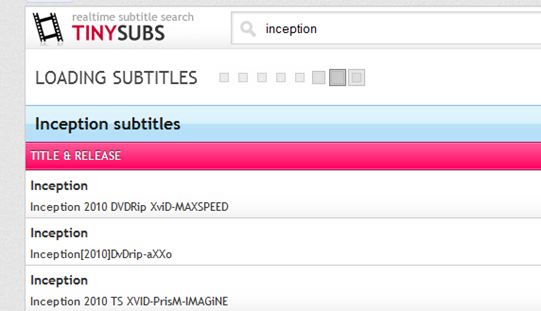
TinySubs screenshot

The usage is simple as you do with most other search engine, just enter the name of the movie to be searched, choose the language and hit enter. You should now be presented with the results listing all the subtitles it found with details including the actual site where the subtitle files are hosted, the language of the subs and whether they are “1-CD versions” or “2-CD versions”.

To try the real-time subtitles search, visit TinySubs.com

For quicker access, you can also try the TinySubs add-on for Firefox.

Found via LifeHacker