Amazon Web-based Kindle Cloud Reader Launched With iPad Compatibility

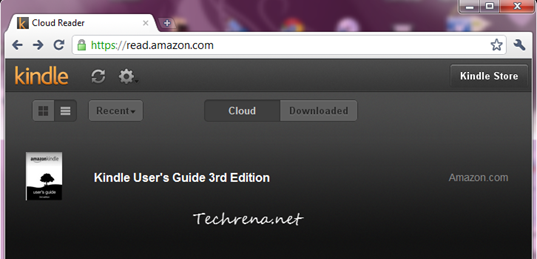
Amazon has just launched a new Kindle Cloud Reader, a tit-for-tat webapp for the Apple’s policy changes to its iTunes App Store, saying that it would be charging 30 p.c of the revenue of every purchase that was made within the app (called in-app purchases). When other popular eBook reader companies like Kobo and Barnes & Noble’s NOOK had to disable the in-app purchases of eBooks and other subscriptions in order to comply with the Apple’s policies, Amazon has found a new workaround to the problem. Using the web based Kindle Cloud Reader users can shop, read and download the subscriptions from the Amazon’s Kindle Store.

Kindle-Cloud-reader-chrome

The website is optimized for viewing on iPad (and we know why!) and currently supports Chrome and Safari on your PC, Linux or Mac. It will soon be available for iPhone as well.

How To Use Amazon Kindle Cloud Reader:

If you are using any of the above mentioned browsers, just type http://read.amazon.com in your browser and you will be prompted to install a small plugin to be able to run the web version smoothly. One good thing about the Kindle Cloud Reader is that it can enable HTML5 powered offline reading for all of your Kindle subscriptions. Of course, if you are on a PC, having the standalone Amazon Kindle application is always a better option but then we always want more choices, don’t we?

Kindle Cloud webapp may not be as good as the iPad native app but do we still need to complain having known the fact that it was just created solely for the purpose of getting around the Apple’s App Store rules?

[More at: Amazon]

[Download] Yahoo Messenger 11 Final Full Standalone Offline Installer

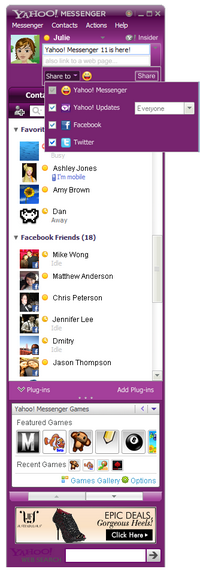
Yahoo Messenger 11 final screenshot

The final version of the Yahoo! Messenger 11 has now been officially released and is available for download. Version 11 of the popular instant messaging software Yahoo Messenger has been in beta development since last November. The build number of the latest version is 11.0.0.2009 which can be downloaded from the links added towards the end of this post. Improvements in the Yahoo Messenger 11 according to the official Yahoo Messenger blog include:

>> Social gaming: Users can invite and play social games like Mafia Wars, Fishville inside the Messenger.

>> Social Integration: Receive and post updates from all your social network sites like Facebook, Twitter and Flickr etc. from right inside the Messenger.

>> Facebook chat

>> Chat history: All your conversations will be saved on the PC from where you signed into the Messenger.

Yahoo Messenger 11 Direct Download Links:

Follow the below mentioned direct links to download the full offline installers for the Yahoo Messenger 11 final. The

Offline version (US) 18.1 MB

You may also want to install the Yahoo Messenger using the following online installer. Keep in mind that, you need to have active internet on the PC where you wish to install Yahoo Messenger using this particular version.

Online Installer – 414 KB

[Tip] Change The Date And Time Picture Was Taken In Windows 7

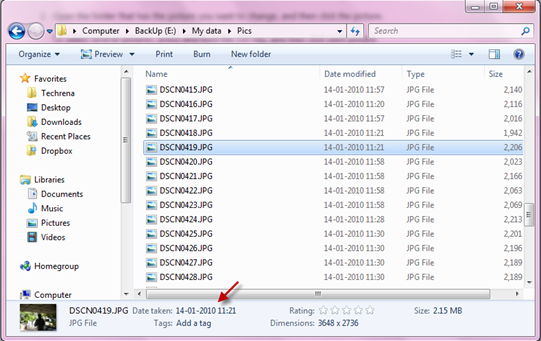
Date picture taken in Windows 7

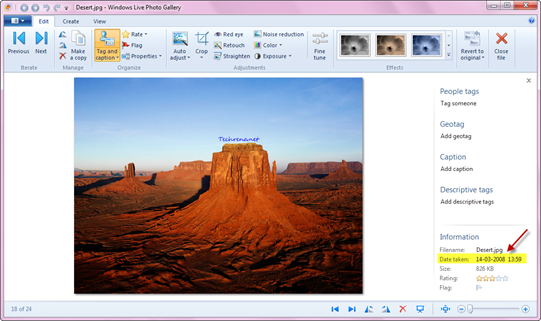
The modern day digital cameras include the time and date of the picture when you take snaps with them. This is very useful, when you see the pictures in future and want to know when it was taken. These details can be seen from the information along with the picture’s metadata when you transfer them to the PC. Fine, everything is good. But what would happen when you travel to a different time zone and forgot to reset the time and date in your camera’s settings? The digital camera would then stamp incorrect time and date onto your pictures. This is a common problem but fortunately, there is a great workaround available if you are using Windows 7. To see the “Time Taken” data of the picture, select the picture and then notice it on the details pane at the bottom of the window.

Let’s now see how to change the date when a picture was taken, on the Microsoft Windows 7 in 5 simple steps. Follow the steps briefed below.

I. Changing The Date When A Picture Was Taken:

Steps:

1. Open the folder where the target pictures reside.

2. Select the picture for which you want to change the date.

3. Now move your focus to the details pane at the bottom of the window.

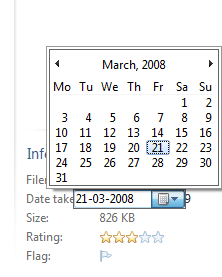
Picture Taken Date Change in Windows 7

4. Click next to the “Date taken” and then click on the calendar icon to choose another date.

5. Click Save to change the settings that you have just changed.

Tip: You may also choose multiple pictures in the step 2 by holding down CTRL while selecting one or more pictures.

Note: If you don’t see any details pane, it might have been disabled. Read our earlier tutorial to enable the details pane in Windows 7 explorer.

II. Changing Both The Time And Date When A Picture Was Taken:

The aforementioned method changes only the date on which the picture was taken but not the time when it was captured. Follow these steps to change both the time and date when the picture was taken.

Steps:

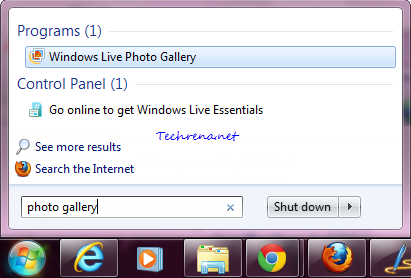
1. Press the Windows key on your Windows 7 machine and type photo gallery in the search box and open the “Windows Live Photo Gallery” from the results under the ‘Programs’.

Photo Gallery Windows 7 start menu search

2. Import the picture for which you want to change the date and time metadata and double-click on it to open it.

Windows Photo Gallery Picture info

3. On the right hand side pane (Tag and caption pane), notice the “Information” section. You will see the ‘Date Taken’ data being listed there.

4. Click on the corresponding date and time values which you want to change.

Windows Photo Gallery picture info edit

That is it. The picture will have new values for “Date Taken” metadata. Isn’t that simple?

[Via: Microsoft]

[Tip] Play Angry Birds Online From Any Web Browser

Angry Birds logo

Angry Birds, the popular iPhone game which later made its way to Android and other smartphones (with touchscreen) is now available online. Yesterday during the 2nd day of Google I/O 2011 developer conference, Peter Vesterbacka, head of ‘Rovio’ announced the launch of web based version of the Angry Birds game. The web-app version of the game has been apparently built using the Google Web Toolkit (GWT).

Though the web app is designed keeping Google Chrome in view, the game still works in most of the modern browsers like Firefox, Internet Explorer, Safari etc.

Angry birds online game

How To Play Online:

Chrome users, can head over to this Chrome web store page and install the app to get started (already more than a million users using the app!).

If you are on any other web browser, visit Chrome.angrybirds.com and start playing the game right away! This is a beta release and the game is currently having 63 levels (7 additional special levels for Chrome). The game is available in 2 version; SD (Standard) version and HD version.

Quick Links: SD Version | HD Version

Top 10 Advanced Windows 7 Search Tips

Windows 7 logo

Microsoft has always been keen to improve the search feature in Windows. With the launch of every new version of Windows, there have always been incremental improvements to the Windows Search. If you are using Windows 7, here are some advanced search tips and tricks to make the most out of the Windows Search.

Tip #1:

To search for files containing multiple terms (in any order) from your search query, just type all of those terms in the Search box:

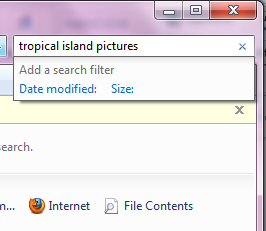
For instance, if you want to search for multiple files or folder containing the terms “tropical”, “island” and “pictures” in any order, just type “tropical island pictures” in the Search box.

Windows 7 search any terms

Tip #2:

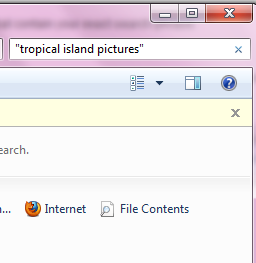
If you want to look for files or folders in your computer containing a particular exact phrase, type your query within quotation marks in the Search box:

Example: “john holiday pics”

Windows 7 search exact match

The above query will list all the files (or folders) that contain your exact search phrase.

Tip #3 – Using Boolean Operators:

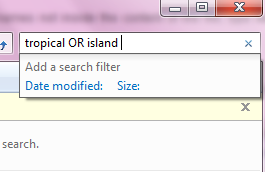
If you want to find that contains at least one of the terms from your search query, use the Boolean operator OR in between the terms.

If you want to search for files that contain a certain term but not the other term, use the operator in between the terms.

Ex: tropical NOT island

Windows 7 search boolean

Please note that the above said Boolean operators have to be used in uppercase.

Tip #4:

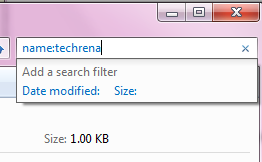
If you want to look for match only in the file names not inside the content of the files, type name: followed by the search keyword(s).

Windows 7 search name operator

Usage:

name:techrena

Tip #5:

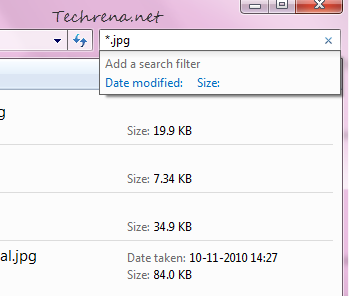
If you want to search for a particular file type, type *. followed by the file extension for instance type “*.jpg” info you only want to search JPEG pictures present on your computer.

Windows 7 search file type

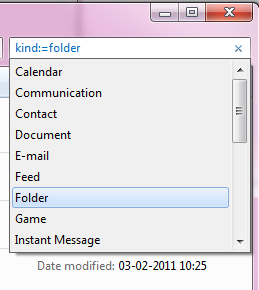
You can also make use of the “kind” operator to search for files of particular type. There are several types to choose from like games, movies, music, pictures, folders etc.

Windows 7 search kind file type

Usage:

kind:=folder

Tip #6:

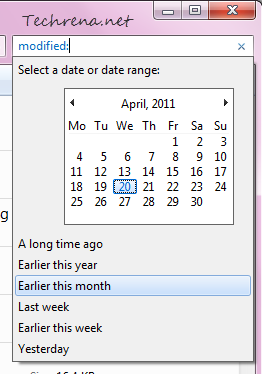
If you want to search only for the files that have been modified after a certain date, you can make use of the “modified:” (or “datemodified:”) search filter.

Windows 7 search modified operator

Tip #7:

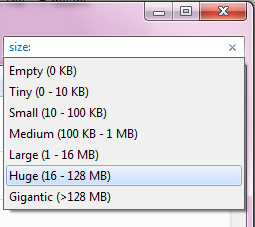
Another search filter that can help you narrow down your search is “Size:”. Type ‘Size:’ in the Search box and choose the size limit so that the search can be limited to all the files under that limit.

Windows 7 search size operator

Usage:

Size:>10mb

Tip #8:

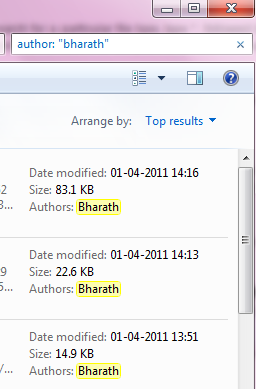
If you want to search for files that are authored by specific person, use ‘”System.Author:” or just “author:” search filters.

Windows 7 search author operator

Usage:

System.Author:Bharath

Author: “Bharath”

Tip #9:

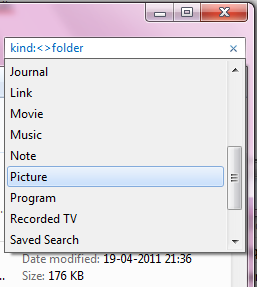
This is to just achieve the opposite result of the tip #5 i.e. to search for files that aren’t of specific type. Here the operator <> means “not”.

Windows-7-search-kind-not-keyword

Usage:

kind:<>folder

Tip #10:

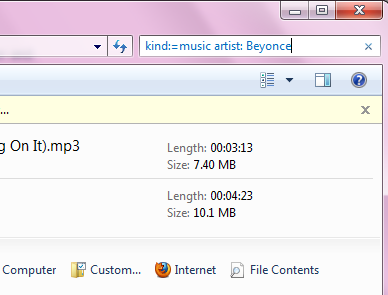
To search for music tracks composed by a particular artist from your music folder, you can make use of the advanced “kind” operator.

Windows 7 search artist operator

Usage:

kind:=music artist: Beyonce


If you know some more Windows 7 search tips, let us know through comments.


Reference: Microsoft

[Download] Internet Explorer 10 Platform Preview

IE logo

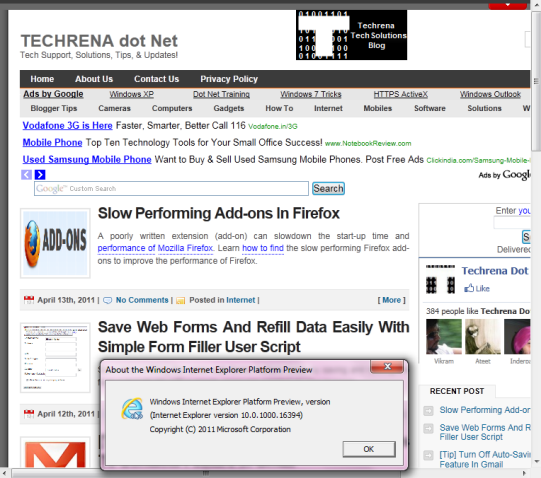
Microsoft has released the first platform preview of the upcoming Internet Explorer 10 (IE10)  browser.  Looks like Microsoft learnt lessons from the success of Chrome and is now more keen to take on it and that might be the reason why we are seeing a platform preview of Internet Explorer 10 just weeks after Internet Explorer 9 final was released. IE10 is just under three weeks of development as of now and we already have a platform preview! Internet Explorer 10 will have native support for HTML5 and supports emerging CSS3 standards like CSS3 Multi-column Layout, CSS3 Grid Layout, Flexible Box Layout, CSS3 Gradients on background images, 3D Transforms and ES5 Strict Mode etc. Microsoft has said that it would update IE10 every 8-12 weeks.

IE10 Platform Preview 1

The Platform Preview of IE10 is available only for Windows 7 (both 32-bit and 64-bit). Web developers can download  the preview from the link added at the bottom of this post. The Platform Preview builds (upcoming) require some specific updates (KB2454826) to be installed on your Windows 7 machine to render Platform Preview graphics, media and printing functionalities. IE10 Platform Preview should install all the prerequisites automatically. But in case of any error during the installation, users have to manually install the updates before installing the Platform Preview. For more detailed instructions on installing the require updates prior to the installation of Platform Preview, head over to this page.

Download Internet Explorer 10 Platform Preview 1 [Direct Link ]

[via] Microsoft Official IE Blog

Slow Performing Add-ons In Firefox

Firefox add-ons

Firefox became popular when the internet was ruled by the Internet Explorer because of the whole lot of add-ons that users can install to get extra features that aren’t built natively into the browser. Since then, all other browsers had to provide similar support for extensions/add-ons to stay alive in the competition. Agree that add-ons in Firefox are a boon to browser but often they are criticized for slowing down the performance of the browser.

As Mozilla says in a blog post,

there are some add-ons that cause extreme slowdowns in Firefox because of poor coding practices, in extreme cases adding 30 seconds to start-up time.i

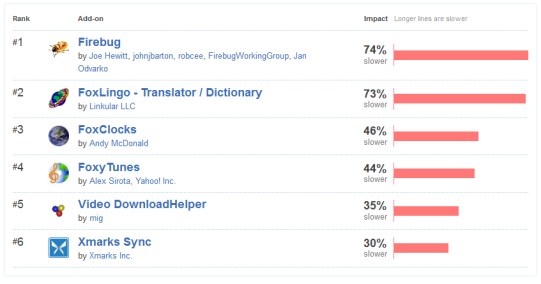
So if you install 10 such add-ons, Firefox start-up time may even slowdown by some minutes in extreme cases. Mozilla noticed the importance of spotting such add-ons that are causing significant performance issues in the Firefox and they even made the data public. Head over to this page where you will see a list of few top add-ons that are slowing down the start-up time of your Firefox.

firefox slow add-ons

As you can see, if you are a web developer and installed the popular “Firebug” add-on, it slows down Firefox start-up time by 74%. As of now, the list also includes other popular add-ons like “FoxyTunes”, “Video DownloadHelper”, “Xmarks Sync”. If you are a developer, you don’t want your own add-on to be featured in that list, right? Don’t worry, Mozilla wants to work with developers to solve the issues and has even listed some best practices for improving startup performance. If you have installed one or more add-ons that are listed under the slow performing add-ons page, try disabling them to improve your Firefox start-up time and performance.

Save Web Forms And Refill Data Easily With Simple Form Filler User Script

Simple Form Filler Userscript

When you are browsing the internet, quite often you need to fill out web forms. Modern day browsers have become more intelligent and most of them offer an option to ‘auto-fill’ the web form using the data you previously entered while filling out the web form. But then, the in-built browser’s auto-fill option (for most of the browsers) is not complete and can easily ditch you when you need it the most.

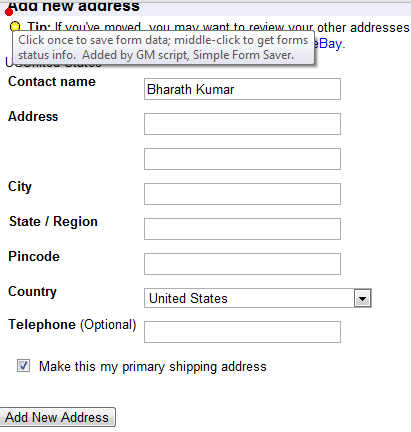
Thankfully, there are many web form savers available as browser add-ons but  ‘Simple Form Filler’ just beats out the rest in serving the purpose. Simple Form Filler is a userscript that you can install on supported browsers like Firefox, Chrome etc. and it adds a small red dot-like button to all the webpages that you browse. The usage is pretty much simple; Just fill out the form on any webpage and click on the red button and it will save the entire form. So in case if you need to comeback and fill the form again by re-entering the data, just click on the button again and it will fill out the form with your saved data and thus saving you a lot of time, particularly when you are in a hurry.

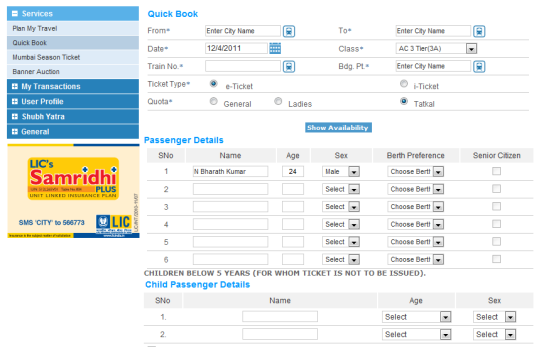
IRCTC ticket reservation

And if you live in India, you might know how hard it is to book a train ticket under ‘Tatkal’ scheme just after 8 AM. The server crashes, webpage doesn’t load properly and so on. You need to re-enter the data in the web form all over again and again. And here is where this userscript saves you. All you need to do is fill in the form for the first time and click the red button to save the data. In case of any failure, you come back to the form and hit the small red button again and it automatically fills in the form for you with the data that you entered previously. That way, you can save time in filling in the form multiple times.

Install Simple Form Filler GreaseMonkey Userscript [Userscripts.org] Via [LifeHacker]

[Tip] Turn Off Auto-Saving Email Addresses To Contacts Feature In Gmail

Gmail logo

Google’s Gmail has got whole bunch of features that makes it as one of the top free email service providers on the internet. But who says that it hasn’t got any annoyances? It surely does. Gmail automatically saves email address of the person and adds it to your contact lists when you communicate with that sender even though you might not communicate with him future. Most users would find it annoying as your contacts list just keeps growing bigger with additions of such unknown contacts. If you look at it from the other side, it indeed is a nice feature for so many who are just lazy to manually add those email addresses to their contact list. I don’t know why it took so long, but apparently Google has decided to let users have the option of turning this ‘auto-save contacts feature on or off.

Steps:

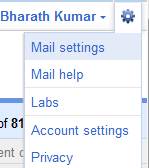
1. Login to your Gmail and click “Mail settings link found at the extreme top right corner of the window.

Gmail mail settings link

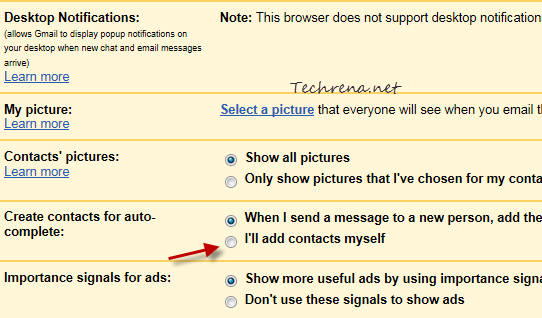
2. Go to ‘General’ tab under the settings. Scroll down until you find the settings “Create contacts for auto-complete”.

3. Choose the “I’ll add contacts myself” radio button and click the “Save Changes” button.

gmail contacts auto complete settings

That is it. But then, keep in mind that you will have to add contacts manually once you have turned this feature off.

[Tip] Use Google Talk Guru To Get Quick Answers In Chat

Google talk guru

If you think you can chat pretty much faster than say doing a web search, Google has some good news for you. Now you can get all your information more quickly while you chat with your friends without switching the windows. Google has recently launched an experimental feature called ‘Google Talk Guru’, a chatbot  that answers most of the information queries that are associated with Google SMS (currently available in the US only). The bot allows you to get information relating to weather, sports scores, simple calculations, definitions, translations, currency and metric conversions etc.

Getting Started:

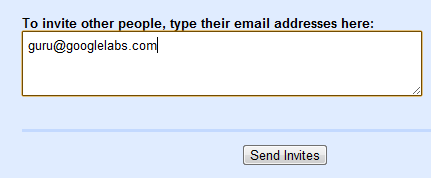
google talk guru chat invitation

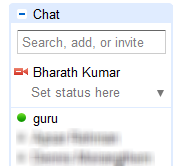
To get started, just send a chat invitation to guru@googlelabs.com and the Google Talk Guru should immediately appear in your chat list, no matter what chat client you are using.

Google talk guru on chat list

Now that you have got the chatBot on your list, all you have to do is to send your query in the form of instant message. In case you are wondering what sort of queries that you can type, take a look at the following examples to get a brief idea about using the service.

Google talk guru examples

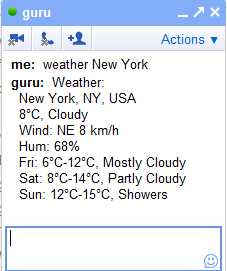
If you are familiar with the Google SMS commands, this shouldn’t a big problem as Google Talk Guru supports the majority of the kind of queries that work with Google SMS. For instance, if you want to get weather information of your city, just type ‘weather (your city name)’ and send an IM. You should immediately get the weather information related to your city:

google talk guru weather

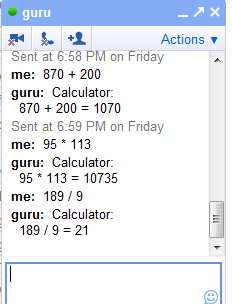
You can also ping the Google Talk guru bot with the calculations and get the result instantly.

google talk guru calculator example

Go ahead and try pinging the Google Talk Guru with various queries to get information that you need.