
Are you a web developer or admin of a network of blogs with WordPress as CMS? Want to test some new features offline before implementing them on your original server online ?
If your answer is “yes” to the above questions, perhaps you have landed on the right page. WordPress is an amazing Content Management System for blogs and it makes everything easy even for not so tech-savvy people. However if you own blogs, you might well be knowing the importance of testing the features like testing some enhancements to your current themes, testing plugins or even testing some third-party scripts on your WordPress blog. At Techrena, which is set to become a network of blogs sooner or later, we understand the importance of this testing. We do a lot of testing on our local computers before finally taking them online. We thought it would be useful if we share how actually we do this kind of testing on our local systems using WordPress. Here we are coming up with a detailed tutorial on installing WordPress on localhost via two methods.
2. Using IIS server (on Windows only)
Before we start, while we try to give every detail while posting this please do note that in some cases, we do take things for granted in the sense that we assume that you know some basic things if not more. Let’s get started…
Using Xampp Server:
Requirements: i) PHP latest version (check here) ii) MySQL Database latest version (check here)
Although, PHP 4.3+ version and MySQL 4+ version is sufficient enough to run WordPress, we recommended you to use the latest versions always. One good thing with WordPress is that, it always notifies users when their database version is outdated. So this helps you keeping the updated database version.
Step 1:
Download the XAMPP local server. Run the installer and make sure that the XAMPP server is running on your tray.
Step 2:
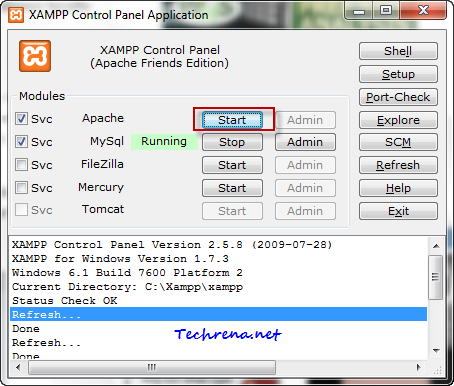
Open the XAMPP Control Panel from the system tray, check the first box (Apache) and click on the “Start” button to start the Apache web server on your local machine.
Step 3:
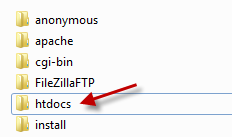
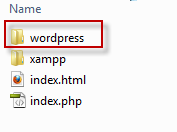
Now that the local server has been installed we are now left with installing WordPress on our server. Download the latest WordPress zip file and extract the “WordPress” folder to the htdocs folder inside the “xampp” server installation folder.
Step 4:
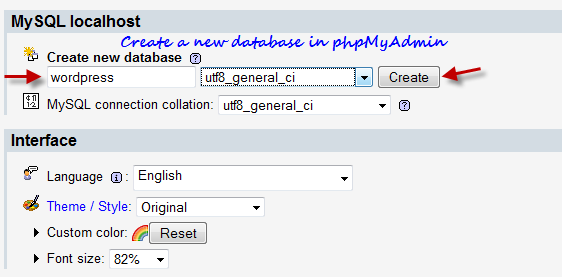
Now you need to create a database table which can be used by WordPress. Go to http://localhost/phpmyadmin/ and create a new database. If you are not able to login to the phpMyAdmin page, go to http://localhost/security/xamppsecurity.php page and edit the MySql SuperUser details and try again.
Enter the new database name (something like “wordpress”) and click “Create” and the new database will be created. Now we need to notify WordPress about this database in the next step.
Step 5:
Go to WordPress folder and open the file called “wp-config-sample.php” in any text editor.
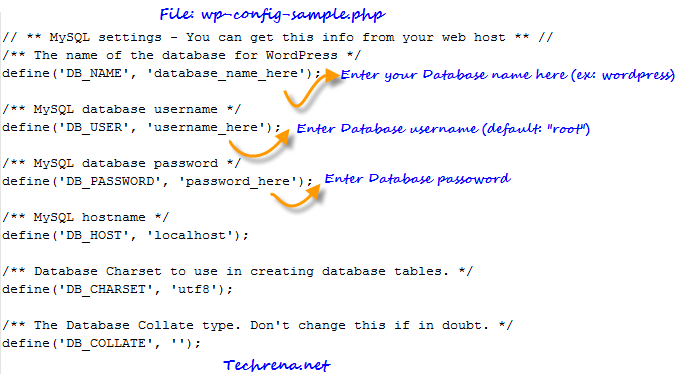
Make the changes to the file and rename it as “wp-config.php” and close the editor.
Step 6:
Now type http://localhost/wordpress/wp-admin/install.php (the path of the URL may change depending on what name you chose for site or the name of the folder under “htdocs”)
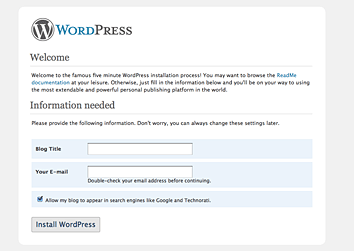
Choose your local WordPress blog title and leave your email address in there start page and click “Install WordPress”. You will now be given username and password to login to your new blog.
Microsoft has made it easier to install WordPress on your Windows based computer just like installing Windows apps, all you need to do is to do a few clicks.
Requirement: You need to enable and run IIS server on your computer. Read our tutorial on how to activate IIS on your computer.
Step 1:
Download and run Microsoft Web Platform Installer. This is a free software from Microsoft developed to make installing web apps easy for Windows users.
Step 2:
Go to Web Applications > Blogs > click “Most Popular”, select “WordPress” and click Install button. Other tools that are required by WordPress like PHP and MySQL will automatically be included in the download. You need to accept the licence agreement and then proceed to the download. The total download size should be less than 90 MB in most cases.
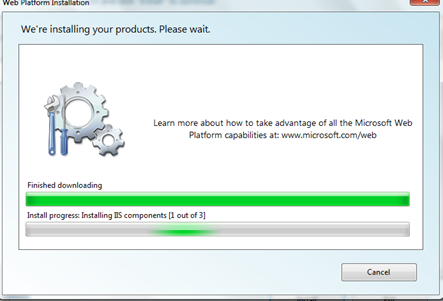
Step 3:
Once the download and installation gets over, you will be asked to enter information about your site in a series of steps:
i) Admin Password for MySQL: By default the database administrator username would be “root” and you need to select a password for the administrator, click “Continue” button once you are done.
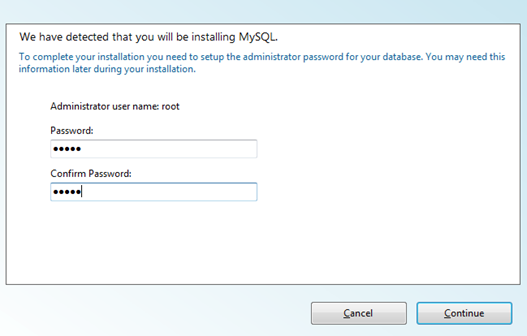
After you enter this, the download resumes for sometime and you will be then asked for some more information about the site.
ii) Application information: You need to enter the Database admin password (which you have set in the above step) and WordPress database password. You will also be asked to enter passphrases to secure your passwords, but the default option here is to leave them blanks and in any case this is not mandatory. You can however change it if you would like to change it.
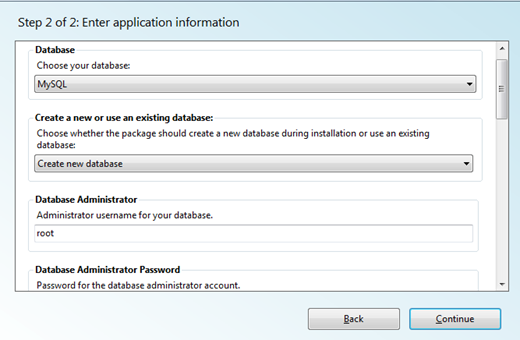
ii) Site information: In this step you just need to enter the WordPress application name. You might not want to change the other details which are set to default already. Click “Continue” button and let the Web Platform installer install the application for you.
Step 4:
This is the last step of the installation. You will be shown the list of product installed on the window.
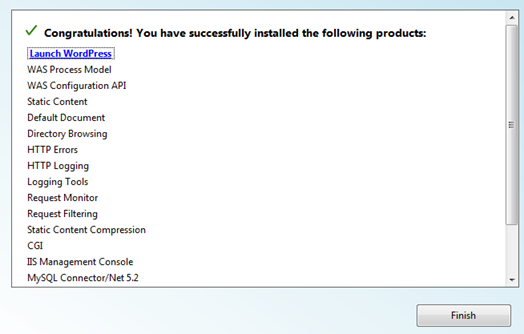
Click “Launch WordPress” to launch your WordPress blog. You can alternatively access it via http://localhost/wordpress/. You can find the WordPress installtion usually inetpub> wwwroot folder.
Still facing any problems during the installation ? Let us know through the comments.
Note:
1. The above two methods have been tested and found to be working well on Windows 7 machines.
2. While the method 2 is relatively simpler and quicker, we have however found that if you delete some sites from your IIS Manager, the WordPress installation getting corrupted. It may not be the same case for all but surely for some. We hence advise you to not to touch anything inside Internet Information Service(IIS) Manager unless you are sure about what you are doing.

i found your site through search engine.i like your web page content and very attractive theme.really i like this it.
Thanks.:)
I think this is a good tutorial of using XAMPP. What I do myself is skip FIRST PART of step 5 (using XAMPP). I only change the file name to wp-config.php and point browser to install location. Follow screen instruction, fill in database information. Once click install wordpress, wp-config.php will be rewrite by wordpress system automatically. Have you ever try my way?
Are there any security precautions for using XAMPP on my main computer or should I install this for use on a dedicated computer?
HELP I was not given a user name and password to log into the new blog!
Why is this so painfully complicated? I am trying to learn to use WordPress without destroying what someone has built for me online. All attempts to load php admin is rejected with all instructions in German. Is there nowhere I can go that I can get a simple guide through this process or am I wasting my time? There must be someway to practice building a site without publishing it.
thanks. worked. And now how to update the offline to online.
Great tutorial
Thanks for posting
Hi,
I’ve installed WordPress on a local XAMPP server on a Mac. When I go to install a new theme, it asks for the hostname, as well as my FTP username and password.
What would my hostname be, i.e. the hostname of my web server?
Hope you can help.
Frank.
Thank you for this info, it was so easy, I tried another method last week and spent a whole day on it and never got it running, this was awesome.
I was wondering how do I get my information from my live site to this offline site I just created in order to test changes?
buy priligy 2 h versus 13
https://t.me/s/Magic_1xBet
https://t.me/s/Official_1xbet_1xbet
https://t.me/s/Official_ROX_ROX
https://t.me/s/reyting_online_kazino/9/sloty_i_stoly_bez_regi
https://t.me/s/licensed_list_casino
https://t.me/Reyting_Casino_Russia/38
https://t.me/Reyting_Casino_Russia/11
https://telegra.ph/Rejting-luchshih-onlajn-kazino-2025–TOP-nadezhnyh-sajtov-dlya-igry-na-realnye-dengi-09-15-2
https://t.me/s/z_official_1xbet
https://t.me/s/a_official_1xbet