This for those who has a Blogger (..blogspot.com) blog and want to upgrade it to use your own custom domain like www.example.com instead of your current example.blogspot.com. First up, you should know why should you migrate your blog to a custom domain. The advantages with using a custom domain instead of a Blog*Spot (..blogspot.com) subdomain are:
Your blog URL becomes reasonably short and you can choose a catchy domain name that will make your regular blog readers to remember the blog URL easily.
You can have a blog at the domain root folder (like example.com) and this has clear advantages in terms of SEO and PageRank aspects. For instance Alexa sometimes may not rank blogs that are located on subdomains like blogspot.com, it only works well with the sites that are hosted on the root folders.
Fortunately, Blogger supports publishing on a custom domain and offers free unlimited hosting and bandwidth for all of your content associated with your blog. So you don’t need to look for a hosting service and pay it for hosting. Let’s see how a naive Blogger user can start using a custom domain name for his/her Blog*Spot blog.
The Actual Process
>> To start with, login to blogger.com with your Google account and go to your Blogger dashboard. Click on “Settings” link under your Blog entry in the dashboard.
>> Find “Publishing” tab under the Settings and click on it. You will see the following:

>> Click on “Custom Domain” link to get started with the custom domain.
Now you have two options. You can either buy a domain name for your blog from Google (Blogger) itself (charges $10 per year via Google Checkout) or you can buy through some dedicated domain name/hosting registrars, for instance Yahoo Small Business.
>> If you choose to buy the domain from Google, it’s very straightforward and you need not worry about other settings like DNS settings plus you will also get Google Apps for your domain.
However, if you have bought the domain from external domain name registrar, first you need to configure DNS (Domain Name Server) settings for your domain.You must have an option to change your CNAME and A NAME records for your domain, if you find difficulty in changing these records, contact your domain name registrar.
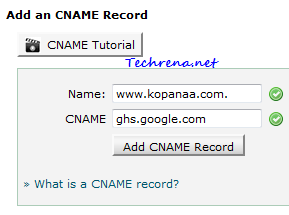
1. Creating CNAME record:
Create a CNAME record for your blog with the following CNAME:
ghs.google.com.

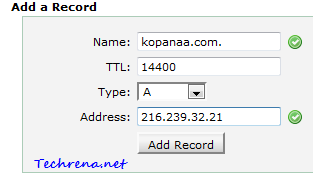
2. Creating an ‘A’ NAME record: ‘A’ NAME records are helpful in redirecting non-WWW URL (naked URL) of your domain (your-blog.com) to a WWW version of your domain (www.your-blog.com).
Create a three ‘A’ NAME records with the name of your domain without the ‘www’ as shown here:
Add the following four such records pointing your naked domain (ex:your-blog.com) to the IP addresses listed below:
216.239.32.21
216.239.34.21
216.239.36.21
216.239.38.21

>> Now, click on the “Switch to advanced settings” at the top corner on your right hand side.
![]()
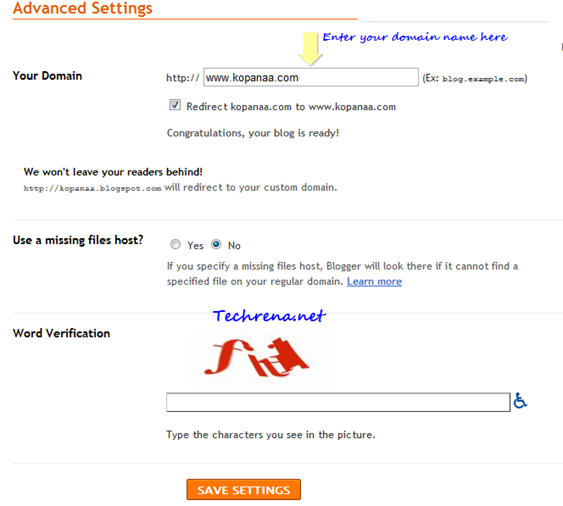
>> Enter your domain name (with www) in the “Your Domain” filed. And also select “Redirect your-blog.com to www.your-blog.com” option. You may keep the default options “No” for “Use a missing file host? ” filed.

>> Enter the word verification and click “Save Settings” to finish the process and save your settings. Now you are done with setting up for your custom domain for your Blog*Spot blog. Now Blogger will redirect all Blog*Spot subdomain visitors to your own custom domain.

Initially your new domain won’t redirect itself to your blog as it takes nearly 24 hours for DNS records to be updated. Tip: Use DNS Propagation checker to check how your DNS information has been propagated around the globe in the internet.
Please note that you can only use this feature on domains or subdomains (like your-blog.com or diary.your-blog.com etc.) but not on subdirectories (your-blog.com/diary). All your existing content including images will continue to work as they used to be.
Let’s know if you find any problem while following this tutorial.

