Creating a System Repair disc in windows vista and Windows 7 is very simple and straight forward process.System repair disc would be very much useful when in situations like your Windows encounters a serious problem and unable to start properly.
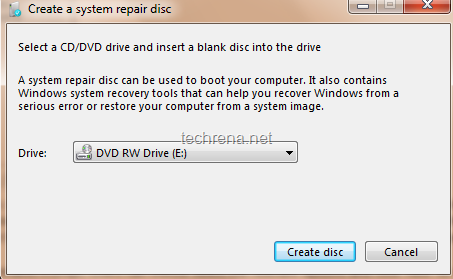
A system repair disc can be used to boot your computer.It also contains Windows system recovery tools that can help you recover Windows from a serious error or restore your computer from a system image
Let’s see how to create a Windows System repair disc in simple steps.
Steps:
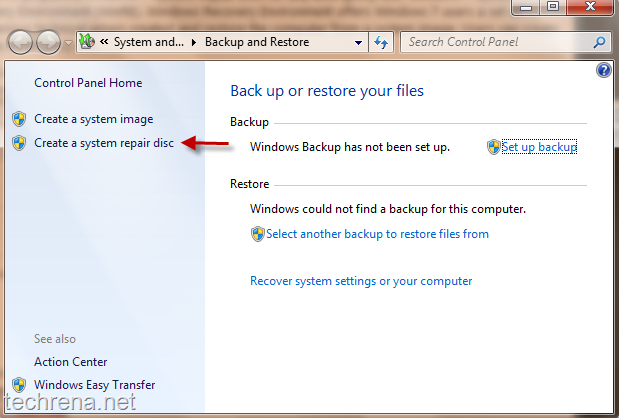
1. Go to Control panel> System And Security> Backup and Restore, click “Create a system repair disc”

2. Now it’ll ask you to select the CD/DVD drive and insert the blank CD into it. Select the drive and click “Create disc’ once you have inserted the blank disc into the drive.

3. Let the DVD/CD (we need a DVD for Windows 7 backup) burn.
4. Now you have successfully created a system repair disc.
Using the system repair disc:
1. Insert the system repair disc into your CD/DVD drive.
2. Restart the computer
3. Windows will automatically discover the system recovery disc.You will be prompted “press any key to start the computer from the system repair disc”
4. If your computer primary boot device isn’t set to “CD/DVD" drive”, go to BIOS settings and change the boot order to configure your computer to start from a CD or DVD.
5. Choose your language settings and click “Next”.
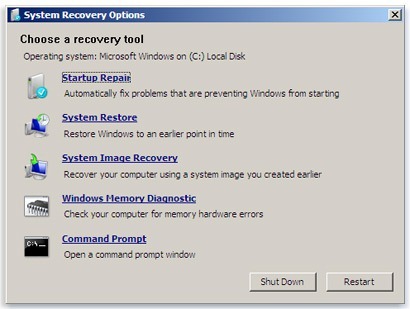
6. Select a recovery option from the following:
# Startup Repaid
# System Restore
# System Image Recovery
# Windows Memory Diagnostic
# Command Prompt

You may also refer to our earlier Windows 7 guides like Install Windows 7 using Microsoft USB/DVD tool, Install Windows 7 using bootable USB
You can also our exclusive posts about Windows 7
