Tip: Always Run A Program As An Administrator By Default

Windows 7 as a security measure doesn’t allow you run any program as an administrator by default. But sometimes you might need to run a program a program far too many times that requires elevated privileges, and it’s really annoying if to see that you are being asked to run it as an administrator each and every time you run it. However, there is a way to run the program as an administrator by default in Windows 7 (and Vista) that many of us aren’t aware of. Here is how you can do it :

Steps:

1. If you wish the program to run as an administrator by using the shortcuts of a program, you need to right-click on the shortcut, select “Properties”,

Windows 7 right click context menu on shortcut

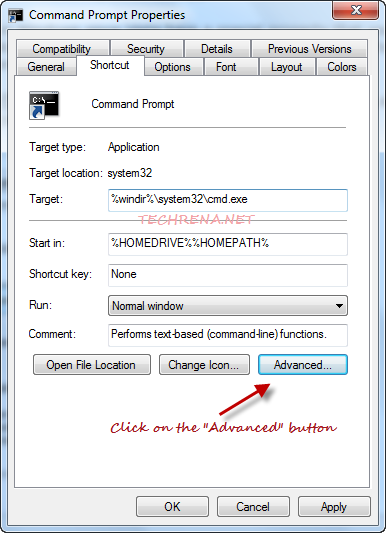
2. Now click on the “Advanced..” button under the “Shortcut” tab of the properties window.

Windows_7_advanced_properties_shortcut

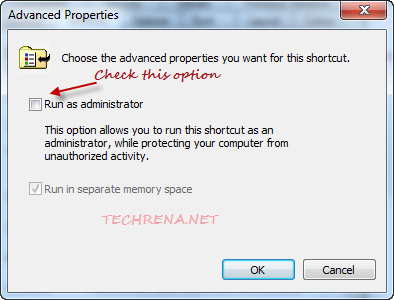
3. Select “Run as administrator” option under “Advanced Properties” window and click OK. Apply the settings and close all the properties window.

advanced_properties_exe

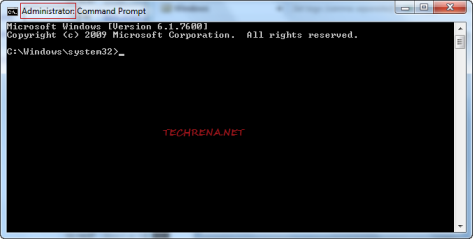
4. Now run the program again and you will see that it’s running as administrator (See the screenshot of the Windows Command Prompt, and observe the string “Administrator” in the title of the program)
CMD as administrator in Windows 7

For more tips and tutorials on Windows 7, you can subscribe to our RSS feed via Email.

[How To] Disable Restart Your Computer Notification After Installing Windows Update

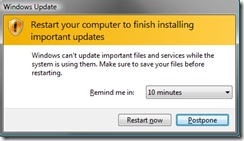
Microsoft Windows automatic updates provides maximum protection against latest security threats and fixes bugs discovered later. Well it is advisable to enable automatic updates or at least install them manually whenever any new update is released. The only annoying thing about Windows Automatic Updates is that it starts displaying a notification to restart your system in regular intervals once it finishes installing the updates.

This notification is even more annoying in Windows XP where we don’t have the option of increasing the time interval.

Windows_XP_Restart Windows-7-restart

Now we can disable this notification. The methods are given below:

1. By using Local Group Policy Editor (gpedit.msc)

Note: Local Group Policy Editor which is not available in Home versions of Windows

Open Local Group Policy Editor. Press Start + R, Type gpedit.msc and Enter.

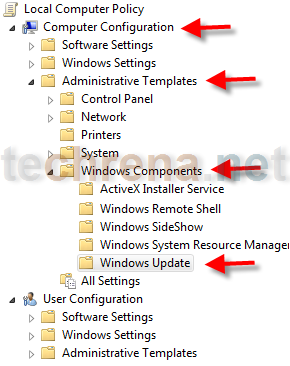
Now go to in the left pane :

Computer Configuration—>Administrative Templates—>Windows Components—>Windows Update

Windows_update

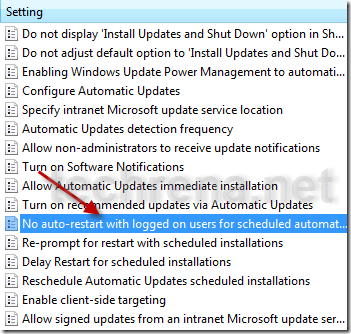
In the Right Pane Double Click on:

No auto-restart with logged on users for scheduled automatic updates installations

no_auto_restart

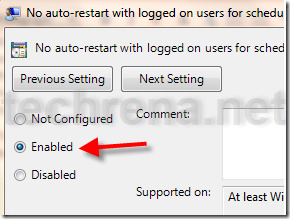
Click on Enabled and press OK.

enable_no_auto_restart

Now the notification has been disabled permanently.

2. By using wuauserv command

Note: This method is applicable for all versions of Windows XP, Vista and Windows 7.

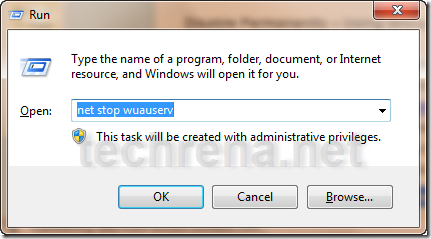
Press Start + R, Type net stop wuauserv and Enter.

net_stop_wuauserv

Stopping_windows_update_service

It will stop the Windows Update service for the current session. It will start again after the system restarts. It is important to note that you have to use this command only after Windows has finished installing the updates and when it starts notifying to restart. Do not stop the service while installing the updates.

If you want to start the service Type net start wuauserv and Enter.

This method stops the notification temporarily, only for the current session.

We hope that now you will not have to press restart later again and again and get hold of the annoying message.

You can subscribe to our RSS feed via email for more tutorials under Windows.

Tip: Make Taskbar Previews Load Faster In Windows 7

Windows logo

Taskbar thumbnail previews take a bit of time to appear when you hover your mouse cursor over any taskbar icon in Windows 7.This delay if set by default to 400 ms by the OS.However, if you want to change the delay time so that the taskbar thumbnail previews load faster, here’s the tutorial that you need to follow.

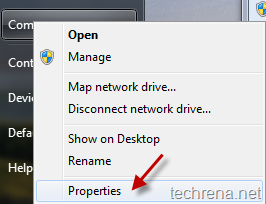
1. Go to Start Menu, right-click on Computer and select Properties

my computer properties in windows 7

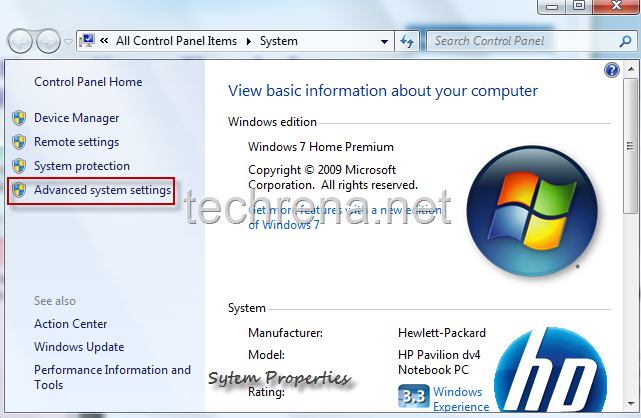
This will open the System Properties window, click on Advanced system settings.Alternatively you can use Windows + Pause/Break shortcut key to open the same.

System_properties_windows7

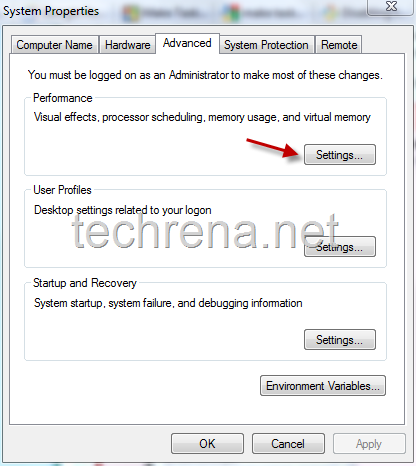
2. Now under the System Properties, go to Advanced tab and click Settings under Performance.

Advanced Settings in System Properties

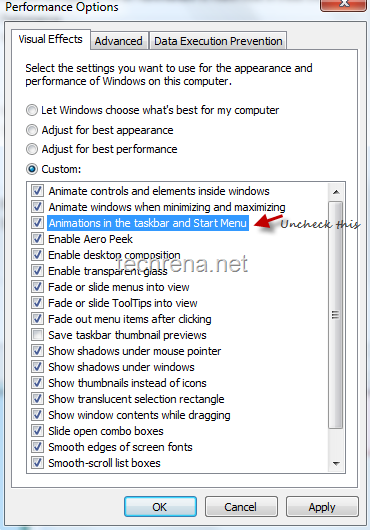
3. This will open up Performance Options windows, now there, uncheck “Animations in the taskbar and Start Menu”.

Performance Options under Visual Effects in Windows7

This option should be deselected since, you may not see much  difference after trying out this tutorial if you keep this option checked.

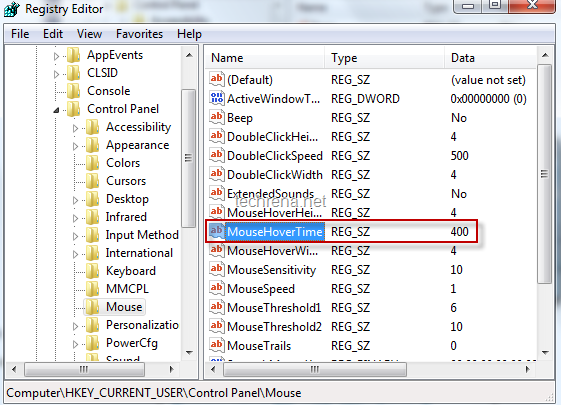
4. Now go to registry editor by typing regedit in the run command (shortcut: Windows + R).Navigate to

HKEY_CURRENT_USER > Control Panel > Mouse

Find the entry “MouseHoverTime” under it.

Mouse Hover Time in Regedit
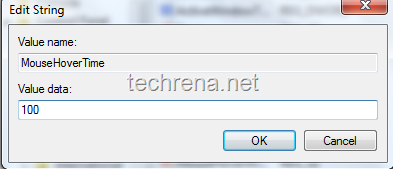
5.You will find a default value of 400 against it in the Data filed.Change this value to something like 100 or even less that that.

Edit MouseHoverTime string value

That’s it, now you have decreased the Mouse hover time which in turn will make the taskbar thumbnail previews to appear more faster.

You can subscribe to our RSS feed via email for more tutorials under Windows 7.

Synchronize Windows Clock With Internet Time Server

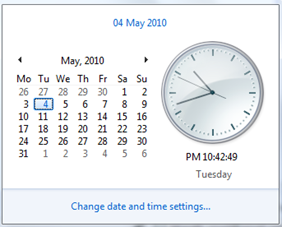
Windows 7 clock

Windows Clock as you all know is really got a makeover ever since Windows Vista has arrived and is really appealing to many Windows users, who earlier were using other software like Google Gadgets to see a analog clock  on their desktop instead of default Windows Clock.

Do you know that you can actually synchronize your Windows clock with several internet time servers if you have an internet connection.

This tutorial is based on Windows 7 and Windows Vista based systems.(Although it’s till valid for Windows XP).

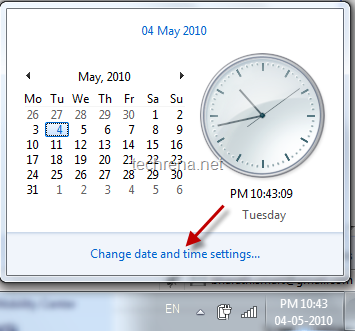
1. Open the Windows clock popup from your taskbar.Click on Change date and time settings.

change date and time settings in windows

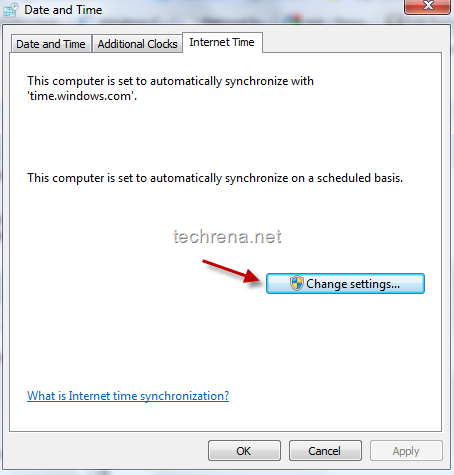
2. In the Date and Time settings window, go to “Internet Time” tab.Click on Change Settings.

change windows clock settings

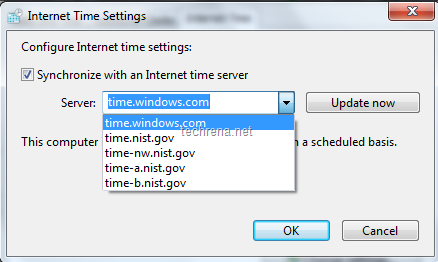
3. Check “Synchronize with an Internet time server”.You can either choose windows time servers or NIST servers.Click Update Now.

Internet time settings windows clock

You have configured your Windows clock to synchronize automatically with the internet time servers.

How To Create A System Repair Disc In Windows 7 & Vista

Windows logo

Creating a System Repair disc in windows vista and Windows 7 is very simple and straight forward process.System repair disc would be very much useful when in situations like your Windows encounters a serious problem and unable to start properly.

A system repair disc can be used to boot your computer.It also contains Windows system recovery tools that can help you recover Windows from a serious error or restore your computer from a system image

Let’s see how to create a Windows System repair disc in simple steps.

Steps:

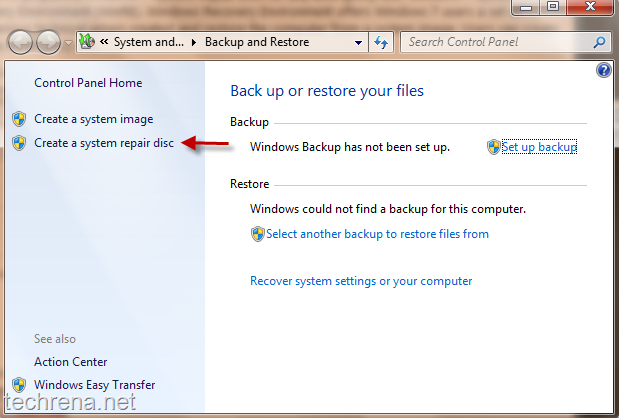
1. Go to Control panel> System And Security> Backup and Restore, click “Create a system repair disc”

backup or restore

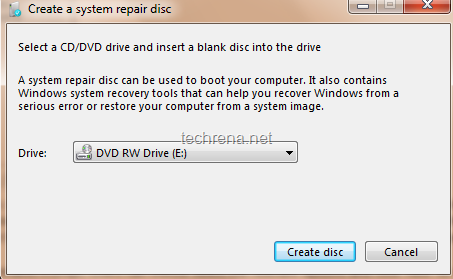
2. Now it’ll ask you to select the CD/DVD drive and insert the blank CD into it. Select the drive and click “Create disc’ once you have inserted the blank disc into the drive.

create system repair disc

3. Let the DVD/CD (we need a DVD for Windows 7 backup) burn.

4. Now you have successfully created a system repair disc.

Using the system repair disc:

1. Insert the system repair disc into your CD/DVD drive.

2. Restart the computer

3. Windows will automatically discover the system  recovery disc.You will be prompted “press any key to start the computer from the system repair disc”

4. If your computer primary boot device isn’t set to “CD/DVD" drive”, go to BIOS settings and change the boot order to configure your computer to start from a CD or DVD.

5. Choose your language settings and click “Next”.

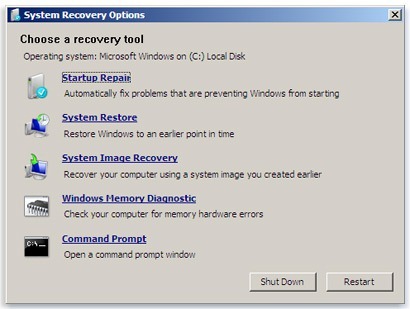
6. Select a recovery option from the following:

# Startup Repaid

# System Restore

# System Image Recovery

# Windows Memory Diagnostic

# Command Prompt

System_recovery _options

You may also refer to our earlier Windows 7 guides like Install Windows 7 using Microsoft USB/DVD tool, Install Windows 7 using bootable USB

You can also our exclusive posts about Windows 7

Display Windows 7 Build And Version Number On Desktop

Windows logo

Users who have earlier used Windows 7 beta test versions, might have observed a watermark on the right extreme of their desktop showing the current Windows 7 version and build number.However this has been removed in the Windows 7 final releases that we have been using right now.

However, to display this sort of watermark on the desktop would actually help the network administrators in troubleshooting the windows errors.This is particularly true if the client is located at a farhter place from the administrator and the administrator wants to know the which version and build of the Windows that the client is using.

There’s a simple registry tweak that makes this display watermark to appear on the Windows 7 desktop right above the task tray.Just follow the simple steps briefed below to apply this trick.

This trick applies to Windows 7, Windows Vista & Windows XP based computers.

Note: Please be cautious that you are going to work on the registry editor, any errant changes to the registry editor would result in a complete mess.Do make a backup of registry editor before starting this.

Steps:

1. Open run dialog box by pressing Windows key + R and type “regedit”, click “OK”.

regedit run command

2. In the registry editor, navigate to the following path:

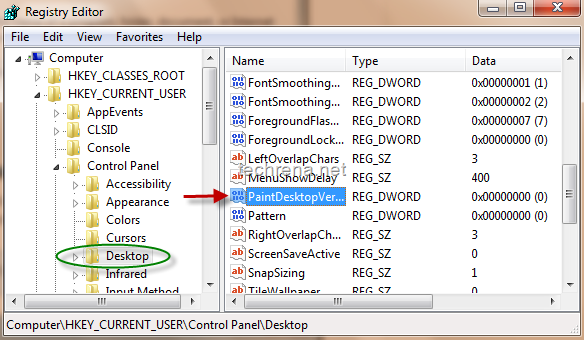
HKEY_CURRENT_USER\Control Panel\Desktop

paintDesktopVersion regedit Windows 7

Point to "the key “PaintDesktopVersion” , right click on it and select “Modify” (or alternatively double click on it)

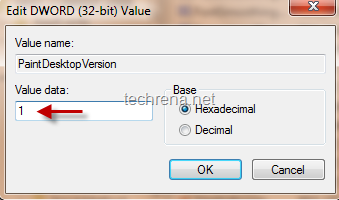
3. Change its DWORD (32-bit) value to “1” instead of “0” and click OK.

paintDesktopVersion regedit Windows 7 change value

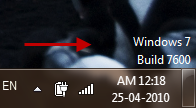
4. You may need to restart your system to see the Windows 7 version & build number watermark on your desktop.

windows 7 build info

Disable Annoying “This Program Might Not Have Installed Correctly” Alerts

Windows logo

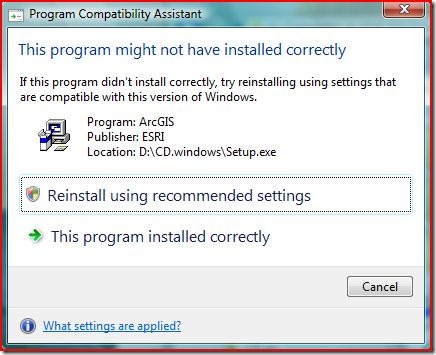
Program Compatibility Assistant is a service first introduced in Windows Vista and being continued in Windows 7.This service is intended to notify users when an installed program has some compatibility issues with the current operating system.Hence we see frequent Program Compatibility Assistant messages “This Program might not have installed correctly”.

If you install programs frequently (particularly when you install old versions of the programs) then you might be sick of these dialogue boxes and may want to disable these notifications.

This program might not have installed correctly error in Windows vista and Windows 7

There alerts are caused by a service called Program Compatibility Assistant (PCA) Service or PcaSVC in short.So stopping this windows service forever by changing the startup type to “Disabled” should serve the purpose.Follow these simple steps :

1. Press Windows + R button to start WIndows Run command.Type “services.msc” in the filed and click “ok”.

windows_run_command_services.msc

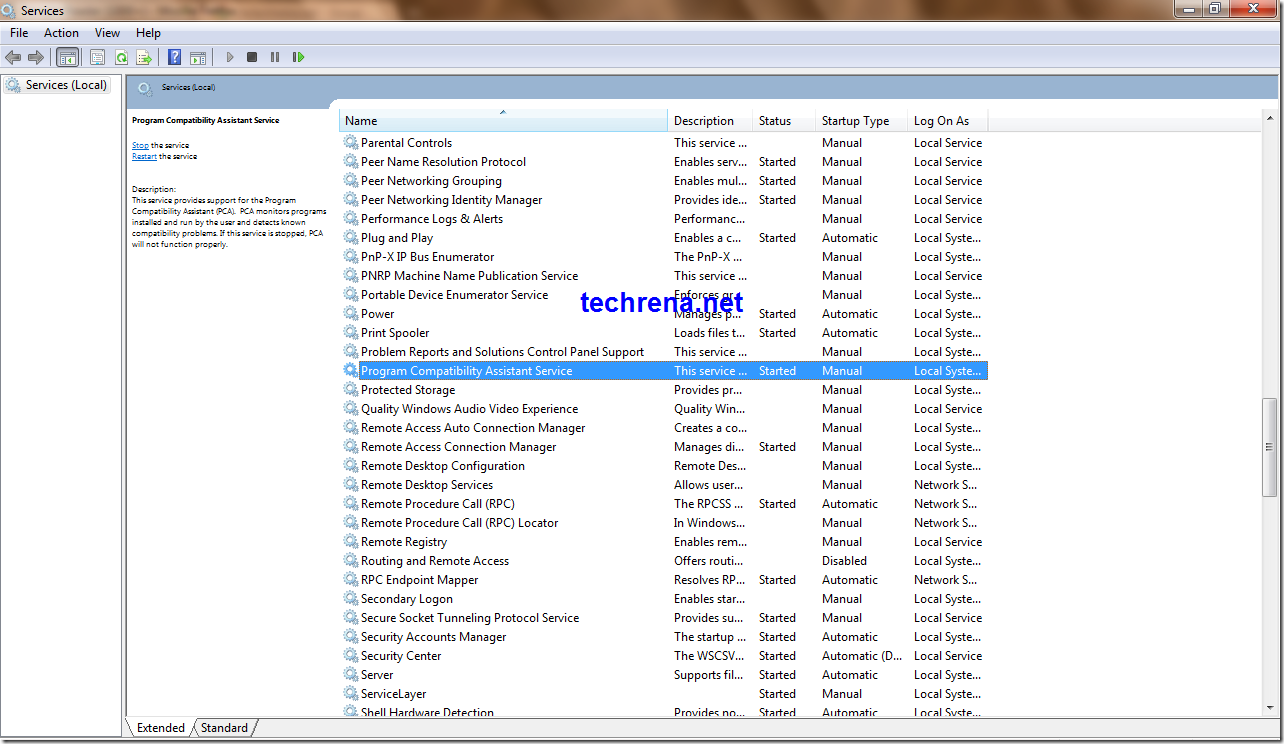
2. The Services window opens up.Find the service called “Program Compatibility Assistant Service” in the list.

Program Compatibility Assistant Service In Windows Services

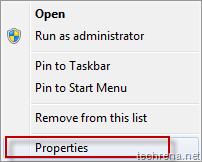
Right click on the Program Compatibility Service and choose “properties” from the menu.

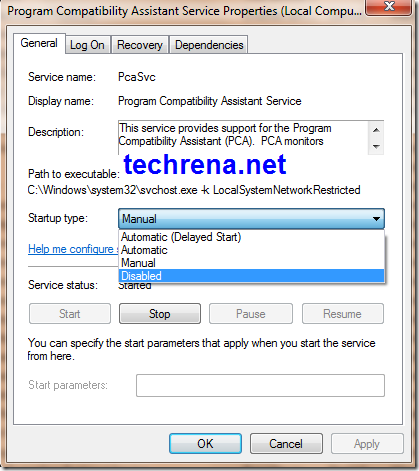
3. In the properties dialogue box, change the startup type to “Disabled” and click “Ok” to save the settings.

Program Compatibility Assistant Service Properties Window

It is that simple !! Now you have disabled the PCA service and no more annoying Program compatibility alerts for you.

Complete Tutorial: How To Disable Windows Error Reporting In Windows 7 ?

Microsoft Windows 7 Official Logo

Windows Error Reporting (WER), a technology (previously known as Dr. Watson),developed by Microsoft lets you report post-error debug information to the developer of the particular application that has just crashed or stopped responding.Windows Error Reporting has been introduced as a Windows service from Windows XP and is being continued in the later versions Windows Vista and Windows 7.By default, this Error Reporting service will be started automatically.

However for some reasons like you may get annoyed by frequent error reporting alerts or for privacy concerns etc., you may want to disable or stop Error Reporting in your Windows operating system (here it is Windows 7).If you are not sure how to stop Error Reporting in Windows 7, please do follow the steps outlined below:

Method-1: Using Action Center

1.Type “wer” in the Start menu search bar.Check the results obtained for this search in control panel (refer to the screen shots).

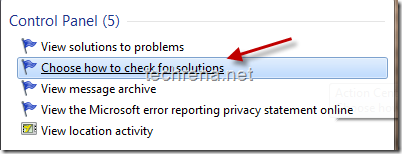
type wer in start menu

start menu search choose how to check solutions

2.Click on the “Choose how to check for solutions” item in the search results.It will open up the “Problem Reporting Settings” under Windows Action Center.
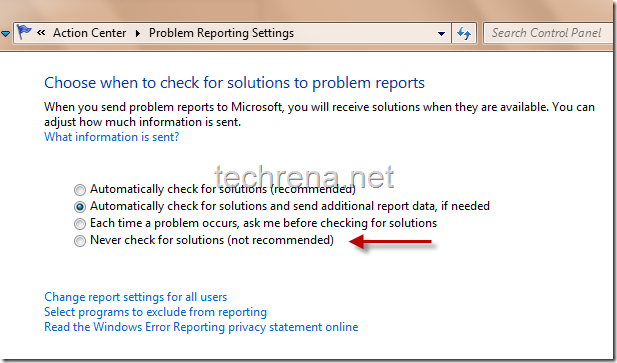
problem reporting settings action center windows7

3. By default the first or second option (“Automatically check for solutions”) will be selected by your Windows.If you want Error reporting to be disabled, select the last option “Never check for solutions” for completely disabling it or select the third option “Each time a problem occurs, ask me before checking for solutions” for moderating the error reporting alerts.Click “Ok” button down the window once you have selected your option.

Method-2: Disabling WER service

Windows Error Reporting Service function:

“Allows errors to be reported when programs stop working or responding and allows existing solutions to be delivered. Also allows logs to be generated for diagnostic and repair services. If this service is stopped, error reporting might not work correctly and results of diagnostic services and repairs might not be displayed.”

We’ll try to achieve the same previous settings result but this time via disabling the Windows Error Reporting(WER) service.To do this, follow..

1. Press Windows button + R to open the Windows Run command.Type “services.msc” in the run command bar and hit ‘OK’.
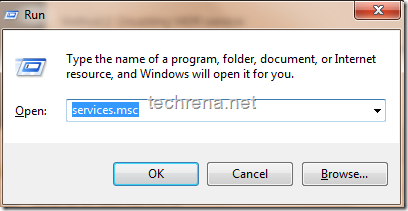
windows run command services.msc

2. It will open up Services window, where you can see list of all the services that are currently available on your Windows.Find “Windows Error Reporting Service” in this list.
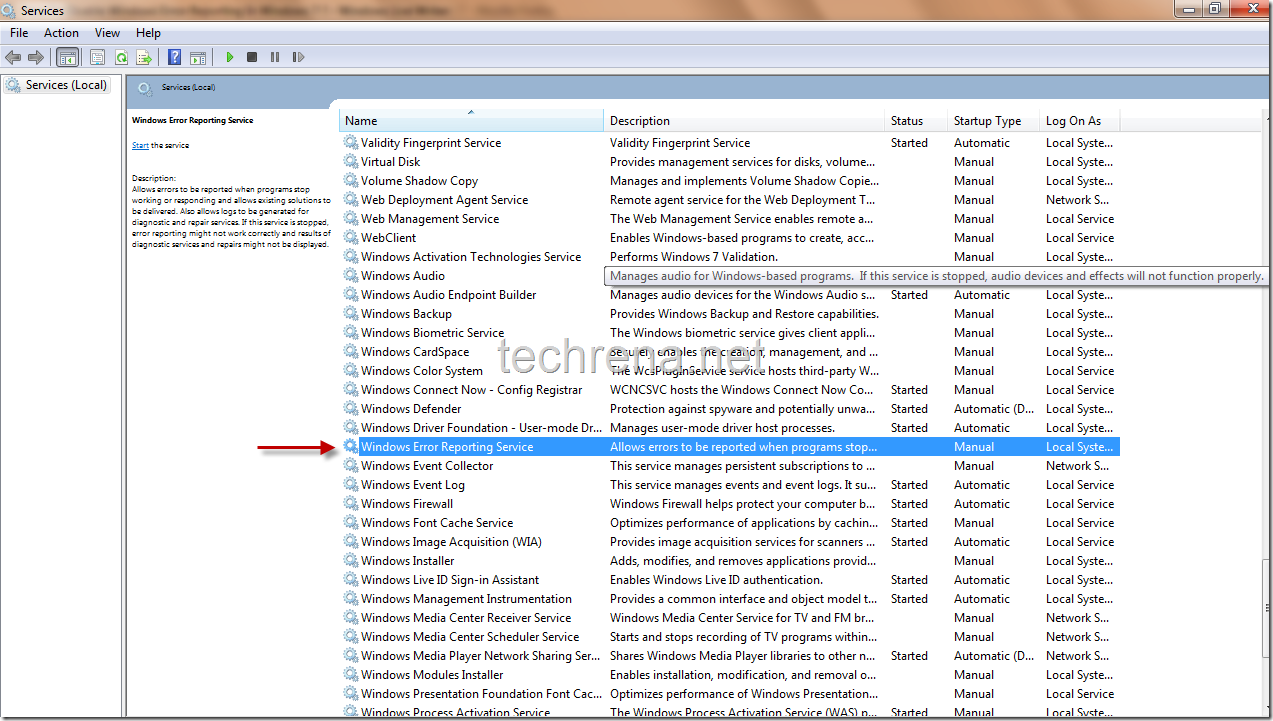
Windows Error Reporting Service

3. Right click on the Windows Error Reporting Service and choose “Properties’ that should open a new properties window.The startup type will be either in “Automatic” or “Manual” by default.To completely disable the service choose “Disabled” and press ok.
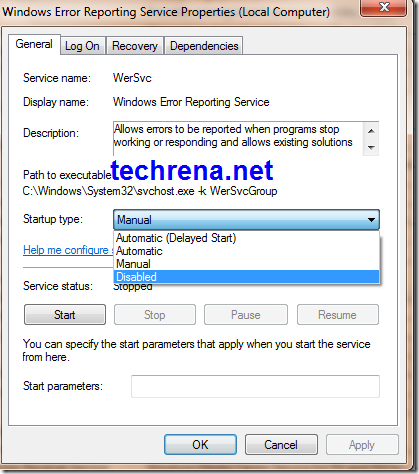
Windows Error Reporting Service Properties

That’s it, now you have disabled the Windows Error Reporting Service successfully.

Method–3: Using Registry Editor

Warning: Changing registry values without much knowledge will dump your entire Windows Operating system.Change them at YOUR OWN RISK.

1. Type Windows + R as in the previous case to open Windows run command.Type “regedit” in the command bar.
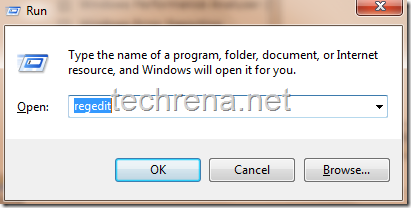
regedit run command

2.It will open up the Registry Editor window which will look like this.It contains three folders like navigable sub keys:

HKEY_CLASSES_ROOT ,

HKEY_CURRENT_USER,

HKEY_LOCAL_MACHINE,

HKEY_USERS,

HKEY_CURRENT_CONFIG.
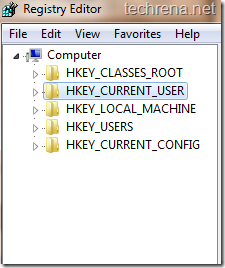
Registry editor windows 7

HKEY_CURRENT_USER is the one we want.Click on it to expand the sub registry key.

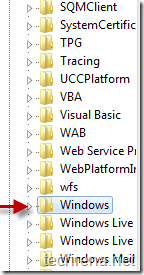
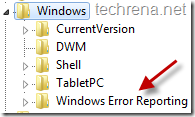
3. Navigate to HKEY_CURRENT_USER\Software\Microsoft\Windows\Windows Error Reporting sub key using the following screen shots carefully.
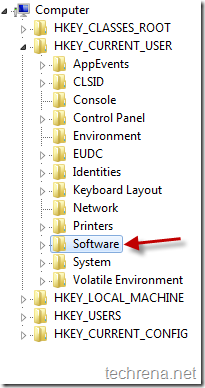
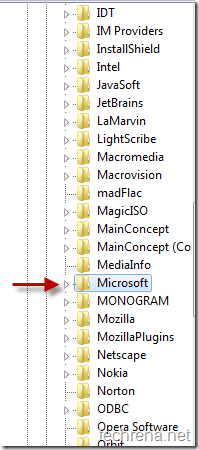
regedit HKCU navigation

regedit HKCU navigation 2 regedit HKCU navigation_3

regedit_HKCU_Windows_Windows_Error_Reporting_key

4. In the Dword list, find the registry entry by name “Disabled” (highlighted in the screen shot).By default the Date value of this dword will be “0” meaning that it is enabled.
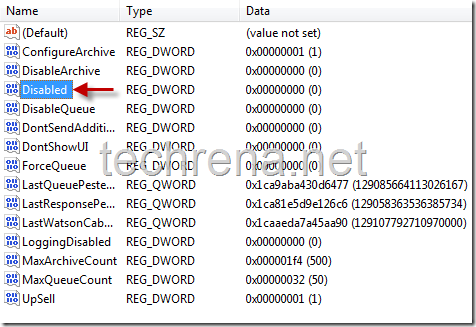
Disabled dword in WER subkey

Right click on the “Disabled” DWORD and choose “Modify”.In the value data filed, change its value to “1” instead of “0”.Click on to reflect the changes.

Now you have successfully disabled WER.


You may also want to read our previous guides on A-Z of Installing Windows 7, Installing Windows 7 on USB stick, Activating Windows 7, Resetting Windows 7 password (when you forget it and unable to retrieve it), Creating desktop shutdown shortcut in Windows 7,Enabling GOD mode in Windows 7, Partitioning hard disk in Windows 7 , Restoring previous versions of files in Windows 7, Install and Run Windows XP in Windows 7 Using VMware Player and much more..

Feel free to leave a comment here if you find problem somewhere in following these methods.
More "God Mode" Like Windows 7 GUID Shortcuts

Excited about Windows 7 unseen ‘GodMode’, the age-old windows trick which has got new life last week in Windows 7 ?

GodMode shortcut can be easily setup by creating a new folder and rename it as GodMode.{ED7BA470-8E54-465E-825C-99712043E01C} [Folder name can be anything you want, give it your desired name followed by a period (.) and then the GUID, here GUID part is {ED7BA470-8E54-465E-825C-99712043E01C} ]

Note: GUID stands for 'Globally Unique Identifier'

If “God Mode” alone isn’t enough for you, here comes Ed Bott with a nice collection of more such GUID shortcut tricks for you.His collection include tricks that work only on Windows 7 as well as some tricks can even work on Windows Vista too.I have put all of the tricks mentioned by Ed Bott in a nice table, so that it’d easier for you..Do make a note of these and you may bookmark this page for future reference.

1.Windows 7 Only (And Later Versions):

Shortcut GUID code
Action Center {BB64F8A7-BEE7-4E1A-AB8D-7D8273F7FDB6}
Backup and Restore {B98A2BEA-7D42-4558-8BD1-832F41BAC6FD}
Biometric Devices {0142e4d0-fb7a-11dc-ba4a-000ffe7ab428}
Credential Manager {1206F5F1-0569-412C-8FEC-3204630DFB70}
Default Location {00C6D95F-329C-409a-81D7-C46C66EA7F33}
Devices and Printers {A8A91A66-3A7D-4424-8D24-04E180695C7A}
Display {C555438B-3C23-4769-A71F-B6D3D9B6053A}
HomeGroup {67CA7650-96E6-4FDD-BB43-A8E774F73A57}
Location and Other Sensors {E9950154-C418-419e-A90A-20C5287AE24B}
Notification Area Icons {05d7b0f4-2121-4eff-bf6b-ed3f69b894d9}
Recovery {9FE63AFD-59CF-4419-9775-ABCC3849F861}
RemoteApp and Desktop Connections {241D7C96-F8BF-4F85-B01F-E2B043341A4B}
Speech Recognition {58E3C745-D971-4081-9034-86E34B30836A}
Troubleshooting {C58C4893-3BE0-4B45-ABB5-A63E4B8C8651}

2.Windows Vista And Windows 7:

These GUID shortcuts work on Windows 7 as well as on Windows Vista versions.
Shortcut GUID code
Administrative Tools {D20EA4E1-3957-11d2-A40B-0C5020524153}
All .NET Frameworks and COM Libraries {1D2680C9-0E2A-469d-B787-065558BC7D43}
All Tasks (Control Panel) {ED7BA470-8E54-465E-825C-99712043E01C}
AutoPlay {9C60DE1E-E5FC-40f4-A487-460851A8D915}
BitLocker Drive Encryption* {D9EF8727-CAC2-4e60-809E-86F80A666C91}
Computer Folder {20D04FE0-3AEA-1069-A2D8-08002B30309D}
Default Programs {17cd9488-1228-4b2f-88ce-4298e93e0966}
Ease of Access Center {D555645E-D4F8-4c29-A827-D93C859C4F2A}
Font Settings {93412589-74D4-4E4E-AD0E-E0CB621440FD}
Get Programs {15eae92e-f17a-4431-9f28-805e482dafd4}
Manage Wireless Networks {1FA9085F-25A2-489B-85D4-86326EEDCD87}
Network and Sharing Center {8E908FC9-BECC-40f6-915B-F4CA0E70D03D}
Network Connections {7007ACC7-3202-11D1-AAD2-00805FC1270E}
Network Folder {208D2C60-3AEA-1069-A2D7-08002B30309D}
Parental Controls {96AE8D84-A250-4520-95A5-A47A7E3C548B}
Performance Information and Tools {78F3955E-3B90-4184-BD14-5397C15F1EFC}
Personalization {ED834ED6-4B5A-4bfe-8F11-A626DCB6A921}
Power Options {025A5937-A6BE-4686-A844-36FE4BEC8B6D}
Programs and Features {7b81be6a-ce2b-4676-a29e-eb907a5126c5}
Sync Center {9C73F5E5-7AE7-4E32-A8E8-8D23B85255BF}
System {BB06C0E4-D293-4f75-8A90-CB05B6477EEE}
User Accounts {60632754-c523-4b62-b45c-4172da012619}
Windows Firewall {4026492F-2F69-46B8-B9BF-5654FC07E423}
Windows SideShow** {E95A4861-D57A-4be1-AD0F-35267E261739}
Windows Update {36eef7db-88ad-4e81-ad49-0e313f0c35f8}

* For Ultimate versions only)

** May Slowdown your system

Warning: Trying some of the above shortcuts created problems in some machines running 64-bit Windows, please do take note of it particularly if your machine is Windows Vista 64-bit version based.

The procedure is same as I had posted earlier for GodMode setup,

Create an empty folder

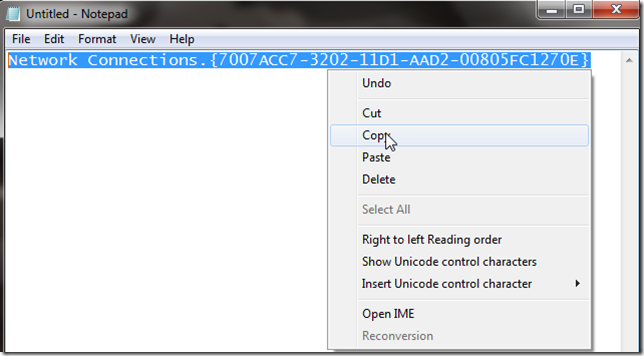
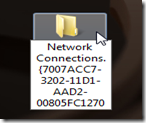
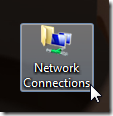
Use the shortcut name that you want to give it, ex: “Network connections” followed by a period (.) following it should be the corresponding GUID shortcut code.

Networks connection GUID GodMode code

Renaming for Networks connection shortcut

Networks connection shortcut

You can try any of the above GUIDs following the same method.

Source, ZDNet

Enter your email address:

Delivered by FeedBurner