If you have just upgraded your operating system from Windows XP to the latest Windows 7 version, you might have some troubles getting used to using the options and features in Windows 7.This is where we thought we could help you and hence we are starting a series of ‘Windows 7’ tips articles.These are compiled from the problems that we have faced when we started using this latest OS from Microsoft.
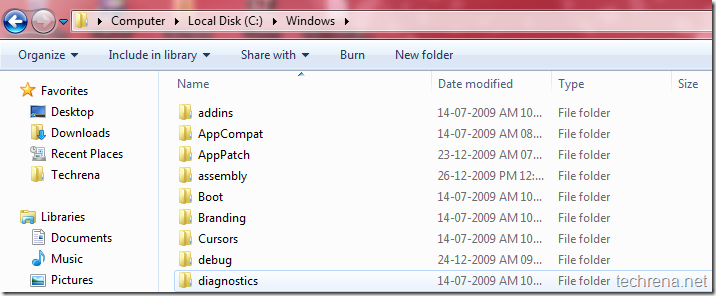
I’m starting with the correct way to see hidden files and folders in Windows 7.The one that we do in Win XP with a couple of clicks if you are used to it.Classical method to enable hidden folders in Windows is to go to “Folder Options” from the “Tools” menu from the top section of the window.The problem with Win 7 is that you don’t find “Tools” menu in the top section.It’s hidden actually as you can spot in the below pic.
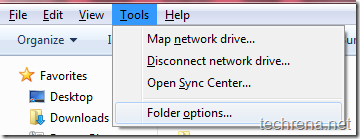
Can’t figure it , right?? Well, as I said it’s hidden.To see it, press ALT button.Now you see the hidden menu appearing in the window.Now you can see those “File, Edit, View, Tools, Help” options in the window.

Now it’s simple from here on, just go to Tools>> click Folder options, it’ll open Folder options window.
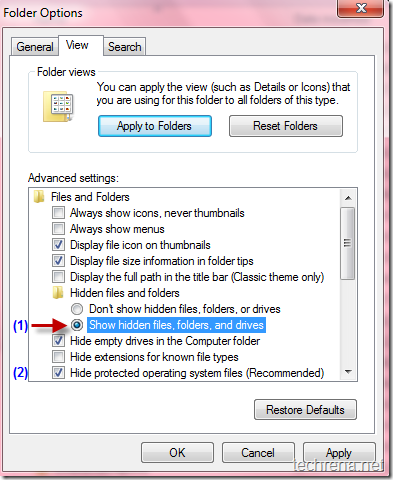
Now Go to “View” tab and check the “Show hidden files, folders, and drives” option.
Also sometimes you may want to see the hidden protected operating system files in your system, to enable this, uncheck “Hide protected operating system files” option.
That’s it, you have now successfully enabled hidden folders and files to show up in your windows.This process will work unless you have some virus running your system in which case your folder options may be disabled.You can refer to this guide on how to handle such a situation.
More Tips: If you have forgotten your Windows 7 Admin password, read this guide to recover or reset windows 7 password.


ada setup hidden y?