Uninor Unlimited Mobile Internet Plans Tariff

uninor

Matching up to the mobile unlimited internet plans of the other mobile operators in India (Airtel RC 98 for instance), Uninor has launched two affordable unlimited mobile internet plans MyConnect 90 and MyConnect 9 for its customers. Uninor is a joint venture of Norway’s Telenor and India’s Unitech group. Debuted in 2009 in India, the mobile network is still relatively considered as infant in a country which is considered as the one of largest countries with high mobile penetration.

Uninor’s new mobile internet plans are in fact far more affordable than Airtel’s RC 98 and unlimited plans of some other mobile operators. If we compare the Airtel’s RC 98 with Uninor MyConnect 90:

Uninor unlimited internet 90

Airtel RC 98 Vs Uninor MyConnect 90

>> Airtel’s data transfer limit is 2 GB where as Uninor’s Rs.90 pack gives internet browsing worth 3 GB for free

>> Uninor is offering free browsing for Twitter, Facebook & LinkedIn sites (meaning that the data browsed will not be counted under the data usage limit)  where as Airtel doesn’t. Considering  fact that most of the youth in India spend their browsing these social networking sites, it saves a lot of data

>> Uninor being a relatively new entrant with less subscriber base, hence the network congestion should be less and this in turn should result in a better browsing speeds at least theoretically when compared to Airtel with huge number of users like you trying to access the internet.

Uninor Unlimited internet tariff plans:

Internet Plans Price Benefit Validity Charges
MyConnect 90 Rs. 90 Free internet browsing up to 3 GB 30 days 10p/10kb beyond free usage
MyConnect 9 Rs. 9 Free internet browsing up to 60 MB 3 days 10p/10kb beyond free usage

Advantages:

– Unlimited internet access (3 days for Rs.9 pack, 30 days for Rs. 90 pack)

– Free browsing for social networking sites like Facebook, Twitter and LinkedIn

Is Your WordPress Internal Files Structure Coming In Google Search? Read On…

If you are a webmaster or managing a blog, some day or the other you need to sit and dedicate time to optimize your website, and you start it with it editing core internal files and if you are unlucky,  you may end up messing up things without being really aware of what you are doing.

This happened to us yesterday, we were editing some internal files of this blog’s WordPress installation files with an insight to optimize the loading time of our blog.We sat for hours and did edit some files.We could at least do something and slept peacefully with some satisfaction.

Then the next day BANG !! we were astonished to find some of the WordPress internal files that otherwise shouldn’t be publicly visible were all over the Google.That’s the moment we spotted the mess (look at the screenshot below) that happened while editing our site files yesterday and started working to fix them.You understood what the problem was, right? Don’t panic, there are lots of people like us, who are unknowingly keeping their site internal files open (see examples).

Wordpress internal files in Google search

How To Fix This?

Step 1: We tried to understand why this is happening?

Reason: The permission properties of inner files of the site are site to ‘public’ that means anyone can see the internal file structure of your blog/site.

Step 2: Having found out the mistake, the solution is simple (at least as it seems):

Permission properties of these files/directories should be made ‘private’ and indexing of these files should be disabled

Step 3: There are two ways to do disable the indexing of files so that other people can’t see what’s inside your internal directories:

# 1 You can place a index.html file in all the folders which are coming ‘index of..’ structures.

# 2 Edit your .htaccess file to disable private indexing of the folders.

Step 4: While the 1st method is relatively simple one to follow, but it takes time as you need to put index.html files in all the directories that are visible in indexing.

Step 5: The optimal method according to us is editing your .htaccess file to disable indexing of folders.

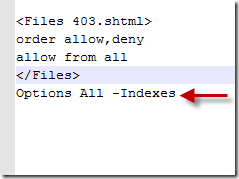
Options All –Indexes

Just add the above code in your .htaccess file (edit through notepad) which is your site’s root folder save it and write it back to your root folder.

Options ALL Indexes in htaccess

Step 6: The problem is solved, now open your Wordpres internal files wihtout logging into the site and you’ll notice the 403 error being returned to you.

This solved the problem in our case.I’ve decided to post this because someone who finds themselves in the same situations as we were yesterday would find it useful to some extent at least.