Microsoft Internet Explorer 9–Security Flaws, Bugs and Fixes? Use or Dump? [Advisory]

The German government urged the public on Tuesday to temporarily stop using Microsoft’s Internet Explorer after a bug was discovered which is yet-to-be repaired. The German government’s Federal Office for Information Security, or BSI, said it was aware of targeted attacks and that all that was needed was to lure Web surfers to a website where hackers had planted malicious software that exploited the bug.

This security flaw in IE may enable attackers to exploit the bug, targeting hundreds of millions of computers, to infect the PC of somebody who visits a malicious website and then take control of the victim’s computer.

ie9-logo

Our advisory in using the IE browsers except IE10 are:

  • Though IE browsers are considered to be most secure ones, we advise for now you look at others
  • The IE big fix will be released in the next few days by Microsoft and will be available for download only then
  • There have been a few attempts to exploit the bug, but German officials claim that this issue can be misused in large scale hacking
  • Users should take proactive actions to ensure that their PCs are well protected
  • For time being we advise all users to download and install the Enhanced Mitigation Experience Toolkit (EMET) version 3.0 which is designed to help prevent hackers from gaining access to your system

Microsoft claims that the Fix will be an easy-to-use, one-click, full-strength solution any Internet Explorer user can install and it won’t even require a reboot of your computer.

We hope that the Fix is releases ASAP and we are sure that Microsoft is working on it.

Facebook Timeline Is Now Available For Everyone; Here’s How To Get It For Your Profile

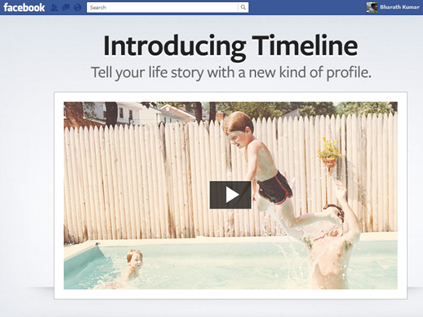
Back in September this year, Facebook announced the new feature called “Timeline” and made it available to the developers initially. Facebook Timeline is basically a new way to list your entire activity of your life in a Chronological order, right from your birth to the present moment. With a neat and visually appealing interface, the Timeline lists all your major events in your life in the chronology. No wonder some call it as your virtual biography (though we differ!).

Facebook timeline

The Timeline, which up until a few days ago was in “beta”, got its public rollout to the users in New Zealand last week. And today the social networking giant has announced that the Facebook Timeline will be available to the users across the globe starting today. The company has also said that those who activate the feature will initially get a 7-day review period during which they can review and choose what content should appear to their friends.


How To Get The Timeline For Your Profile:

We have published a detailed guide earlier on how to activate the Facebook Timeline for your Facebook profile. But this feature was in “beat” stage at that time and it we had to use a hack to get it enabled. Now that this feature is available for all, the process is much simpler and straightforward.

Navigate to this page on Facebook, and click the “Get Timeline” button that you see at the bottom. This will automatically activate the Timeline for your profile.

Get TimeLine

Facebook Timeline View As

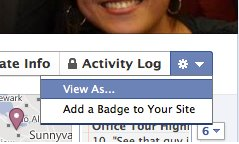
The next thing you have to do is to view your Timeline and manage the content that is visible to your friends. To do this, find and click on the gear menu which will be present near your profile name in the Timeline view. Select “View As…” from the dropdown menu. This will show how your profile will appear to a specific friend or public once it gets published.

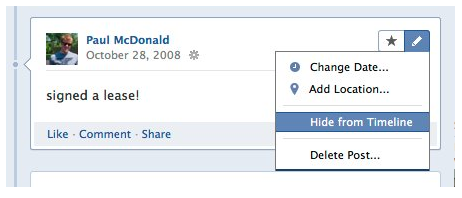
Go through the events/posts on your profile. Should you decide to hide a particular post from your friends (or specific friends) or public, all you need to do is to click on the “Edit” pencil icon right next to that post and choose “Hide from Timeline”.

Hide Post from Facebook Timeline

Supposing that you have activated Facebook Timeline today i.e December 15th, you are allowed to edit, finalize and publish your Timeline to your profile. In case you choose to wait, your Timeline will get published automatically on December 22nd (i.e., on the seventh day). If you feel your Timeline is ready to go public, you can always hit the “Publish Now” button to publish it.

Facebook timeline publish now button

We suggest you watch this video to make yourself acquainted with the features of the Timeline.

[Tip] How To Activate Facebook Timeline

Facebook timeline ad

Facebook has launched a new feature called Facebook Timeline, which is basically portrayal of your entire activity on the Facebook in a chronological order. This is pretty much different from the regular  profile view and offers a new and interesting insight into what you have been up to on the Facebook.

Sadly, Facebook hasn’t enabled this feature for all the users right now. However, the feature has already been activated for the open graph developers. If you are a normal user like me on the Facebook, you may have to wait a few more weeks to get this feature enabled for your account. But if you are curious enough to get it immediately, TechCrunch has come to your rescue.

As there is no direct way of enabling this feature right now for your profile, we’ll have to use the workaround suggested by Greg Kumparak. The process involves enabling developer mode and creating a dummy developer app which will be accessible only to you. Though the entire process isn’t a single button-click-enable thing, but yes, it is very straightforward indeed. All you need to do is to follow the steps briefed below:

Steps:

1. Login to Facebook with your credentials.

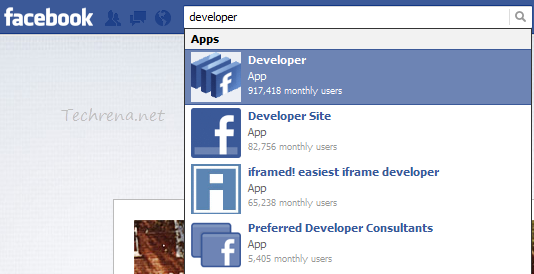
2. Type “developer” in the search box and hit the first result (Developer, type: App) under the Apps section.

Facebook Developer app search

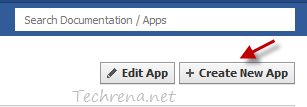
3. Click the “Create New App” button on the right corner of your screen.

Create-new-app-Facebook-Developer-app

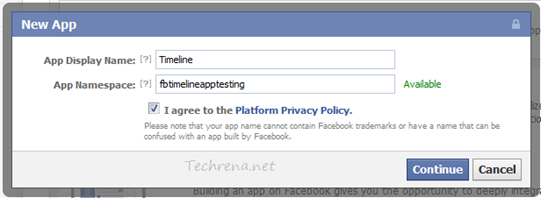
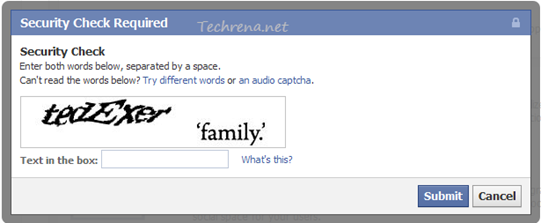
4. Choose a display name and namespace for your new app. Keep in mind that the chosen namespace should be unique and is subject to availability (Don’t use words like ‘Facebook’ or ‘FB’ in the App Display Name as they are not allowed). Read and agree to the Facebook Platform Policies and click Continue, complete the security check to proceed to the next step.

Facebook Developer new app parameters

Facebook new Dev app security check

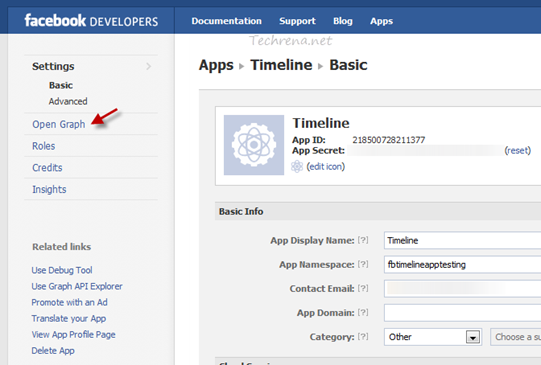
5. Now you will be taken to the ‘Basic Settings’ page for the app. Look for “Open Graph” link on the left sidebar and click on it.
Facebook developers new app Open Graph Link

6. You will be then asked to edit the action properties followed by object type settings and another page to create an aggregation. Just keep the default values and in each one and proceed to the next step.

7. Now open the Facebook homepage and you will then notice an invitation to access Timeline.

8. You are done.

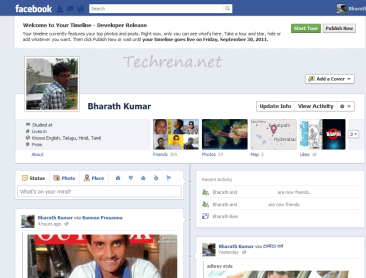
Facebook timeline screenshot

Facebook Timeline Start Tour or Publish now

Your Facebook’s Timeline right now will appear only to you. You can always click the “Publish Now” button or wait for a week’s time for your timeline to go live. You cal also access your timeline by pasting the following URL on your browser:  http://www.facebook.com/username?sk=timeline.

Changing Google Chrome’s Default Search From Regional Google To Google.com

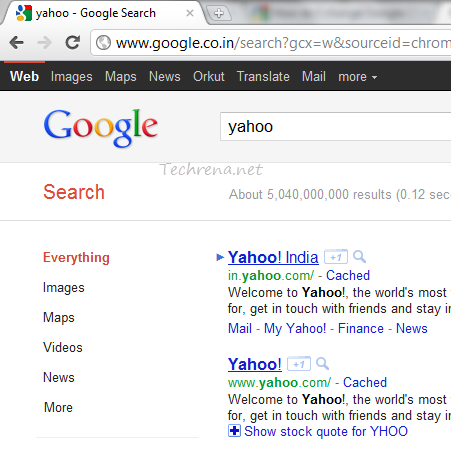
If you use Google Chrome much and love searching right from the address bar, you might be knowing that any search you perform from the address bar will take you to a regional Google search like Google.co.in or Google.co.uk etc.

Google Chrome Addess bar Search regional

In case you want the search results from the more generic version of the Google (i.e google.com) and are looking to change the settings so as to reflect the same in the Google Chrome’s address bar default search, here are the steps you need to follow:


Steps:

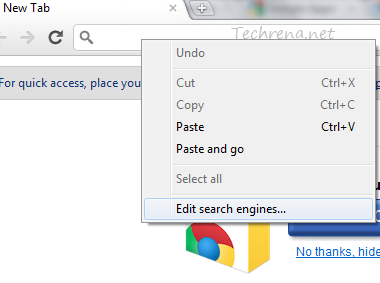
1. Right click on the address bar and choose “Edit Search Engines”.

Google Chrome Edit Search Engines

Alternatively you can access the search engines settings by typing the following URL in the address bar:

chrome://settings/searchEngines

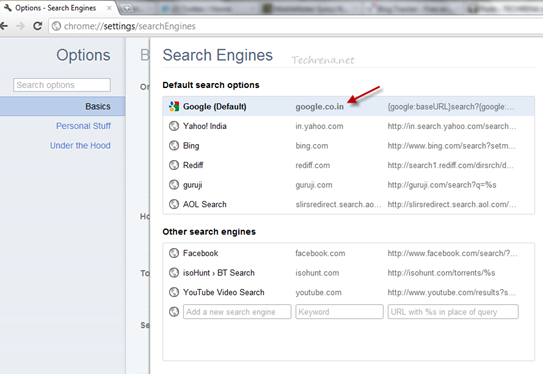
2. You will notice that the regional version of the Google search engine has been set as your default search engine under the ‘Default Search Options’ as shown in the following screenshot.

Google Chrome Search Engines list

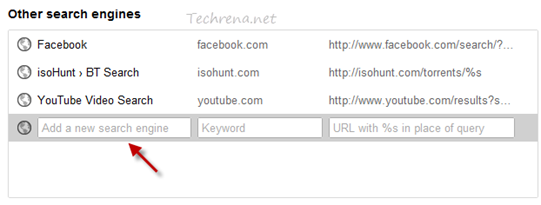
3. We need to add a new custom search engine (in our case the international version of the Google) and then make it the default search engine.

Google Chrome add a search engine

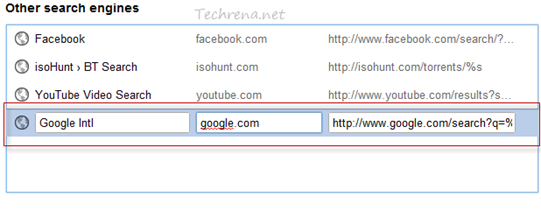
To do that type the name of your new search engine in the empty box and then type the keyword (There are no rules in filling these two boxes). That now leaves you with the URL box which holds the key. As we need a international version of the Google to serve us, key in this value (and hit Enter):

http://www.google.com/search?q=%s


Google Chrome Search Engines add new Google

4. Now that we have added a new search engine, we are now left with making it the default search engine. Hover your mouse over the newly added search engine and you will now see an “Make default” option right next to the search engine entry. Click the ‘Make default‘ button as shown in the screenshot:

Google Chrome Search engines newly added


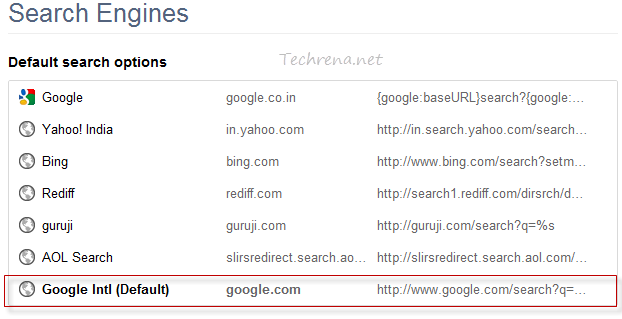
5. You will now notice that your newly created search engine has been made the default search engine and is found under the ‘Default Search Options’ listing.

Google Chrome Search Engines new default search options

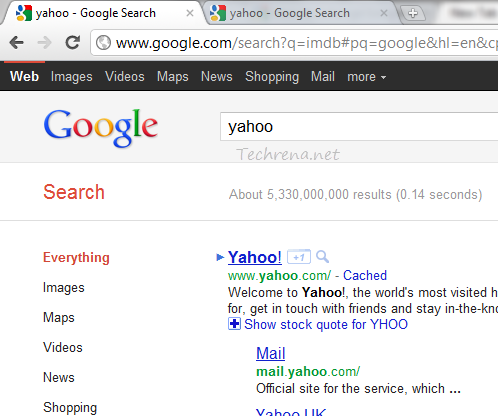
6. You have successfully changed the default search engine of your Google Chrome and you might want to test it.
Google-Chrome-Addess-bar-Search-international

Perfect! Isn’t it?

Amazon Web-based Kindle Cloud Reader Launched With iPad Compatibility

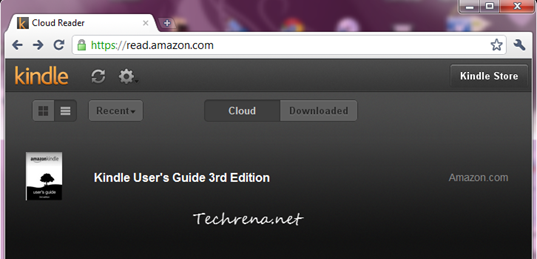
Amazon has just launched a new Kindle Cloud Reader, a tit-for-tat webapp for the Apple’s policy changes to its iTunes App Store, saying that it would be charging 30 p.c of the revenue of every purchase that was made within the app (called in-app purchases). When other popular eBook reader companies like Kobo and Barnes & Noble’s NOOK had to disable the in-app purchases of eBooks and other subscriptions in order to comply with the Apple’s policies, Amazon has found a new workaround to the problem. Using the web based Kindle Cloud Reader users can shop, read and download the subscriptions from the Amazon’s Kindle Store.

Kindle-Cloud-reader-chrome

The website is optimized for viewing on iPad (and we know why!) and currently supports Chrome and Safari on your PC, Linux or Mac. It will soon be available for iPhone as well.

How To Use Amazon Kindle Cloud Reader:

If you are using any of the above mentioned browsers, just type http://read.amazon.com in your browser and you will be prompted to install a small plugin to be able to run the web version smoothly. One good thing about the Kindle Cloud Reader is that it can enable HTML5 powered offline reading for all of your Kindle subscriptions. Of course, if you are on a PC, having the standalone Amazon Kindle application is always a better option but then we always want more choices, don’t we?

Kindle Cloud webapp may not be as good as the iPad native app but do we still need to complain having known the fact that it was just created solely for the purpose of getting around the Apple’s App Store rules?

[More at: Amazon]

[Tip] Play Angry Birds Online From Any Web Browser

Angry Birds logo

Angry Birds, the popular iPhone game which later made its way to Android and other smartphones (with touchscreen) is now available online. Yesterday during the 2nd day of Google I/O 2011 developer conference, Peter Vesterbacka, head of ‘Rovio’ announced the launch of web based version of the Angry Birds game. The web-app version of the game has been apparently built using the Google Web Toolkit (GWT).

Though the web app is designed keeping Google Chrome in view, the game still works in most of the modern browsers like Firefox, Internet Explorer, Safari etc.

Angry birds online game

How To Play Online:

Chrome users, can head over to this Chrome web store page and install the app to get started (already more than a million users using the app!).

If you are on any other web browser, visit Chrome.angrybirds.com and start playing the game right away! This is a beta release and the game is currently having 63 levels (7 additional special levels for Chrome). The game is available in 2 version; SD (Standard) version and HD version.

Quick Links: SD Version | HD Version

Slow Performing Add-ons In Firefox

Firefox add-ons

Firefox became popular when the internet was ruled by the Internet Explorer because of the whole lot of add-ons that users can install to get extra features that aren’t built natively into the browser. Since then, all other browsers had to provide similar support for extensions/add-ons to stay alive in the competition. Agree that add-ons in Firefox are a boon to browser but often they are criticized for slowing down the performance of the browser.

As Mozilla says in a blog post,

there are some add-ons that cause extreme slowdowns in Firefox because of poor coding practices, in extreme cases adding 30 seconds to start-up time.i

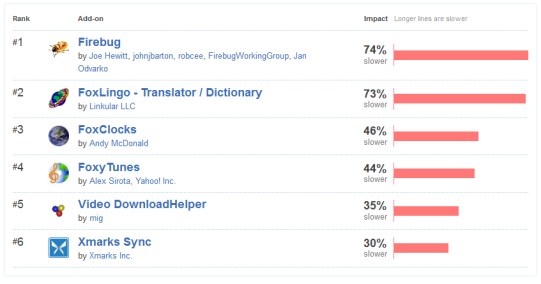
So if you install 10 such add-ons, Firefox start-up time may even slowdown by some minutes in extreme cases. Mozilla noticed the importance of spotting such add-ons that are causing significant performance issues in the Firefox and they even made the data public. Head over to this page where you will see a list of few top add-ons that are slowing down the start-up time of your Firefox.

firefox slow add-ons

As you can see, if you are a web developer and installed the popular “Firebug” add-on, it slows down Firefox start-up time by 74%. As of now, the list also includes other popular add-ons like “FoxyTunes”, “Video DownloadHelper”, “Xmarks Sync”. If you are a developer, you don’t want your own add-on to be featured in that list, right? Don’t worry, Mozilla wants to work with developers to solve the issues and has even listed some best practices for improving startup performance. If you have installed one or more add-ons that are listed under the slow performing add-ons page, try disabling them to improve your Firefox start-up time and performance.

Save Web Forms And Refill Data Easily With Simple Form Filler User Script

Simple Form Filler Userscript

When you are browsing the internet, quite often you need to fill out web forms. Modern day browsers have become more intelligent and most of them offer an option to ‘auto-fill’ the web form using the data you previously entered while filling out the web form. But then, the in-built browser’s auto-fill option (for most of the browsers) is not complete and can easily ditch you when you need it the most.

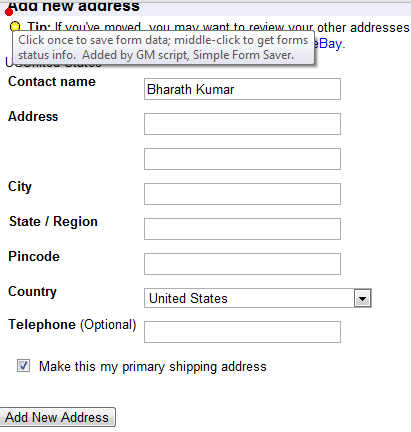
Thankfully, there are many web form savers available as browser add-ons but  ‘Simple Form Filler’ just beats out the rest in serving the purpose. Simple Form Filler is a userscript that you can install on supported browsers like Firefox, Chrome etc. and it adds a small red dot-like button to all the webpages that you browse. The usage is pretty much simple; Just fill out the form on any webpage and click on the red button and it will save the entire form. So in case if you need to comeback and fill the form again by re-entering the data, just click on the button again and it will fill out the form with your saved data and thus saving you a lot of time, particularly when you are in a hurry.

IRCTC ticket reservation

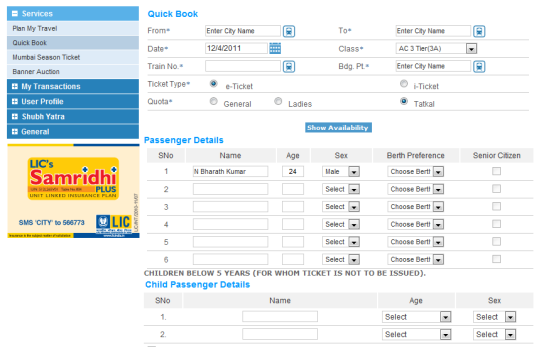
And if you live in India, you might know how hard it is to book a train ticket under ‘Tatkal’ scheme just after 8 AM. The server crashes, webpage doesn’t load properly and so on. You need to re-enter the data in the web form all over again and again. And here is where this userscript saves you. All you need to do is fill in the form for the first time and click the red button to save the data. In case of any failure, you come back to the form and hit the small red button again and it automatically fills in the form for you with the data that you entered previously. That way, you can save time in filling in the form multiple times.

Install Simple Form Filler GreaseMonkey Userscript [Userscripts.org] Via [LifeHacker]

[Tip] Turn Off Auto-Saving Email Addresses To Contacts Feature In Gmail

Gmail logo

Google’s Gmail has got whole bunch of features that makes it as one of the top free email service providers on the internet. But who says that it hasn’t got any annoyances? It surely does. Gmail automatically saves email address of the person and adds it to your contact lists when you communicate with that sender even though you might not communicate with him future. Most users would find it annoying as your contacts list just keeps growing bigger with additions of such unknown contacts. If you look at it from the other side, it indeed is a nice feature for so many who are just lazy to manually add those email addresses to their contact list. I don’t know why it took so long, but apparently Google has decided to let users have the option of turning this ‘auto-save contacts feature on or off.

Steps:

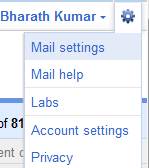
1. Login to your Gmail and click “Mail settings link found at the extreme top right corner of the window.

Gmail mail settings link

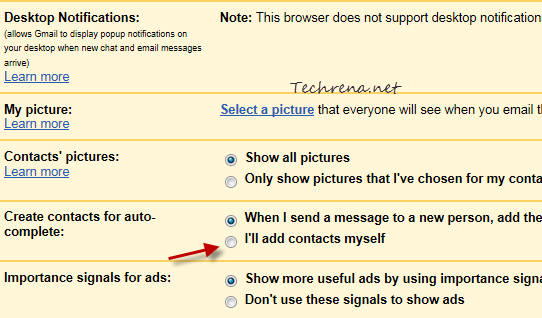
2. Go to ‘General’ tab under the settings. Scroll down until you find the settings “Create contacts for auto-complete”.

3. Choose the “I’ll add contacts myself” radio button and click the “Save Changes” button.

gmail contacts auto complete settings

That is it. But then, keep in mind that you will have to add contacts manually once you have turned this feature off.

[Tip] Use Google Talk Guru To Get Quick Answers In Chat

Google talk guru

If you think you can chat pretty much faster than say doing a web search, Google has some good news for you. Now you can get all your information more quickly while you chat with your friends without switching the windows. Google has recently launched an experimental feature called ‘Google Talk Guru’, a chatbot  that answers most of the information queries that are associated with Google SMS (currently available in the US only). The bot allows you to get information relating to weather, sports scores, simple calculations, definitions, translations, currency and metric conversions etc.

Getting Started:

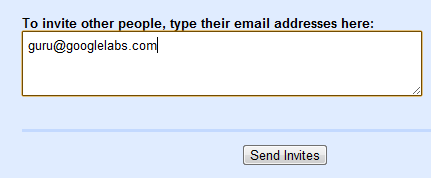
google talk guru chat invitation

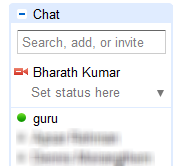
To get started, just send a chat invitation to guru@googlelabs.com and the Google Talk Guru should immediately appear in your chat list, no matter what chat client you are using.

Google talk guru on chat list

Now that you have got the chatBot on your list, all you have to do is to send your query in the form of instant message. In case you are wondering what sort of queries that you can type, take a look at the following examples to get a brief idea about using the service.

Google talk guru examples

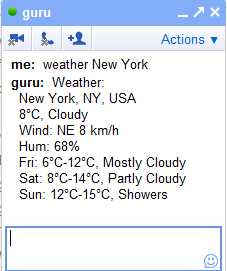
If you are familiar with the Google SMS commands, this shouldn’t a big problem as Google Talk Guru supports the majority of the kind of queries that work with Google SMS. For instance, if you want to get weather information of your city, just type ‘weather (your city name)’ and send an IM. You should immediately get the weather information related to your city:

google talk guru weather

You can also ping the Google Talk guru bot with the calculations and get the result instantly.

google talk guru calculator example

Go ahead and try pinging the Google Talk Guru with various queries to get information that you need.