Delete Hiberfil.sys from Windows 7, Vista & XP By Disabling Hiberation

hibernate

Running out of space in C Drive?

If you are running out of space in C drive and if you don’t want to delete or move any data from it, you can probably try these two things:

1. Disable System restore or delete the restore points.

2. Delete hiberfil.sys file from your hard disk.

HIBERFIL.SYS is a Windows system file managed by Windows for the purpose of Hibernating the system. Hibernation mode of Windows allows you to completely save the current process and power off your computer where the system will not require any power. During Hibernation the system will write the complete status and process of your computer and save it in the hard disk which is the hiberfil.sys.

While you start your computer, the system loads the status from the hard disk which was written in hiberfil.sys file.

HIBERFIL.SYS reserves around 2.5 GB in Windows 7 and Vista. And it takes 512 MB in Windows XP.

Important Note: You can delete hiberfil.sys only if you do not want to use the hibernation feature. Even if you delete the file you can still use the sleep mode. If you want to see the hiberfil.sys file in your C drive then you need to show system hidden files.

hiberfil_sys

How to delete HIBERFIl.SYS file from the your drive?

As hiberfile.sys is a system file we cannot delete it directly. So in order to delete it we need to disable the Hibernate feature in Windows.

Disable hibernation mode in Windows 7 and Vista:

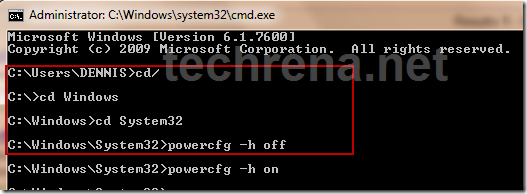
Open Command Prompt. Press Start + R. Type CMD and press Enter.

Type the following commands and Press Enter after each command:

cd/
cd Windows
cd System32
powercfg -h off

It will look like:

cmd_disable_hibernate

To turn on the Hibernate feature Type:

powercfg –h on

Disable hibernation mode in Windows XP:

In Windows XP it is easy. Follow the instruction below:

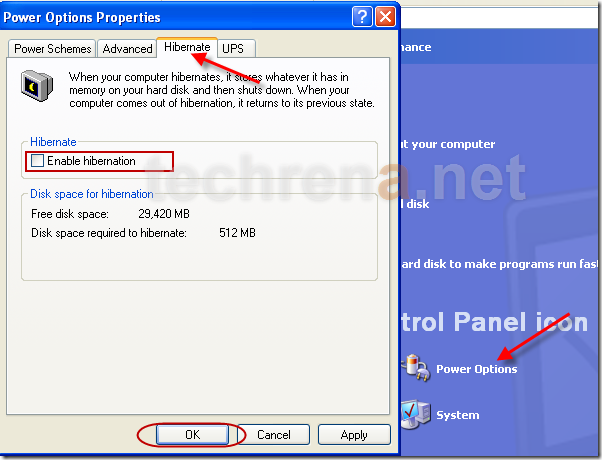
Open Start menu, Go to Control Panel. In control Panel, go to Performance and maintenance. Then Click Power Options

In power options windows, go to Hibernate Tab. Uncheck Enable hibernation and press OK.

disable_hibernate_xp

If you want to re enable hibernation, then check the check box and press OK.

Now after performing the steps, if you check your C drive, you will find that the hiberfil.sys file is gone.

Hope you have got some free space at least for now 🙂

How To Turn On or Off System Restore In Windows PC

Windows logo

System Restore is a feature of Windows Operating Systems namely Windows 7, Vista and XP. This feature in Windows enables you to restore or rollback your system to a position in an earlier time. Windows automatically creates restore points to back up the program files, registry and system data whenever you install a new software, driver or make any changes in the system settings. You can restore the system to the restore points saved earlier if anything goes wrong in future. You can also create the restore points manually.

The only problem in System Restore is that it occupies a lot of disk space, as it has to save a lot of restore information in your system. This system restore information is stored in System Volume Information. You may be confused that all the data in your drive is showing lesser usage then the actual amount of disk usage. This is due to the System Restore Files present in the inaccessible folder System Volume Information. You can open this folder by taking Ownership in windows 7 or Vista.

Now, if you feel that System Restore is not necessary or if you want to free up disk space by deleting the earlier Restore points then refer the details below.

Open System Properties:

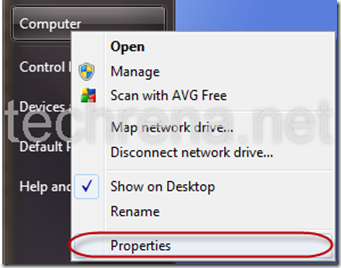
Open Start Menu, Right click on My Computer (in XP) or Computer (In Windows 7) and Select Properties

my_computer_properties

Open System Restore or System Protection:

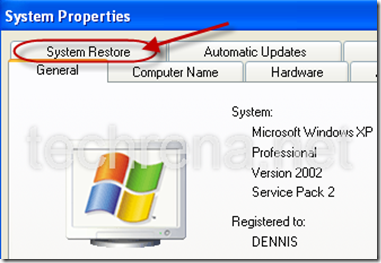
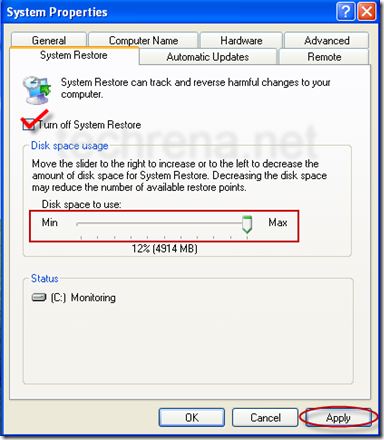
If you are using Windows XP, then Go to System Restore Tab.

system_properties

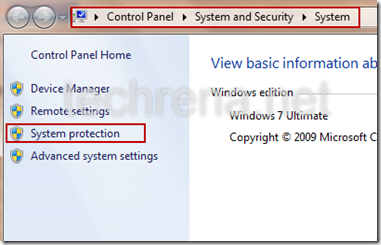
If you are Using Windows 7, Click on System protection in the left pane.

system_properties_7

Turn off or delete system restore points in Windows XP:

You can see the System Restore Options. Here you can change the amount of Disk space to be used for System Restore.

If you want to delete the System Restore Data then, check Turn off  System Restore and click Apply. It will delete all the related data and turn off your System Restore. Now the disk space has been freed up.

Note: If you only want to delete the system restore data but don’t want to turn off System restore then, don’t forget to turn it back on by unchecking the checkbox and applying again.

system_restore_xp

turn_off_restore_confirm_xp

Turn off or delete system restore points in Windows 7:

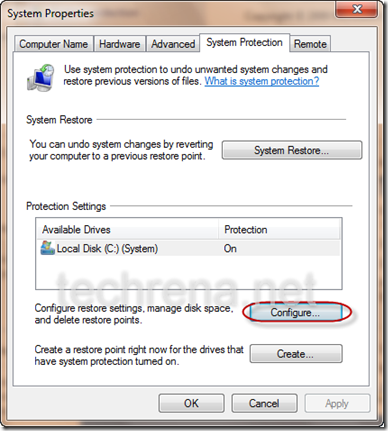
In the System Protection tab, click on Configure.

system_protection_7

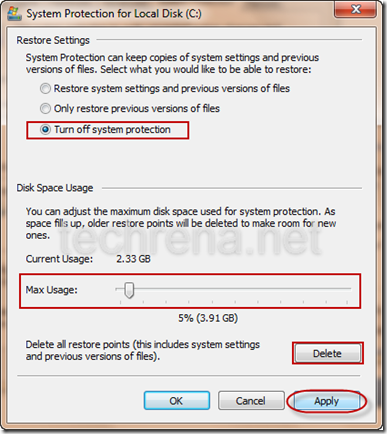
It will open System Protection for your disk. You can change Maximum Disk space Usage for System Restore. You can delete the system restore points to free up the disk. Or you can turn off the System Protection feature completely in your Windows 7 PC.

turn_off_restore

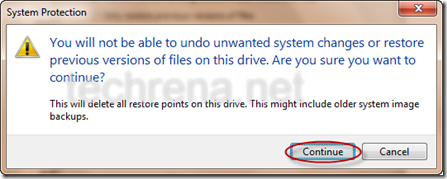
If you Click on delete it will ask for confirmation as follows. Then it will delete the restore points. Deleting the System Restore points will not Turn off System Restore in Windows 7.

confirm_delete_restore_point

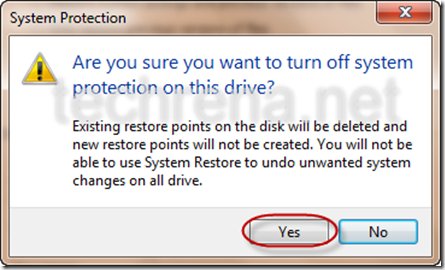
If you select Turn off System protection and click on apply, it will ask for the confirmation given below and Turn off your restore. This will also delete all your current restore points.

turn_off_restore_confirm

You can turn On the system Restore anytime by Selecting Restore system settings and previous version of files and clicking Apply.

In Windows 7 there is an option for restoring the previous version fo files or deleted files in a folder. To know more, refer the post: How to Restore Previous Versions of Files in Windows 7 Using System Restore.

Important:

1. The given procedure will also work for Windows Vista.

2. It is not recommended to Turn off or Disable System Restore in your Windows PC.

3. If you are deleting all the System Restore Points, then you will not be able to restore the system to any earlier point of time.

Restore Previous Versions of Files in Windows 7 Using System Restore

One of the exciting features in Windows 7 is that we can restore deleted files using the Windows System Restore.  If you ever delete an important file or a document unintentionally then this feature of Windows 7 is going to help you in every ways.

Windows 7 copies the image of your files everyday or when a restore point creation is triggered. This service is known as  the volume shadow copy service. The Previous Version feature is available in all editions of Windows 7.

Windows 7 logo

Now to restore your files or to explore this feature, just follow the easy steps below.

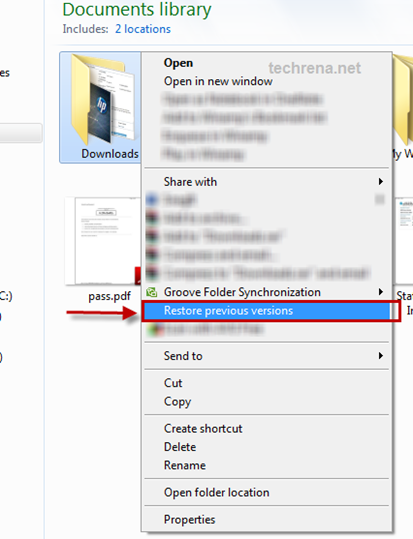
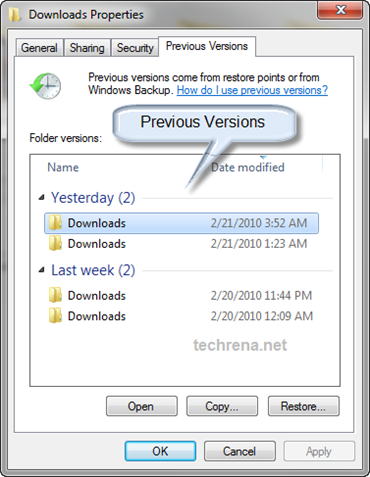
Step 1: Find out the Previous Versions of the files available. In order to do this, right click on the folder where your files are present and select Restore previous versions. All available versions of the folder is shown where the content of the folder will be Yesterday’s or Last week’s and so on.

Restore Previous Versions in Windows 7

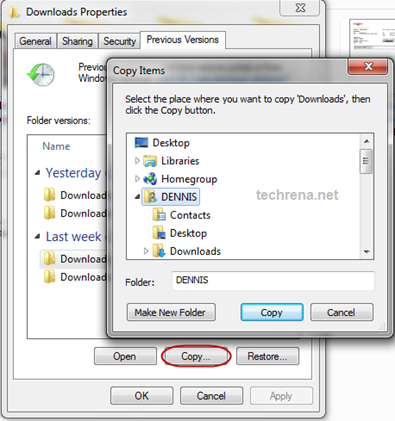
Step 2: Select which operation you need: Open, Copy or Restore. You can see three buttons Open, Copy, and Restore.

Restore Previous Versions in Windows 7

Open: Select the folder on the particular day or date which you want to open and click on Open. It will show you the files present in that folder on that day. You can simply copy the particular file you want.

Copy: Copy lets you copy the whole folder on the particular day to a different location. This will be useful if you do not want to disturb the current files present in the folder. Select the destination of the files to be copied.

Restore Previous Versions in Windows 7

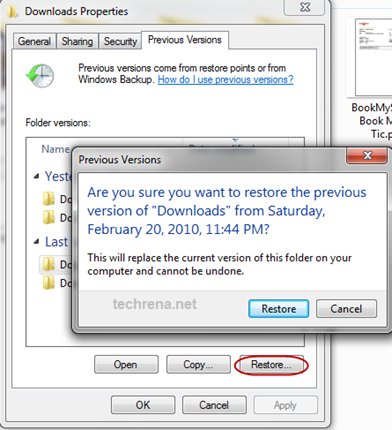
Restore: This option will restore the files to the day which you have selected. It will be useful if you want to restore the folder exactly same as on the selected day. This can be used for restoring source files of an installed software which you had changed erroneously.

Restore Previous Versions in Windows 7

Now you have learnt how to restore deleted files and folders in Windows 7. I hope it was an easy one.

Note:

1. This feature is available in all versions of Windows 7.

2. If you want to have restore points of the files and folders for longer duration, you have to increase the size of the Disk Usage Space for System Restore in System Restore Properties. Follow:

My Computer—> System properties—>System protection—>Configure…—>Max usage

3. Restore Previous Versions feature will not support for Disk Drives, libraries and external drives(including the folders present in the external drives).