[How To] Edit “Send To” Menu In Windows 7

Do you frequently move files to a particular folder or location on your computer? Wish you could have an easy way to quickly transfer a file to that location? Yes, Windows does have a solution for you, in the form of “Send to” menu list found in the right-click context menu of any folder.
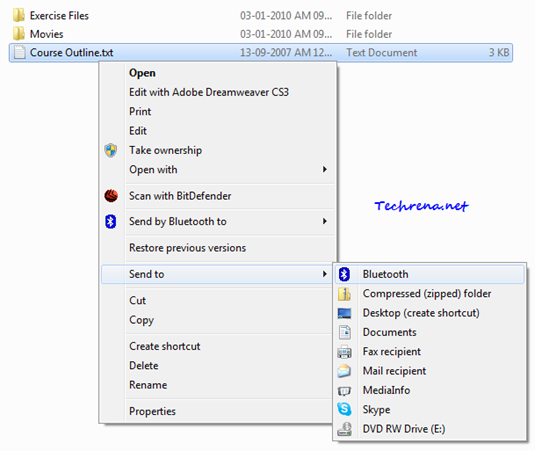
Send To items in windows 7 explorer

This tutorial explains about how you can add or delete items from the “Send to” menu list in Windows 7, Windows Vista and Windows XP.

Steps:

1. Navigate to the following folder in Windows:

Windows XP users:

C:\Documents and Settings\(User-name)\SendTo

Windows Vista & Windows 7 users:

C:\Users\(User-name)\AppData\Roaming\Microsoft\Windows\SendTo

Where “User-name” stands for the Windows username with which you are logged in.

2. You will find all the shortcuts that are included in the “Send to” list in this folder. Add whatever shortcut t(program or folder) hat you would like to have it in the “Send to” in the right-click context menu or delete the item which you don’t want to see in the “Send to” menu option.
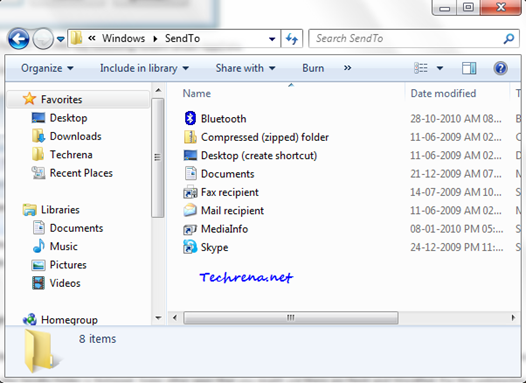
SendTo folder in windows 7

3. For instance, I have added a nee shortcut for “Techrena’ folder inside the “Send to” list as shown:
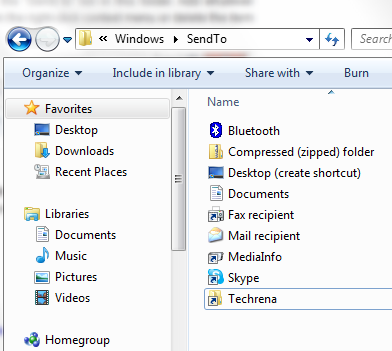
SendTo folder edit

and it’ll appear in the “Send to” list in the right-click context menu as shown:
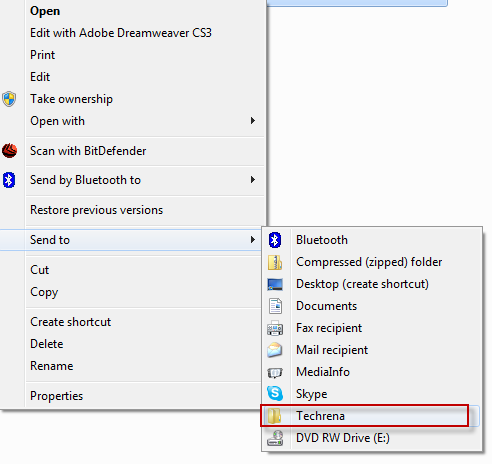
Added item in Send to list

Isn’t that simple? Now go and play around with the Send to items in your Windows (XP/ Vista/ Windows 7).

[How To] Start Windows Explorer With Custom Folder

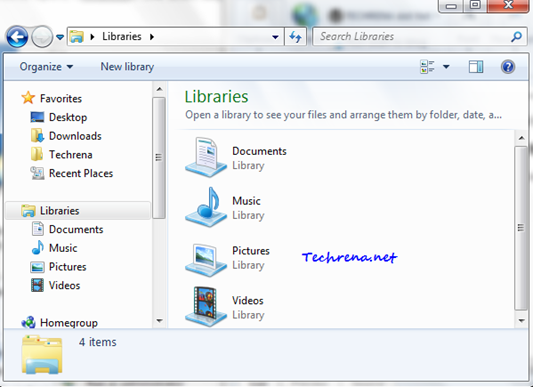
Windows 7 has a small folder icon Explorer windows 7 pinned itempinned to the taskbar (or you can add it manually*)  which indicates the shortcut for the “Windows Explorer”. Clicking on it will open the “Libraries” folder by default as shown.

Libraries in windows 7 explorer

But in most of the cases, you might want this to open a default folder other than the “Libraries” folder. Use the following trick to customize any Windows Explorer shortcut to open it with a custom folder of your choice in Windows 7, Windows Vista and Windows XP.

* This tutorial assumes that you have a pinned shortcut for the Windows Explorer on your taskbar. To pin the Windows explorer the shortcut to the taskbar, just drag and drop the “Computer” entry found in the Start menu. This guide works well for all types of shortcuts for the Windows Explorer. You can also add a desktop shortcut for the windows explorer on your desktop. To do this, search “explorer” in the Start menu and drag the “Windows Explorer” result to the desktop.

Steps:

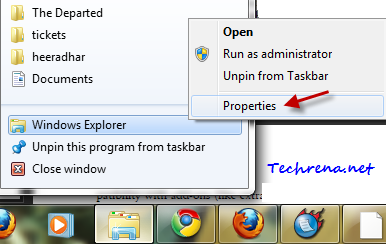
1. Right-click on the folder icon at the taskbar:

Change explorer shortcut properties

2. Again right-click on Windows Explorer, choose Properties.

windows explorer context menu in taskbar

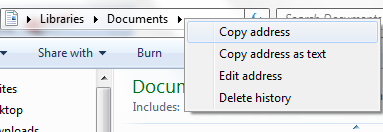
3. Now open the folder which you want to open through this Windows Explorer shortcut . Right-click on the path box, and select “Copy address”. The most sought folder which most of the users might want to use as default folder would be the “My Documents” folder. So here I’m taking it as an illustration to explain you the this trick.

copy address from libraries folder

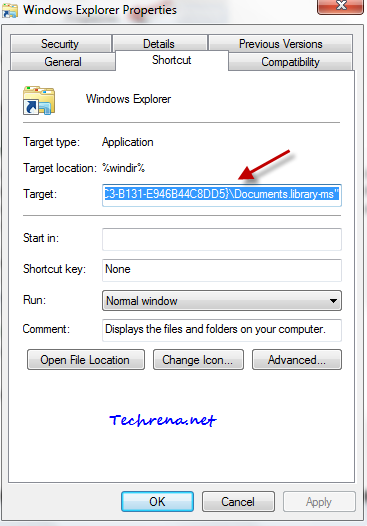
4. Now go back to the “Properties” window that is kept open in the step 2, choose “Shortcut” tab and focus on the “Target” field. By default, it would have the following path:

%windir%\explorer.exe

5. Select the “Target” filed and paste the address that you copied from the step 3. For “My Documents”, it would be this string

%windir%\explorer.exe Libraries\Documents”::{031E4825-7B94-4DC3-B131-E946B44C8DD5}\Documents.library-ms”

customizing windows explorer shortcut

6. Click on “OK” to apply and save the settings.

Target strings for other destinations:

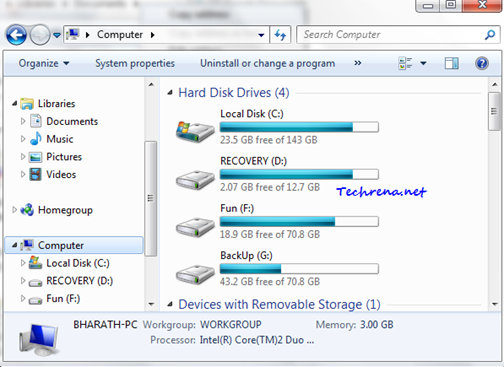
Computer: %SystemRoot%\explorer.exe /E,::{20D04FE0-3AEA-1069-A2D8-08002B30309D}

Set the above string under Target filed to open “Computer” by default in Windows Explorer.

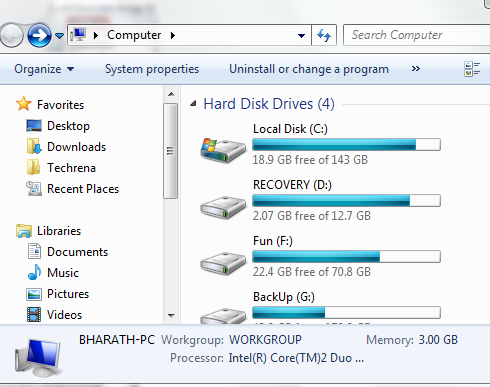
computer in windows 7 explorer

From now on, when you double click on this Windows Explorer shortcut, it will open the custom folder that you set.

Related: Pin Computer Icon To Windows 7 Taskbar

[How To] Turn Menu Bar On Or Off In Windows 7 Explorer

Menu bar in windows 7

Menu bar is that small bar having options like “File”, “Edit”, “View”, “Tools” and “Help” in Windows explorer. One can find it always in the top of any window s explorer window in the Windows XP and earlier versions, however Microsoft had started to hide this menu bar ever since the Windows Vista was launched owing to save some space in Windows explorer. Windows 7 and Vista users can always easily toggle between turning the menu bar on or off by pressing the “Alt” key.

But fortunately Windows 7 has added a feature to let users choose to enable or disable the menu bar in windows explorer. If you are very much used to Windows XP-like environment in windows explorer, you might fancy to have the menu bar permanently appear in Windows 7. Here is how you can turn on the menu bar forever in Windows 7.

1. Open windows explorer (press Start button + E).

Windows explorer in windows 7

2. Click Organize at the top of the window.

Organize button in explorer

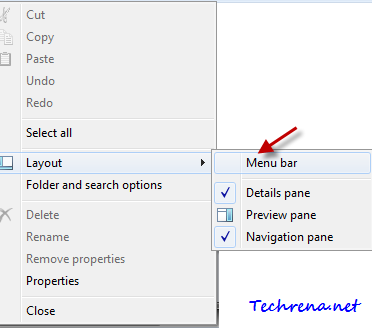
3. Expand “Layout” options and select “Menu bar” from the list.

Menu bar in organize options

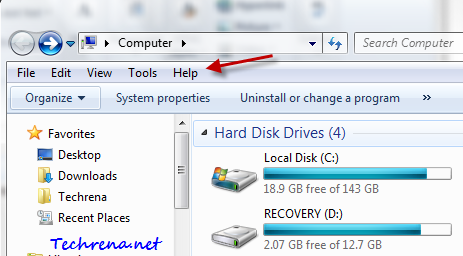
That’s it, the menu bar will start appear in all windows explorer windows from now on.

Menu bar permanent in windows 7

[How To] Disable Auto Sleep Mode In Windows 7

Windows 7 power options

If you have recently purchased a new computer (laptop in particular), there is a setting which you need to look at is the “Power Options” found under the Control Panel. By default, the power options would be set to make your computer go to sleep mode automatically after being idle for a defined amount of time. It would be really annoying when the laptop goes into sleep mode without your attention when you let your laptop run a program in the background (like downloading a big file from internet) and go away from it. Even though it is not advisable to change the advanced settings of a power plan, we can safely change these basic settings like  “Turn off the display”, “Put the computer to sleep” etc. Follow these steps:

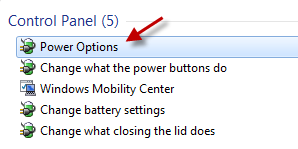
1. Type “power options” in the Start menu search and open “Power Options” result from the Control Panel section.

Power options start menu search result

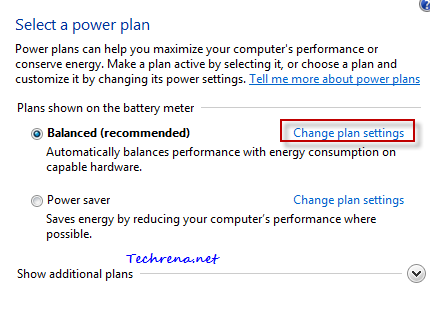
2. Click on “Change plan settings” found right next to your current power plan.

Power options window

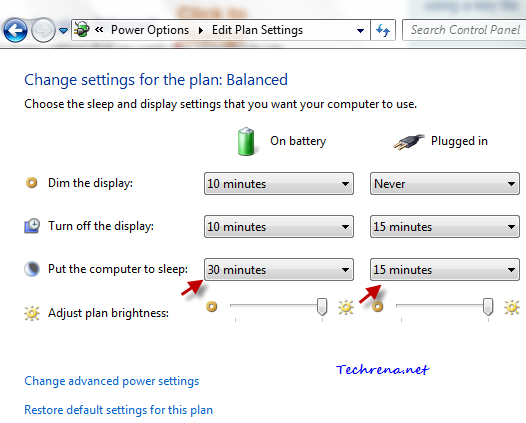
3. You will see the default settings for when to “dim the display”, when to “turn off the display” and when to put the computer to sleep.

Power plan default settings

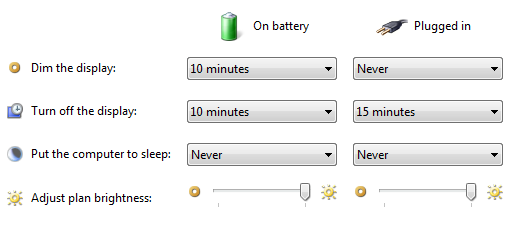
Change the settings to your convenience, you can try setting “Put the computer to sleep” option to “Never” to disable the auto sleep mode completely (preventing your computer from going to sleep mode automatically).

Editing plan settings in power options

Click Save changes button once you are done with it and that’s it! You have now successfully turned off the auto-sleep mode in Windows 7.

Get A Free 500GB HDD With Windows 7 Purchase

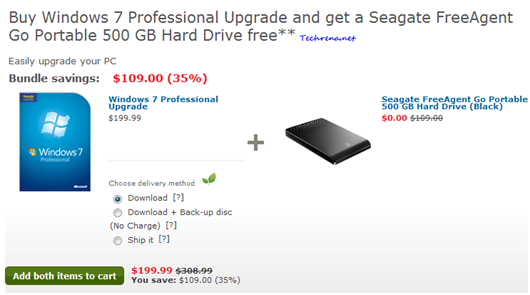
Windows 7 pro upgrade HDD offer

Microsoft is offering a free Seagate FreeAgent Go Portable 500 GB Hard Drive with every purchase of Windows 7 Professional Upgrade. You can buy both these items at a discounted price of $199.99. If you purchase the same Seagate 500GB hard drive independently, it would cost you $109 alone. It’s really worth a deal and if you are running a licenced version of Windows XP or Windows Vista and plan to upgrade to the latest Windows 7 (includes both 33-bit and 64-bit versions), it is the right time to go for it.

This is a limited period offer and is valid till the supplies last. So hurry up! visit this Microsoft Store page to download or order the Windows 7 Professional Upgrade now.

For any queries, you can call the Microsoft toll-free number (United States) at 1-877-696-7786.

[How To] Rename Favorites In Windows 7 Navigation Pane

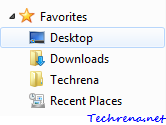
Favorites in Windows 7 navigation pane

Earlier this month, we had covered in an article about how to remove “Favorites” from the Navigation pane in Windows 7. Sometimes you don’t want to remove them completely, all you want is to customize them by renaming “Favorites”. Fortunately, this can be done with simple tweaks in Windows 7. Let’s get started on how you can rename “Favorites” in the Windows 7 explorer.

Steps:

1. Type regedit in the Start menu search bar and open “regedit.exe”. Click Yes when prompted by the UAC.

regedit result from programs

2. Navigate to the following path in the Registry Editor:

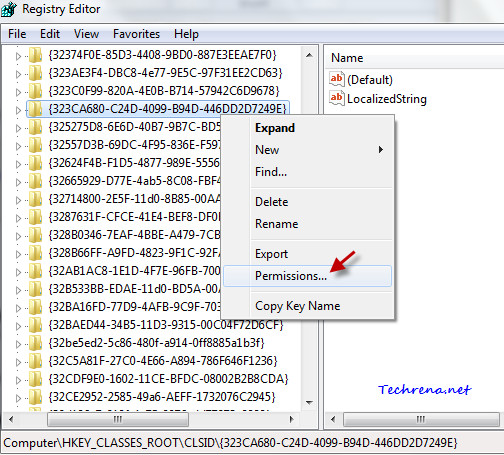
HKEY_CLASSES_ROOT\CLSID\{323CA680-C24D-4099-B94D-446DD2D7249E}

3. Right-click on {323CA680-C24D-4099-B94D-446DD2D7249E} folder and choose “Permissions…

permissions for folder in regedit

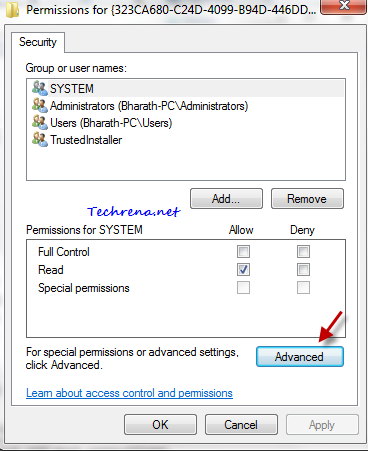
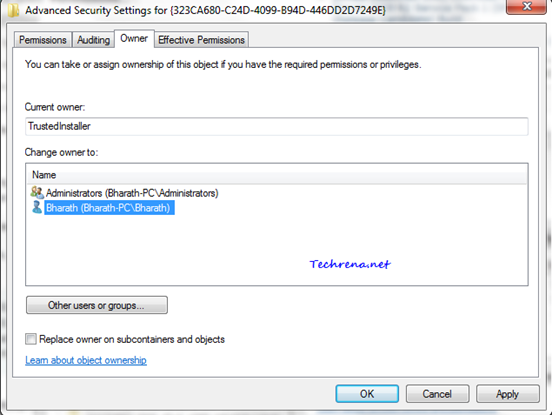
4. Click on the Advanced button in the Permissions window. It will now open another dialogue box.

renaming favorites using registry edits

5. Go the Owner tab in the dialogue box. Select your Administrator account. Click OK to save the changes.

renaming favorites using registry edits

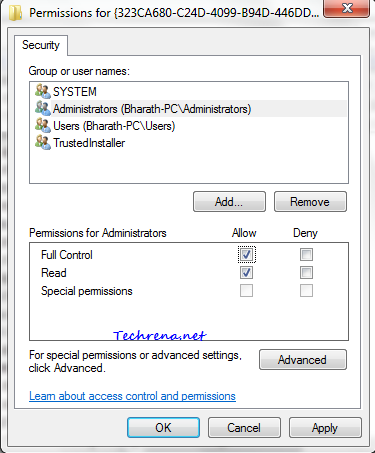
6. In the Permissions window, select your username from the list and check against Allow button right next to “Full Control” option. Click OK button to close the window.

permissions for key in regedit for favorites renaming

6. On the left hand side pane, double click on the “LocalizedString” registry key.

renaming favorites through registry edits

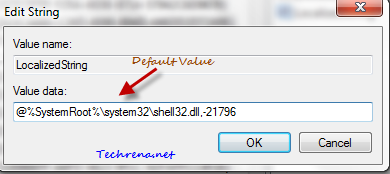
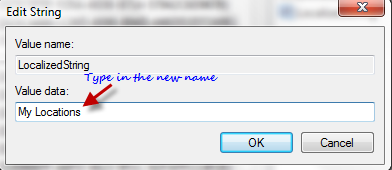
7. Type the new name which you want to set for Favorites in the Value data field, thus changing it from the default value @%SystemRoot%\system32\shell32.dll,-21796

default string value

new string value in renaming favorites

You can give it any name that you wish, be it “PC Locations”, “Personal Favs”, “Important Folders”..etc., whatever .

8. Click OK to save the settings. Close the Registry Editor. Restart the Windows Explorer (explorer.exe) process to see the change.

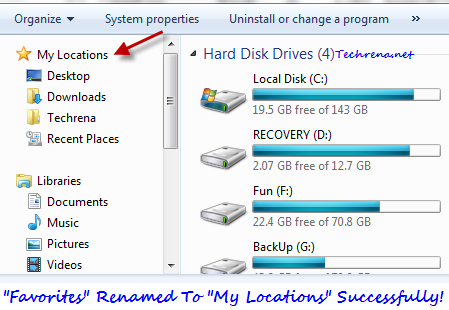
Favorites renamed successfully

You can see how “Favorites “being renamed to “My Locations” in Windows 7 explorer’s Navigation pane in the above screenshot.

To set the back the defaults, just go to step 7 and change the Value data field to the default value “@%SystemRoot%\system32\shell32.dll,-21796”.

[Download] Windows 7 Update KB2028551

XPS icon

Along with the updates KB2284742 and KB2388210, Microsoft has also released another update for Windows 7 based systems, KB2028551. The update resolves issues with printing from XML Paper Specifications (XPS) based applications to print drivers that are based on Graphical Device Interface (GDI).

The update resolves issues that you may encounter while printing an XPS that contains visual brushes, where certain elements in the document gets clipped when printing on a GDI-based printer device. The update contains improvements for the XPS  to GDI converter, which finally improves the performance of the printing when you print from XPS-based applications to GDI-based drivers. Microsoft has also mentioned that installing this update is also essential to support some of the features included in Internet Explorer 8 platform preview build. Download the update KB2028551 for Windows 7 from the links added below.

Download Links:

Windows 7 (32-bit) file size: 282 KB

Windows 7 (64-bit) file size: 452 KB

[How To] Select Multiple Files Using Check boxes In Windows 7

Windows 7 logo

What do you do when you want to select multiple files at once in Windows ? Traditionally, we have been accomplishing this task by holding down CTRL or SHIFT keys while selecting the files to select multiple files at once. Even though we have got used to this, yet there can be instances when we accidentally click on the blank space resulting in deselecting all the items that you gathered with much effort. Our hand or keyboard may tease you at times, causing these type of annoyances, but a mouse cannot. That is why many people prefer to use mouse over keyboard particularly when doing this kind of multi-selection.

Keeping this in mind, the folks at Windows 7 development team included a pretty nice option to select multiple items using check boxes (this kind of selection method is incrementally getting popular with smartphone devices now!) using a mouse without needing to hold any key on the keyboard. By default, this options would be turned off in Windows 7 and Windows Vista. Follow the steps to learn how to select multiple items all at once in Windows 7 (and Vista)  using the check boxes:

Steps:

1. Open Windows Explorer (Or use Windows + E shortcut).

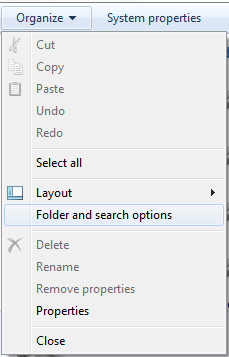
2. Click on Organize button to expand it’s dropdown menu items. Select Folder and search options.

Organize button in explorer

Folder_search_options_win7

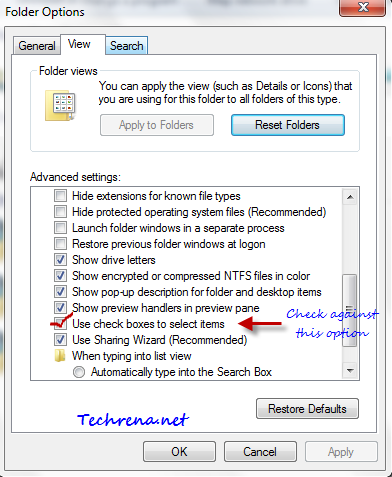
3. Go to View tab in the Folder Options window. Scroll until you find “Use check boxes to select items”. Just check against this option.

Checkboxes option in folder options

use check boxes option selected

4. Click OK to apply the changes to Folder Options and close the window.

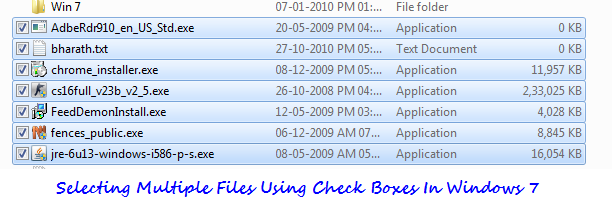
5. Now go to any explorer window and you will now be able to select multiple files using the check boxes:

select multiple files with check boxes

[Download] Windows Update KB2388210 For Application Compatibility Issues

Windows Update

Microsoft has released a new update Application Compatibility Update KB2388210 (for October 2010) to address various known application compatibility issues that users experience in Windows XP Pro x64, Windows Server 2003, Windows Vista, Windows Server 2008, Windows 7, Windows Embedded Standard 7, Windows Server 2008 R2.

The update KB2388210 resolves the compatibility issues like “The application is installed incorrectly”, “The application causes system instability”, “The functions of the application do not work correctly”..etc. When you see these sort of alerts too frequently, it’s high time that you should install this update.

Download the appropriate update file from the direct download links given in the table below and install them to resolve the compatibility issues with games, applications and firmware etc.

Download Links:

OS x86 x64
Windows 7 download (2.7 MB) download (2.8 MB)
Windows Vista download (3.4 MB) download (4.0 MB)
Windows XP download download (1.8 MB)
Windows Embedded Standard 7 download (2.7 MB) download (2.8 MB)

[Download] Windows 7 SP1 Release Candidate

Windows 7 SP1

Microsoft has released the Windows 7 Service Pack 1 Release Candidate to testers, available as a free download from Microsoft website. Microsoft initially released the Windows 7 and Windows Server 2008 R2 SP1 Beta(update KB976932) in July 2010. With the release of the Release Candidate (RC), Microsoft is gearing up for the final release of the Windows 7 SP1 which is expected to happen somewhere during the beginning of 2011. Now that the Release Candidates for both Windows 7 and Windows Server 2008 R2 SP1 are available for download, those who have already installed the beta versions of the Windows 7 and Windows Server 2008 R2 Service Pack 1 must uninstall the same before going ahead with installing the SP1 RC. Please note that you must have an RTM (Release To Manufacturing) version of Windows 7 or Windows Server 2008 R2 installed on your PC before you can install the Release Candidate.

The Release Candidate includes the previous updates that are delivered via Windows Update along with continual updates to Windows 7 and Windows Server 2008 R2 operating system platforms.

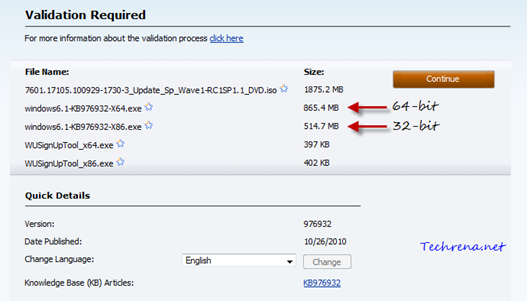
Windows 7 sp1 download

The download size for Windows 7 SP1 RC  (build version 976932) for 32-bit version is 514.7 MB (windows6.1-KB976932-X86.exe), where as it is 865.4 MB for the 64-bit version (windows6.1-KB976932-X64.exe) of the OS. You need to validate your Windows before you can proceed to the download page.

Download Windows 7and Windows Server 2008 R2 SP1 RC