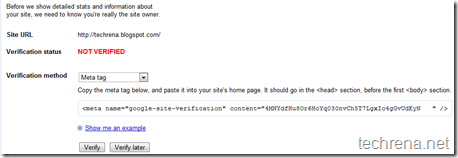
There has been some changes of late, to the verification process in Google Webmaster Tools for Blogger.com hosted blogs. The “Webmaster Tools” auto-verification link from the Blogger dashboard has been removed leaving Blogger blog users to have no other choice but to opt for verification through adding a HTML meta tag.

Webmaster Tools has outlined this process in simple steps.
Steps:
Sign in to Webmaster Tools
1)Click the “Add a site” button on the homepage of Webmaster Tools

2) Just enter you blog’s URL (like techrena.blogspot.com for instance) and click “Continue” button.
3)Select the “Meta tag” verification method from the drop-down list

Copy the meta tag code that has been generated.It should be something of the form <meta name=”google-site-verification” content=”X…….X” />
Now open Blogger.com in a new tab or window and don’t close this Webmaster Tools page.
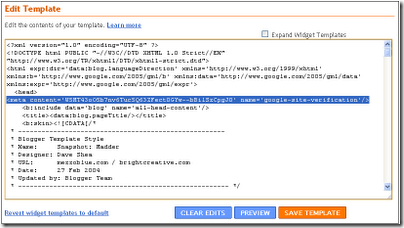
4) Now Sign into blogger.com and go to Dashboard and go to Layout section of your blog, under the Layout, select “Edit HTML”
5) Paste the meta tag verification code it into the <head> section, before the first <body> section
[Image : Google Webmaster Central blog]
6) Click “Save Template “
7) Go back to Webmaster Tools page which you have kept open and click on the “Verify “ button.
You are done and your blog has now been verified in Google Webmaster Tools.


YOU SAVE ME ! THank YOU VERY VERY VERY VERY MUCH !
Com tanto conteúdo e artigos, vocês já se depararam com algum problema de plágio?