[Tip] Change The Date And Time Picture Was Taken In Windows 7

Date picture taken in Windows 7

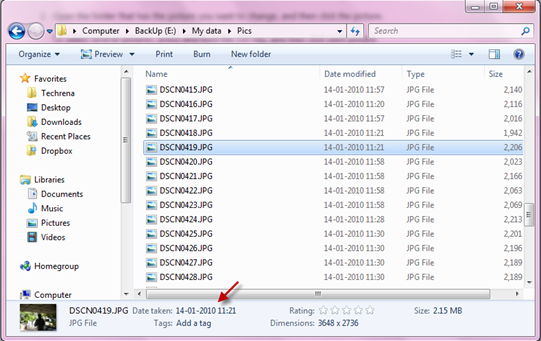
The modern day digital cameras include the time and date of the picture when you take snaps with them. This is very useful, when you see the pictures in future and want to know when it was taken. These details can be seen from the information along with the picture’s metadata when you transfer them to the PC. Fine, everything is good. But what would happen when you travel to a different time zone and forgot to reset the time and date in your camera’s settings? The digital camera would then stamp incorrect time and date onto your pictures. This is a common problem but fortunately, there is a great workaround available if you are using Windows 7. To see the “Time Taken” data of the picture, select the picture and then notice it on the details pane at the bottom of the window.

Let’s now see how to change the date when a picture was taken, on the Microsoft Windows 7 in 5 simple steps. Follow the steps briefed below.

I. Changing The Date When A Picture Was Taken:

Steps:

1. Open the folder where the target pictures reside.

2. Select the picture for which you want to change the date.

3. Now move your focus to the details pane at the bottom of the window.

Picture Taken Date Change in Windows 7

4. Click next to the “Date taken” and then click on the calendar icon to choose another date.

5. Click Save to change the settings that you have just changed.

Tip: You may also choose multiple pictures in the step 2 by holding down CTRL while selecting one or more pictures.

Note: If you don’t see any details pane, it might have been disabled. Read our earlier tutorial to enable the details pane in Windows 7 explorer.

II. Changing Both The Time And Date When A Picture Was Taken:

The aforementioned method changes only the date on which the picture was taken but not the time when it was captured. Follow these steps to change both the time and date when the picture was taken.

Steps:

1. Press the Windows key on your Windows 7 machine and type photo gallery in the search box and open the “Windows Live Photo Gallery” from the results under the ‘Programs’.
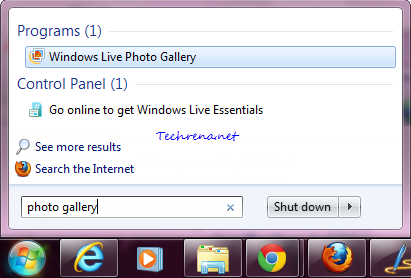
Photo Gallery Windows 7 start menu search

2. Import the picture for which you want to change the date and time metadata and double-click on it to open it.

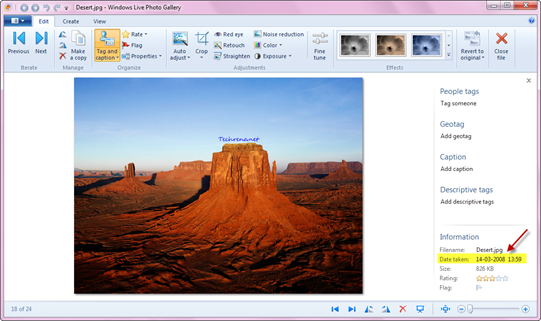
Windows Photo Gallery Picture info

3. On the right hand side pane (Tag and caption pane), notice the “Information” section. You will see the ‘Date Taken’ data being listed there.

4. Click on the corresponding date and time values which you want to change.
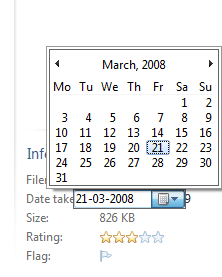
Windows Photo Gallery picture info edit

That is it. The picture will have new values for “Date Taken” metadata. Isn’t that simple?

[Via: Microsoft]

Top 10 Advanced Windows 7 Search Tips

Windows 7 logo

Microsoft has always been keen to improve the search feature in Windows. With the launch of every new version of Windows, there have always been incremental improvements to the Windows Search. If you are using Windows 7, here are some advanced search tips and tricks to make the most out of the Windows Search.

Tip #1:

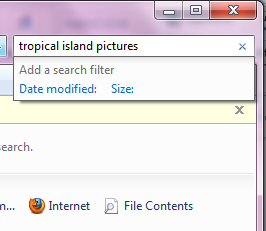
To search for files containing multiple terms (in any order) from your search query, just type all of those terms in the Search box:

For instance, if you want to search for multiple files or folder containing the terms “tropical”, “island” and “pictures” in any order, just type “tropical island pictures” in the Search box.

Windows 7 search any terms

Tip #2:

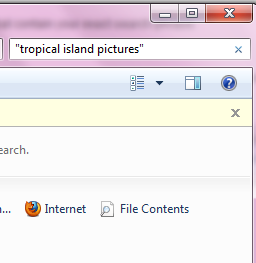
If you want to look for files or folders in your computer containing a particular exact phrase, type your query within quotation marks in the Search box:

Example: “john holiday pics”

Windows 7 search exact match

The above query will list all the files (or folders) that contain your exact search phrase.

Tip #3 – Using Boolean Operators:

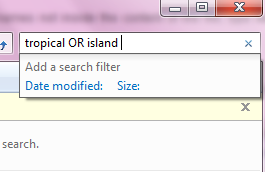
If you want to find that contains at least one of the terms from your search query, use the Boolean operator OR in between the terms.

If you want to search for files that contain a certain term but not the other term, use the operator in between the terms.

Ex: tropical NOT island

Windows 7 search boolean

Please note that the above said Boolean operators have to be used in uppercase.

Tip #4:

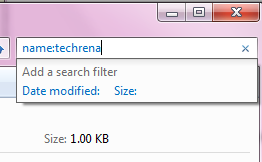
If you want to look for match only in the file names not inside the content of the files, type name: followed by the search keyword(s).

Windows 7 search name operator

Usage:

name:techrena

Tip #5:

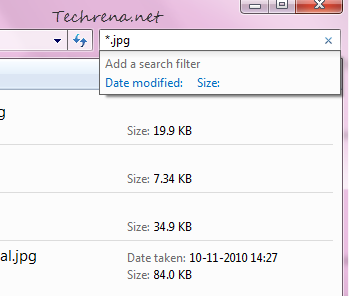
If you want to search for a particular file type, type *. followed by the file extension for instance type “*.jpg” info you only want to search JPEG pictures present on your computer.

Windows 7 search file type

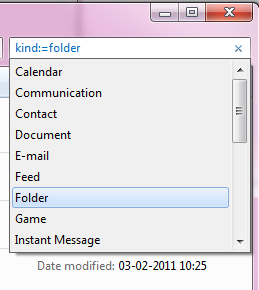
You can also make use of the “kind” operator to search for files of particular type. There are several types to choose from like games, movies, music, pictures, folders etc.

Windows 7 search kind file type

Usage:

kind:=folder

Tip #6:

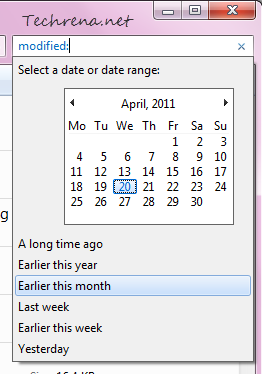
If you want to search only for the files that have been modified after a certain date, you can make use of the “modified:” (or “datemodified:”) search filter.

Windows 7 search modified operator

Tip #7:

Another search filter that can help you narrow down your search is “Size:”. Type ‘Size:’ in the Search box and choose the size limit so that the search can be limited to all the files under that limit.

Windows 7 search size operator

Usage:

Size:>10mb

Tip #8:

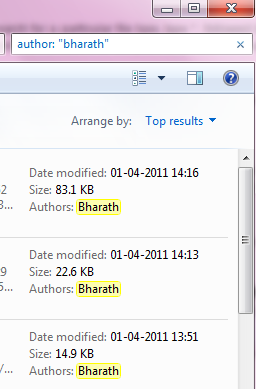
If you want to search for files that are authored by specific person, use ‘”System.Author:” or just “author:” search filters.

Windows 7 search author operator

Usage:

System.Author:Bharath

Author: “Bharath”

Tip #9:

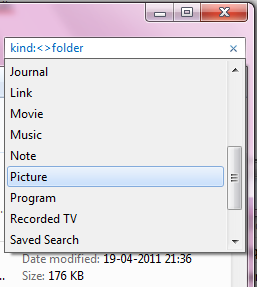
This is to just achieve the opposite result of the tip #5 i.e. to search for files that aren’t of specific type. Here the operator <> means “not”.

Windows-7-search-kind-not-keyword

Usage:

kind:<>folder

Tip #10:

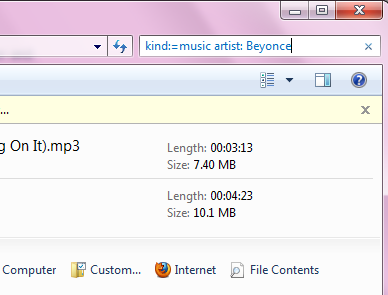
To search for music tracks composed by a particular artist from your music folder, you can make use of the advanced “kind” operator.

Windows 7 search artist operator

Usage:

kind:=music artist: Beyonce


If you know some more Windows 7 search tips, let us know through comments.


Reference: Microsoft

Download Internet Explorer 9 Final Now

IE9 logo

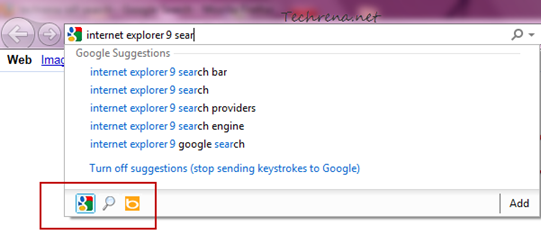
Microsoft’s Internet Explorer 9 has moved out of beta and the final version is now available for download for Windows 7 and Windows Vista based computers. Internet Explorer 9 looks sleek with minimalistic design, no toolbars, without any toolbars. As we have covered earlier, there is no search bar in IE9 and it has been integrated to the address bar adopting the popular move that was earlier taken by Google Chrome. Changing the default search engine in IE9 is quite easy as well. All you have to do is enter your search query and choose the search engines that have added to IE9.

IE9 Search Engine address bar

When it comes to speed, IE9 is neck-to-neck with Google Chrome 10 (without considering Firefox 4, equations may change when the final version of Firefox 4 releases). New tab page in IE9 has also been revamped to show most frequently sites along with their favicons and the frequency of visit to them. What’s more? If you use Windows Phone 7, you will soon have hands on mobile version of IE9 on your device.


Download IE9 Final:

Windows IE9 download

The final version of IE9, Internet Explorer 9 RTM (build number 9.00.8112.16421.110308-0330) is available for public download for Windows 7 and Vista and Windows Server 2008 R2. However, IE9 is not available for Windows XP users as Microsoft chose not to develop Windows XP version of the IE9. Find the direct download links for the standalone offline installer of IE9 after the break.


Windows 7 (32-bit) (17.3 MB)

Windows 7 (64-bit) (34.7 MB)

Windows Vista (32-bit) (17.2 MB)

Windows Vista (64-bit) (34.5 MB)

IE9 Product Guide (PDF – 28 MB)

[Tip] Turn Off The Clicking Navigation Sound In Internet Explorer

IE9 logo

If you use Internet Explorer frequently, you might be aware of the annoying click sound that the browser generates whenever you click a link in the webpage, use back or forward buttons or when you type a URL and press enter. If you observer closely, this is the same sound that comes when you are browsing the Windows explorer windows as well. This happens so because whenever you click something in Internet Explorer or Windows explorer, it will trigger the “System Navigation” event of the system sounds. As always, you can completely disable this sound both for Windows explorer and Internet Explorer. But let’s confine ourselves to the Internet Explorer for now, in the wake of the latest IE9 release. Follow the steps briefed below to disable the clicking navigation sound in the Internet Explorer 9.

Steps:

1. Click on the settings icon IE9 settings iconfound on the top right corner of the Internet Explorer. Choose “Internet options” from the menu.

IE9 settings menu

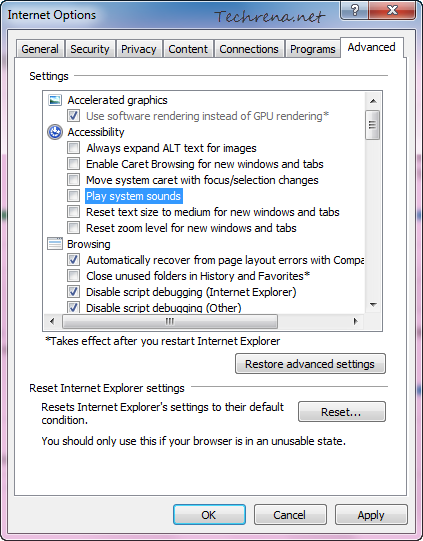
2. A new “Internet Options” window opens up. Go to the “Advanced” tab in the window. Uncheck against “Play system sounds” under the settings for “Accessibility”.

System sounds from internet options in IE9

Click “Ok” to apply the changes and close the window. Now the click navigation sound in the Internet Explorer gets disabled (If you to enable it back, just choose the option shown in the above screenshot and save the settings). However, the clicking navigation sound in the Windows explorer will still continue to exist. We’ll see how to completely turn off or mute these navigation sounds for Windows explorer completely in the upcoming posts.

[Tip] Disable Delete Confirmation Dialog Box In Windows 7

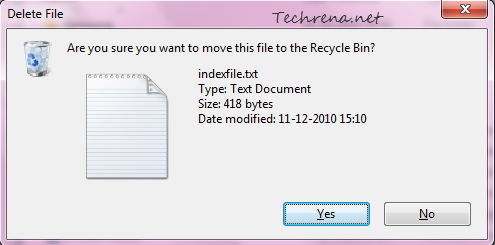
Windows alerts users in the form of various prompts including various confirmation dialogs. These are actually pretty much handy in making sure that you are performing the action that you are actually intended to do. Delete confirmation dialog box is one such prompt, asking you to confirm that you really want to delete that particular file.

Delete file confirmation in Windows 7

Though highly useful, sometimes when you are deleting a large set of files, these dialogs could annoy you and you might want to disable them till you complete the task. Here’s what you need to do to disable the delete confirmation dialogs on your Windows 7 or Windows Vista based PC.

Steps:

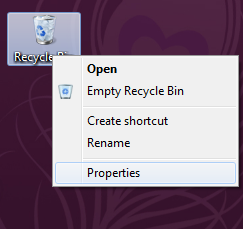
1. Right-click on the “Recycle Bin” icon on your desktop and choose “Properties”.

Recycle bin properties link

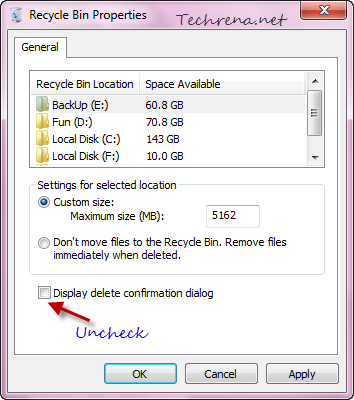
2. In the Recycle Bin Properties window, you will see this option: “Display delete confirmation dialog”.

Display delete confirmation dialog

Just uncheck this option and click OK to apply the settings.

Recycle bin properties delete confirmation

That is all you need to do. You will not be shown the delete confirmation dialogs anymore. But I strongly advise you to change this settings only if you are desperate to get rid of these prompts for a while.

Order Free Windows 7 SP1 DVD [US And Canada Only]

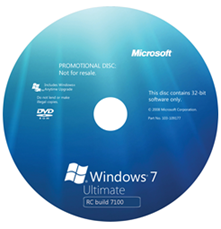
Windows 7 DVD

Last week, Microsoft has released the Windows 7 Service Pack 1 final RTM for the Windows 7 users. It can either be downloaded manually from the Microsoft official website or users can also opt also for automatic installation via Windows Update. However, if you can’t afford to use your network bandwidth to download the SP1 update files, you might want a way around to get the Service Pack 1 using traditional methods. For the same purpose, Microsoft is now providing a free Windows 7 SP1 DVDs for the users in Canada and the United States. If you stay in US or Canada, you can follow the following steps to order Windows 7 SP1 physical media DVDs.

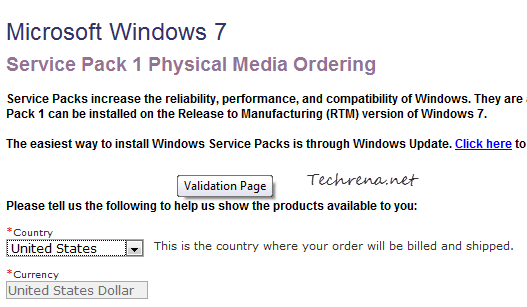
1. Open this link and choose you country and click the “Continue” button.

Windows 7 SP1 Physical Media Order

2. Choose the language of the Windows 7 SP1 installation and click Add To Cart.

Windows 7 SP1 Physical Media Shipment

As you can see, the DVD is free of charge ($0.00).

Click the Checkout button in the next step and enter your shipment address to where you want the DVD to be delivered. And please note that there’s no option to use PayPal for checking out.

Note:

# A customer can order only 1 copy of the physical media DVD.

# Even though the DVD is offered for free, there are shipment and handling charges around $6.

[Tip] Change Internet Explorer 9 Search Provider

IE9 logo

If you have already downloaded and installed the Internet Explorer 9 (IE9) on your computer, you might well be aware that there’s no search sidebar in IE9. IE9 lets you search directly from the address bar so much so in the similar way Google Chrome does. You can also see the suggestions as you type (along with suggestions) in the address bar. But the problem here is by Bing set as the default search engine by default and most of the beginners will have tough time in figuring out how to change this default search engine to their liking, say Google. Here is a small tutorial explaining you the exact procedure to follow to change the default search engine in the Internet Explorer.

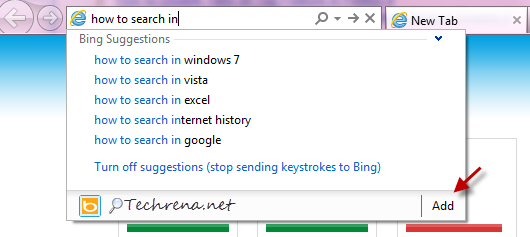
1. Type your search query in the IE9 address bar and click on “Add” button that you can see under the search suggestions (from Bing by default).

Bing search suggestions in IE9

Icon of your current search engine is shown at the extreme left below the suggestions. As you can see from the above screenshot, it is Bing in my case and it should be in most of the cases as well.

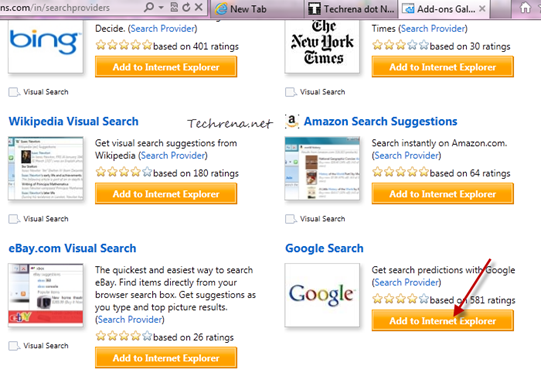
2. You will now be taken to IE add-ons gallery page where you will find a whole lot of available search providers.

Search providers IE add-ons gallery

Locate your favorite and click on the “Add to Internet Explorer” link present next to it. All of the search providers listed there offer search suggestion as well.

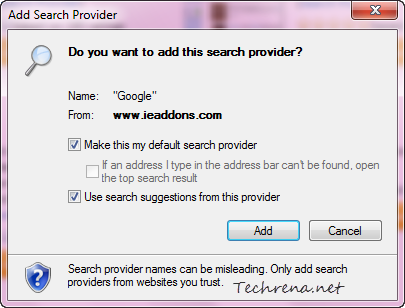
3. In the new window that pops up, choose both the options (“Make this my default search provider” and “Use search suggestions from this provider”) and click the “Add” button.

Add search provider IE

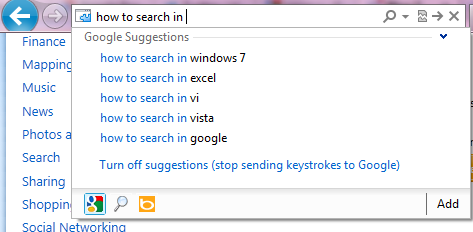
That is it. We have successfully change the search provider in the Internet Explorer 9. And as you can see Google is my default search engine now!

Google search in IE9 address bar

Related: Download Internet Explorer 9 RC

[Download] Windows 7 Service Pack 1 (KB976932)

Windows 7 SP1 update

Microsoft has released the Windows 7 Service Pack 1 (SP1) RTM for everyone. Windows 7 SP1 was earlier released for MSDN and TechNet subscribers last week. Starting today users of Windows 7 and Windows Server 2008 R2 can download the the Service Pack 1 (SP1) via Windows Update (as KB976932) when it becomes available to them. Most of the Service Pack 1 contains updates most of which have already been released through Windows Update.

You can either download the SP1 for Windows 7 or Windows Server 2008 R2 through the Windows Update or also from the direct links from Microsoft Download Center, made available by Microsoft (added at the bottom of this post). The advantage with downloading and installing Service Pack 1 through Windows Update is that it automatically detects the updates that have been installed previously on your Windows 7 and downloads only the ongoing updates that are not yet installed on your computer.

The build number of the final RTM is 7601.17514.101119-1850 and it does indicate the build has been compiled on November 19, 2010. The SP1 (KB976932) package includes client-side support for RemoteFX and Dynamic Memory two new features that are enabled in Windows Server 2008 R2 SP1.

If you have installed a pre-release version of Windows 7 or Windows Server 2008 R2 SP1 (like Beta or Release Candidate versions) on your machine, you must uninstall them before proceeding further with installing the Windows 7 Service Pack 1 final RTM version.

Download:

Windows 7 SP1: 32-bit (537.8 MB) | 64-bit (903.19 MB)

[Via] [Image credit]
[Tip] How To Delete Explorer File Search History In Windows 7

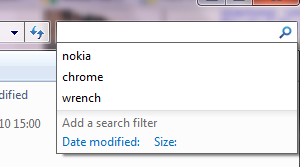
Windows 7 has enhanced search feature that enables users to search for files and folders present in the computer efficiently. The search is faster, more accurate and fetches the results in seconds. Windows Explorer saves and remembers these search terms along with locations of the files and visitors for future use.

Windows 7 search history

These items will be shown when you start typing the part of the search term of location of a file or folder.While this is pretty useful you might also want to have a choice to delete them when you don’t want them to show up in the Windows Explorer location bar on in the search bar.

The Easy Way:

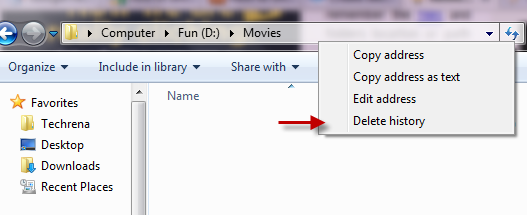
In the Windows Explorer window, right-click on the location bar or address bar when it is out of focus and choose “Delete history” from the context menu. This will delete all the files and folders search terms history that were typed in the location bar and search bar. This should delete the file history in your Windows 7.

Delete file folders history in Windows 7

Alternate Method:

The same can be achieved using Registry Editor as well. Type regedit in the Start Menu search and open the Registry Editor from the results or press Windows button + R to open the Run command and type “regedit” and hit OK to open the Registry Editor.

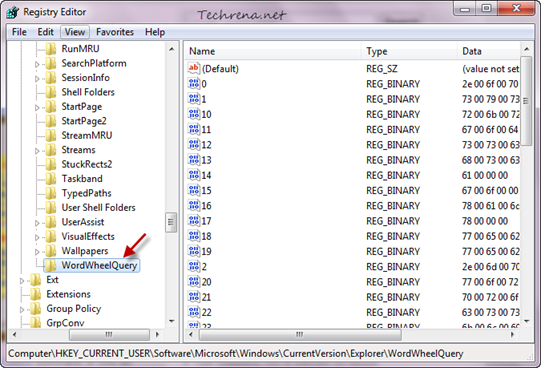
In the Registry Editor, navigate to the following path:

HKEY_CURRENT_USER\Software\Microsoft\Windows\CurrentVersion\Explorer\WordWheelQuery

Files and folders histoy registry editor Windows 7

and delete all the entries (each one corresponds to a search term) present inside this sub key. That is it. Now all your history related to files and folders would be deleted.

[Tip] Change Wireless Networks Priority In Windows 7

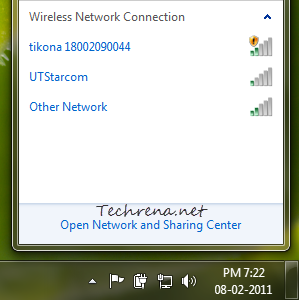
Wireless networks in Windows 7 taskbar

Connecting to a wireless network in Windows 7 is pretty much simple and straightforward compared to the days of Windows XP and earlier operating systems. However if you have more than one wireless network available at your home or workplace, you might want to assign priority to these networks to tell your windows to which it should try to connect first. Al though you can choose to a wireless networks from all of the available wireless networks that appear under the network icon in the taskbar, it would be better if your computer connects to your favored networks automatically. This tutorial explains how you can change the priority or order of wireless networks in Windows 7.

Steps:

1. Open the Network and Sharing Center either from link in the network icon in the taskbar or from Control Panel > Network and Internet > Network and Sharing Center

Network and Sharing center link at the taskbar

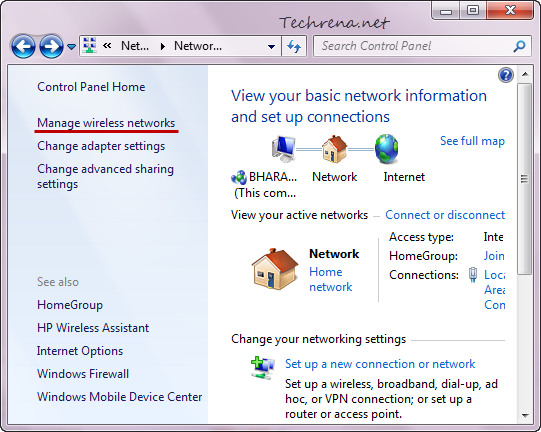
Click on the “Manage wireless networks” link found on the left-hand side pane.

Manage wirelss networks link in the network and sharing center

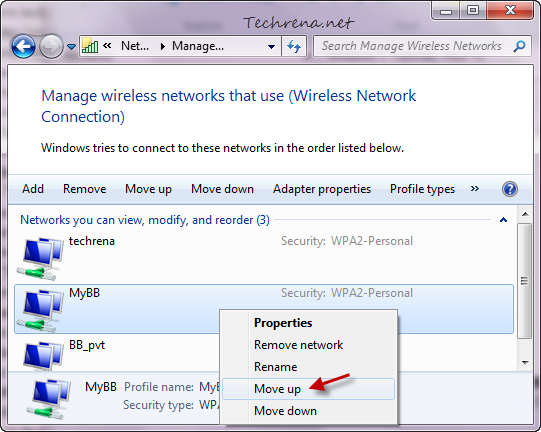
2. In the Manage wireless networks window, right-click on the wireless network for which you want to change priority and you can either move it up (giving more priority) or move it down (lesser priority) depending on your usage.

Move wireless network up in Windows 7

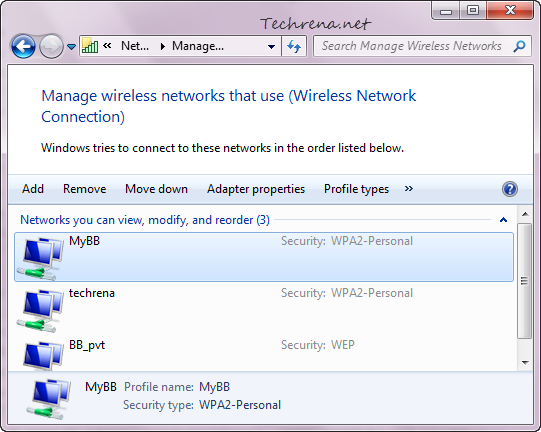
3. Now the order of preference of the wireless networks used by your Windows will be changed.

Wireless-networks-windows-7-priority-changed

You are now done with setting up the priority order for your wireless networks. So from now on, Windows will try to connect to the first one wireless network in the priority list. If it isn’t available, then it will try the next connection and so on. You can also change the settings to not connect to a particular wireless connection automatically.

If you are looking to change the order of priority among the various wired and wireless network cards on your computer, read our popular post on changing the network cards priority order in Windows.