[How To] Change Keyboard Input Language In Windows 7

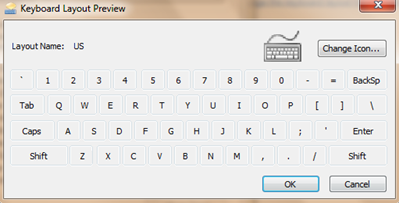
Keyboard layout preview

Windows 7 allows you to change the default input language of your keyboard like most other operating systems do. This is pretty straightforward if you follow the steps mentioned below:

Steps:

1. Go to Control Panel, click “Change keyboards or other input methods” under the Clock, Language, and Region section.
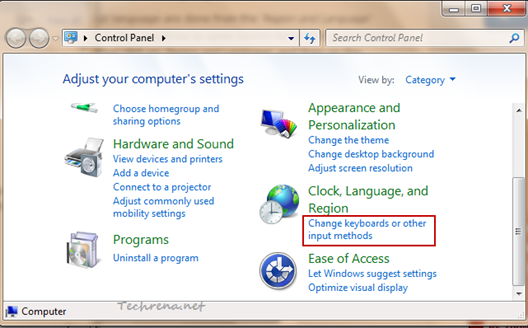
Change keyboards input control panel

2. A new Region and Language window pops up. Click on “Change keyboards..” button:
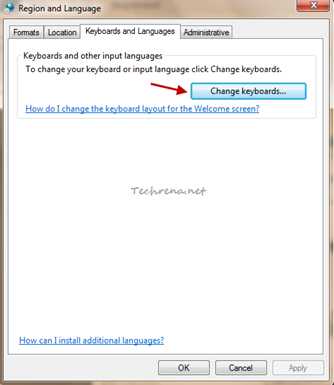
Region and Language

3. Again a new “Text Services and Input Languages” window opens up. To add a new keyboard input language, just click “Add” button found under the “General” tab.
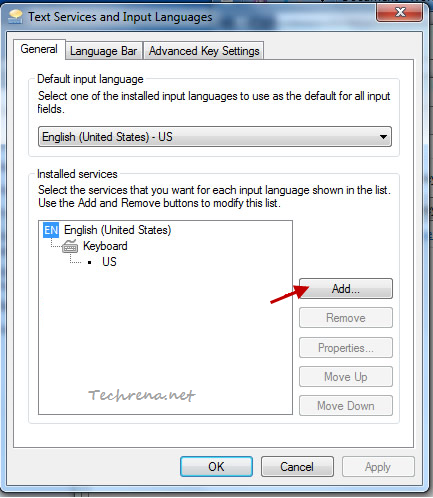
Add keyboard input language

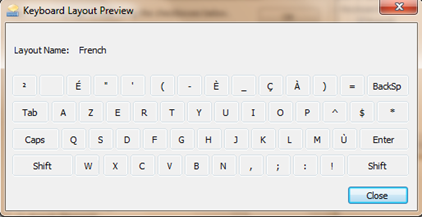
4. Choose the language that you want to add, check against it and click “Preview” too see how it looks like before adding it.
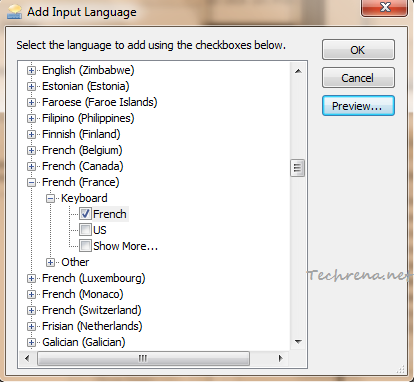
Add input language in keyboard

Keyboard french layout preview

Click OK to add this input language to your keyboard.

5. Your newly selected input language will appear under the “Installed services”.
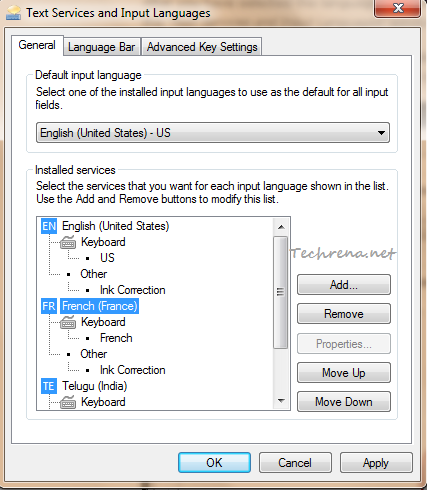
keyboard input languages installed

Select the input language and you can either move it or move down on the order of priority. You will also get an option to “Remove” the added input language.

6. From the “Default input language” option, select the input language that you want to from the dropdown list and click “Apply” button.
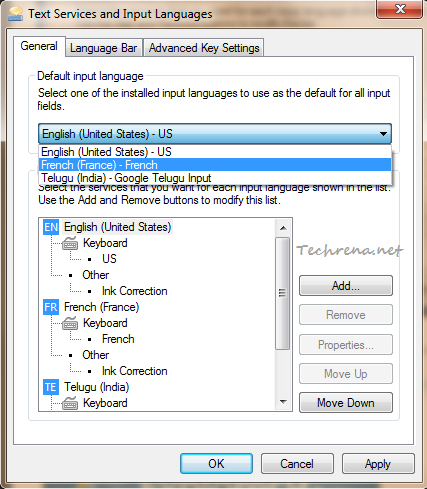
select default input language

That is it! You have successfully changed your keyboard input language. Open notepad or any text editor to test the newly added input language.

[Tip] Disable Or Remove GoogleUpdate.Exe Process

When you install Google products like Google Chrome, Picasa and others on your system, new Google Update service gets installed on your computer, responsible for running “googleupdate.exe” process in regular intervals. This process regularly contacts Google servers to check if there are any updates available to the Google products that you have installed on your system. Agree, this is essential to keep your Google products up-to-date by installing the important security updates etc., but definitely you may not like to dedicate some of your CPU resources to the process to keep it running continuously. The same process is responsible for the Automatic Silent Update feature in Google Chrome. If you don’t want to run Googleupdate.exe process on your computer, follow these steps to stop running it on your computer.
GoogleUpdate.exe process

You can’t find the GoogleUpdate.exe in the start up items using msconfig, but you can surely find it in the Task Scheduler as it gets added to the Windows Task Scheduler.

Steps:

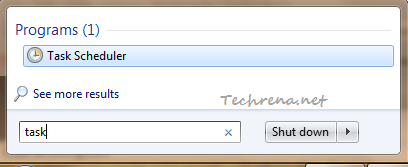
1. Go Start Menu, type “tasks” in the search box and click “Task Scheduler” from the results under “Programs” section.

Task Scheduler from Start Menu search result

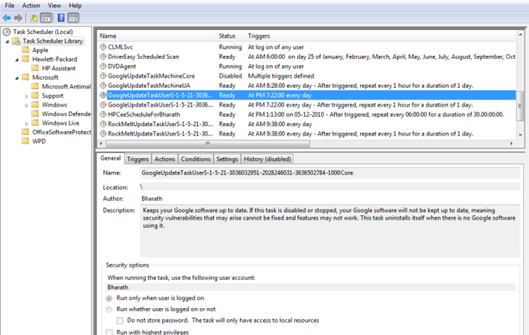
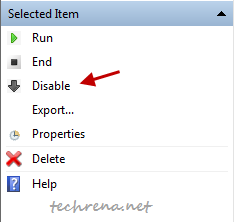
2. Find an entries starting with “GoogleUpdate” in the tasks and disable or remove them to stop running again on your computer.

GoogleUpdate in task scheduler

disable google update tasks

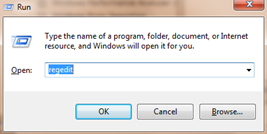
3. Press Windows + R to open the RUN command box, type “regedit” and hit OK.

regedit in run command

4. In the registry editor, try and see of you can find an entry with value “Google Update” in the following paths:

   HKEY_LOCAL_MACHINE\Software\Microsoft\Windows\CurrentVersion\Run                                                     
                        and       
   HKEY_CURRENT_USER\Software\Microsoft\Windows\CurrentVersion\Run

If you could find a value with that name, right-click on “Google Update” and select “Delete”. Restart your system to see the changes in effect.

Please note that when you remove GoogleUpdate.exe, the Google software will not be updated automactically you might need to download the updated versions manually. Also when you install any other products like Google Earth, the GoogleUpdate.exe comes back to your system and you might need to repeat the above steps all over again!

Fix The AVG Post Update Issue With Windows 7 64-Bit Computers

AVG logo

64-bit Windows 7 users who are using the free AVG 2011 edition and downloaded the free update 271.1.1/3292 (432/3292) released yesterday have found that this update conflicts with Windows 7 and make it non-bootable, when they tried to restart the system just after installing the update. The affected systems fail to boot the Windows leaving an error message:

STOP: c0000135 The program can’t start because %hs is missing from your computer. Try reinstalling the program to fix this problem.

AVG responded quickly to do the damage control and issued a few fixes addressing this post update 3292 issue. Apparently AVG has pulled the update from their servers and issued a detailing on how to fix it:

Fixing the Windows 7 64-Bit Issue Post AVG Update:

According to the information issued by AVG,

>> If you have installed the AVG 271.1.1/3292 (432/3292) update and haven’t restarted your system even after the prompt by the AVG to do so, you are lucky. Just install this Fixcorex utility from AVG, this will undo all the changes affected by the update and you can safely restart your Windows after you run this program.

[or]

Alternatively you can delete the following files manually from your system:

C:\Program Files\AVG\AVG10\avgrsx.exe

C:\Program Files\AVG\AVG10\avgrsa.exe

C:\Program Files\AVG\AVG10\avgchsvx.exe

C:\Program Files\AVG\AVG10\avgchsva.exe

>> Critical- If the AVG update has dumped your Windows: If you have already installed and restarted your machine and not able to get into your Windows 7 installation, read this tutorial to fix the issue.

The issue was reported in some Windows 7 users running 64-bit OS. If you have not downloaded the update your system is fine and no need to worry at all.

[How To] Change Sounds In Windows 7

Change Sounds In Windows 7

Windows always has unique styles of system sounds for various events since very long. Windows 7 just gets better in this aspect with addition of even more sound schemes. The system sounds for various events in Windows 7 are really great and they usually change whenever you change settings like changing Windows theme. Personally I’m very much impressed with these sounds and not really willing to change them. But you know, customization is the most fun part of Windows 7 and you might want to know how to apply a custom sound to a system event (program event). Follow these steps to learn about how to change these sound settings.

Steps:

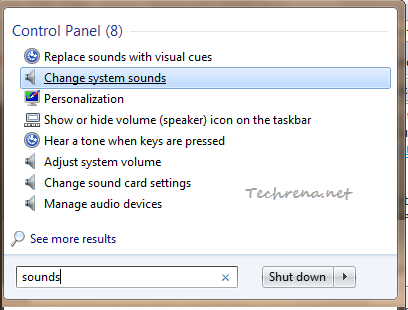
1. Search “sounds” in the Start Menu search and click “Change system sounds” from the results under “Control Panel” section.

Start Menu search result for sound

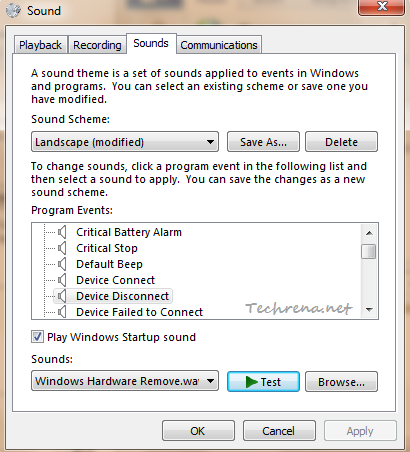
2. A new Sound settings window will open up.

sound-windows-7-settings

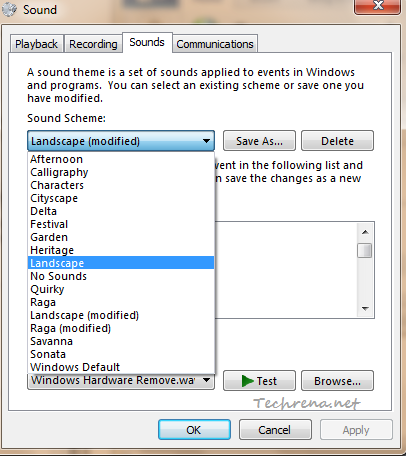
3. Select a sound scheme from the list which you want to edit:

sound-scheme-windows-7-settings

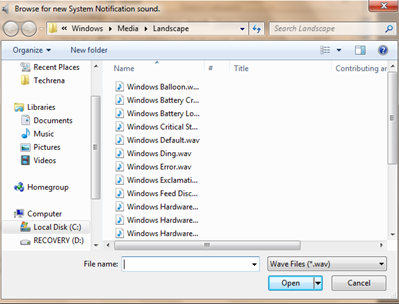
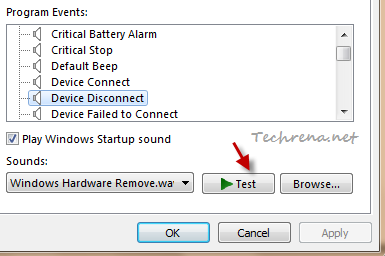
You can then select and test sounds for various program events. Click on “Test” button to preview the sound. To change the sound for a particular program event, click the “Browse…” button to browse a custom .wav (wave music format) music file from your computer to replace it with any other custom sound track.

browse-program-event-sound

Program Event sound in Windows 7

Ensure that you preview the sound before applying the customized sound track to any program event. Click “OK” to apply the sound track.

[How To] Turn Off Windows Search In Windows 7

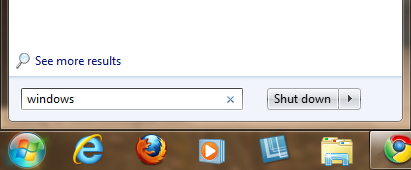
Windows Search has been modified and improved a lot since Windows Vista and is much better in the case of Windows 7. Windows Search is by default turned on all machines running Windows. If you prefer to use a third-party search application instead of Windows Search, you might want to disable the Windows Search so that it doesn’t interfere in the working of the third-party application. Read the following guide to learn how to turn off the Windows Search.

Windows search in start menu

Steps:

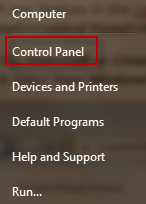
1. Open Control Panel from the link in the Start Menu.

Control panel link in start-menu

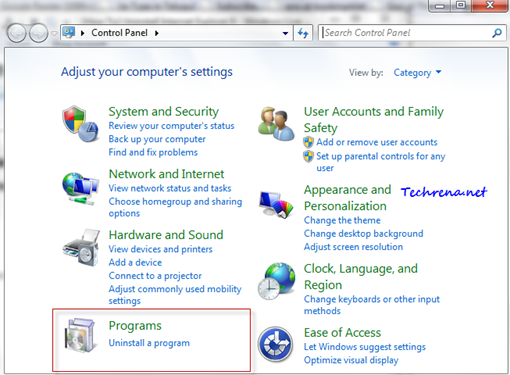
2. Click On “Programs” link on the Control Panel items.

Control Panel items

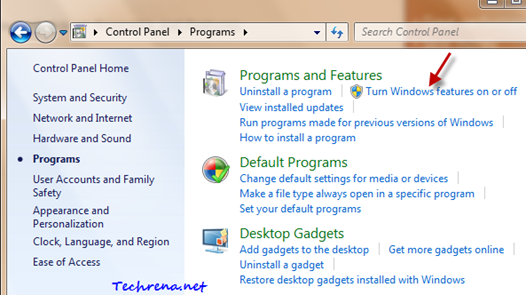
3. Click on “Turn Windows features on or off” link under “Programs and Features”.

Programs-control-panel

[You can also open the same by searching “Windows features” in the Start Menu and then by opening the “Windows Features”.]

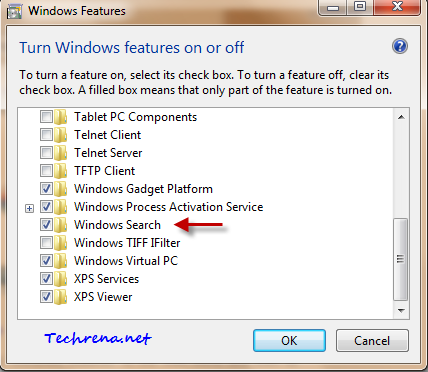
4. Windows Features settings would now open up. Scroll down until you find “Windows Search”.

Windows-features-windows-search

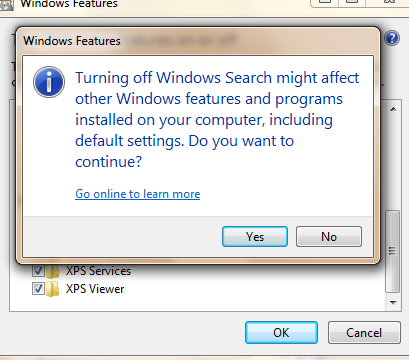
Uncheck in the checkbox against “Windows Search” and you would be presented with a warning. Click Yes to continue.

Windows search turn off warning

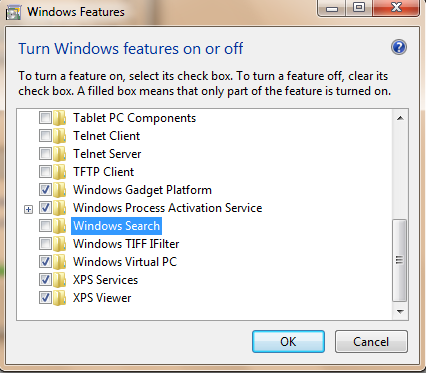
5. Click “OK” button to apply the settings.

Windows search off

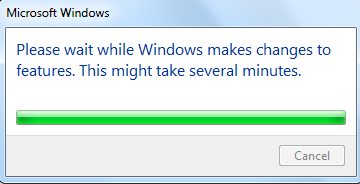
It may take several minutes for Windows to make changes to the Windows Features.

Windows-making-changes-wait-message

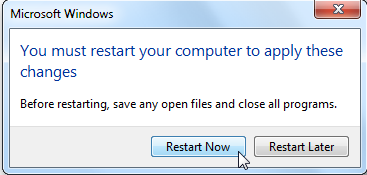
6. You need to restart your computer to see the changes in action.

Windows Restart to apply changes

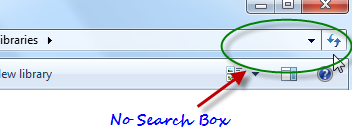
When you see your computer after the reboot, you will find that all the search boxes in Windows are gone! There won’t be search boxes in the Start Menu, Windows Explorer, Control Panel and Libraries.

No search box in Start Menu

Windows Search box missing

If you want to turn the Windows Search feature on, just go back to the step 4 and check the “Windows Search” option to enable it again.

[Download] Free Excel 2010 Ebook From Microsoft

Microsoft has released a new eBook for Excel 2010 users who have upgraded from earlier versions like Excel 2003. Titled Rev Up to Excel 2010: Upgraders Guide to Excel 2010, the book is authored by Bill Jelen of MrExcel.com. This 250-page ebook covers every nook and corner of the latest Microsoft Excel 2010 software.

Excel 2010 ebook

The book is divided into 20 chapters.The first 11 chapters of the book deal with all the new changes in the Excel 2010 interface. Chapter 12 speaks about the new features and functions in Excel 2010. Chapters 13 through 20 are about data wrangling and business intelligence.

This book is a must and will be of great help particularly if you are upgrading from an earlier version of Excel to the latest Excel 2010.

Download Rev up to Excel 2010: Upgraders Guide to Excel ebook [16.2 MB]

[Download] Harry Potter And Halo Reach Windows 7 Themes

Microsoft has released fresh themes to the Windows 7 themes gallery as it has been doing all the time. The recent new theme packs are “Harry Potter”, “Halo Reach: Art Inspiration”, and “Halo Reach”.

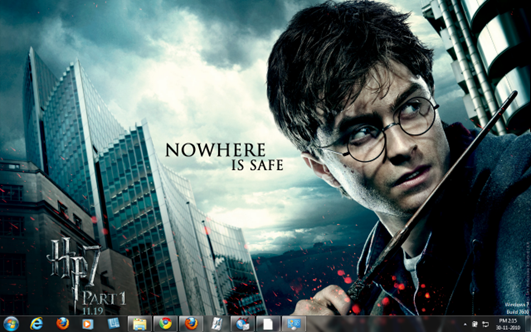
Harry Potter theme packs six high resolution desktop wallpapers showing lead roles Harry Potter, Hermione, Ron etc. from the latest Harry Potter 7: Part 1 film. [Download]

Harry Potter 7 Windows 7 theme

Halo Reach: Art Inspiration theme contains thirteen wallpapers providing rather amusing custom sounds, based on the blockbuster Xbox video game Halo: Reach. [Download]

Halo reach art inspiration Windows 7 theme

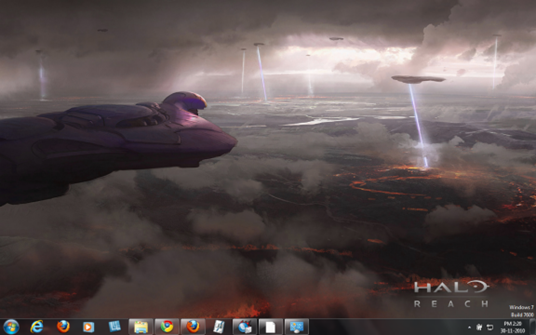
And finally, Halo: Reach theme features twelve desktop backgrounds inspired from the same video game, Halo: Reach.

Halo reach windows 7 theme

Download:

Halo Reach: Art Inspiration

[Tip] Run Program As Administrator Right From The Start Menu In Windows 7

If you are using Windows 7, you might well be knowing by now that you can easily start any program from Start Menu by simply searching for it there. The problem here, which many of us aren’t aware is that when you a program in this fashion, it doesn’t start with administrator rights. There may be times where in you need to start a program for instance a command prompt with elevated rights, otherwise you might receive errors such as “The requested operation requires elevation” etc. Thankfully, there’s a little lesser-known trick available in Windows 7 to execute a program directly from the Start Menu search or quick search run box as administrator. Here is how you can do it:

1. Go to Start Menu, type the name of the program that you want to run in the search box. I’m going to run Command Prompt window as administrator so, in my case, I need to type “cmd” in the search box.

Cmd start menu search

2. Now, when you see the required program in the search results, you tend to hit enter to run it.

CMD start menu search result

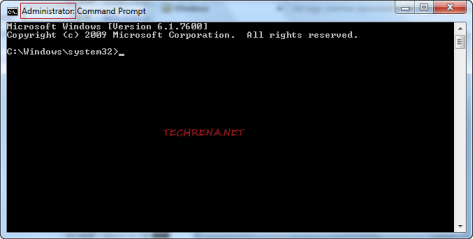
Instead, press Ctrl + Shift + Enter to run the program with elevated (administrator) rights. Click “Yes” when you are asked by UAC to run the program. That’s it! The program runs in administrator mode:

CMD as admin in Windows 7

Note: You can always right-click on the search box results and choose “Run as administrator” to run the program as an administrator as well.

Run CMD as admin from start menu search results

Also learn how to Always Run A Program As An Administrator By Default.

[Tip] Pin Important Folders To The Top In Windows Explorer

Have you ever wondered how could I keep my most frequently used folder at the top in any Windows Explorer window?

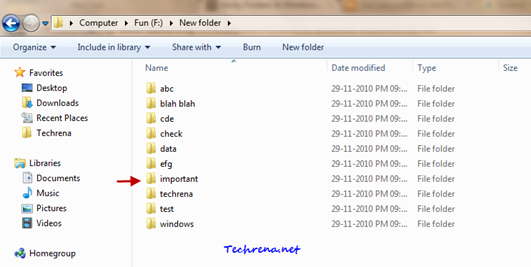
As all of us know, the folders inside any Windows Explorer window are by default sorted by name (alphabetical). So a folder like “important” would always gets listed down in order than say some folder like “abc”.

Windows explorer default view

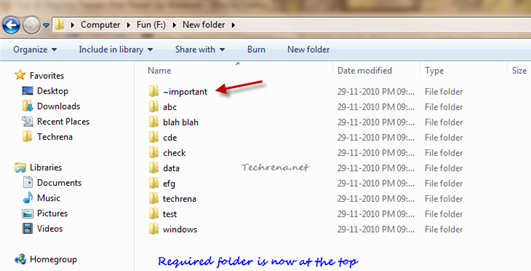
If you can see in the above screenshot, our motto is to get the “important” folder up in the order, right at the top of the list. One simple workaround to get this done is to add some symbols on your keyboard like ~, `, !, #, ^ etc to the folder names that you want to see atop. However please be aware that you can not use symbols like \, /, :, *, ?, “, <, >, | because Windows doesn’t allow these strings to be present in the names of the folders.

Sticky folder at the top of the windows explorer

Try using different symbols in order to use multiple sticky folders at the top of the Windows Explorer. If you use same symbol for any two folders, they are still going to be sorted by their names as shown:

Two folders starting with same symbol

Avoid using digits instead of symbols as the whole name looks a bit cluttered if you prepend a numbers like 1, 2, 3 etc. at the beginning of the name of the file.

[via] Labnol

[How To] Disable Aero Snap In Windows 7

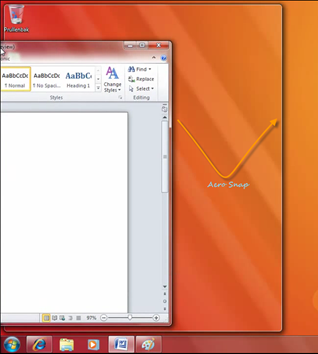
Aero Snap” is a new feature introduced in Windows 7 as part of the windows management. In short what it does is when you drag a window to the top or towards the side of the screen, it gets maximized (when dragged to top) or resized (when dragged to side) automatically to fit that portion of the screen.

Aero Snap

The minor problem here is when you want to hide the window by dragging it to the side of the screen, it gets resized instead. Also this is also a worthless feature of you use multiple monitors. Whatever may be the reason, just in case if you want to disable this feature, read the following guide:

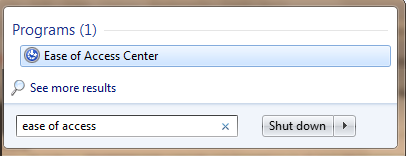
1. Type “ease of access” in the Start Menu search and open the result from the Programs section.ease of access start menu search

You may also open the Ease Of Access Center from the Control Panel menu.

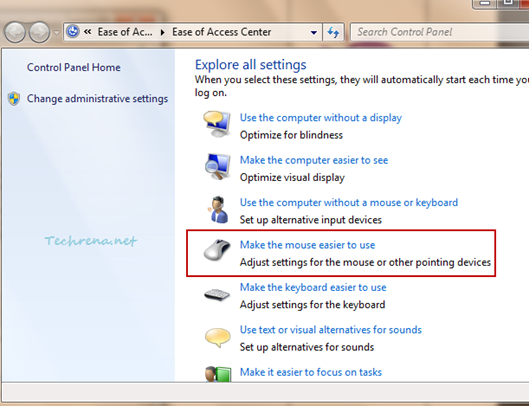
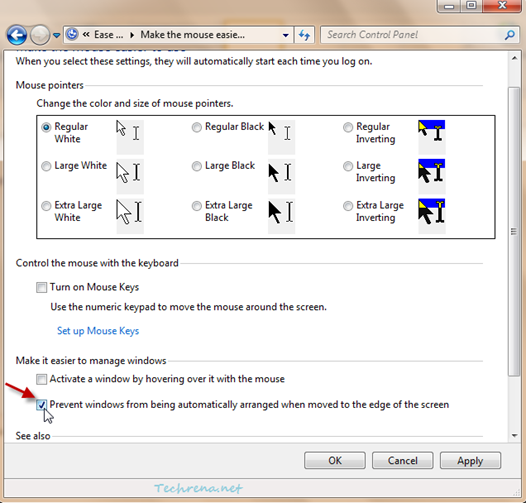
2. In the Ease Of Access Center, scroll down and click “Make the mouse easier to use

Ease of Access Center

3. A new window (Control Panel \ Ease of Access \ Ease of Access Center \ Make the mouse easier to use) will open up.

Scroll down to the bottom of the window, where you will see “Prevent windows from being automatically arranged when moved to the edge of the screen”. Check against it and click OK to apply the settings and close the window.

Make mouse easier to use settings

That’s it. You have just turned off the Aero Snap on your Windows 7. To enable the Aero Snap feature back on your computer, just uncheck the option in the step 3.