[How To] Use SFC Scannow Command In Windows 7

Windows 7 logo

SFC (System File Checker) is a very useful command to check the integrity of all the protected system files in Windows 7 and Vista and replaces any corrupt, changed or missing system files (including DLL files) to correct versions (undamaged versions), if possible.

Even though there are several switches available under the SFC command, the sfc scannow is the most used command. If SFC can’t fix the corrupted system files, then you need to consider other options like using a recovery, reinstalling  Windows, restoring from backup, or restoring to an earlier system restore point.

Here is the step-by-step guide on using the SFC /scannow command tool in Windows 7 or Windows Vista:

Steps:

1. Click Start button, type “cmd” in the start button, right-click on the “cmd.exe” and select “Run as administrator” to run the command prompt in elevated or administrator mode.

running cmd as an administrator

2. Type the following command in the command prompt and hit enter:

sfc /scannow

Sfc /scannow command

3. Now the toll will run a verification of integrity of every protected operating system file. Wait until the system scan is finished. This usually takes 5-10 minutes.
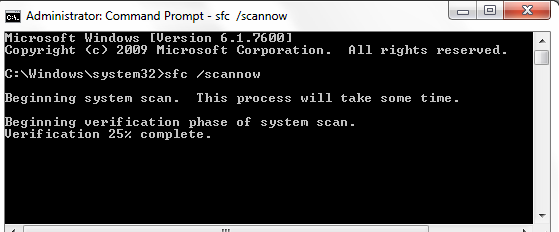
Sfc /scannow command scan progress

4. When the scan is finished, you will “Windows Resource Protection did not find any integrity violations” message when it doesn’t find any corrupted files.

On the other hand, if it does find any corrupt files, it will automatically (if it’s possible) repair them. Restart your computer once the repairing process by the SFC tool gets over (as indicated in the command prompt). Please note that if the System File Checker (SFC) finds any integrity violations and fixes them, you should restart your computer immediately even if you are not prompted to do so.
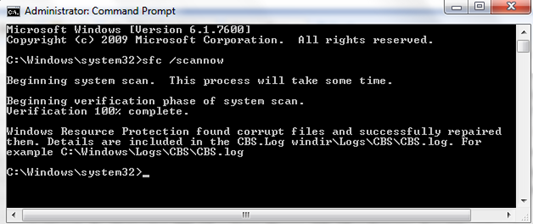
Sfc /scannow command scan repair successfull

Run the sfc / scannow command once again (after restarting your PC) to see if all the corrupted system files have been repaired.

The SFC command writes the log to CBS.log file found in C:> Windows > Logs > CBS.

When To Use The SFC Tool ?

When any Windows Resource Protection (WRP) file goes missing or corrupted, your Windows behaves in an odd manner. Windows functions may not work or entire Windows may crash unexpectedly. Run the SFC tool in such situations to repair any missing or corrupted system files.

[Download] Cumulative Security Update For Internet Explorer KB2360131

Windows Update

Microsoft has released security update KB2360131 to  address the vulnerability that was mentioned in the Microsoft Security Bulletin MS10-071.

The users of Windows Vista and Windows XP have been advised to install the update KB2360131 to address the security issue that could allow an attacker to gain control over a computer running Microsoft Internet Explorer by executing a remote code.

The update has been issued for Internet Explorer 7 and Internet Explorer 8 versions running on Windows XP, Windows Vista. Find the download links added below to download the update patch to keep your computer and Internet Explorer safe from the attackers.

Download Links:

  Windows Vista Windows XP
Internet Explorer 8 x64 (18.2 MB): x86 (9.3 MB) x64 (40.1 MB): x86 (9.9 MB)
Internet Explorer 7 x64 (36.7 MB): x86 (7.6 MB) x64 (14.7MB): x86 (8.8 MB):
     

Microsoft had released similar updates in the past: Cumulative security update for IE.

[How To] Change Desktop Icons For Computer And Recycle Bin

Windows 7 can show desktop shortcuts for any program (you can add as many as you can), but by default shows the following:

Computer, User file’s folder, Network, Recycle Bin (full), Recycle Bin (empty)

default desktop shortcuts

Windows shows some default icons for “My Computer” (Computer in Windows 7) and “Recycle Bin” and other shortcuts on the desktop as shown:

Computer icon in windows 7Recycle bin icon in windows 7

If you want to change these icons and add your own icons, follow these instructions:

Steps:

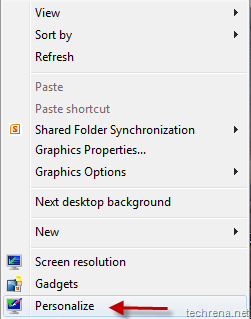
1. Right-click on empty space and choose “Personalize”:

Personalize in desktop context menu

2. A new Personalization window opens up. Click “Change desktop icons” link in the window.

change desktop icons shortcut in personailzation Windows 7

3. Select the item for which you want to change the desktop icon (example; Computer, Recycle Bin etc., ) and click on “Change Icon”.

desktop icon settings for computer

desktop icon settings for recycle bin

4. In the next step, choose an icon from the list of the icons available already or you can even browse for icons in your computer. You can also create your own icon using the many freeware software available on the internet.

change icon desktop icons

You are done! Check the desktop icon back and it should reflect the change as shown:

computer icon changed

You can change desktop icons for the any of the five items discussed at the beginning of this post. Mean while if you are facing problems with broken icons on your desktop, read this post to fix the broken icons.

[Tip] Show File Extensions In Windows 7 & Vista

Windows logo

Windows 7 hides the extensions of the files by default to keep t simple. However you can easily know the extension of any file just by looking at its icon. However, it may sometimes can get as bad as it can, suppose an attacker copies an .exe file to your computer and renames it as something catchy like “sensational-pic.jpg.exe”, now as Windows 7 doesn’t show the file extensions, all you will see is “sensational-pic.jpg” (.exe part would be hidden!)which might falsely lead you to think it as a picture and click it all just to run the whatever code the attacker has injected into the program.

And I guess I have convinced to find out a way to show the file extensions in your Windows 7 Smile. That’s why I’m writing a step-by-step tutorial to explain to show the file name extensions that had been set to be hidden by default.

Steps:

1. Open My Computer (Use Alt + E button).

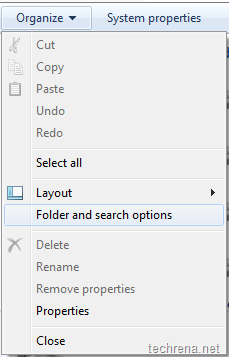
2. Click Organize button, select “Folder and search options from menu”.

Folder search options in windows 7

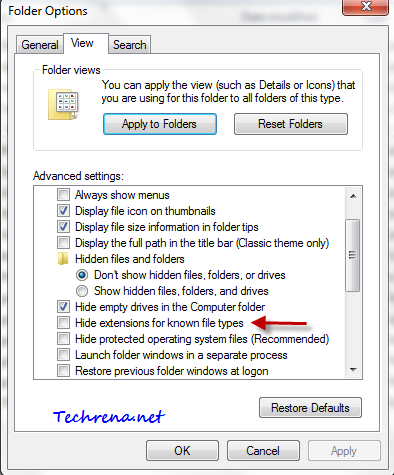
3. In the Folder Options window, go to “View” tab.

View tab in folder options

4. Under the View tab, uncheck “Hide extensions for known file types”.Hide extensions for known files under folder options

5. Click Apply to save the settings and then click OK to close the window.

Alright, you have now changed the settings to enable the file extensions. Here is what the change would be like:

Before:

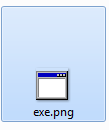
file_ext_disabled

Guess what type of file it is?

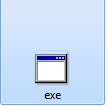
After enabling file extensions:

file_ext_before

It is an image file! It is evident after changing the settings to show the extensions for file types. The only problem that you might face is during renaming the file, except that you shouldn’t be having too many issues with these settings enabled. To hide the file extensions, just check against “Hide extensions for known file types” in the step 4.

[Download] IE8 & IE9 Compatibility View List

Internet explorer logo

Even though we are in the age of Internet Explorer 9 , there are still handful of websites that were designed specifically for use with IE7 (or even IE6!) and which may break when rendered in the Inter Explorer 8.

To solve the issues with such websites, Microsoft has included “Compatibility Mode” in IE8. Whenever the browser finds that the URL entered by the user points to a website that is mostly compatibility with IE7 and older versions, the browser will quickly switch to the Compatibility Mode to render the content as it would be seen in the older versions of the Internet Explorer.

IE8 (as well as IE9) maintains a native list of websites that are to be rendered “Compatibility Mode”. To view this Compatibility view list in your browser, type the following in the address bar:

res://iecompat.dll/iecompatdata.xml (IE8)

File:\\%LOCALAPPDATA%\Microsoft\Internet Explorer\IECompatData\iecompatdata.xml(IE9)

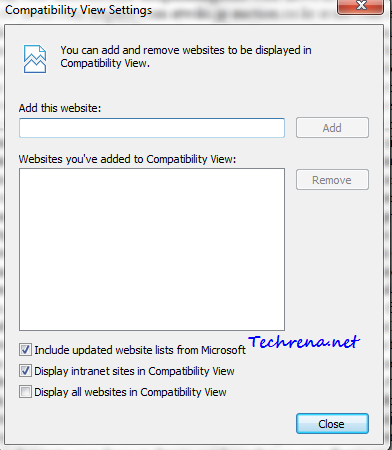
You can also add your own websites  to the list (IE8 or IE9) by clicking on the Alt button > Tools > Compatibility View Settings:

compatibility view settings

Microsoft now and then updates the Compatibility View List by including or removing websites to the list. It is rather surprising to find that websites from Microsoft own domain are featured in the list (Microsoft.com and Live.com). Download the latest Compatibility View lists in (xls format) for IE8 and IE9 from the links given below:

IE8 Compatibility View List (Updated on 04/17/11 – Link expired)

IE9 Compatibility View List

[How To] Disable HomeGroup In Windows 7

HomeGroup is a new feature introduced in Windows 7 to share music, files and others between two or more Windows 7 computers through the network. But if you don’t have any other Windows 7 in your local network,  then you cannot use “HomeGroup” feature. You might want to disable the HomeGroup feature in such scenarios to save some resources that are currently being used for running HomeGroup services.

Here is a step-by-step guide on how to disable the HomeGroup feature in Windows 7.

Steps:

1. Open Start menu and click on “Computer”.

computer_link_start_menu

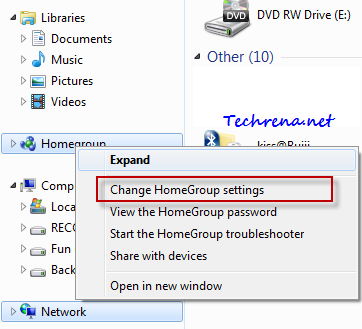
2. Right-click on “Homegroup” icon/link found in the side navigation bar.

Homegroup right-click my computer

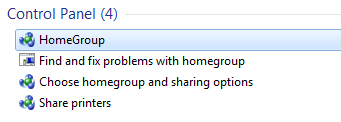
Alternatively, type “homegroup” (without quotes) in the Start menu and click “HomeGroup” item from the results under “Control Panel”.

Control panel homegroup result

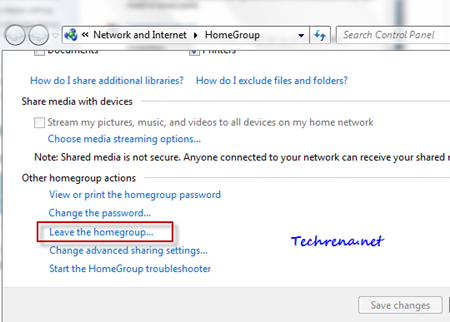
3. Click on “Leave the homegroup..” found under “Other homegroup actions”.

leave homegroup option in settings

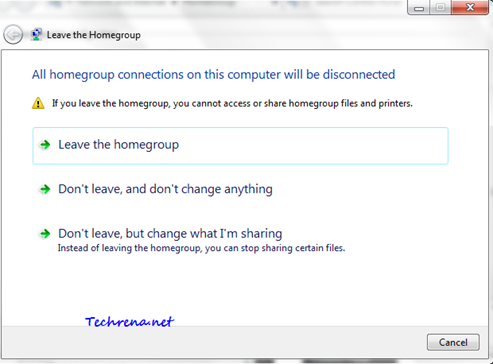
4. In the Leave Homegroup confirmation window, select the first option “Leave the homegroup

leave homegroup

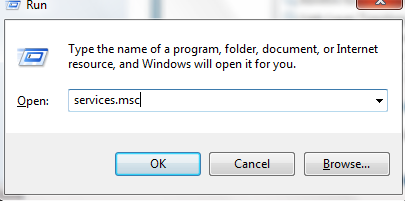
5. Press Start button + R to open RUN tool and type “services.msc” in the filed and press OK.

services.msc in run command

6. Locate  HomeGroup Provider and HomeGroup Listener in the services list.Homegroup listener and HomeGroup provider in services

7. Right-click on each of them and select Properties . Choose Disabled from the dropdown next to the Startup Type.

startup type disabled

8. Click Apply and then press OK to save and close the settings. Exit the Services and reboot your PC.

Now you have successfully removed HomeGroup feature and its processes in your Windows 7. If you check any explorer window after rebooting it, you will find that the “Homegroup” icon is gone as shown.

Homegroup icon missing

[Tip] Disable Startup Sound In Windows 7

To begin with, why would anyone want to disable the startup sound (also known as welcome sound) in Windows 7? Well, I don’t have an exact answer, but I’m sure somebody wants to do it just for the sake of experiment or just to learn how to do it. If you are bored of hearing the routine sound everyday when you start your PC, you might either want to disable the start up sound or you might want to change the soundtrack that Windows plays during startup. While we cover the changing start up sound part in another post, let us guide you through the details about how to disable (turn off) Windows startup tone in Windows 7.

Steps:

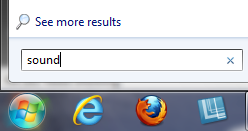
1. Go to start menu and type “Sound” in the search field.

sound_start_menu_search

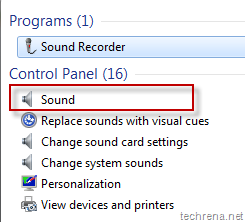
2. Open “Sound” item from the results in “Control Panel” section.

sound_search_results_control_panel

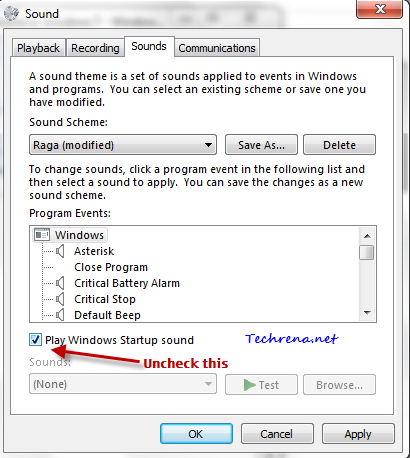
3. Go to “Sounds” tab in the sound settings window.

Sound in control panel

Uncheck against “Play Windows Startup sound”.

4. Click Apply and then click OK to close the settings window.

windows_startup_sound_disable

That is all you needed to do. Windows 7 startup music will no longer be played while booting your Windows 7 from now on. To enable the startup sound playback during the system boot again, just check against “Play Windows Startup sound” and save settings.

[Download] Security Update For Microsoft Silverlight KB978464

Microsoft Silverlight logo

Microsoft has issued the security update KB978464, dedicated to solve the issues with Microsoft Silverlight.

The update KB978464 contains the file “runtime\Silverlight.3.0.exe”. From this it can be said that the update actually is intended for the Microsoft Silverlight version 3. But the latest version of the product is Silverlight 4. You might need to check the version of Microsoft Silverlight installed on your computer. If you have the latest version on your computer, the update will fail to install saying “A newer version is already installed”.

Download the update from the link below to install it in case if you haven’t got the latest version of the Silverlight. This update has been released as part of the bulletin MS10-060 and applies for Microsoft Silverlight for Windows as well as for Macintosh computers(only for Mac OS X 10.4.11 (Leopard) or later versions running on an Intel-based Macintosh computer).

Supported Operating Systems: Mac OS X, Windows 7, Windows Vista, Windows X, Windows XP Service Pack 2, Windows Server 2008 & Server 2008 R2.

Download KB978464 (File Size: 4.7 MB)

[Download] DirectX 11 For Windows 7 & Vista

After releasing DirectX 10 for Windows Vista, Microsoft has released its successor DirectX 11 with Direct3D 11 keeping Windows 7 gamers in mind.

DirectX 11 for Windows 7

DirectX include the APIs like DirectDraw, DirectMusic, DirectPlay, DirectSound. The “X” in DirectX denote all these APIs. DirectX 11 (with Direct3D 11) for Windows 7 boasts of many feature improvements over its predecessor and promises to provide rich gaming experience for Windows users.

The new features in DirectX 11 include:

>> Tessellation: Tessellation in simple terms is like tiling of a plane. With tessellation, higher dimensions images etc. are possible. This is implemented on the GPU.

>> Multi-Threading: With the help of Multi-threading in DirectX 11, developers can take the full advantage of the power of multi-core processors.

>> DirectComputer: This feature besides from improving graphics, can also improve the day-to-day tasks that the users accomplish on their PCs like video editing using Windows Movie Maker in Windows 7 etc.

Although Windows 7 will not have any compatibility issues with games that use older versions of DirectX (like DirectX 9 or DirectX 10 etc.), the new features in DirectX 11 will appeal to the PC gamers a lot.  If you are looking for DirectX 11 based cards from the graphics manufactures, you can visit the links for: ATI DirectX 11 & nVidia DirectX 11. Find the download links for DirectX 11 (DirectX2D 11) for Windows 7 and Windows Vista below.

Download Direct3D 11:

Windows 7 Direct3D 11 (DirectX 11) Web Installer

DirectX 11 SDK

[Tip] Change The Registered Owner And Organization Name in Windows 7

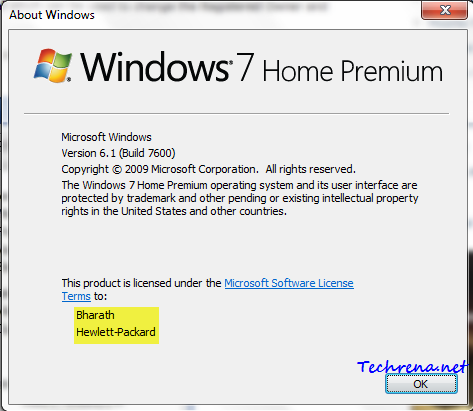
When you are installing Windows 7 or Windows Vista, you will be prompted to enter your name and your organization name during the setup. Once you have given that, the Windows will be registered on the names that you had provided during the Windows initial setup. To see the current Windows owner name and organization name according to Windows, type “Winver” in the Start Menu and launch the windowsver.exe program.

Winver from start menu programs

About Windows

As you can see in the above screenshot, my Windows has been registered with my name and the Organization name (manufacturer name here).

This will show up even when you open any native Windows application and click “About”. For example, “About Notepad” from the Notepad application also will lead to the same window as shown above.

Unfortunately, Windows 7 or Vista do not provide a native support to change this data after the installation process. But then, we have the pretty useful Registry Editor , through which we can tweak this to whatever we like. Follow the steps written below carefully to to perform this editing.

Warning: As always, working with Registry Editor can be extremely dangerous. Do make a backup of the registry . Even a small mistake can lead to utter disorder of the OS.

Steps:

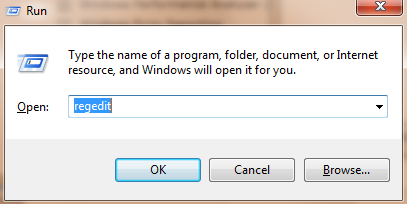
1. Press Start + R and type “regedit” in the text filed and press OK. Accept the User Account Control (UAC) prompt and proceed to the next step.

regedit run command

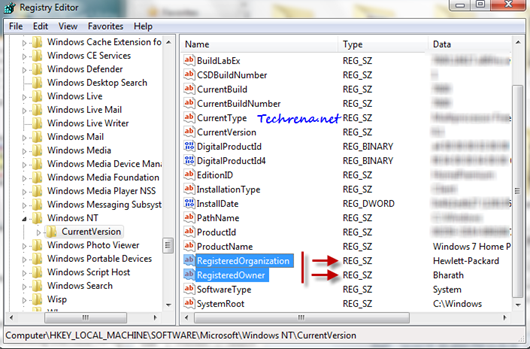
2. Navigate to the following path in the Registry Editor:

HKEY_LOCAL_MACHINE> SOFTWARE> Microsoft> Windows NT>  CurrenVersion

Reg_key_win_owner_name

3. Find two registry key entries “RegisteredOrganization”, “RegisteredOwner” in the left pane (see the screenshot below).

regedit owner and organization

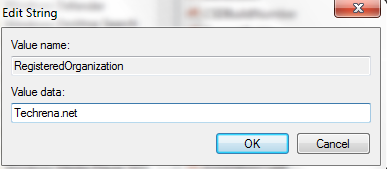
4. Change the data values against “RegisteredOrganization” and “”RegisteredOwner”  to whatever you like:

Edit owner and registered owner info

That is it. You can again open the Winver command to see if the change has happened.