[Tip] Change Default Action For The Power Button In Windows 7

change power button action

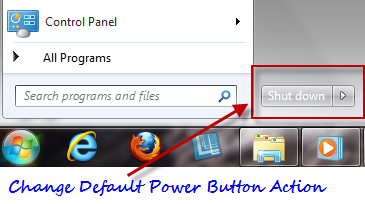
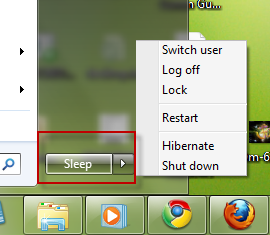
In Windows 7 and Windows Vista, when you open the start menu, you can find the power button being displayed at the bottom of the start menu. This has been placed at the similar position where you find “Log Off” and “Turn off Computer” buttons in Windows XP. By default this power button will have “Shit down” option for Windows 7 and “Sleep” option in case of Windows Vista. But according to your usage and need, you can change the default action for this power button. This article explains you how to change the default action for this power button, with reference to Windows 7 (also works on Windows Vista).

Steps:

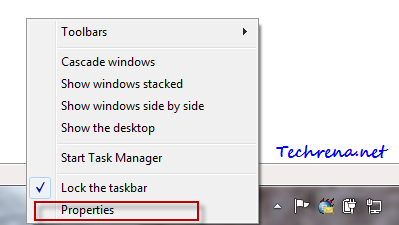
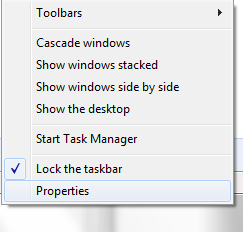
1. Right click on the Task bar and choose “Properties”.

taskbar and start menu properties link in right-click

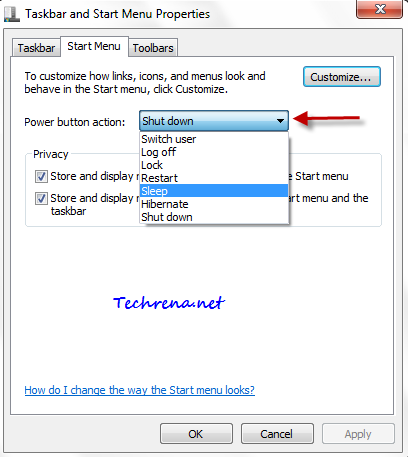
2. Click on “Start Menu” tab in the Taskbar and Start Menu Properties Window

Start menu tab in taskbar and start menu properties

3. Choose your desired action for the power button from the dropdown menu. You can choose an action from the following:

Shut down, Switch User, Log Off, Lock, Restart, Hibernate

Power button action in start menu properties

4. Click on “Apply” to save the settings and click “OK” to close the window. Go and check back the Start Menu, the action for the power button should have changed to what you chose in the previous step.

Power button action

[How To] Rebuild Icon Cache To Fix Broken Icons

Sometimes when you install some program, and place its shortcut somewhere on the desktop or Start Menu, the icon of the program might appear broken (display incorrect icons) in your Windows 7. As you can see in the following screenshot:

Program icon broken in Windows 7Program icon broken in Windows 7 taskbar

It is very annoying to see such broken icons for any programs. Not only that they confuse you what program is it, particularly when you pin such a program to the taskbar. Follow this step-by-step guide to fix the broken or missing icons and show the original icons of the program, works in Windows 7 and Windows Vista.

Steps:

1. Close all the folder windows that are currently open in the Windows Explorer.

2. Launch the Task Manager either by using CTRL + SHIFT + ESC or by right-clicking on the taskbar and choosing “Start Task Manager”.

start task manager

3. Go to the processes tab, find “explorer.exe” in the list. Right-click on it, choose end process.

End explorer process

4. Go to File >  choose New Task (Run..) from the menu.

Run new task in Windows Task manager

5. In the Create New Task dialogue box, type “cmd” and click OK to open the Command Prompt window.

Create new task in task manager

6. Type the following commands* one by one in the Command Prompt (Press “Enter” after each command).

IconCache rebuild commands

CD /d %userprofile%\AppData\Local
DEL IconCache.db /a
EXIT

IconCache command prompt

7. Again go to the Task Manager, launch “New Task” from the File Menu. Type “Explorer” in the text filed and hit enter.

Explorer from Create New Task in Task Manager

Your icons should appear fine now.

Background:

This method actually rebuilds the icon cache. The first of the three commands is used to go into the directory C:\Users> username> AppData> Local. The second command will delete the hidden IconCache.db file. And then we restart the explorer.exe process to rebuild the deleted IconCahce file.

You can alternatively, set the Folder Options > Views and change the settings to Show Hidden files and then delete the IconCache.db to the Recycle bin and restart the explorer.exe process.

[Download] KB2300535 Windows 7 Update

Along with KB979538, Microsoft has also released KB2300535 for Windows 7 based systems. KB2300535 addresses the issues with Windows Ribbon in certain applications running on 64-bit systems or 32-bit systems with the /3GB switch enabled.

Windows Update

When you run a certain application that uses the /largeaddressaware option (Windows Live Movie Maker for instance), on Windows 7 or Windows Server 2008 R2 systems, Windows Ribbon sometimes may not be displayed correctly and then the whole application doesn’t work on the expected lines. Microsoft released the supported Hotfix for this issue as well. Until now, users needed to download this Hotfix from Microsoft website to address this issue.

The update KB2300535 is available as Windows6.1-KB2300535-x86.msu and Windows6.1-KB2300535-x64.msu (file size: 1.8 MB for 32-bit systems and 2.9 MB for 64-bit systems). Download the file (strictly for Windows 7 systems) from the link given below. You need to restart your computer after installing this update.

Download KB2300535 [x86 link] [x64 link]

[Download] Windows 7 Update KB979538

Microsoft has just released a new update KB979538 to address issues with Windows 7 while using a USB video device. The issue may include unexpected shutdowns or bluescreens while using the USB video device.

KB979538

The issues with USB video devices arise because of a race condition in the USB Video driver when the device is unloaded. If you didn’t know, Microsoft had already released a Hotfix to solve the issue for those Windows 7 machines that were severely affected by the issue. But now Microsoft has decided to release a software update that can be applied to all the Windows 7 machines irrespective of the issue with the USB Video device being small or severe.

Find the download link below to download the Windows update file called “Windows6.1-KB979538-x86.msu”, 336 KB in size. Restart the computer after installing this update.

Download KB979538

[How To] Disable Access To Control Panel In Windows 7

control panel restriction

If your computer is used by many of your friends or family members etc., you might want to restrict access to Control Panel of your Windows 7 (or Windows Vista) so that they won’t mess up with it. Disabling access to control panel means that they won’t be able to modify the default settings of the programs installed and other settings as well.

Here is the step-by-step by guide to disable Control Panel from your Windows 7. It not only disables access to the Control Panel, it’ll also remove shortcuts present for Control Panel in places like Start Menu etc. I’m going to discuss two ways in which you can do it. While the first method only works for Professional, Enterprise or Ultimate editions of Windows 7 or Windows Vista.

Method-I: Using Group Policy Editor

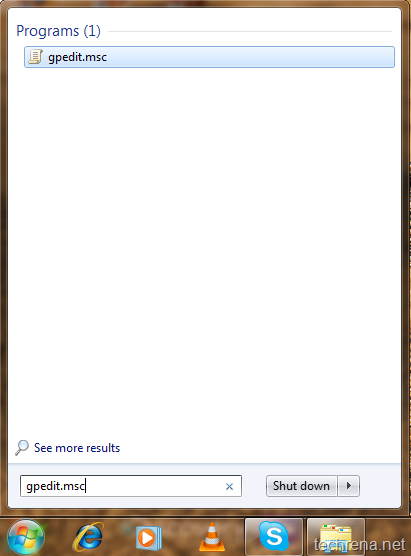
1. Open start menu and type “gpedit.msc” in the search box and open the Group Policy Editor from the results:

Gpedit start menu

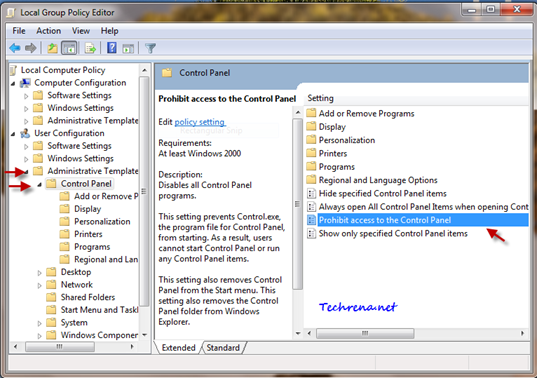
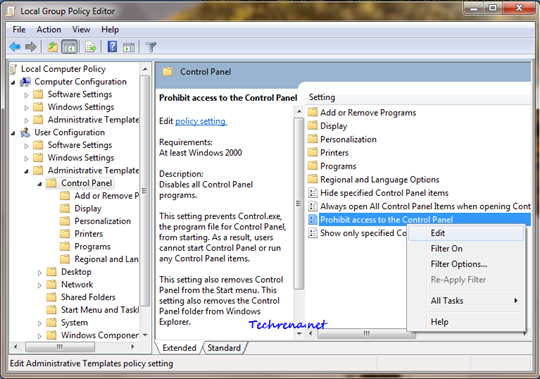
2. In the Group policy editor, expand “User Configuration” and find “Control Panel” under “Administrative Templates” as shown in the screenshot below:

Local Group Policy Editor

3. Find the “Prohibit access to the Control Panel” entry in the right hand side of the window. Either double click on it or right-click and choose “Edit”.

Control panel in Gpedit

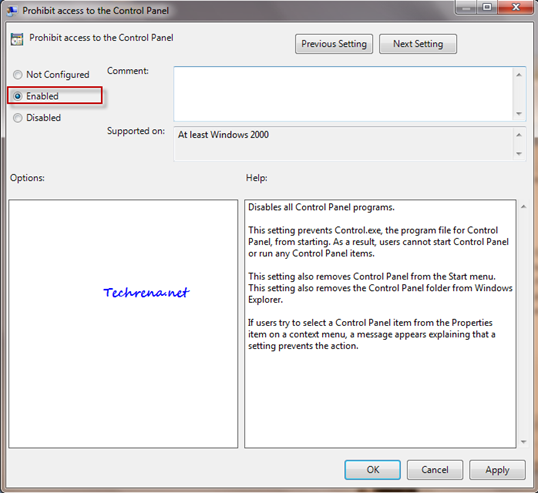
4. Choose the option “Enabled” under “Prohibit access to Control Panel” as shown here.

prohibit access to control panel

Click “Apply” and then choose “OK” to close the window.

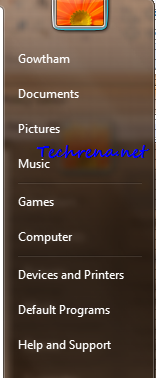
5. Now your Control Panel will get disabled and you can’t even find the link for the same in the Start Menu. Check it yourself:

control panel missing from the start menu

When you try to open it by searching it in start menu, you will get an error:

This operation has been cancelled due to restrictions in effect on this computer. Please contact your system administrator.

Control panel start menu

control panel restriction error

Method- II: Using Registry Editor:

This method works on all versions of Windows 7 & Windows Vista. But this involves a bit of editing the values in registry editor. If you are not acquainted with the Registry Editor much, we strongly advise not to implement this.

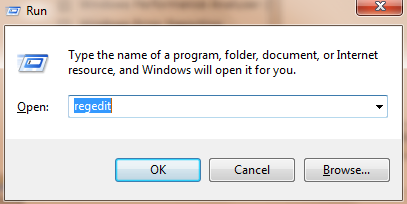
1. Press Start + R to open the run command. Type “regedit” and click OK.

regedit run command

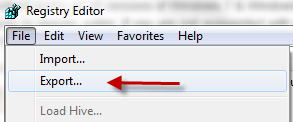
2. First take a backup of the registry editor just to be on the safe side. Go to File > Export and save a backup on your computer.

Regedit export backup

3. Now navigate to the following path in the registry editor:

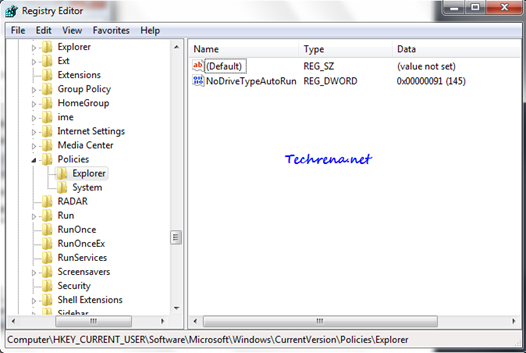
HKEY_CURRENT_USER > Software > Microsoft > Windows> Current Version> Policies> Explorer

Regedit explorer

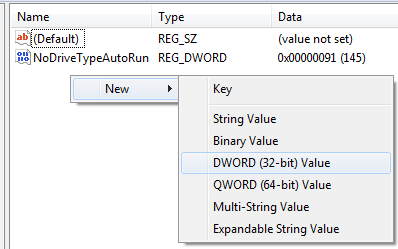
4. Right click on the right hand pane and select “New > DWORD (32-bit) Value

Regedit_explorer_new_key

Give it a value “NoControlPanel”.

NoControlPanel

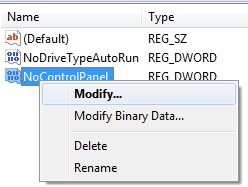
Right-click on the new value NoControlPanel and choose “Modify”.

NoControlPanel modify value

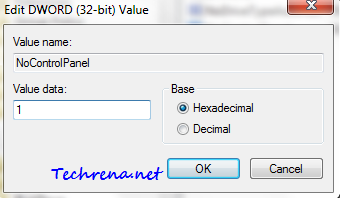
Change the Value Data filed value to “1” from “0” and click OK.

Edit dword value

Close the registry editor and restart your computer and check back. When you check back after rebooting your PC, you will find that the Control Panel is disabled and also is not listed in the Start Menu as shown in the first method.

If you want to enable the Control Panel again, just choose ‘Disabled" (third option) in the step 4 of the first step. In case of the second method, just delete the "NoControlPanel" DWORD Value and the Control would be back once your reboot your system.

Disabling Control Panel is just not enough to restrict users using your PC, If you want to setup advanced controls on your computer, read how to setup parental controls in Windows 7 .

[Tip] Remove Username From Windows 7 Start Menu

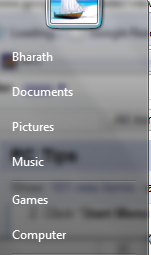
User name in the start menu

Windows users might be knowing well that the Start Menu in Windows shows a username of the user currently logged on to the computer, now matter how many user accounts your Windows has. For some reasons, if you want to remain anonymous by removing your username from the Start Menu, here is the step-by-step guide of what you need to do if you are using either Windows 7 or Windows Vista.

Steps:

1. Right click on the taskbar and select “Properties”.

Taskbar right click menu

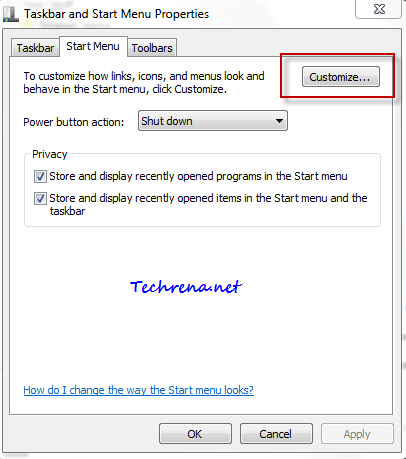
2.Taskbar and Start Menu Properties” window opens up. Go to the “Start Menu” tab in the window. Click on the “Customize” button.

Taskbar and start menu properties

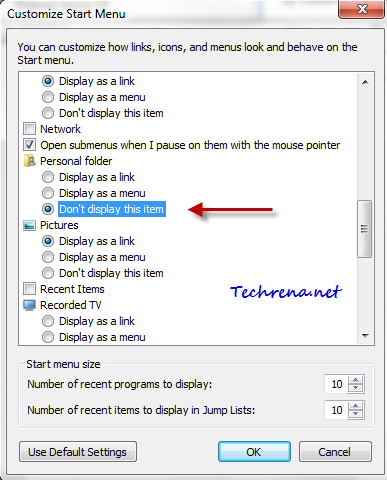
3. Another window “Customize Start Menu” opens up. Scroll the window down until you see “Personal folder” section. By default, “Display as a link” option would be selected. Now as you want to remove your username from the Start Menu, select the last option “Don’t display this item”, Click OK to save the settings.

Customize start menu

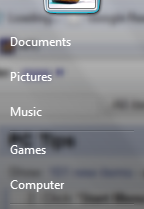
4. Click on the Apply button on the Taskbar and Start Menu Properties and click “OK” to close the window. Now your username will be delisted from the Start Menu as shown here:

No username on the start menu

You are done. Just check “Display as a link” whenever you want to revert back to the default settings to show your user account name back on the Start Menu.

[Tip] Disable “This device can perform faster” Message In Windows 7

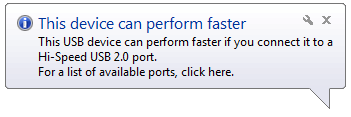
This device can perform faster

Sometimes when you insert an older flash drive or any other drive into USB port of your PC, a message may appear saying “This device can perform faster”. This message appears because there are two USB standards namely USB 1.1 and USB 2.0, the later one being the standard that supports high speed performance with USB devices.

But it may seem annoying when this notifications pops up each and every time you connect the flash drive to the USB port. If you don’t want to see this message anymore, follow these steps below to completely disable this notification:

For Windows XP Users:

device_can_perform_faster_xp

1. When you see the balloon message, just click on it and it will open a new window:

USB host controller properties

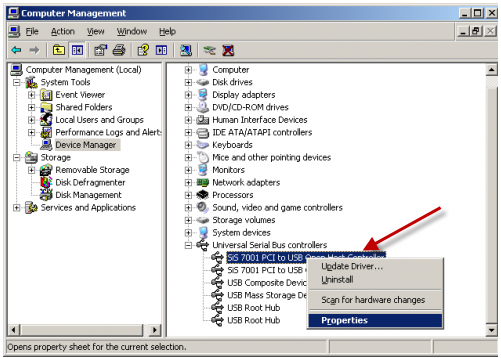
Alternatively, you can open the same window in a different way. First right click on My Computer > Select Manage > and Computer Management window will open up:

computer management in windows xp

right click on the USB device that is connected and click “Properties”, you will still land on the same window. But by this way, you can even disable settings for the other USB ports as well.

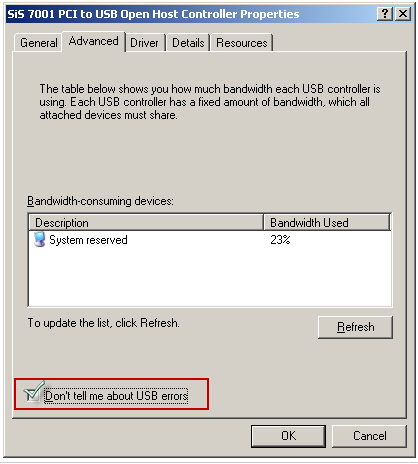
2. Now check against “Don’t tell me about USB errors” and click OK.

You will no longer see the remainder balloon when you connect this device to the USB port

For Windows 7 and Windows Vista Users:

When it comes to Windows 7, the newest Windows OS has got better option than disabling USB errors. In Windows 7, you can choose not to notify even if the device attached to the USB port can perform better.

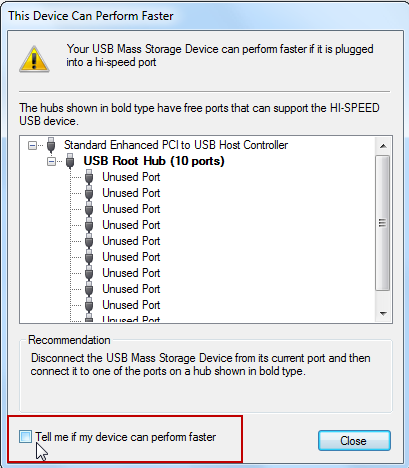
Click on the balloon message, it will show a window listing all available USB 2.0 ports. Uncheck “Tell me if  my device can perform faster” option at the bottom and click Close.

This device can perform faster options in Windows 7

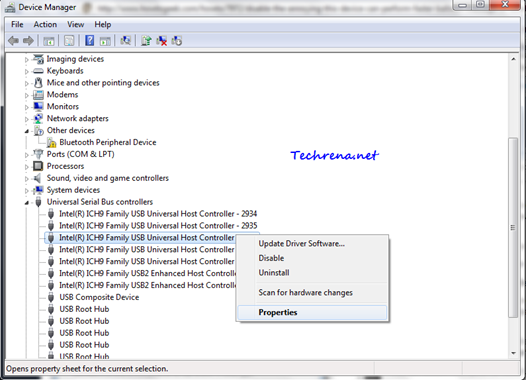
Alternate method: You can disable this option for other USB ports also via Device Manager > Universal Bus Controllers,

Device Manager and USB controllers

right click on the USB port and select properties.

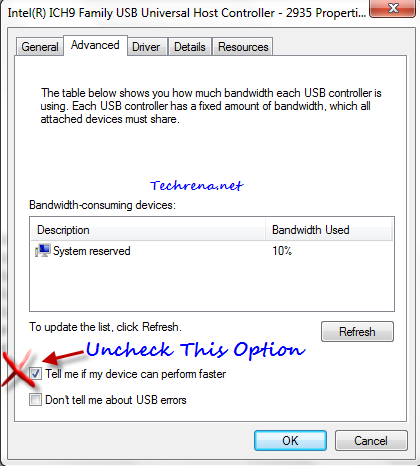
Now go to Advanced in the properties window. Uncheck against “Tell me if my device can perform faster” option and click OK.

USB_host_controller_properties_win7

From now on, you won’t see the balloon notification message when you connect a USB drive into your computer.

[How To] Fix Missing “Show Hidden Files And Folders” Option In Windows 7

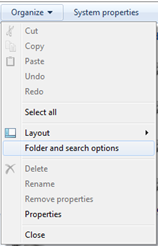
Windows comes with an option to either disable or enable the hidden files and folders. This option can be usually found via Windows Explorer > Organize > Folder and search options as shown here:

Folder and search options in windows 7

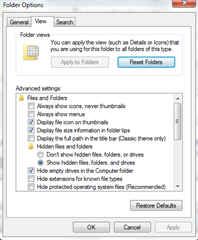
Folder options windows 7

Under the View tab, you must see two options:

  • Don’t show hidden files, folders or drives
  • Show hidden files, folders and drives

Hidden files and folders items

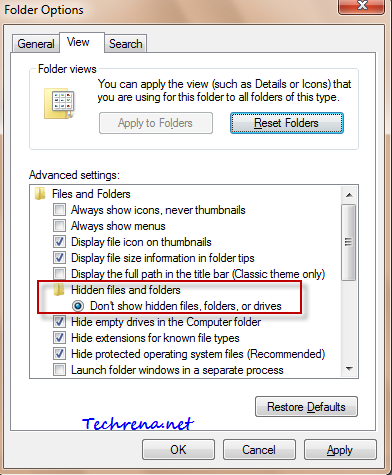
But when your computer is infected by a virus or malware, it can change your default settings to not show hidden files and folders and more often it can even remove the “Show hidden files, folder and drives” option completely, as you can see in this screenshot:

Show hidden folders missing

Even if you scan your computer with any antivirus program and remove the virus, these settings will not be reverted back to default. Hence you must enable them manually. We had previously posted solution to similar problem but it was for showing hidden files and folders in virus affected system in case of Windows XP.

And now let me guide you on how to enable this missing option in your Windows 7 (or even in Windows Vista) folder options.

1. Press “Stat button + R” to open the run command tool.

2. Type “regedit” in the text filed and press enter to open the registry editor.

Regedit from run command

3. Follow the following path and carefully navigate to the same in the registry editor:

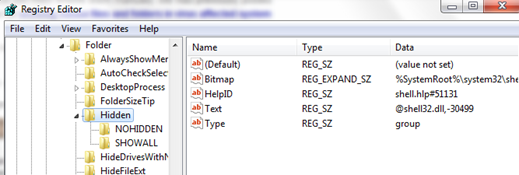
HKEY_LOCAL_MACHINE > SOFTWARE > Microsoft > Windows> CurrentVersion> Explorer> Advanced> Folder> Hidden

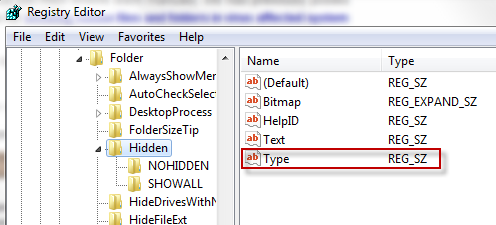
4. In the right hand side, look for a key with name “Type”. It should have a vale “group” under data column. If it doesn’t show this value, then follow:

registry editor

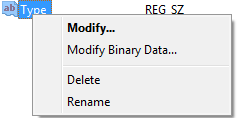
5. Right click on the key Type and chose modify.

Modify regedit

And change the value data to “group”. If the key “Type” doesn’t exist at all, just right click on right hand side pane and select New > String Value and enter the data value as group.

Registry editor vaules

Now open Task Manager (right click on taskbar and choose Task manager), go to processes tab, find explorer.exe, right click on it and choose “End Process”. Don’t get frightened when you see all the windows explorer windows getting closed leaving you with just the windows of the opened programs.

Just go to File > New Task (Run..) from the Task Manager and enter “explorer” in the filed and click OK, Windows Explorer will be back.

Now go back to the folder options and the “show hidden folder..” option should be visible again.

[Download] Windows 7 Hotfix Update KB2028560

kb2028560 update

Microsoft has released an important hotfix update KB2028560 for Windows 7 and Windows 2008 server. This particular update is intended to provide performance improvements for the graphics platform (i.e to improve the performance of DirectX 11 in Windows 7 & Windows Server 2008 R2). This update also addresses the issue with Windows Live products when you have installed the Windows Internet Explorer 9 beta or preview build version on your computer. Instead of uninstalling IE9 when you face issues with Live products, I suggest you to download and install this hotfix and it should solve the issue for you. In fact Microsoft has also said that this update KB2028560 must be installed in order to support features in “upcoming release of an IE 9 platform preview build”.

Although the update is supposed to be an update for DirectX 11, it only includes files that are related to DirectX 10.1, DirectWrite and Direct2D. The gamers who have installed this update have reported no major improvements in DirectX 11 though they seem to have noticed a good fps increase in DirectX10 or DirectX10.1 based games.

KB2028560 Download Link:

Windows 7 (Windows6.1-KB2028560-v2-x86.msu- 1.4 MB) – Validation required

[How To] Change Network Cards(Wired/Wireless) Priority Order In Windows

change network interface card priority

Consider this scenario: You have both wireless network and wired LAN network available at your place and assume that you have enabled your wireless card and connected to the wired LAN network as well. Which one do you think your Windows will choose? Have you ever thought about it?

If you haven’t, here’s what you should know: There is a default priority order (or network binding order) that would be set for each of your network cards. You might not be knowing about this because it’s so hidden in the windows. You can only see it via a “netstat” command or through some advanced settings in the network connections.

Note: All the following operations are done in Windows 7 and they should also work in Windows Vista as well.

Checking Your Network Cards Priority:

Go to Start menu and type “cmd” in the search box and open cmd.exe from the programs list to open the command prompt.

cmd.exe from start menu

And then type the following command in the window and press enter:

 netstat -rn | more

Nestat command in command prompt

You will now see “Interface List” in the results as shown (click on the image to view the bigger image):

Network interface metrics list in cmd

I tried to represent the above result that I got in the command prompt in a text format below:

Interface List

14...00 xx xx xx xx xx ......Bluetooth Device (Personal Area Network)

12...xx xx xx xx xx xx ......Broadcom 802.11b/g WLAN

11...00 xx xx xx xx xx ......Realtek PCIe FE Family Controller

1...........................Software Loopback Interface 1

17...00 00 00 00 00 00 00 e0 Microsoft ISATAP Adapter

19...00 00 00 00 00 00 00 e0 Microsoft ISATAP Adapter #2

15...00 00 00 00 00 00 00 e0 Microsoft 6to4 Adapter

18...00 00 00 00 00 00 00 e0 Microsoft ISATAP Adapter #3

16...00 00 00 00 00 00 00 e0 Microsoft 6to4 Adapter #2

22...00 00 00 00 00 00 00 e0 Teredo Tunneling Pseudo-Interface

As you can see in the above screenshot (highlighted in red), the numbers against the network card interfaces (called “interface metrics”)represent the priority of that network according to Windows. The lower the number, the higher is the priority. In my case Software Loopback 1 (representing Microsoft Loopback adapter) is assigned the highest priority (lowest number #1), followed by Realtek Ethernet adapter (number #11), Wireless LAN adapter (number #12).

So to sum up, my wired network card has been set a higher priority than my wireless network card by Windows. Now let’s assume that my wireless network gives me a faster internet access than what my ISP through the wired network card does. So I’d be keen to connect to the ISP via wireless network card that is offering a faster internet access. But if you are connected to both the wired network & the wireless network, according to the priority assigned, Windows will gives you access to the internet via wired network card by default. So we need to find a way to instruct Windows to let you access the network via wireless network by default, when you are connected to both the wired and wireless networks at the same time. Read on to find out how to do this:

Warning-: You may not want to change the default priority order unless you see some real problem with how Windows is prioritizing the network interface cards.

Changing Network Cards Priority in Windows:

You can change the network card priority in two ways in Windows:

Method #1:

To start with, I’ll introduce you the easier method first:

1. Go to Control Panel > Network and Internet (View network status and tasks)> Change adapter settings and now you will now be in “Network Connections” window.
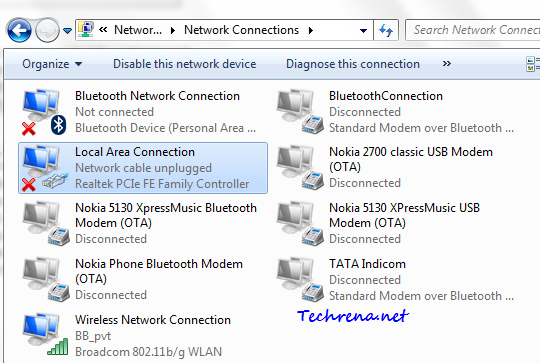
network connections in windows 7

2. Now press Alt button and a hidden menu will appear beneath the location bar.

hidden menu

3. Under the Advanced menu, click “Advanced Settings”.
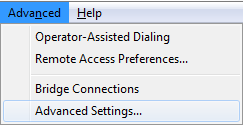
advanced settings in network connections

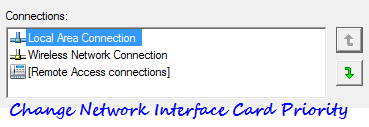
4. You can now see the order of preference in which the connections are accessed by network services.
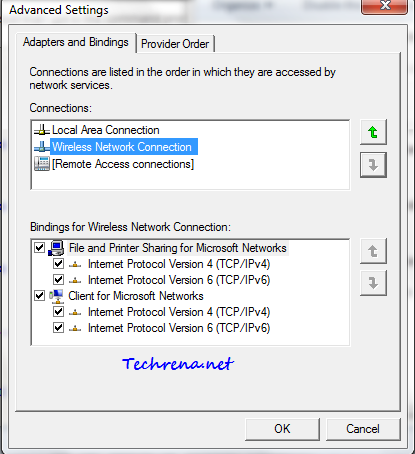
advanced settings for network priority

Use “Up” and “Down” buttons to move a network connection either up or down and thus changing the order of priority of connections.

Method #2:

And now let me introduce you the second alternative method, which is a bit laborious when compared to the first one:

1. Go to the “Network Connections” window by following the step 1 as detailed in the above step.

2. Right-click on the network connections for which you want to change the priority order and choose “Properties”. In my case, I wanted to change the interface metric for my wireless network card and hence I will proceed with the changing priority order for Wireless Network Connection under my network connections.
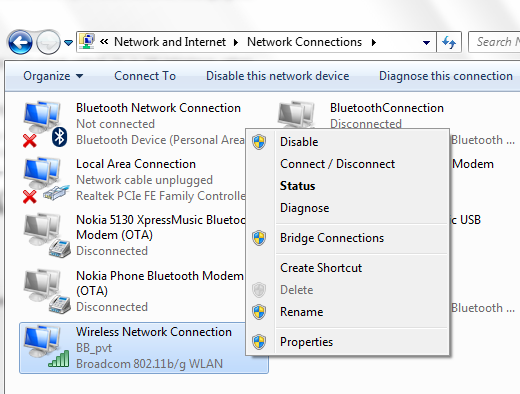
Context menu on network connection

3. Now choose “Internet protocol Version 4 (TCP/IPv4)” and click on “Properties” button.
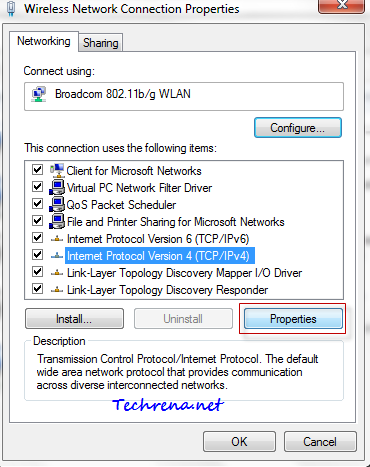
Wireless network connection properties

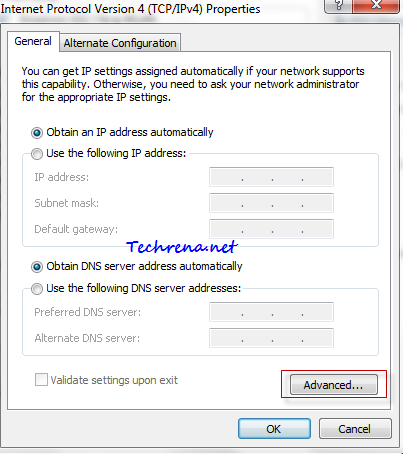
IPv4 properties

Click on “Advanced..” button in the IPv4 properties window.

4. Look for the “Automatic metric” option in the advanced TCP/IP settings window.
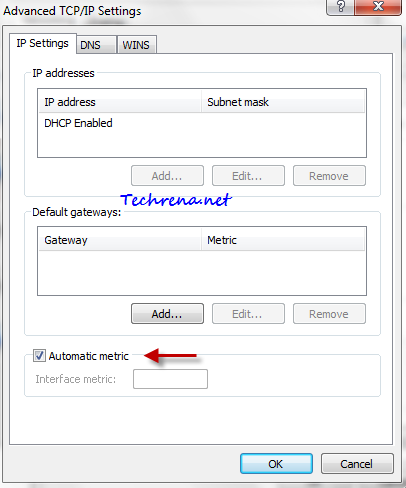
Advanced tcp/ip settings

5. Uncheck against the “Automatic metric” option and enter some value other than 1 in the filed against “Interface metric” (as 1 will always be assigned to Microsoft Loopback adapter always) as shown:
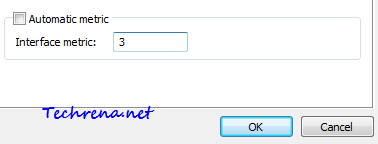
Automatic metric/interface metric value

Click OK and close all the windows.

You have now changed the priority of your network card interfaces.