[How To] Start Windows Explorer With Custom Folder

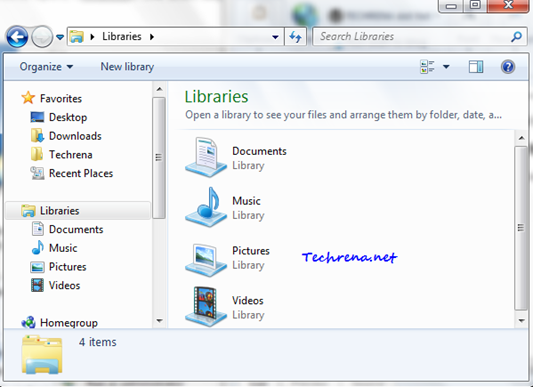
Windows 7 has a small folder icon Explorer windows 7 pinned itempinned to the taskbar (or you can add it manually*)  which indicates the shortcut for the “Windows Explorer”. Clicking on it will open the “Libraries” folder by default as shown.

Libraries in windows 7 explorer

But in most of the cases, you might want this to open a default folder other than the “Libraries” folder. Use the following trick to customize any Windows Explorer shortcut to open it with a custom folder of your choice in Windows 7, Windows Vista and Windows XP.

* This tutorial assumes that you have a pinned shortcut for the Windows Explorer on your taskbar. To pin the Windows explorer the shortcut to the taskbar, just drag and drop the “Computer” entry found in the Start menu. This guide works well for all types of shortcuts for the Windows Explorer. You can also add a desktop shortcut for the windows explorer on your desktop. To do this, search “explorer” in the Start menu and drag the “Windows Explorer” result to the desktop.

Steps:

1. Right-click on the folder icon at the taskbar:

Change explorer shortcut properties

2. Again right-click on Windows Explorer, choose Properties.
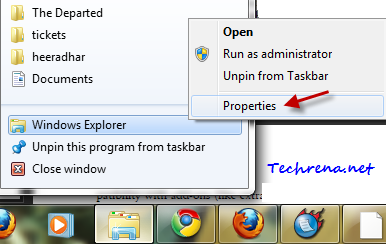
windows explorer context menu in taskbar

3. Now open the folder which you want to open through this Windows Explorer shortcut . Right-click on the path box, and select “Copy address”. The most sought folder which most of the users might want to use as default folder would be the “My Documents” folder. So here I’m taking it as an illustration to explain you the this trick.
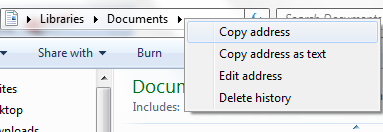
copy address from libraries folder

4. Now go back to the “Properties” window that is kept open in the step 2, choose “Shortcut” tab and focus on the “Target” field. By default, it would have the following path:

%windir%\explorer.exe

5. Select the “Target” filed and paste the address that you copied from the step 3. For “My Documents”, it would be this string

%windir%\explorer.exe Libraries\Documents”::{031E4825-7B94-4DC3-B131-E946B44C8DD5}\Documents.library-ms”
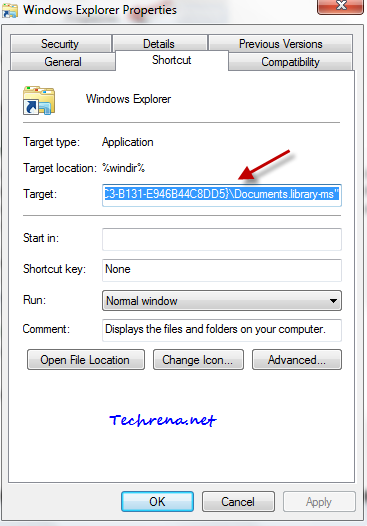
customizing windows explorer shortcut

6. Click on “OK” to apply and save the settings.

Target strings for other destinations:

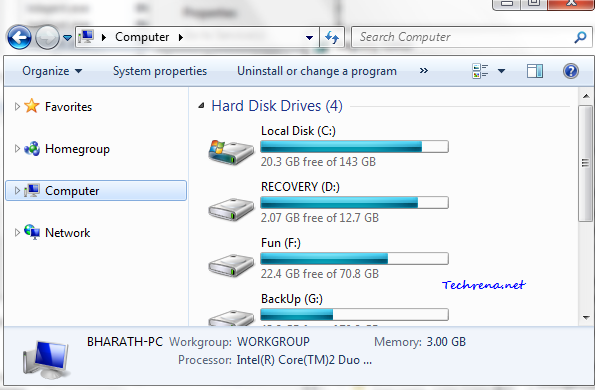
Computer: %SystemRoot%\explorer.exe /E,::{20D04FE0-3AEA-1069-A2D8-08002B30309D}

Set the above string under Target filed to open “Computer” by default in Windows Explorer.

computer in windows 7 explorer

From now on, when you double click on this Windows Explorer shortcut, it will open the custom folder that you set.

Related: Pin Computer Icon To Windows 7 Taskbar

[How To] Turn Menu Bar On Or Off In Windows 7 Explorer

Menu bar in windows 7

Menu bar is that small bar having options like “File”, “Edit”, “View”, “Tools” and “Help” in Windows explorer. One can find it always in the top of any window s explorer window in the Windows XP and earlier versions, however Microsoft had started to hide this menu bar ever since the Windows Vista was launched owing to save some space in Windows explorer. Windows 7 and Vista users can always easily toggle between turning the menu bar on or off by pressing the “Alt” key.

But fortunately Windows 7 has added a feature to let users choose to enable or disable the menu bar in windows explorer. If you are very much used to Windows XP-like environment in windows explorer, you might fancy to have the menu bar permanently appear in Windows 7. Here is how you can turn on the menu bar forever in Windows 7.

1. Open windows explorer (press Start button + E).

Windows explorer in windows 7

2. Click Organize at the top of the window.

Organize button in explorer

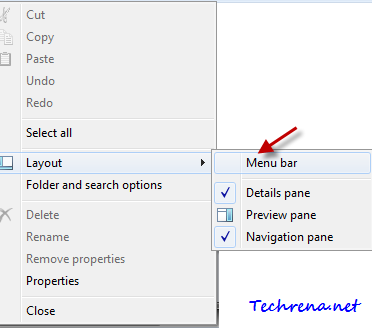
3. Expand “Layout” options and select “Menu bar” from the list.
Menu bar in organize options

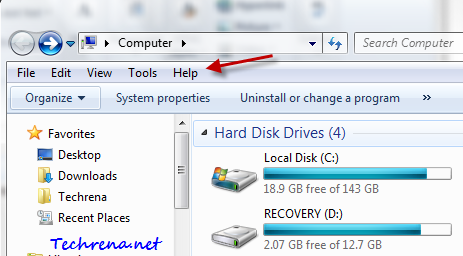
That’s it, the menu bar will start appear in all windows explorer windows from now on.
Menu bar permanent in windows 7

[How To] Rename Favorites In Windows 7 Navigation Pane

Favorites in Windows 7 navigation pane

Earlier this month, we had covered in an article about how to remove “Favorites” from the Navigation pane in Windows 7. Sometimes you don’t want to remove them completely, all you want is to customize them by renaming “Favorites”. Fortunately, this can be done with simple tweaks in Windows 7. Let’s get started on how you can rename “Favorites” in the Windows 7 explorer.

Steps:

1. Type regedit in the Start menu search bar and open “regedit.exe”. Click Yes when prompted by the UAC.

regedit result from programs

2. Navigate to the following path in the Registry Editor:

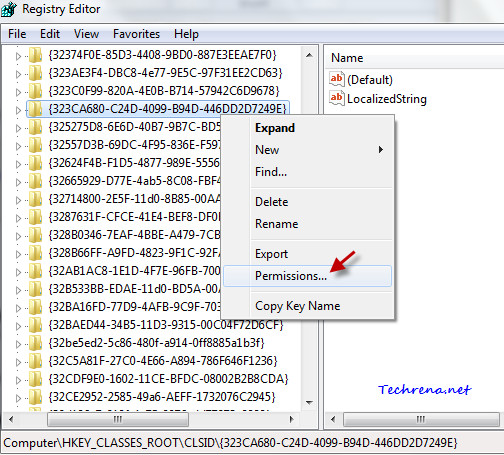
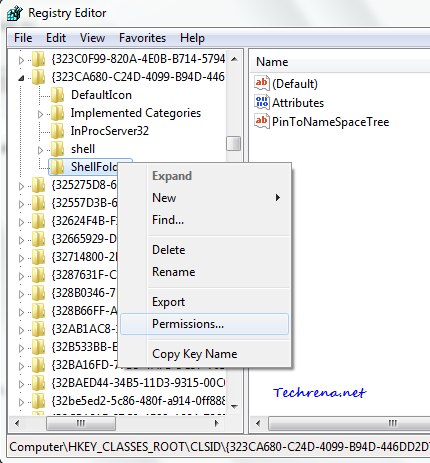
HKEY_CLASSES_ROOT\CLSID\{323CA680-C24D-4099-B94D-446DD2D7249E}

3. Right-click on {323CA680-C24D-4099-B94D-446DD2D7249E} folder and choose “Permissions…

permissions for folder in regedit

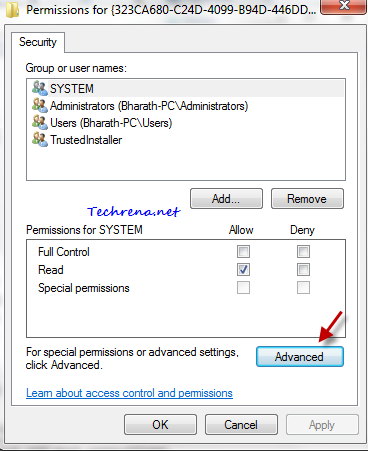
4. Click on the Advanced button in the Permissions window. It will now open another dialogue box.

renaming favorites using registry edits

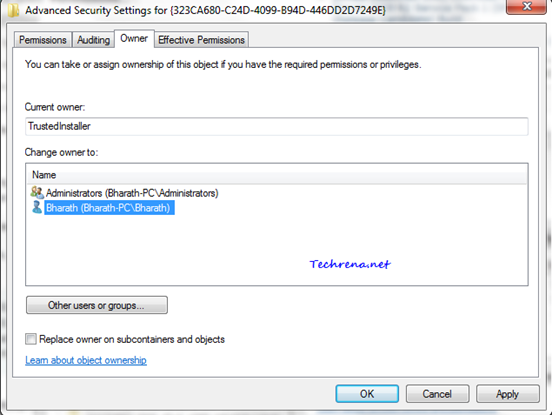
5. Go the Owner tab in the dialogue box. Select your Administrator account. Click OK to save the changes.

renaming favorites using registry edits

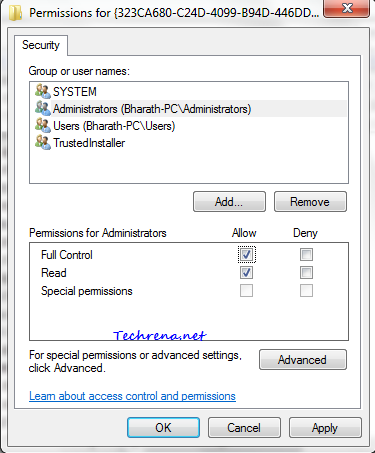
6. In the Permissions window, select your username from the list and check against Allow button right next to “Full Control” option. Click OK button to close the window.

permissions for key in regedit for favorites renaming

6. On the left hand side pane, double click on the “LocalizedString” registry key.

renaming favorites through registry edits

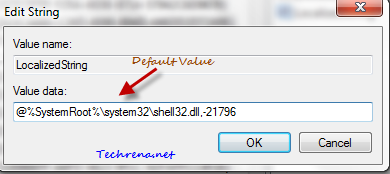
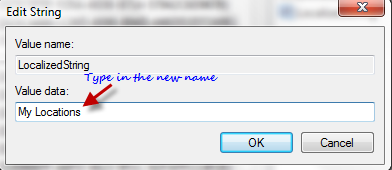
7. Type the new name which you want to set for Favorites in the Value data field, thus changing it from the default value @%SystemRoot%\system32\shell32.dll,-21796

default string value

new string value in renaming favorites

You can give it any name that you wish, be it “PC Locations”, “Personal Favs”, “Important Folders”..etc., whatever .

8. Click OK to save the settings. Close the Registry Editor. Restart the Windows Explorer (explorer.exe) process to see the change.

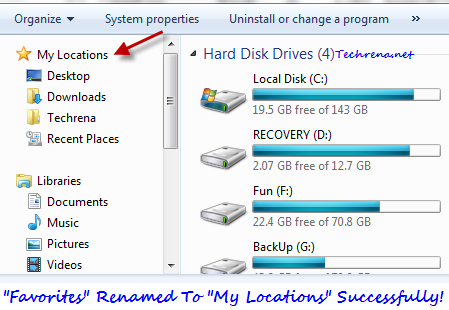
Favorites renamed successfully

You can see how “Favorites “being renamed to “My Locations” in Windows 7 explorer’s Navigation pane in the above screenshot.

To set the back the defaults, just go to step 7 and change the Value data field to the default value “@%SystemRoot%\system32\shell32.dll,-21796”.

[How To] Select Multiple Files Using Check boxes In Windows 7

Windows 7 logo

What do you do when you want to select multiple files at once in Windows ? Traditionally, we have been accomplishing this task by holding down CTRL or SHIFT keys while selecting the files to select multiple files at once. Even though we have got used to this, yet there can be instances when we accidentally click on the blank space resulting in deselecting all the items that you gathered with much effort. Our hand or keyboard may tease you at times, causing these type of annoyances, but a mouse cannot. That is why many people prefer to use mouse over keyboard particularly when doing this kind of multi-selection.

Keeping this in mind, the folks at Windows 7 development team included a pretty nice option to select multiple items using check boxes (this kind of selection method is incrementally getting popular with smartphone devices now!) using a mouse without needing to hold any key on the keyboard. By default, this options would be turned off in Windows 7 and Windows Vista. Follow the steps to learn how to select multiple items all at once in Windows 7 (and Vista)  using the check boxes:

Steps:

1. Open Windows Explorer (Or use Windows + E shortcut).

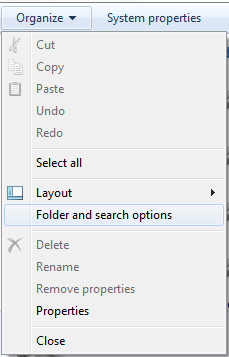
2. Click on Organize button to expand it’s dropdown menu items. Select Folder and search options.

Organize button in explorer

Folder_search_options_win7

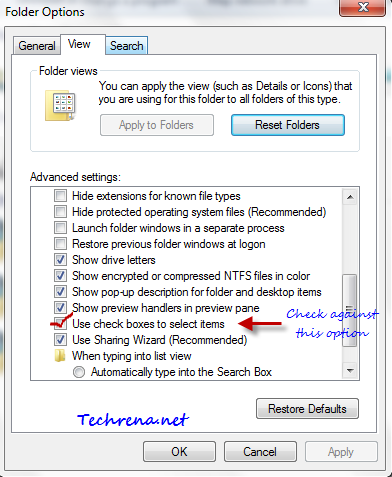
3. Go to View tab in the Folder Options window. Scroll until you find “Use check boxes to select items”. Just check against this option.

Checkboxes option in folder options

use check boxes option selected

4. Click OK to apply the changes to Folder Options and close the window.

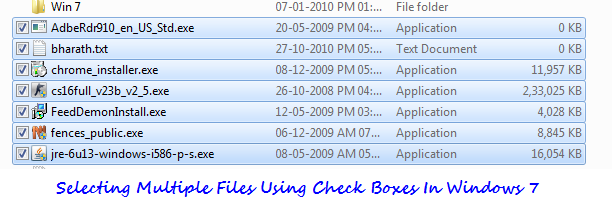
5. Now go to any explorer window and you will now be able to select multiple files using the check boxes:

select multiple files with check boxes

[How To] Remove “Libraries” From Windows 7 Navigation Pane

As part of tweaking the Navigation pane in Windows 7 explorer series, we have already discussed about removing “Favorites” from the windows explorer navigation pane. If you don’t use the “Libraries” much, you might also want to hide this from showing up. Now let’s look into how to remove “Libraries” from the windows 7 explorer.

Libraries in windows 7 navigation pane

Method-I

Steps:

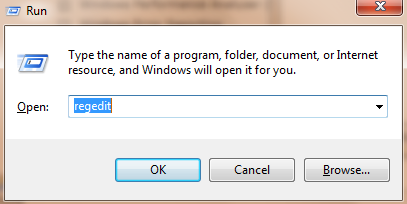
1. Press Start button + R to open the run command bar. Type “regedit” in the filed and hit enter to open the registry editor.

regedit run command

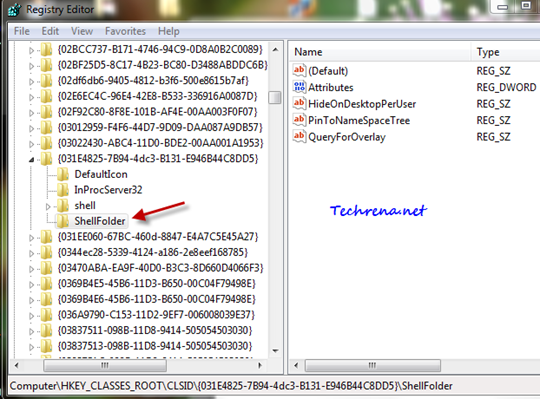
2. Navigate to the following address in the Registry Editor.

HKEY_CLASSES_ROOT\CLSID\{031E4825-7B94-4DC3-B131-E946B44C8DD5}\ShellFolder

ShellFolder for libraries in registry editor

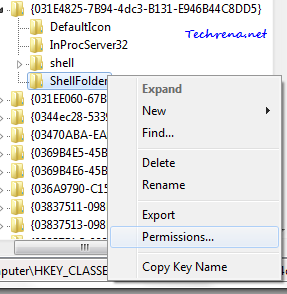
3. You need special permissions to change the values inside this folder. To get permissions, right-click on the “ShellFolder” and click Permissions.

ShellFolder permissions for libraries reg entries

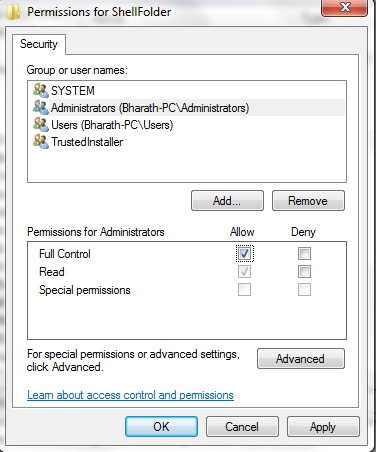
4. In the next step, check under the Allow option right next to Full Control for the user name “Administrators”. Click OK to close the window and you would be back in your Registry Editor.

ShellFolder permissions options

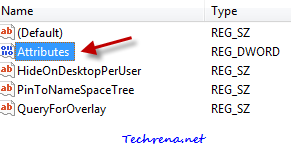
5. Double click on the Attributes registry DWORD.

Attributes reg values in libraries shellfolder

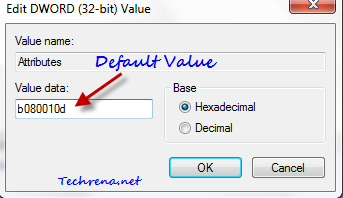
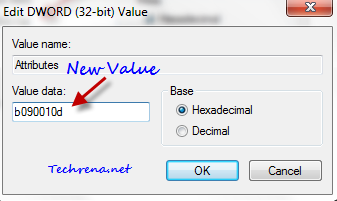
6. Change its value data from the default b080010d to a new value: b090010d.

Attributes reg values shellfolder default Dword

Attributes reg values shellfolder new Dword

7. Click OK to save the changes and close the Registry Editor.

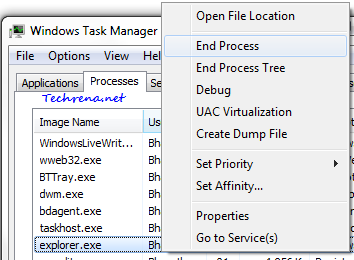
8. Open the Task Manager, go to Processes tab, end the process explorer.exe. All your active explorer windows will now be closed.

End process explorer in task manager

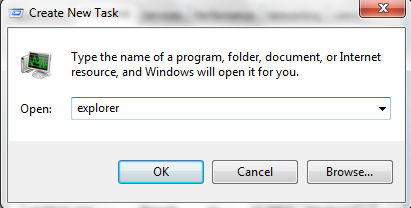
9. Go to File > New Task (Run..) in the Task Manager and type explorer to run the explorer.exe again.

New task from Task manager

Now you would find that the “Libraries” link from the Navigation pane disappeared as shown.

Navigation pane without libraries

If you want to get it back, just go back to the step 6 and change the value data back to the default b080010d .

Method II: The Easy Way

If you don’t want to go through all the above hassles, we have a much simpler solution for you. Just download the following file:

Disable Libraries In Explorer

Once you download the above .reg file, right-click on it and choose “merge” and that’s it, restart the explorer by following the step 8 and step 9 and you will no longer see the Libraries in the Navigation pane.

To get back the Libraries into your Windows 7 explorer, download the following file,

Enable Libraries In Explorer

Right-click on it and select merge. The Libraries will again start to appear once you restart the explorer.

[How To] Remove Favorites From Windows 7 Explorer

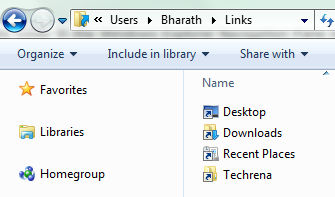
Windows 7 Navigation pane shows Favorites folder, which contains links to your favorite folders on the computer. You can add any folder to the Favorites simply by dragging the folder to the Favorites in the Windows 7 explorer or even by placing the shortcut to that particular folder in the following locations:

C:\Users\(Username)\Links

favories links folder

However, if you don’t use them much, you might want to remove this from the Windows Explorer.

Steps:

1. Press Start button + R to open the run dialog box. Type “regedit” in the text filed and press OK to open the Registry Editor.

2. Navigate to the following path in the Registry Editor:

HKEY_CLASSES_ROOT\CLSID\{323CA680-C24D-4099-B94D-446DD2D7249E}\ShellFolder

3. Right-click on “ShellFolder” and select Permissions [Since you need special permissions to change the DWORD value of “Attributes”].

ShellFolder permissions

4. A new window will open up. Select Administrators from the user names and check against the Allow option on the right to the Full Control click OK to apply changes and close the window.

ShellFolder permissions options

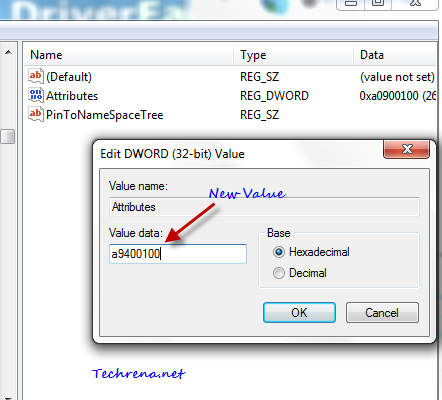
5. Double click on the Attributes and change the Value data field to a9400100 from the default value of a0900100.

Modifying DWORD value to remove Favorites from Windows 7

6. Click OK and close the Registry Editor.

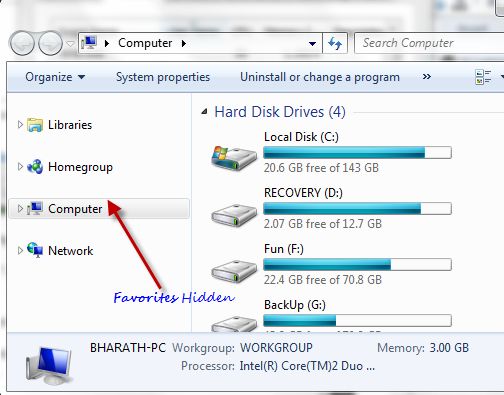
7. Restart the Windows Explorer (Go to Task Manager, end explorer.exe, then go to File > New Task, type explorer and click OK).You should now see the change, the “Favorites” in Navigation pane would disappear from the explorer.

Favorites disabled in Windows 7 navigation pane

If you want to get “Favorites” back, just go back to the step 5 and change the DWORD value data back to a0900100.

Related: You might also want to disable the entire Navigation pane in Windows 7 explorer.

[How To] Enable Or Disable Navigation Pane In Windows 7

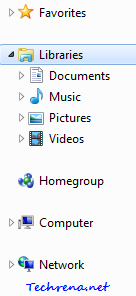
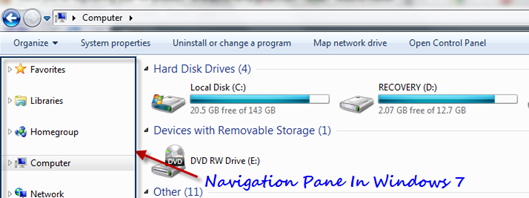
Windows explorer in Windows 7 looks great, showing the drives and other devices on the most prominent right side pane and quick links to important locations on your computer in a relatively thinner pane, known as “Navigation Pane”. This Navigation Pane contains the following icons in general:

  • Favorites
  • Libraries
  • Homegroup
  • Computer
  • Network

Navigation pane in windows 7

While it is highly handy to have quick access to different locations through this navigation pane, there are few people who might like the Windows 95 version of the Windows Explorer, where we don’t have such a pane in the left sidebar. Follow the steps mentioned below to disable or enable the navigation pane in your Windows 7.

Steps:

1. Open any Windows explorer window (or use Start button + E shortcut).

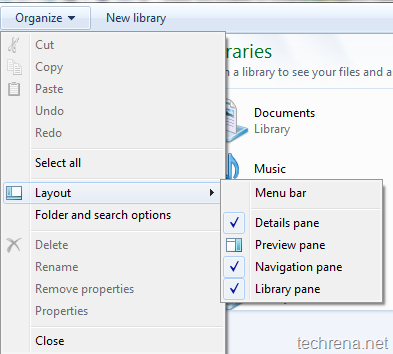
2. Click on Organize dropdown menu button. Expand “Layout” options as shown:

Organize options

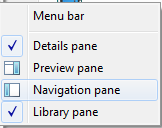
3. To disable the Navigation pane, deselect the “Navigation pane” option from the list as shown:

Navigation pane option deselected

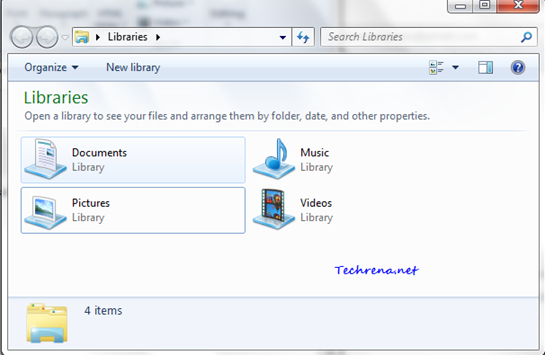
4. And once you have done that, the Windows 7 Navigation pane would be disabled (or hidden):

Navigation Pane Disabled

To enable the Navigation pane again, just check the “Navigation pane” option in the step 3.

[How To] Change Fonts In Windows 7

Change windows 7 fonts

Windows 7 lets you change the font in any part of Windows including menus, Active Title Bar, Icon, Inactive Title Bar, Message Box, Palette Title, Desktop, Selected Items etc. Please note that changing these Windows fonts doesn’t change any program fonts, which means that these are the settings for changing the outer view of any program window rather than the look that we see inside the program which depends on the fonts and styles adopted for that particular program.

Follow these steps to change the default Windows 7 fonts

Steps:

1. Go to Start menu and type “window colors” in the search box:

Window colors start menu search

2. Click on “Change window colors and metrics” link from the search results in “Control Panel” section:

change window colors start menu search result

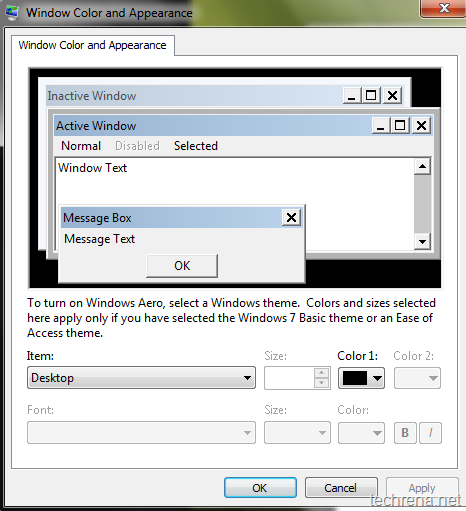
3. A new “Window Color and Appearance” window opens up *:

window color and appearance

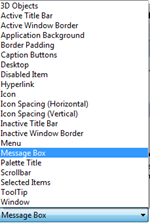
4. Choose the part of the Windows for which you want to change fonts in the Item list.

Items list in window colors

Once you select the item from the list, you will be able to change its fonts and color settings:

Window colors & fonts change

You can change the fonts parameters like the font type, size of the font, color etc.

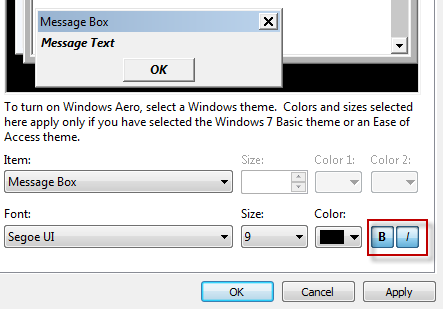
Click on B icon to make the font bold or click on I icon to italicize the font as shown:

Repeat these steps for each item in the list for which you want to make changes.

Window fonts bold and italic

5. Click OK to apply the changes and close the window.

You are done!

[*] Alternatively, you can launch the Window color and Appearance settings from these steps:

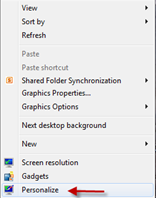
Right-click on vacant space on the desktop and select Personalize.

Personalize in desktop context menu

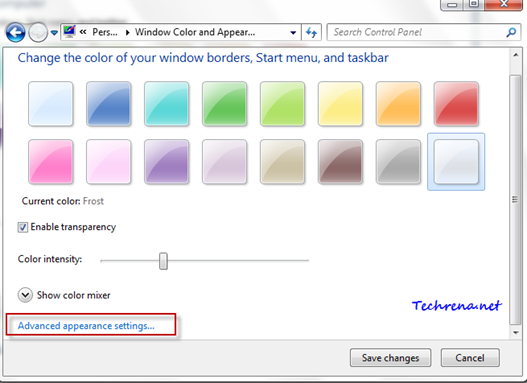
Click on the Window Color link found at the bottom of the Personalization window.

Windows color link

windows color appearance window

It will open the same Window Color and Appearance Settings window as shown in the step 3.

[How To] Use SFC Scannow Command In Windows 7

Windows 7 logo

SFC (System File Checker) is a very useful command to check the integrity of all the protected system files in Windows 7 and Vista and replaces any corrupt, changed or missing system files (including DLL files) to correct versions (undamaged versions), if possible.

Even though there are several switches available under the SFC command, the sfc scannow is the most used command. If SFC can’t fix the corrupted system files, then you need to consider other options like using a recovery, reinstalling  Windows, restoring from backup, or restoring to an earlier system restore point.

Here is the step-by-step guide on using the SFC /scannow command tool in Windows 7 or Windows Vista:

Steps:

1. Click Start button, type “cmd” in the start button, right-click on the “cmd.exe” and select “Run as administrator” to run the command prompt in elevated or administrator mode.

running cmd as an administrator

2. Type the following command in the command prompt and hit enter:

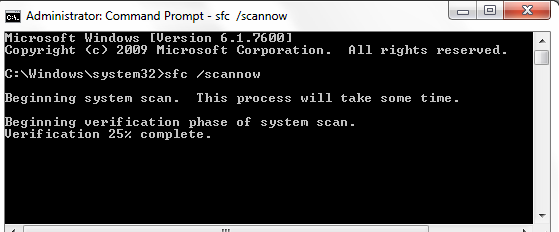
sfc /scannow

Sfc /scannow command

3. Now the toll will run a verification of integrity of every protected operating system file. Wait until the system scan is finished. This usually takes 5-10 minutes.

Sfc /scannow command scan progress

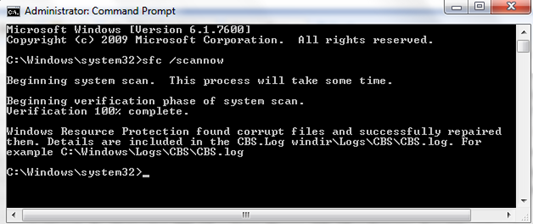
4. When the scan is finished, you will “Windows Resource Protection did not find any integrity violations” message when it doesn’t find any corrupted files.

On the other hand, if it does find any corrupt files, it will automatically (if it’s possible) repair them. Restart your computer once the repairing process by the SFC tool gets over (as indicated in the command prompt). Please note that if the System File Checker (SFC) finds any integrity violations and fixes them, you should restart your computer immediately even if you are not prompted to do so.

Sfc /scannow command scan repair successfull

Run the sfc / scannow command once again (after restarting your PC) to see if all the corrupted system files have been repaired.

The SFC command writes the log to CBS.log file found in C:> Windows > Logs > CBS.

When To Use The SFC Tool ?

When any Windows Resource Protection (WRP) file goes missing or corrupted, your Windows behaves in an odd manner. Windows functions may not work or entire Windows may crash unexpectedly. Run the SFC tool in such situations to repair any missing or corrupted system files.

[How To] Disable All In One SEO Additional Columns From Posts Editing Page

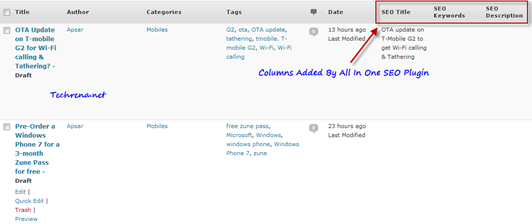
If you have just upgraded the All In One SEO plugin today for your WordPress based blog, you might have noticed three new columns being added to the post editing page (SEO Title, SEO Keywords and SEO Description) as shown below

All in one seo added additional columns

It’s very much annoying as the the post title column gets longer due to this and make it difficult to read it as you need to scroll down. These columns added after upgrading the All In One SEO are not actually needed considering the fact that they take significant amount of your screen space. So I quickly dug into this to find out how we can remove, and realized that it was quite easy after seeing a tweet from Micheal Torbert, the developer of this great plugin. Here is how you can remove the additional three SEO columns in posts editing page (no code modification required):

1. Go to All In One SEO plugin configuration page (Can be found under Settings menu in your dashboard).

All in one seo link in sidebar

2. Look for “Custom Post Types for SEO Column Support” filed in the settings page. By default, the settings would be enabled for both post and page editors as shown:

Custom post types SEO Columns checked in All in One SEO

3. Hold Control key and uncheck the post and page options as shown:

Custom post types SEO Columns unchecked in All in One SEO

4. Click Save the Options and go back and check the post and page editing page in your WordPress dashboard, the extra columns should have been removed now.