Delay Services In Windows 7 To Speed Up The Boot Time

delayed start programs in Windows 7

Is your Windows starting up too slow even after performing the suggested optimizations? Wonder what more you can do to save on your computer’s boot up time? Consider delaying the non-essential services so that they can be run once the system has completed the booting and has enough free time to load these services. Windows services are the ones that are needed by various programs installed on your PC. Even though some of the services need to run along with the Windows boot, some may be delayed to start so as to reduce the high activity during the start-up. Delaying the Windows services was introduced for the first time in Windows Vista and is now available in Windows 7 as well. By default Windows automatically sets some services like Windows update, Google update (if installed), Windows Font cache etc. to start delayed.

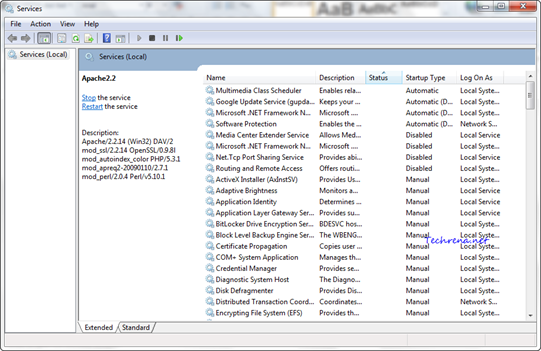
But you might want to consider delaying other third party services to boot your Windows even faster. Take the following screenshot for instance, you don’t need to run the “Apache web server service” along with boot, you can safely delay it so that your Windows gets loaded a touch quicker.

Apache service in windows

>> To see all the services installed on your Windows, type “services.msc” in the Start Menu search and open the services.msc from the results.

Services.msc from Start Menu

Alternatively press Windows button + R to open the RUN command and type services.msc and hit enter to open the Services window.

Windows 7 services

>> To see all the services which are already set to “Delayed Start”, first click on the “Startup Type” column and then click “Status” column. All the delayed services will be shown as “Automatic (Delayed Start)” next to them under the Startup Type.

Delayed start programs

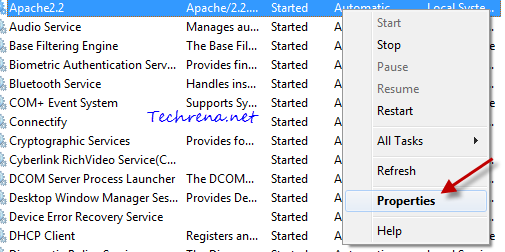
>> To delay start of any service (for instance Apache2.2 in this case), just right-click on the service and choose “Properties

Services context menu

>> In the Properties window, choose “Automatic (Delayed Start)” from the drop down menu under Startup Type filed.
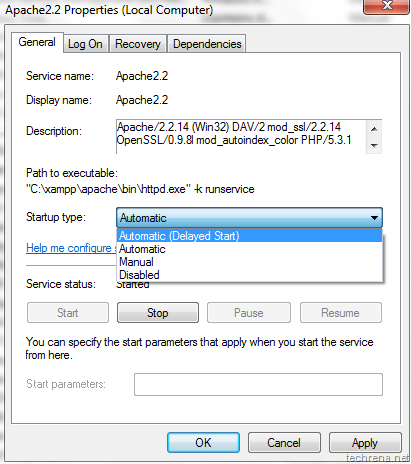
Editing properties of service

Click “OK” to apply the settings and close the properties window. Now the startup of the selected service would be delayed. You can safely set “manual” and “disabled” services to delayed startup, however you should be careful while handling important services like Windows related services which are set to start automatically by default .

[How To] Enable The Details Pane In Windows 7 Explorer

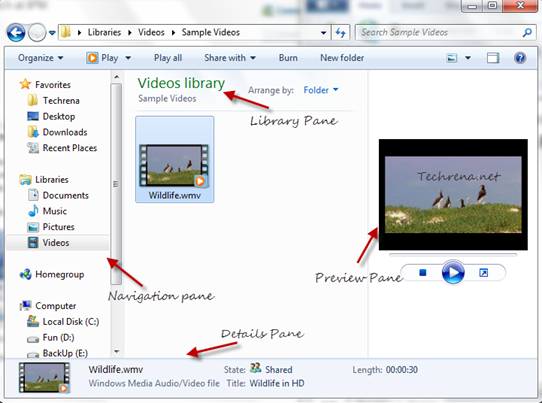
Windows 7 explorer panes

Unlike the earlier Windows versions, the Windows Explorer in Windows 7 has been revamped a bit to make it appealing to the users. Any Windows Explorer window in Windows 7 can have at least 3 panes i.e., Navigation Pane, Preview Pane and Details Pane. For Library folder, there would be an additional pane called Library Pane which would be displayed at the top just below the address bar.
For now, we are concerned about the Details Pane. It is the pane that appears at the bottom of the window and displays the important information about the file or folder selected. While it is enabled by default in Windows 7 and Vista, some may find it missing in their explorer windows. In case it is disabled, this is how you can enable the Details Pane again:

Steps:

1. Open any Windows Explorer window.

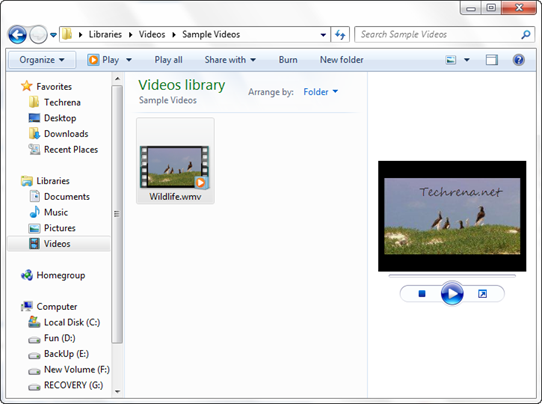
No navigation pane in Windows 7

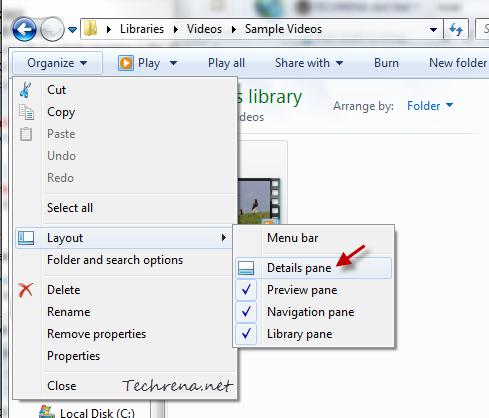
2. Click on the Organize button and from the drop down menu, roll over to the “Layout” and select “Details pane

Details pane in Windows 7 explorer settings

3. You should now see the Details Pane at the bottom of your Windows Explorer window as shown in the screenshot.

[How To] Tweak The Low Battery Notification In Windows 7

Working on your notebook which is having a pretty high battery life? And wonder why you are being notified even when you have pretty much time left to plug into an AC power supply?

Windows takes into account the average laptops with battery lives around 2-4 hours and Microsoft has accordingly set the battery levels after which the users get notified and eventually pushing Windows into Hibernate mode after reaching a critical stage. But if you consider the case of the users with long battery backups, they would still be having more than enough time to save their current work, get plugin the power supply to the laptop. So if you are once such user, you might want to change the low battery actions on your laptop. Before that, let’s see what are the different battery levels considered by your Windows OS.

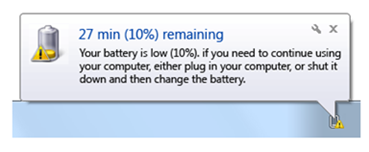
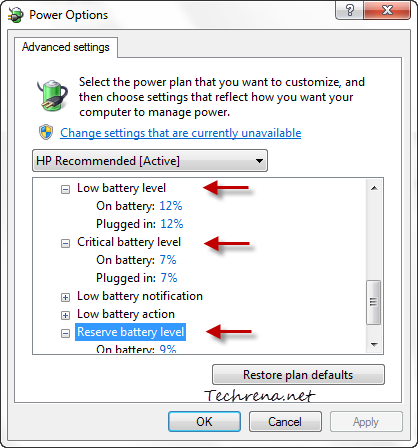
>> Low battery level is where you will laptop starts showing the first low battery notification and the low battery level usually lies in the range of 10-12%.

low battery in Windows 7

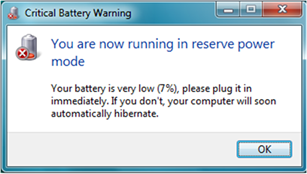
>> Reserve battery level is where your Windows starts acting and gets ready for hibernating, in most cases it will be around 7-8% lying closer to the critical battery level.

reserve battery level

>> Critical battery level is where your laptop goes into Hibernation mode immediately and it’ll be around 5% in general.

Critical battery in windows

Now that you have got the basic idea about different battery levels, let’s get into to details of changing the low battery notifications in Windows 7.

Steps:

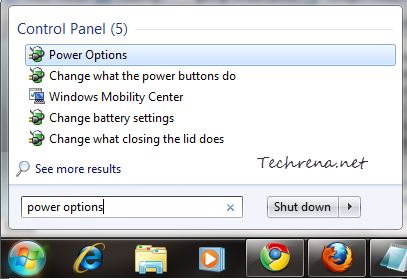
1. Type “power options” in the Start Menu search and open the first result under the Control Panel section.

Power Options search in the Start Menu

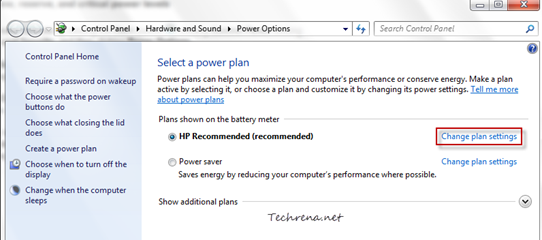
2. Now select the power plan for which you want to change the low battery notification settings, and click the “Change plan settings” link found next to the power plan.

Power options in Control Panel

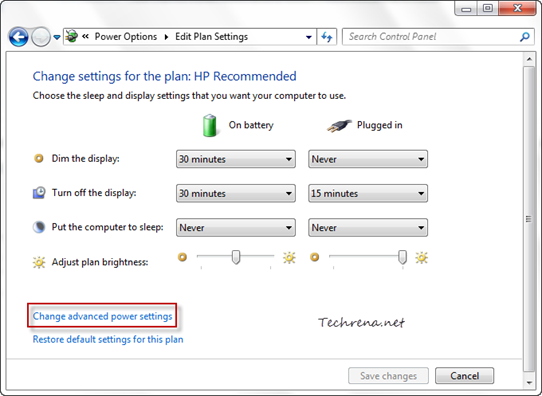
3. In the “Edit Plan Settings” window, click on the “Change advanced power settings” link found at near the bottom.

Edit power plan settings in Windows 7

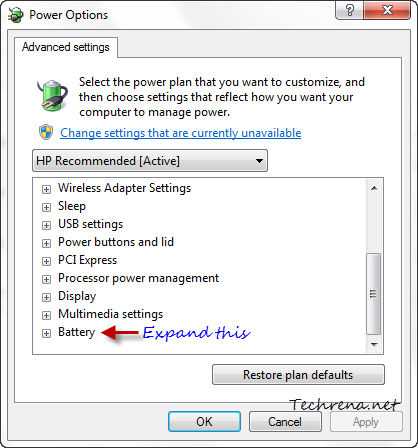
4. Scroll down to “Battery” section in the Advanced settings tab and click the “+” button to expand it.

Battery advanced power plan settings

5. You may adjust the settings for each of the battery levels i.e Low battery level, Reserve battery level and Critical battery level.

Low battery notification settings

Click “OK” once you are done to apply the settings. That’s it.

[How To] Disable Aero Shake In Windows 7

If you are using Windows 7 you might have noticed the Windows Aero Shake effect. Just hold down a window on its title bar and shake it back and forth and you will notice that all the other windows will be minimized. I’m sure you must have noticed this, but chances are that you might not be aware that this is due to an special Windows 7 Aero effect called Windows Shake. Windows Shake is part of the Aero effects in Windows 7 alongside Aero Peek and Aero Snap. Watch the following video to know about Aero Shake.

For some reasons, if you want to disable Aero Shake feature for your Windows, here are the two ways in which you can do it.

Method-1: Using Registry Editor [For All Windows 7 Editions]

1. Press Windows + R button to open the RUN command.

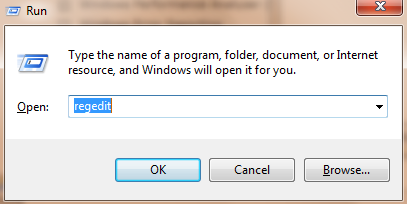
2. Type “regedit” in the text field and hit Enter to open the Registry Editor.

regedit run command

3. In the Registry Editor, navigate to the following path:

HKEY_CURRENT_USER\Software\Policies\Microsoft\Windows

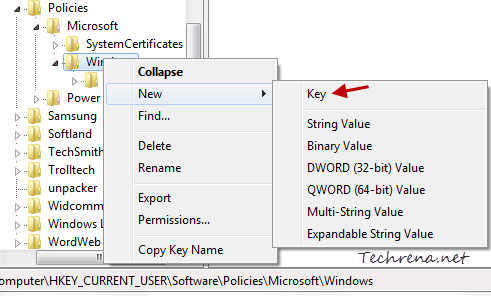
4. Right-click on the “Windows” main key and choose New > Key from the context menu to create a new key with name “Explorer”.

Create a new sub key under Windows main registry key

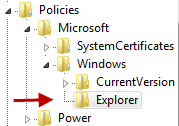
And it should look like this:

New Explorer sub key in regedit

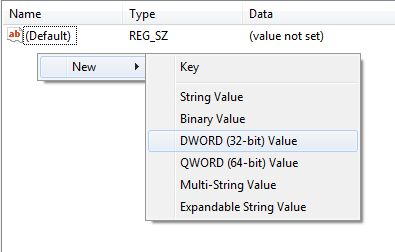
5. Now in the right hand side pane under the newly created “Explorer” key, right-click and choose “New > DWORD (32-bit) Value”.

Creating a new DWORD in regedit

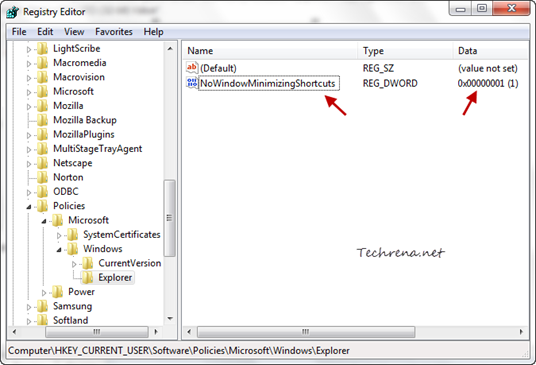
6. Name it as “NoWindowMinimizingShortcuts” and set its value to 1 as shown:

Registry setting to disable Aero Shake

That is it. Just log off from your account and log back in and you will learn that the Aero Shake has been disabled. To enable the Aero Shake again, just delete the DWORD that you have just created.

Method-2: Using GPEDIT [Only For Limited Windows 7 Editions]

If you are on Windows Professional, Enterprise or Ultimate editions you have access to the Local Group Policy Editor and it is relatively easy to achieve the same settings vis GPEDIT.

Steps:

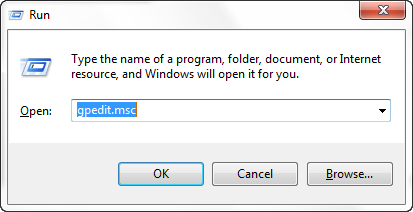
1. Press Windows button + R to open the RUN dialog box and enter “gpedit.msc” in the text field and hit enter.

Gpedit from RUN command

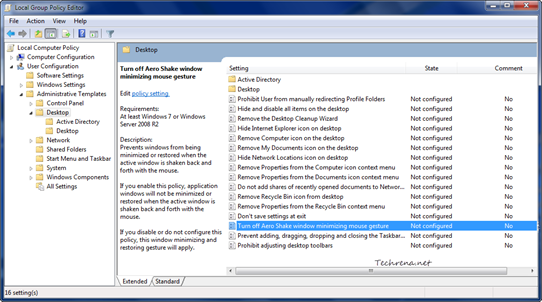
2. Go to User Configuration > Administrative Templates > Desktop in the local group policy editor.

3. On the right-hand side pane, find an entry named “Turn off Aero Shake window minimizing mouse gesture”. Double-click on the entry to configure the settings.

GPEDIT settings for Aero Shake

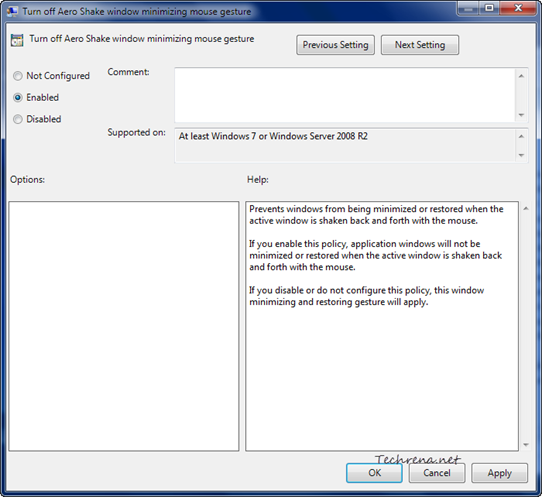
4. Select the “Enabled” option and click “OK” to apply the settings.

GPEDIT settings to disable Aero Shake

The changes will be in action immediately and the Aero Shake will be disabled.

If you are on Windows 7 Starter, Home Basic or Home Premium editions, you must use the method-1. If you are on Windows 7 editions other than the above mentioned ones, we suggest you to go with the method-2.

[How To] Use The Reliability History In Windows 7

Windows 7 has many lesser-known features and “Reliability Monitor” is one such feature. Reliability Monitor, a handy tool for diagnosing when a particular event was first occurred. It usually monitors five types of events:

>> Application failures

>> Windows failures

>> Miscellaneous failures

>> Warnings

>> Information

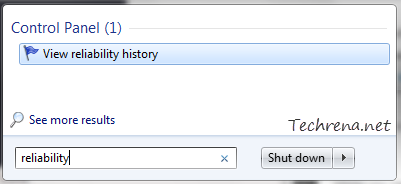
To see the Reliability History for your Windows, go to Start Menu and type “reliability” in the search box and click “View reliability history” from the results under “Control Panel” section.

reliability history in start menu

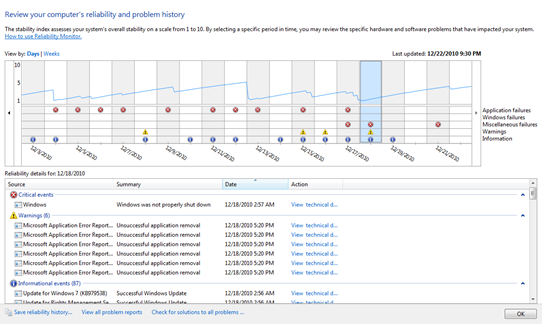
You will see a graph divided into weeks (or days) showing the all the different types of events that are recorded.

reliability monitor

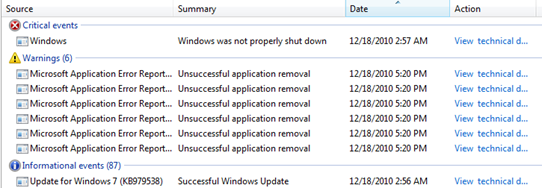
Critical errors are displayed with critical error in windowsicon , Warnings with warning in windowsand information messages with information icon in windows.

While you can safely ignore the information messages, you should look deeply into the critical errors and warnings. If you are encountering any serious issue with your Windows, and decide to trouble shoot it, the first place you should visit is this as you can get an idea of exactly when the problem has started. The monitored events mostly include processes that stopped working, errors when windows was not properly shut down, unsuccessful application installations and driver installations etc.

Events in reliability history

Check solution for a critical event

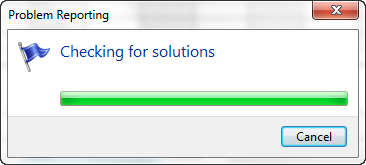
You can right-click on any critical event to check for a solution for that event. If you are connected to internet Windows will automatically look for a solution and will save it in the Windows 7 action center.

Checking for solution in Windows 7

If you view the technical details of the problem, you will get some important details like error code for the issue with which is pretty much useful in troubleshooting the problems.

Reliability monitor and reliability history is also available in Windows Vista.

Do you use this tool much? How far has this tool been useful to you? Do let us know though comments..

[How To] Change Computer Name In Windows 7

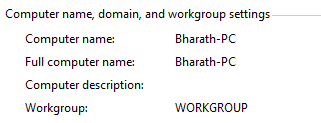
Computer name domain and workgroup settings

Computer names are pretty much useful to distinguish different computers when you are on a network with too many computers connected it. You would normally choose this computer name during the initial installation. Or if your system came with a pre-installed version of Windows 7 or Windows Vista, chances are that your manufacturer might have chosen a crappy computer name. It is always a good practice to have a unique computer name which is more descriptive so that you can easily identify your computer over others in the network.

Changing a computer name was relatively easy in Windows XP. When it comes to Windows 7 and Vista, you need to get through a couple of windows before you can land at the correct settings window. Here are the steps.

Steps:

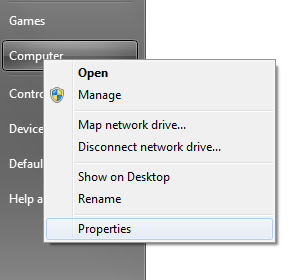
1. Go the Start Menu, right-click on the “Computer” and click “Properties”.

Computer right-click context menu from Start Menu

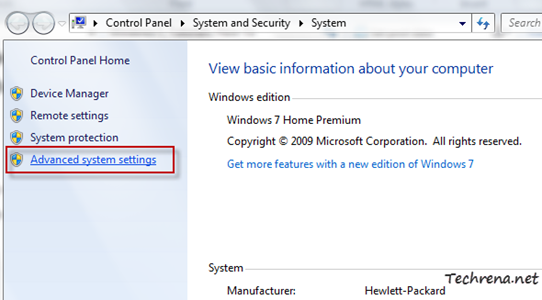
2. Click on the “Advanced system settings” link on the left hand side pane.

System settings in control panel

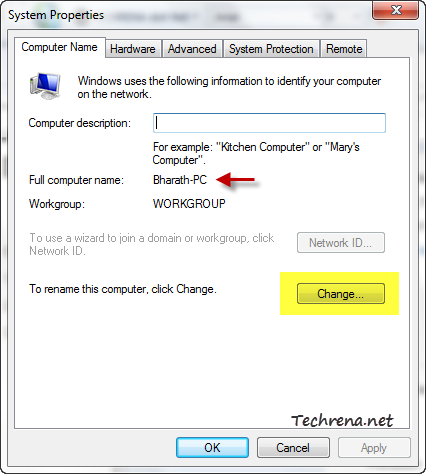
3. Go to the “Computer Name” tab in the System Properties window.

Computer Name in System Properties

Note: In Windows 7 you can also arrive at the above settings window from the “Computer name, domain, and workgroup settings” from the step 2.

change settings in system control panel

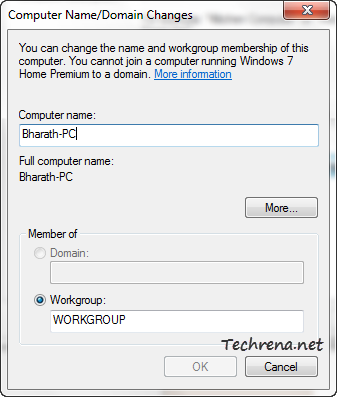
4. In the next dialog box, you can change your computer name and the workgroup membership of your computer.

Computer name and domain changes

Click OK to close the window and apply the changes. You must restart your system for the full changes to take effect.

[How To] Create A System Image Backup In Windows 7

Windows 7 logo

Backing up has been made so much easier in Windows 7. Now if you are running a Windows 7 PC, you can create and save a “System Image” (captures the current state of the system as it is) is pretty much simple and you don’t even need any third party tools like Ghost. A Windows system image will let you to quickly revert back to the state when the image was prepared. This is pretty much useful if your system crashes in future. It is always best practice to take create a system image when you install a fresh copy of Windows 7 and customise it by adding some important programs. Don’t try to add too many, as it would finally increase the file size of the system image. Let’s look into the details about how to create a system image in Windows 7.

Important: Before start, make sure that you have a safe external storage device to store your image. Although you can use another drive of the same disk, in case of a disk failure, you might loose this image as well. Also note that Windows 7 can only save system image on a storage device which is having NTFS file system.

Steps:

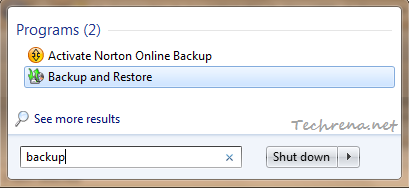
1. Go to Start Menu, type “backup” in the search box and click “Backup and Restore” from the search results under “Programs” section.

backup start menu search

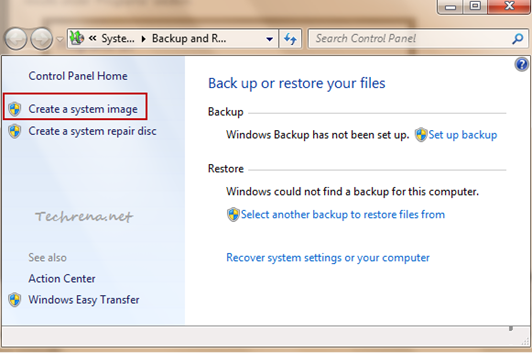
2. In the Back and Restore window, click “Create a system image” link that can be found in the left hand pane of the window.

Backup and restore in windows 7

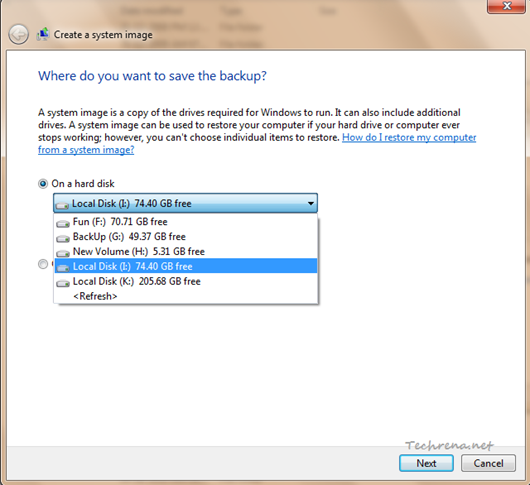
3. Now Windows will look for the available backup devices and will list them under the “On a hard disk” option.

Backup devices for the system image

Here you will realise that you can’t select a drive which is not using NTFS file system. An error message will be shown up, “This drive cannot be used to store a system image because it is not formatted with NTFS”.

Error with non-NTFS formatted backup drives

Also make sure that you have enough space on our backup drive. The system image will consume space which is equal to the total amount of used spaces in the drives selected for the creating an image.

4. Choose the appropriate drive and click “Next” to proceed to the next step.

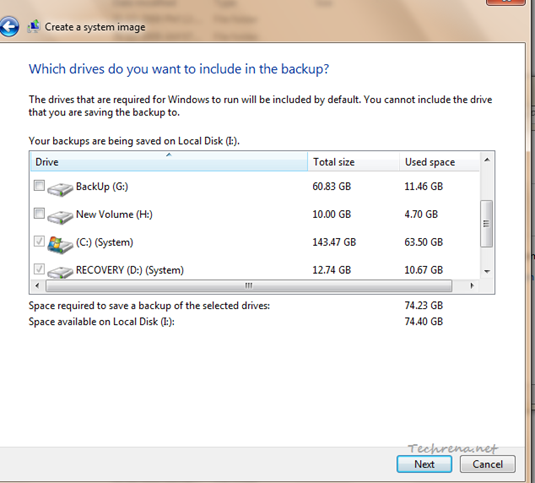
5. In the next step, you can choose the drives which you want to be included in the backup. By default, all “System” drives will be selected and you have an option to include or not to include other drives. And of course, you can not choose the drive which you are using to save the backup.

Create a system image select drives to backup

Select the drives and click “Next’ to go the next step.

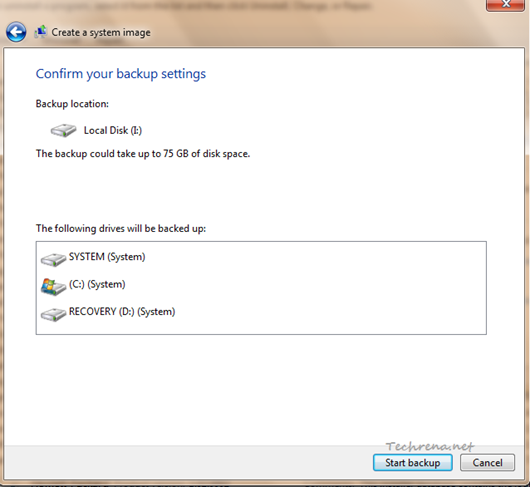
6. The next window will show the backup location and the drives that you are backing up. Click “Start backup” to confirm the backup settings and start the backup process.

Confirm baackup settings for system image

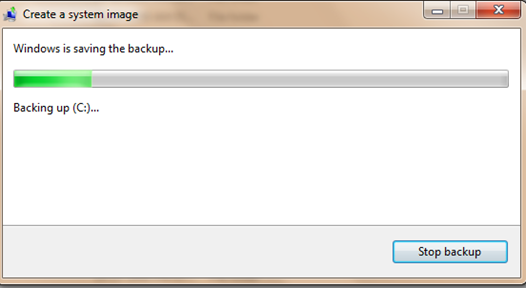
7. Wait for few minutes for the backup process to get completed. You can stop the process at any time by creating the “Stop backup” button in the window.

Windows is saving the backup for creating system image

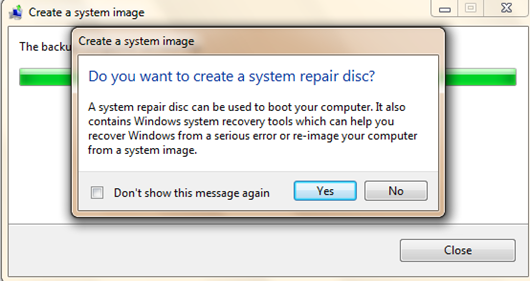
8. Once the process is over, you will be asked to whether to create a system repair disc. It is your choice but we highly recommend that you go ahead and create one.

create a system repair disk after system image

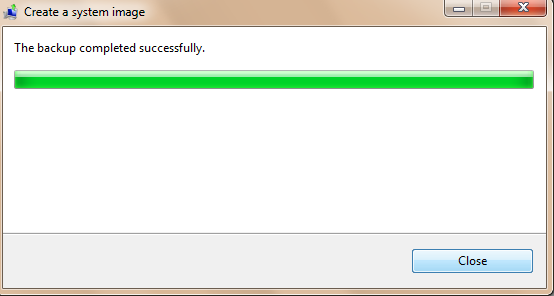
Congrats! You have now successfully backed up your Windows 7 using a system image.

backup completed system image

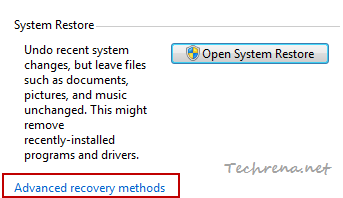
You can use “Advanced recovery methods” found under the “Recovery’ section of Control Panel to restore your computer to an earlier state using the system image that you stored.

restore backup

[How To] Disable Aero Peek In Windows 7

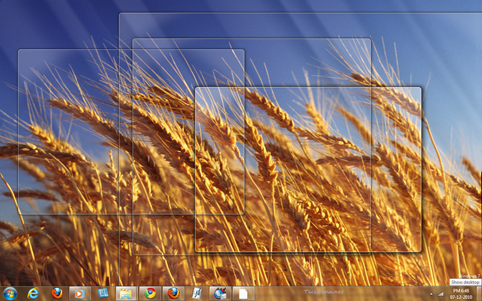
aero peek windows 7

Aero Peek is another nice Windows 7 feature that makes use of the “Aero” effects along with Aero Snap and Aero Shake. When you hover your mouse over the small rectangle found at the right extreme of your taskbar, you will see the desktop with the outlines of the active application windows s shown above. However, if you don’t use it much, you would like to disable it. Here are the two simple ways in which you can do it,

Method-1:

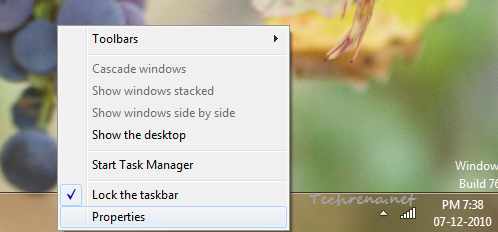
1. Right-click on the Taskbar and choose “Properties”.

Taskbar right-click context menu

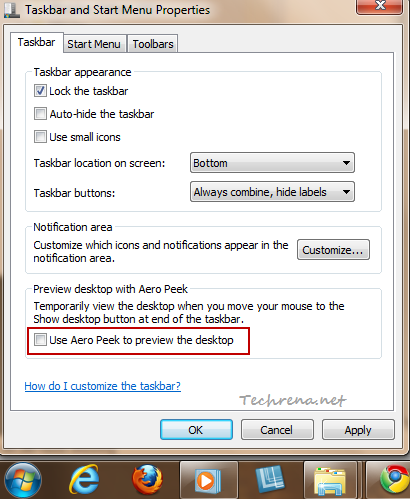
2. Under the “Taskbar and Start Menu Properties” window, uncheck against “Use Aero Peek to preview the desktop”.

Aero peek option in taskbar and start menu properties

Click “OK” button to save the settings and close the window.

The “Aero Peek” effects should now be disabled. There’s another alternative away you can achieve the same.

Method-2:

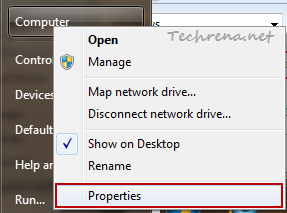
1. Right-click on the Computer link on your Start Menu and choose “Properties”.

Properties in Start Menu Computer context menu

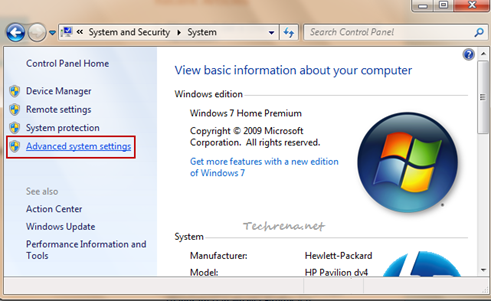
2. A new window will open up. Click on the “Advanced system settings” in the left side pane.

System settings in Control Panel

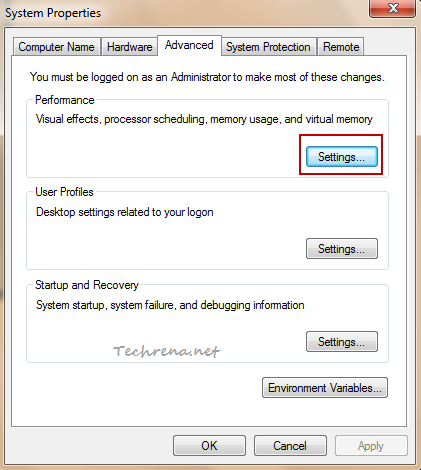
3. In the new “System Properties” window, click on the “Settings” button under the “Performance” tab.

System properties settings

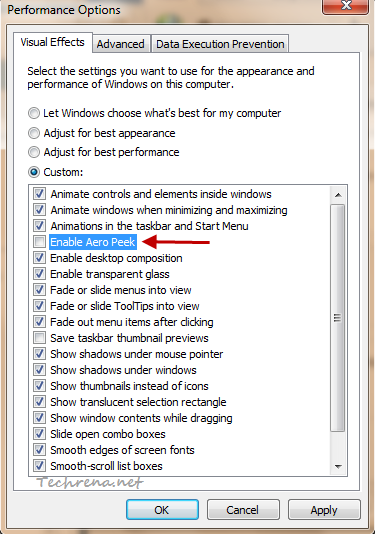
4. Under the  “Visual Effects” tab in the “Performance Options” window, scroll down until you find “Enable Aero Peek” option. Uncheck against and click “OK” to apply the settings and close the settings window.

Aero Peek settings in Performance Options

That is it! You have now disabled the Aero Peek in your Windows 7. To enable it again, just check the option back again in method 1 or method 2.

[How To] Password Protect A Folder Without Using Any Third Party Software

If you own a multi-user computer, you will always feel the necessity to password protect your important data so that other users will not have a direct access to it. If you want to lock or password protect your folders, consider using this free software (Secure Folder) to do it. It is easy to configure and use. However, if you are one of those who thinks you get all these sort of things worked on your Windows with tweaks, here is a classic (has been around since the days of Windows XP!) trick which allows you to lock (using a password) and make the folder invisible in Windows 7, Windows Vista and of course Windows XP. Follow these steps:

Steps:

1. Open notepad and type the following code saved in this text file.

2. Replace “ENTER YOUR PASSWORD” with your own password in the following line.

if NOT %pass%== ENETR_YOUR_PASSWORD_HERE goto FAIL

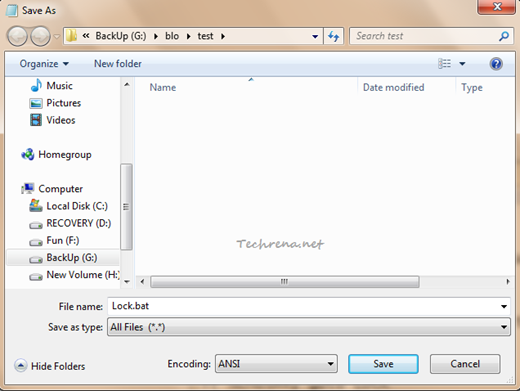
3. Save the file as a .bat (batch) file (you can name it whatever name you want)

Save as batch file

4. Now double-click on the .bat file that you have just saved. A new “Private” folder will be created.

5. Copy and paste all your private and important data to this “Private” folder.

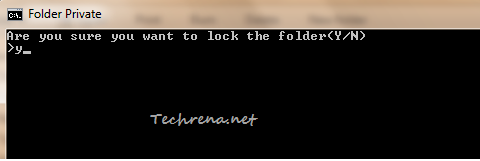
6. Now again double-click on the batch (.bat) file. A command prompt window will ask you for confirmation. Press “y” to continue.

Lock folder private with password

7. The “Private” folder will go missing this time and you can only find the .bat file.

Private folder gone missing

If you have enabled the “Folder Options” to show the hidden files, you will an empty “Control Panel” system folder.

8. To get the folder back, double-click the .bat file again and you will be asked to enter the password that you have set in the step 2.

Enter password to open private folder

The “Private” folder re-appears again!

Private folder

You can see that the trick actually works but there’s a small catch. Anyone can open the above batch file in a text editor and can actually see the password that you had entered. Hence we’ll try to convert this batch file to an .exe (executable) file so that it can’t be opened it in text editor.

To workaround this issue, download this Batch to Exe file converter and convert the above .bat file to an .exe file. That is it!

[How To] Change Sounds In Windows 7

Change Sounds In Windows 7

Windows always has unique styles of system sounds for various events since very long. Windows 7 just gets better in this aspect with addition of even more sound schemes. The system sounds for various events in Windows 7 are really great and they usually change whenever you change settings like changing Windows theme. Personally I’m very much impressed with these sounds and not really willing to change them. But you know, customization is the most fun part of Windows 7 and you might want to know how to apply a custom sound to a system event (program event). Follow these steps to learn about how to change these sound settings.

Steps:

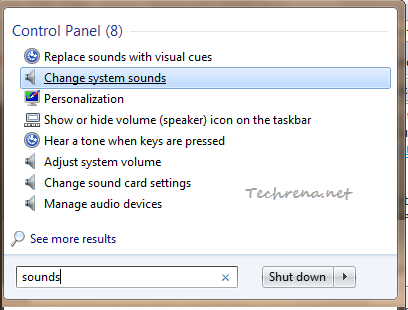
1. Search “sounds” in the Start Menu search and click “Change system sounds” from the results under “Control Panel” section.

Start Menu search result for sound

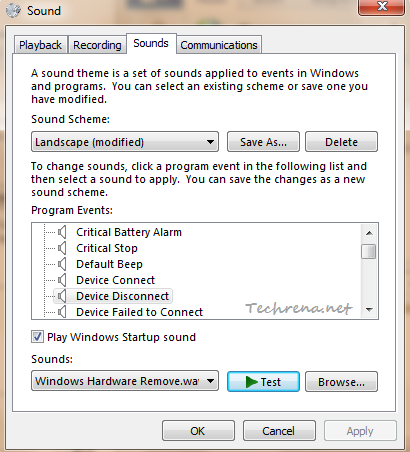
2. A new Sound settings window will open up.

sound-windows-7-settings

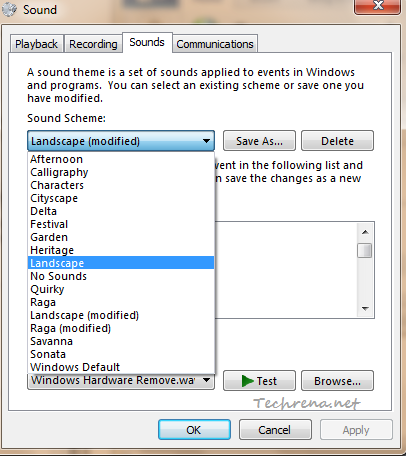
3. Select a sound scheme from the list which you want to edit:

sound-scheme-windows-7-settings

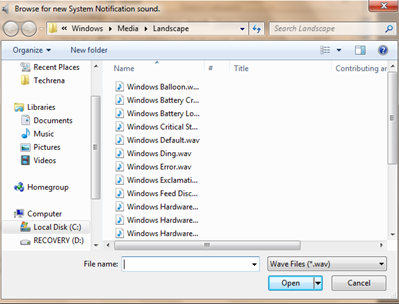
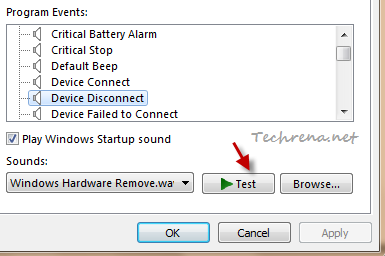
You can then select and test sounds for various program events. Click on “Test” button to preview the sound. To change the sound for a particular program event, click the “Browse…” button to browse a custom .wav (wave music format) music file from your computer to replace it with any other custom sound track.

browse-program-event-sound

Program Event sound in Windows 7

Ensure that you preview the sound before applying the customized sound track to any program event. Click “OK” to apply the sound track.