Share Files With Your Pals Instantly With Ge.tt

Gett logo

Ge.tt, is a new file-sharing service with a difference. With Ge.tt, not only you can share your files instantly but you can also share the link with your friends immediately without needing to wait till the upload gets over. You can share the links in real-time with your friends over Facebook, Twitter and email. This innovative web-app doesn’t use any additional plugins and is as simple as it can get.
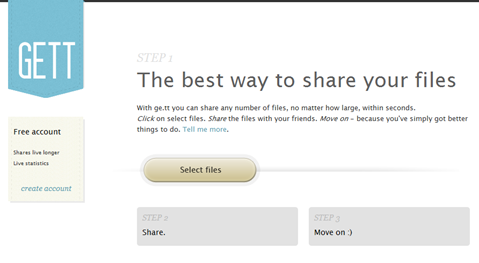
Select files in Gett

To get started with Ge.tt, head over to the homepage. Creating an account is not mandatory, Ge.tt still keeps you files on the server for a period of 30 days. But by signing up for an account, you can extend the time till which the files reside over the server. Click “Select Files” button and start uploading (you can also drag-and-drop in supported browsers). Wait for a while till the shortened link for your shared file appear. You can see that the download URL for the shared file appears even while the uploading of the file is still under progress.
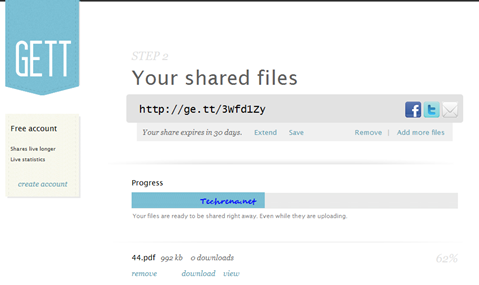
Shared files in Gett

When you share the download link with your friend, he can also see the status of the file upload and the advantage here is that he can immediately start downloading the files before the whole uploading process could even get finished. On the other end, you can go on adding as many files as you can after you share one file and all these files will instantly appear to your friend at the other end without even refreshing the page. Ge.tt doesn’t clearly mention any limits for the size of the file being uploaded, but they do have rules for the nature of the files that are allowed to be uploaded.

Checkout, Ge.tt

[Download] Harry Potter And Halo Reach Windows 7 Themes

Microsoft has released fresh themes to the Windows 7 themes gallery as it has been doing all the time. The recent new theme packs are “Harry Potter”, “Halo Reach: Art Inspiration”, and “Halo Reach”.

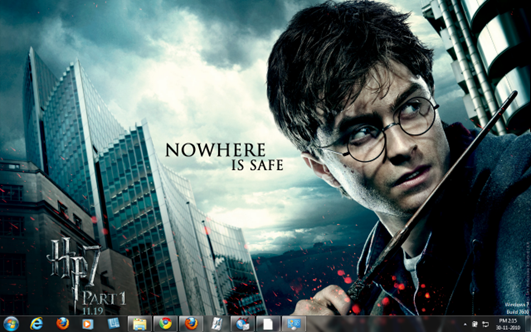
Harry Potter theme packs six high resolution desktop wallpapers showing lead roles Harry Potter, Hermione, Ron etc. from the latest Harry Potter 7: Part 1 film. [Download]

Harry Potter 7 Windows 7 theme

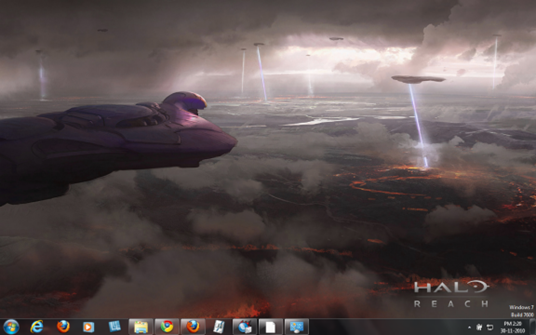
Halo Reach: Art Inspiration theme contains thirteen wallpapers providing rather amusing custom sounds, based on the blockbuster Xbox video game Halo: Reach. [Download]

Halo reach art inspiration Windows 7 theme

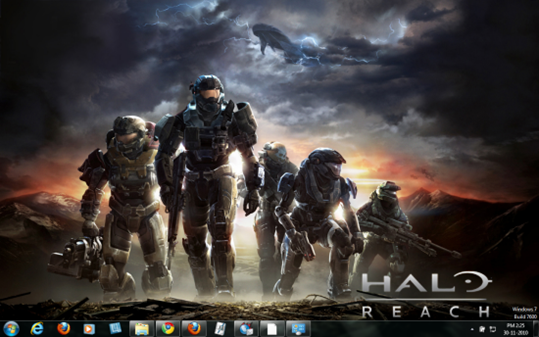
And finally, Halo: Reach theme features twelve desktop backgrounds inspired from the same video game, Halo: Reach.

Halo reach windows 7 theme

Download:

Halo Reach: Art Inspiration

[Offer] LayerView Free License Key Code

LayerView is a lightweight and flexible packet sniffer program for Windows which allows you to monitor what data has been sent or received by our computer. It supports most of the Ethernet and wireless adapters. As a native network packet analyser, the software allows you to see all the inbound and outbound TCP/UDP network traffic on your PC. This is pretty much useful for network administrators to identify inaccurate network packer and the network data to locate the bottlenecks on the network and maintain the seamless network data transmission without any hefty data errors.

LayerView is now giving away license key codes for free until January 19, 2011. A 3-user LayerView license for non-commercial use would normally cost us $39. But now you can grab this license for free. Follow the steps to get your free license/serial code:

1. Visit the LayerView License code giveaway page.

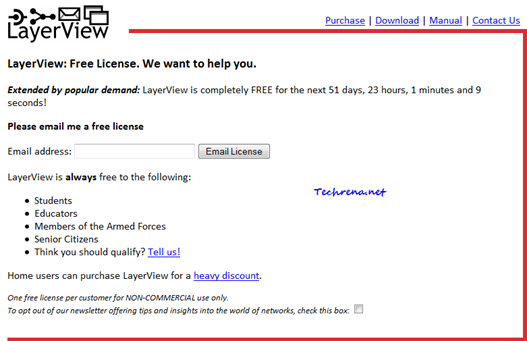
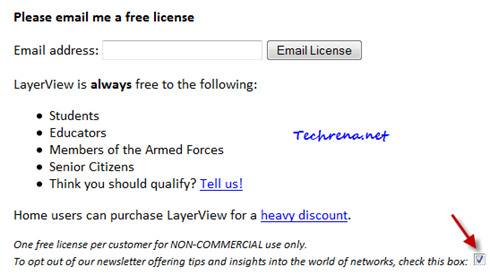
2. Enter your email address in the text box and click the “Email License” button to receive your free license key code to your email inbox.

LayerView license key

3. Before submitting the request, tick the checkbox at the bottom of the page to opt out of their newsletter (or leave it unchecked if you want to receive regular emails from them).

LayerView license code request

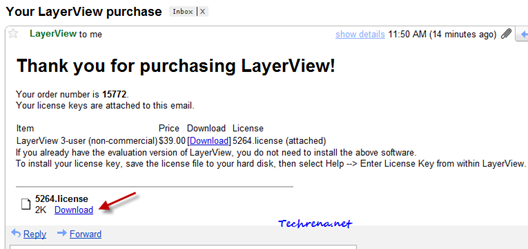
4. You should have got a email and it contains the link to download your free license (.license file) for the LayerView:

Layerview license email

Download the LayerView and use the license key code that you have got.

[Download] Google Earth 6

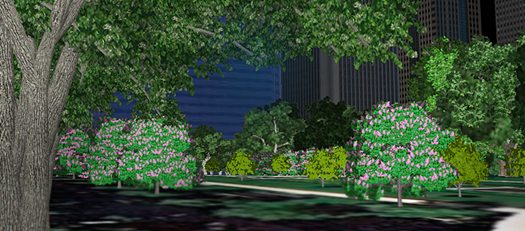
Google has just released the Google Earth 6 with entirely new and surprise addition of features. The virtual 3D earth application from Google, boasts of 3D trees and a much improved version of the Street View. Google Earth 6 packs virtual 3D images of tress in locations all over the world. A blog post at the Official Google Earth Blog reports that there are as many as 80 million trees added in this version. To enable the trees in your Google Earth, just select the Trees checkbox inside the 3D Buildings layer option and tick against it.

Google earth 6 trees


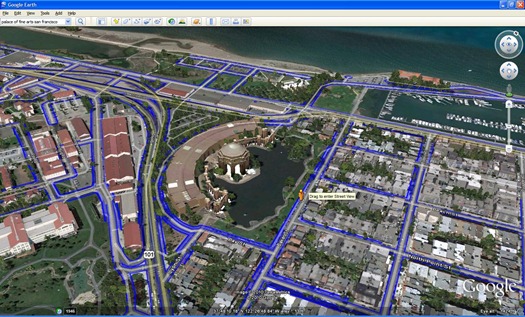
The 2-year old Street View in Google Earth is now fully integrated. This means that you can directly enter the street view all the way from the space. You can either zoom in until the Street View gets enabled automatically or you can drag and drop the peg-man icon (yellow man icon standing in the street) to enter into the Street View for your desired street.

Integrated street view in Google earth 6

Start Downloading Google Earth 6 for Windows, Mac or Linux right away from the below links:

Offline Installer [13.37 MB]

Online Installer

[Tip] Run Program As Administrator Right From The Start Menu In Windows 7

If you are using Windows 7, you might well be knowing by now that you can easily start any program from Start Menu by simply searching for it there. The problem here, which many of us aren’t aware is that when you a program in this fashion, it doesn’t start with administrator rights. There may be times where in you need to start a program for instance a command prompt with elevated rights, otherwise you might receive errors such as “The requested operation requires elevation” etc. Thankfully, there’s a little lesser-known trick available in Windows 7 to execute a program directly from the Start Menu search or quick search run box as administrator. Here is how you can do it:

1. Go to Start Menu, type the name of the program that you want to run in the search box. I’m going to run Command Prompt window as administrator so, in my case, I need to type “cmd” in the search box.

Cmd start menu search

2. Now, when you see the required program in the search results, you tend to hit enter to run it.

CMD start menu search result

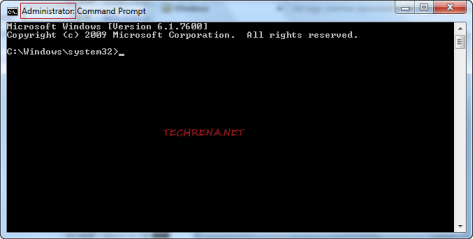
Instead, press Ctrl + Shift + Enter to run the program with elevated (administrator) rights. Click “Yes” when you are asked by UAC to run the program. That’s it! The program runs in administrator mode:

CMD as admin in Windows 7

Note: You can always right-click on the search box results and choose “Run as administrator” to run the program as an administrator as well.

Run CMD as admin from start menu search results

Also learn how to Always Run A Program As An Administrator By Default.

[Download] Ubuntu One For Windows

Ubuntu One

If you don’t know yet, Ubuntu One is a cloud storage application much like the popular Dropbox, offering a 2GB (basic version) of online storage for you to backup and sync your files, contacts, notes, bookmarks etc. To get the free 2GB storage, you need to sign up for Ubuntu One. You can always add more storage by paying additional $2.99 per month for 20GB storage (20-Pack of storage). Ubuntu is also offering Ubuntu One Mobile one, cloud music streaming service for iPhone and Android mobile devices at $3.99 per month.

If you are on Windows, you may need to request a Ubuntu One Windows Beta invite to be able download the installer file, which is around 12 MB in size. Once installed, use your Ubuntu One account to sign into the application.

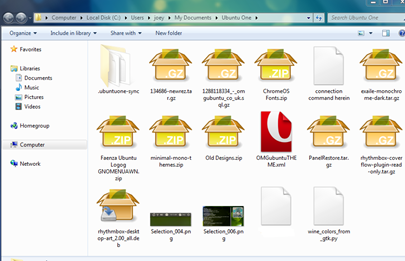
Ubuntu One for Windows

Even though, the first release of the beta version of the Ubuntu One doesn’t offer syncing folders outside the main Ubuntu One folder, the feature is soon expected to be arrived in the later release of the software.

Price List:

Plan

Price

Monthly

Yearly

Baisc (2GB)

Free

Free

Mobile

$3.99

$39.99

Additional Storage (20 GB packs)

$2.99

$29.99

Download:

To download the first release of Ubuntu One beta for Windows, fill out this this request form.

[via] OMGUbuntu

[Tip] Pin Important Folders To The Top In Windows Explorer

Have you ever wondered how could I keep my most frequently used folder at the top in any Windows Explorer window?

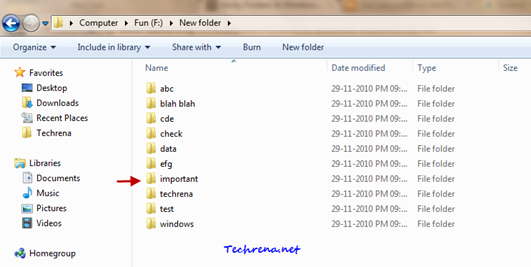
As all of us know, the folders inside any Windows Explorer window are by default sorted by name (alphabetical). So a folder like “important” would always gets listed down in order than say some folder like “abc”.

Windows explorer default view

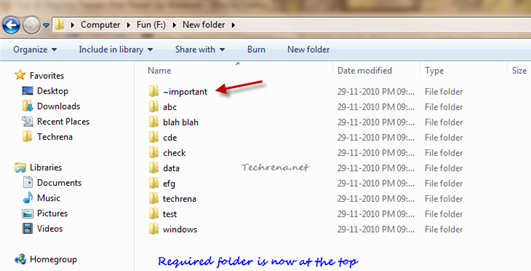
If you can see in the above screenshot, our motto is to get the “important” folder up in the order, right at the top of the list. One simple workaround to get this done is to add some symbols on your keyboard like ~, `, !, #, ^ etc to the folder names that you want to see atop. However please be aware that you can not use symbols like \, /, :, *, ?, “, <, >, | because Windows doesn’t allow these strings to be present in the names of the folders.

Sticky folder at the top of the windows explorer

Try using different symbols in order to use multiple sticky folders at the top of the Windows Explorer. If you use same symbol for any two folders, they are still going to be sorted by their names as shown:

Two folders starting with same symbol

Avoid using digits instead of symbols as the whole name looks a bit cluttered if you prepend a numbers like 1, 2, 3 etc. at the beginning of the name of the file.

[via] Labnol

[How To] Disable Aero Snap In Windows 7

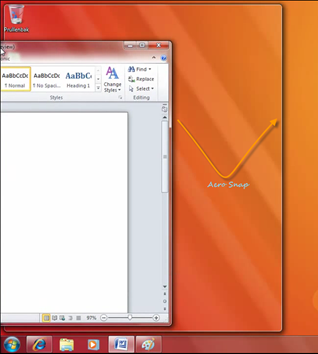
Aero Snap” is a new feature introduced in Windows 7 as part of the windows management. In short what it does is when you drag a window to the top or towards the side of the screen, it gets maximized (when dragged to top) or resized (when dragged to side) automatically to fit that portion of the screen.

Aero Snap

The minor problem here is when you want to hide the window by dragging it to the side of the screen, it gets resized instead. Also this is also a worthless feature of you use multiple monitors. Whatever may be the reason, just in case if you want to disable this feature, read the following guide:

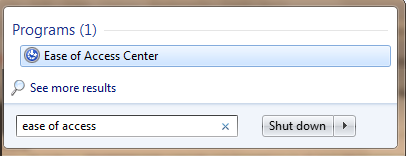
1. Type “ease of access” in the Start Menu search and open the result from the Programs section.ease of access start menu search

You may also open the Ease Of Access Center from the Control Panel menu.

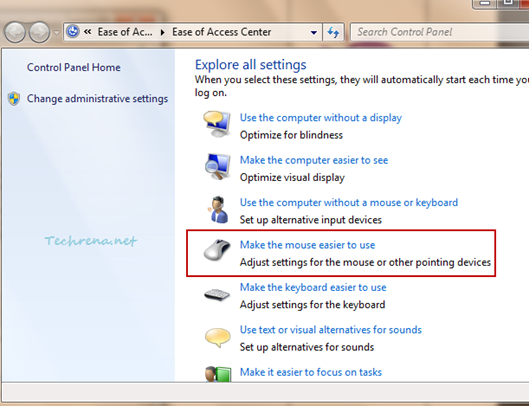
2. In the Ease Of Access Center, scroll down and click “Make the mouse easier to use

Ease of Access Center

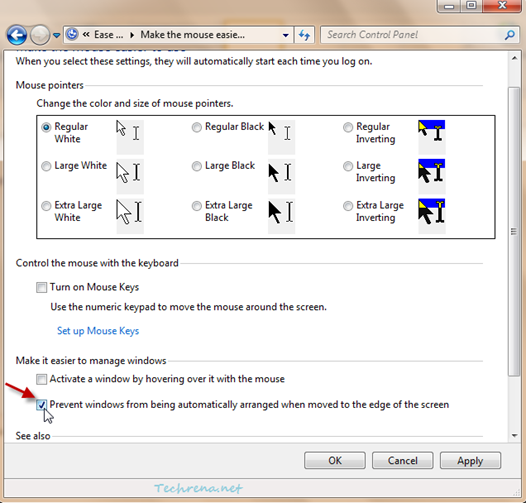
3. A new window (Control Panel \ Ease of Access \ Ease of Access Center \ Make the mouse easier to use) will open up.

Scroll down to the bottom of the window, where you will see “Prevent windows from being automatically arranged when moved to the edge of the screen”. Check against it and click OK to apply the settings and close the window.

Make mouse easier to use settings

That’s it. You have just turned off the Aero Snap on your Windows 7. To enable the Aero Snap feature back on your computer, just uncheck the option in the step 3.

[How To] Enable Offline Files In Windows 7

Offline Files Windows 7

Offline Files is a cool feature available in Windows since the days of Windows XP which allows you to see the files shared over a network even when you are not connected to the network. When you enable offline files, it will tell the Windows to store a local copy of the files on your computer so that you can access them even when you are away from the network. Later, when you come back on to the network, these files will get synchronized with the server to update to the latest version of the files. Follow this guide to enable the Offline Files on your Windows 7 machine.

Please note that the “Offline Files” feature is not available in Windows 7 Starter and Home Premium editions.

Steps:

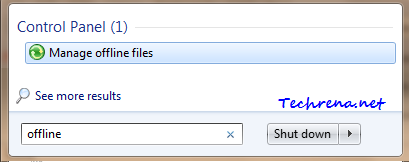
1. Type “offline” in the Start Menu search and open the first result from the Control Panel section:

offline files start menu search

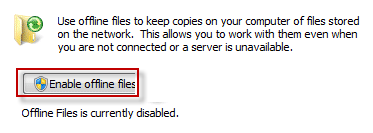
2. Click “Enable offline files” in the Offline Files window and click OK to apply the changes.

enable offline files in windows 7

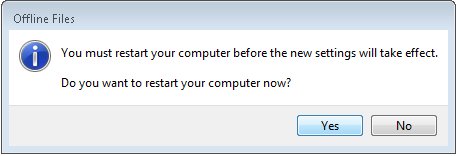
3. And you will now be prompted to restart your computer before these changes could be applied on your machine.

Restart offline files enable

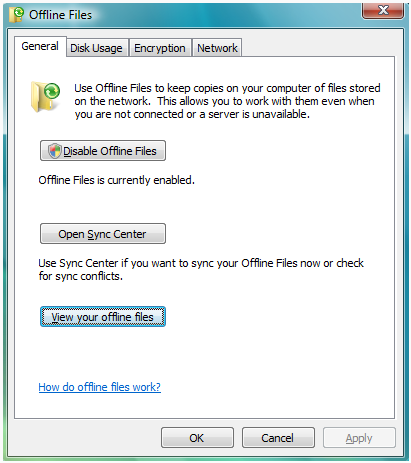
Choose Yes to restart your machine and check back to see the offline files being enabled for you:

Offline files enabled

[Tip] Disable Web Clips Ads In Gmail

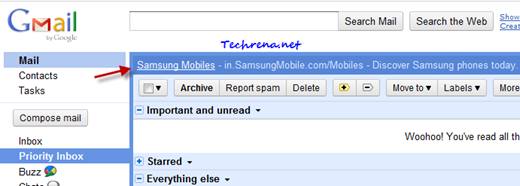
Web clips inside gmail inbox

Google had added Web Clips sometime back originally with the intention of showing some RSS and Atom feed snippets, blog posts, news headlines and above the inbox in Gmail. But seldom you see any useful clips in your Web Clips section as most of the messages that appear in this section are now seem to be just ads (sponsored links). Google however has left the choice to the users to either enable or disable them. If you find them annoying a bit, here is what you need to do in order to get rid of them:

1. Login to your Gmail and open the Web Clips settings page.

2. Uncheck against the “Show my web clips above the Inbox”.

Web clips settings in Gmail

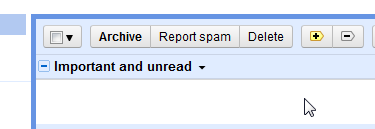
3. Go back to inbox to see the change, the Web Clips should no longer appear above your inbox.

No web clips inside Gmail