[How To] Enable Quick Launch In Windows 7

Quick Launch Bar that used to exist in Windows until Windows Vista was offering an easy way to quickly start a program from the Windows taskbar. However, this feature has been disabled (or ‘hidden’, I would rather prefer to say) in Windows 7. This is due to the latest improvements in Windows 7 that let you to directly pin the programs to the Taskbar for quicker and direct launch. But sooner or later you will understand that if you go on pinning programs to the Taskbar, you would probably left with very little space on your taskbar. Quick Launch Bar has an advantage here as it won’t occupy much space. Anyway if you are all for Quick Launch Bar and want to enable or disable it in Windows 7, here is how you have to do it:

1. Right-click on the Windows 7 Taskbar and choose Toolbars> New toolbar..
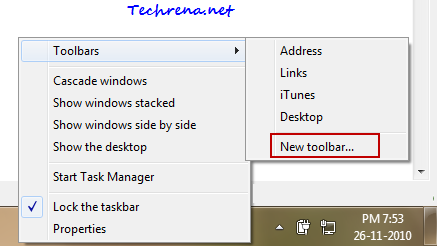
new toolbar from taskbar in windows 7

2. A new file browser window will be opened. Copy the following path and paste it into the “Folder” filed click “Select Folder”.

%userprofile%\AppData\Roaming\Microsoft\Internet Explorer\Quick Launch
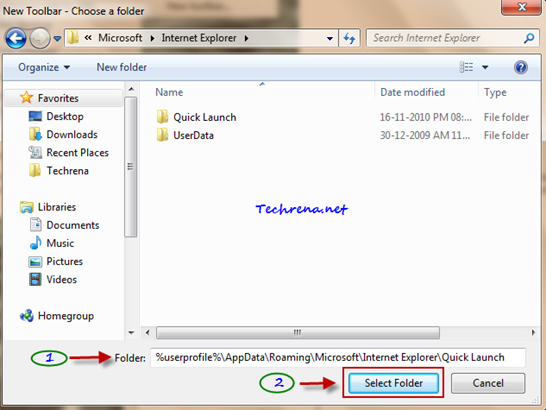
Select folder for new Quick launch toolbar

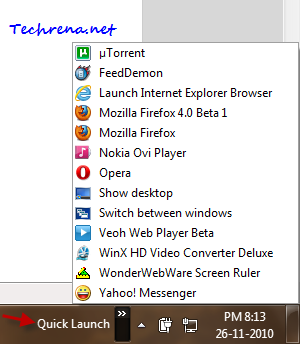
3. Now you will notice the new Quick Launch Bar being added to the Taskbar, just before the System Clock in the system tray.
Disable Quick Launch Bar

Clicking on the arrows icon next to the Quick Launch Bar would open the list of programs that are currently added to the Quick Launch Bar. So you need to open the list and then click the program to run it. Let’s see how can we make this even simpler, to quickly open the programs in the Quick Launch Bar.

4. Right-click on the Taskbar and uncheck against “Lock the taskbar”.
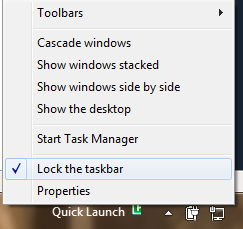
Lock the taskbar in Windows 7

5. Now you’ll notice that you can actually move the Quick Launch Bar to adjust its position.

move quick launch bar

Just drag it a bit forward to show the program icons in the Quick Launch Bar as shown:

Program icons in the Quick Launch Bar expanded

If you want further customization, you can right-click on the Quick Launch Bar position and deselect “Show Title” and then lock the taskbar to see all the Quick Launch Bar icons placed next to each other in a line.
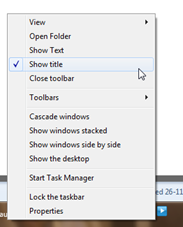
Show title quick launch bar

Quick launch bar icons together

Disable Quick Launch Bar:

If you want to disable or hide the Quick Launch Bar from the Windows 7 Taskbar, right-click on the taskbar, Toolbars> ..and deselect Quick Launch from the context menu.
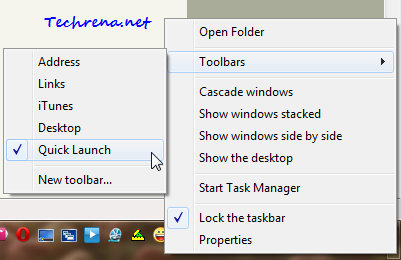
Quick Launch bar in context menu

Black Friday 2010 Ads & Deals

Black Friday 2010 Is Here:

Black Friday 2010 is just 4 days away and it’s time to make the most of the wonderful 2010 Black Friday ads (deals). if you are a gadget lover, you have every reason to be ecstatic as there are loads of discount deals available on gadgets like mobile phones, digital cameras, blue-ray players, TVs, laptops etc.

Go through all the available Black Friday 2010 deals to find the deal that suits you the best.

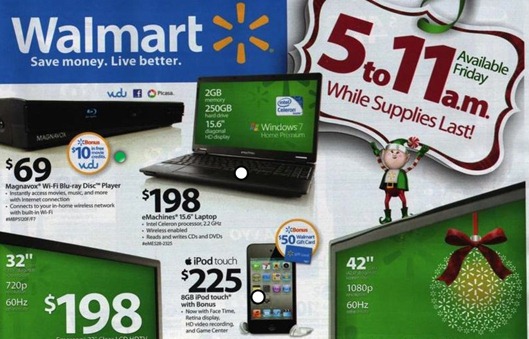
Walmart:

Walmart black friday ads

Wallmart Black friday 2010 deals are out and they look cool! Get an HDTV or laptop starting from $198, while iPod touch is being offered for less than $225.

Visit Walmart.com for more deals.

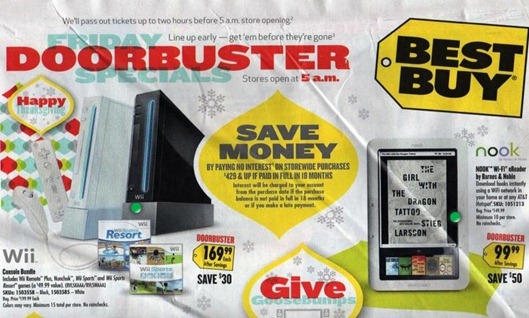
Best Buy:

Best Buy Black Friday deals 2010

Best Buy deals for Black Friday 2010 include the Barnes & Noble’s Nook e-reader Wi-Fi tablet for $99. Visit Best Buy website for more info on deals.

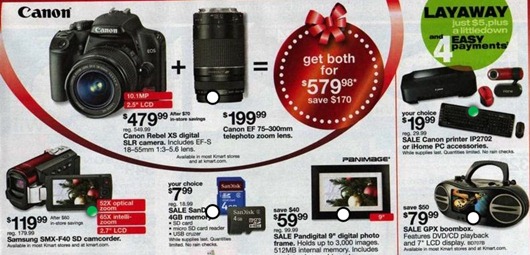
K-Mart:

K-Mart black friday ads 2010

More info about K-Mart Black Friday 2010 discount deals at official website.

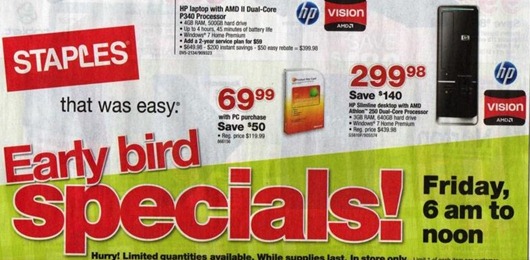
Staples:

Staples-black-friday-deals

More info on the exclusive Black Fridays 2010 deals by Staples at: Official Website

More to follow..

via

[How To] Pin Computer Icon To Windows 7 Taskbar

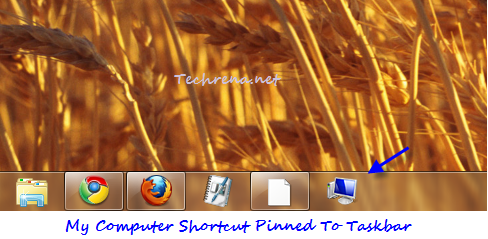
My computer shortcut icon pinned to taskbar

Windows 7 taskbar is really handy and as you might be knowing it allows you to just drag and pin any program shortcut to the taskbar. But have you ever tried pinning the “Computer” shortcut from desktop to the taskbar in Windows 7? Does it get pinned to it? No, right? This what you will end when you try to pin it to the taskbar:

Pin My Computer to Taskbar

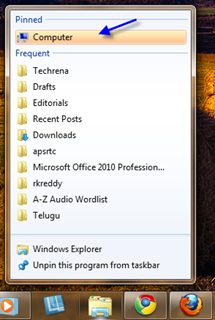
Computer icon pinned to windows explorer

It gets pinned to the “Windows Explorer” and it’ll be shown above the jump lists as shown in the above screenshot. Oh no, wait! not exactly where we wanted it to be! No compromise, we just want it to be pinned to the taskbar no where else! Oh no, problem, problem, problem!!

We are here for you. In this tutorial we are going to talk about workaround to pin the Computer icon to the taskbar. Let’s get started !
Steps:

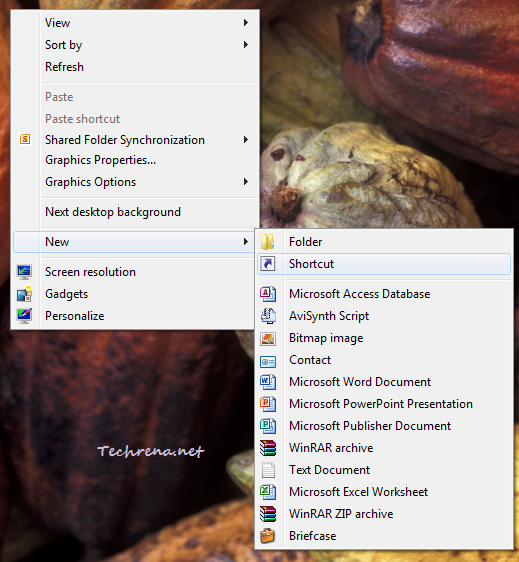
1. Create a new shortcut on your desktop: Right-click on your desktop and choose New > Shortcut.

new shortcut desktop right-click context menu

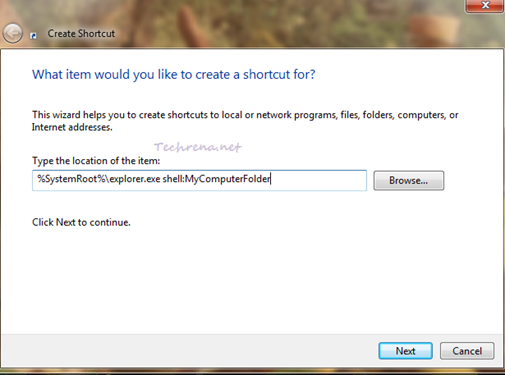
2. In the next “Create Shortcut” window, paste the following string:

%SystemRoot%\explorer.exe shell:MyComputerFolder

create desktop shortcut wizard

Click “Next” button at the bottom of the window

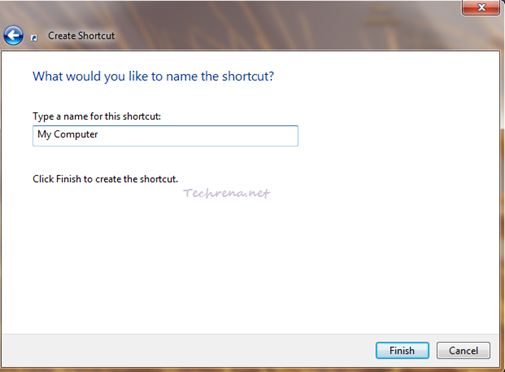
3. Name the shortcut. You can type any name for the shortcut and click “Finish” button to finish the wizard.

create desktop shortcut wizard

4. Now you will have a shortcut for “My Computer” created on your desktop.

My Computer shortcut original icon

5. Now we are going to change the icon for the shortcut and get the original icon (computer) that is normally associated with “My Computer”.

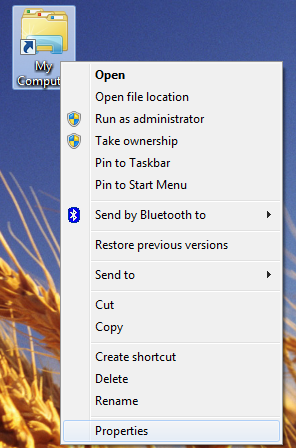
To do this, right-click on the shortcut and select “Properties”.

Right-click context menu for shortcut

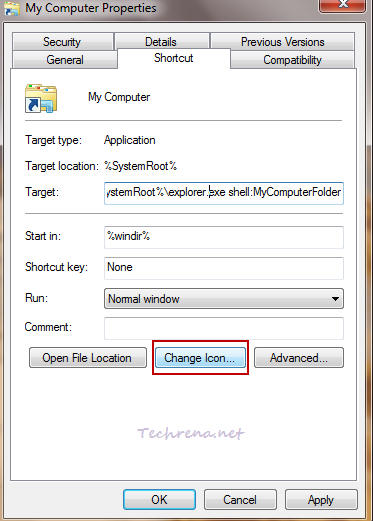
6. Go to the “Shortcut” tab in the “Properties” window and click “Change Icon”.

My computer shortcut properties

7. Paste the following string in the “Look for icons in this file” field and press Enter.

%SystemRoot%\system32\imageres.dll

Change icon for My Computer shortcut

Select the “Computer” icon and click OK.

8. Click OK to close the Properties window.

9. Now try dragging the shortcut to the taskbar and it works!!

Pin My Computer icon to taskbar

You will now have the Computer icon pinned to the Taskbar as shown in the above pic. If you liked this post then chances are that you might also want to checkout Start Windows Explorer With Custom Folder

[Tip] Quickly Resize Desktop Icons In Windows 7 & Vista

If you were used to Windows XP for long time and then shifted to the newer versions of Windows like Windows Vista or Windows 7, one thing you will find a bit annoying the default big size desktop icons that eat most of your computers desktop. Fortunately Windows has made it easier for the users to choose the size of the icons on your desktop. There are plenty ways available to resize the size of the desktop icons in your Windows 7 and Windows Vista based PCs. We’ll discuss a few of them here:

Desktop icon resize

1. Easy: Using Mouse Wheel:

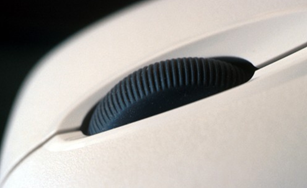
mouse-wheel

This the easy and hassle free way to resize your desktop icons which many of us aren’t aware of. Just hold down the CTRL button on your keyboard, press left button on your mouse initially and then move the scroll button of your mouse to resize the desktop icons as well as icons inside any folder.

2. Usual Method: Right-click Context Menu

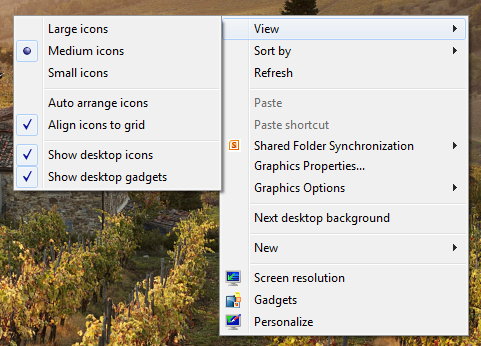
Right-click on your desktop, under “View” list, you can choose resize your desktop icons to small, medium and large icons.

View context menu on desktop

The second method is most common and  majority of the Windows 7 users might be aware of this. However the first method is pretty much simple and handy, highly recommended !!

[Download] Yahoo Messenger 11 Beta

Yahoo messenger smile

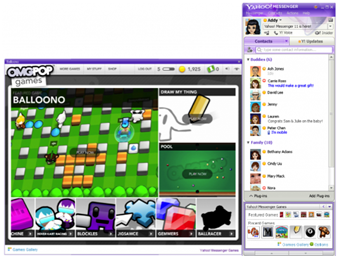
Yahoo Messenger 11 Beta has been released and is now available for download. The latest beta version of the popular IM software shows off many new features and improvements, the biggest among them being the social networking integration.

Yahoo messenger 11

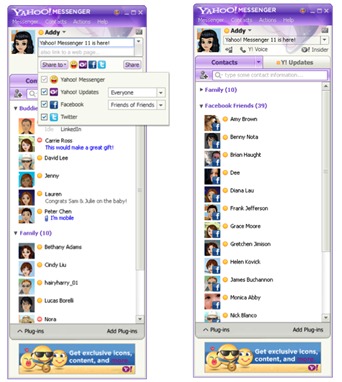
Yahoo messenger 11 social

New features and improvements in Yahoo Messenger 11:

# Play social games with friends (Flashville, Mafia Wars, Balloono, Pool, Draw My Thing, Happy Harvest etc.)

# Manage all your social networks from Messenger: Post or view status updates, comments and like updates from Facebook, Flickr, Twitter etc.

# Post status to multiple social networks simultaneously

# Chat with Facebook friends

# Android support (you can make video calls between PC, iPhone and Android devices too!)*

# Sign in to multiple PCs simultaneously

# Retrieve all IM conversations history

[*] Supported only on devices running Android OS 2.2+ with Yahoo! Messenger Video Add-on installed

Download Yahoo Messenger 11 Beta:

>> Online installer

>> Offline standalone installer [16.75 MB]

[Tip] Download Your Entire Facebook Data

facebook logo

What’s the point of any service where you don’t have control over the data you add through it? This is the first and foremost point that every user considers before using any service and the service provider must be up to it to provide users with full control over their data. Being the most widely used social networking website on the internet, Facebook is no exception. Facebook has recently added a provision through which the users can download their entire personal information that you have posted on Facebook including messages, Wall posts, photos, status updates and profile information etc. You can download all this data with a single click.

Follow these steps to download all your information on Facebook:

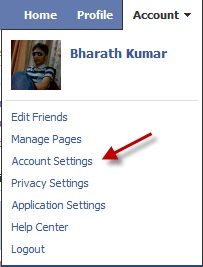
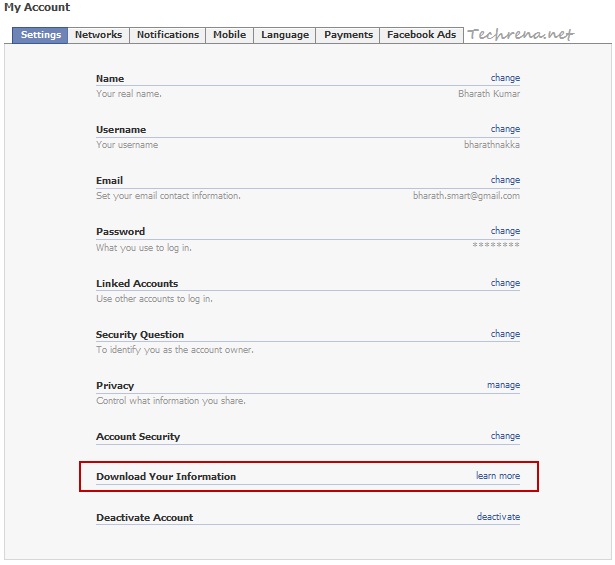
1. Login to Facebook and click “Account Settings” under Account.

Facebook account settings

2. Locate “Download Your Information” in the Settings tab and click “learn more” link present right next to it.

Download Your Information in fb account settings

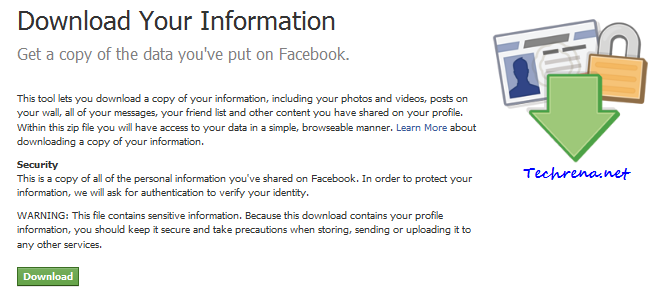
3. In the next page, you will receive a brief message about what the tool exactly going to do along with a brief warning message. Click on the green “Download” button to proceed to the next step.

Download Your Information warning in facebook

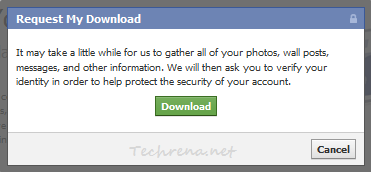
4. A pop-up window (“Request My Download”) appears now. The window tells you to wait till Facebook gathers all your photos, wall posts, messages and other information. Click on the Download button again to proceed.

Request my download window in facebook

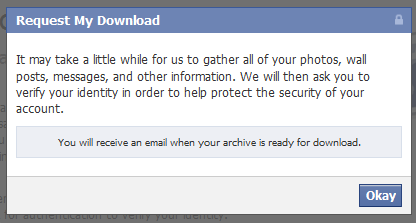
Request my download window in facebook

5. It may take a little while for Facebook to gather all your information and you will eventually receive a mail containing a download link for the zip file containing your Facebook account information.

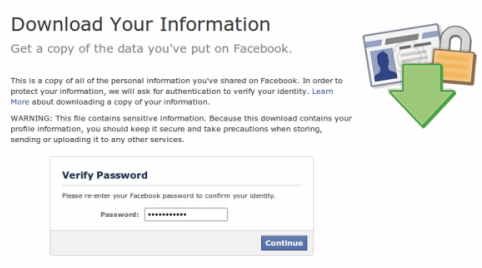
You need to verify your identity by entering your account password before you can download the zipped file.

Download your information fb verification

In the next page you should see a download button along with showing information about the size of the file you are about to download. Download the .zip file and unzip to see the contents of it. You should see sub-folders like photos, html along with index.html and readme files.

6. You are done with downloading your information from Facebook!

Watch the below to video to follow the above steps:

[How To] Display Run Command Button In Start Menu

Run start menu link

Run Command in Windows is so handy to run programs and other commands quickly. Even though it has lost it’s charm a bit in Vista and Windows 7 due to the wonderful “search and run” addition to the Start Menu, it still does hold it’s prominence among users who are used to it from the days of Windows XP.

By default RUN command option is hidden in Start Menu for Windows 7 and Vista and one needs to either press Windows Key + R or search for “run’ in the Start Menu and press enter to open the RUN command. Fortunately Windows 7 and Vista allow you to add  this “RUN” command button to the Start Menu for quicker access. Here are the two ways in which you can add this button.

Method-1:

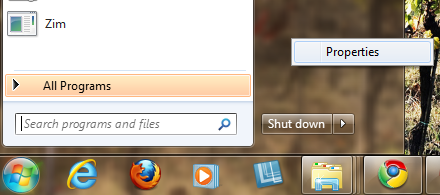
1. Right-click on Start Menu and click “Properties”.

Start menu properties option

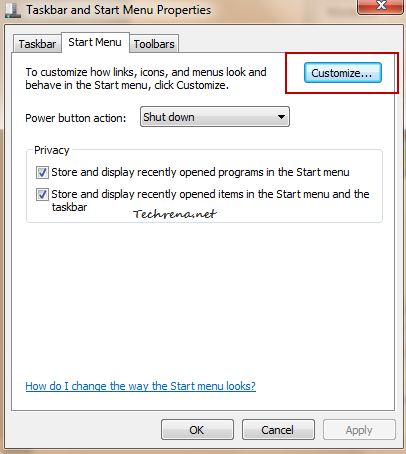
2. In the “Taskbar and Start Menu Properties” window, click on “Customize” option found under the “Start Menu” tab as shown:

Start menu properties customize option

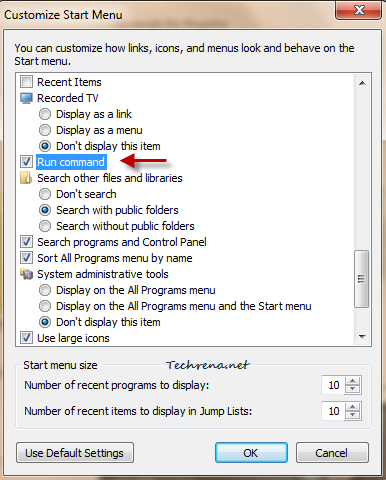
3. A new window will open up, scroll down the list until you find “Run Command” option. Just check against it and click OK.

Run command option in start menu customize

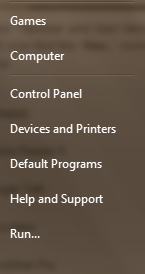
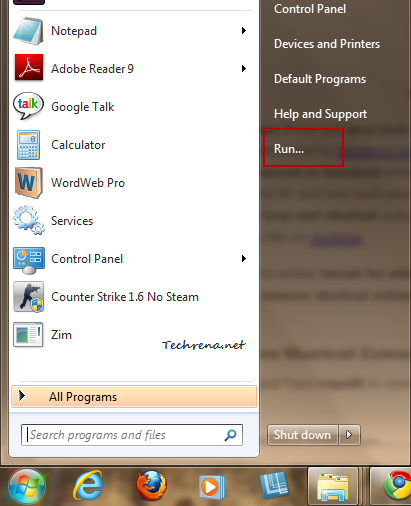
4. Click OK in the “Taskbar and Start Menu Properties” window to save the settings and close the window. You will now find the “Run..” command option right inside the Start Menu as shown in the screenshot below:

run option in start menu

Method-2: Using Registry Editor:

1. Type “regedit” in the Start Menu search bar and hit Enter to open the Registry Editor.

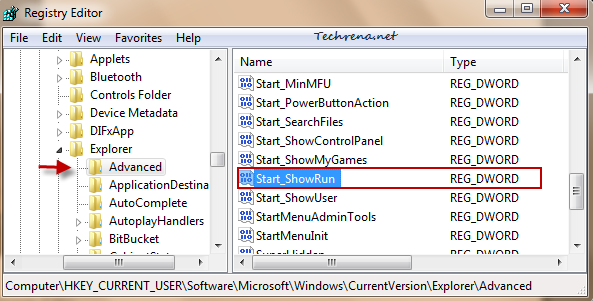
2. Go to the following path in the Registry Editor:

HKEY_CURRENT_USER\Software\Microsoft\Windows\CurrentVersion\Explorer\Advanced

3. On the right side pane, look for a key named “Start_ShowRun” :

Start ShowRun key in regedit

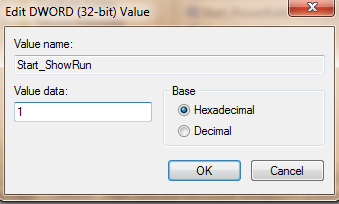
4. Double-click on the key to change it’s DWORD value. Enter “1” in the “Value data” field and click OK.

DWORD edit for Start ShowRun key in regedit

5. Close the Registry Editor and as usual Logoff and log back into notice the change (you may instead restart your explorer.exe process as well). Your Start Menu should showup the “Run..” button as shown in the above pic.

[Tip] Find System Uptime In Windows 7

Sometimes you will leave your system running for too much of time and later you forget for how much time you had kept it running like that. Wouldn’t it be just useful if we can find the exact system boot time or uptime (the amount of time for which your computer is running since it’s turned on) of your Windows?

Here are the simple tricks that you can use in your Windows 7 or Windows Vista based computers to find the system uptime or exact boot time.

Method-1: Using SystemInfo

Here we’ll make use of systeminfo command, using which we wrote a tutorial earlier to find the windows 7 original install date.

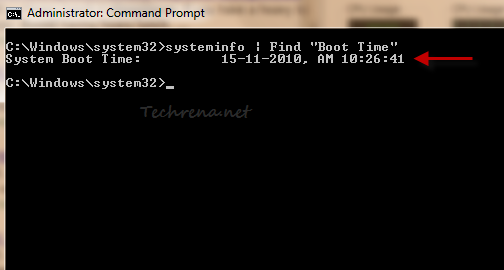
Type “cmd” in the Start Menu search bar and press enter to open the Command Prompt window. Type the following command in the cmd window and hit Enter:

Systeminfo | Find “Boot Time”

And you will see the System Boot Time in the next line in the CMD window as shown:

system boot time in cmd

Once you know the boot time, you can easily calculate the System Up time or vice versa.

Method-2: Using Task Manager

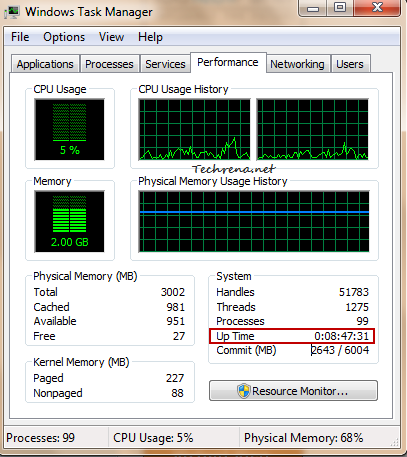
Right-click on the taskbar and choose “Start Task Manager” to open the task manager. Alternatively you can press CTRL + SHIFT + ESC to open it directly.

Under the Performance tab, you will find Up Time being listed as shown:

uptime in task manager

As you can see from the above screenshot, Up Time for my system is shown as 0:08:47:31 which translates to 0 days, 8 hours, 47 minutes and 31 seconds.

Note:

These values turns up accurate only when you keep your system running. These values may deviate slightly from the actual values if your system goes to stand by mode or sleep mode in the middle.

[Download] Windows 7 Harvest Time & Windows Live Clouds Themes

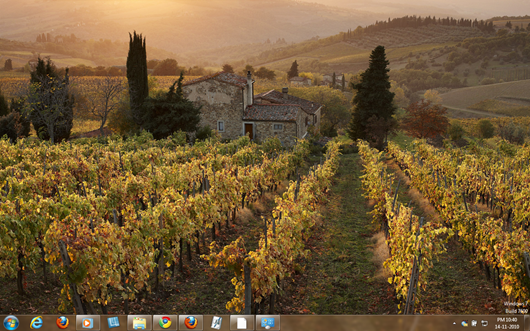
Microsoft as always released two exclusive theme packs for Windows 7 keeping the upcoming Thanksgiving season in mind. Windows 7 themes gallery has been updated with two high quality themes Harvest Time and Windows Live Clouds theme. Harvest Theme for Windows 7 is for created especially for the Thanksgiving season and contains 18 beautiful wallpapers related to harvest.

Harvest time theme for windows 7

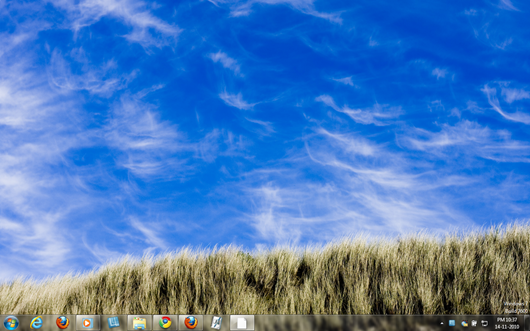
The Windows Live Clouds theme contains 10 high resolution images (with 1920 x 1200 dimension) of clouds, which are selected from the photo submission to Bing.

Windows live clouds theme for Windows 7

Download the theme files (.themepack files) from the following links and double-click on them to install and apply them immediately.

Download Harvest Time Theme

Download Windows Live Clouds Theme

[Download] Windows 7 SP1 RTM Blocker Tool

Windows 7 logo

Microsoft has released Windows 7 Service Pack 1 blocker tool kit that allows you to block all Windows 7 Service Pack 1 updates without disabling the Windows Updates. If your organization wants to wait till the official RTM release of Windows 7 which is expected around the first quarter of 2011, and don’t want to install Service Pack updates via Windows Updates.

Download the Windows Service Pack Blocker Toolkit  (for Organizations) from the direct download link given below to temporarily stop the installation of Windows 7 and Windows Server 2008 R2 SP1 updates and will be valid for 12 months from the date when the service pack gets general availability.

The toolkit contains three components:

  • A Microsoft-signed executable
  • A script
  • An ADM template

And you need to use the component that best serves the computer management infrastructure in your organization from the above three.

Download Windows Service Pack Blocker Tool Kit [ 96KB – For Windows 7 Service Pack 1 & Windows Server 2008 R2 Service Pack 1 ]