[Tip] Reset Internet Explorer Settings

Internet explorer logo

If you have been using Internet Explorer (IE7, IE8 & IE9) for long, it’s quite obvious that you might have added many customizations, add-ons etc. You have become its master, it does what you instruct. But a day comes where the scene goes out of your hand, Internet Explorer does respond and behaves in an unexpected manner. Doesn’t open the websites, throwing errors at your face which you never want to see like “Internet Explorer has “encountered a problem and needs to close” or “ Visual C++ “runtime error” has occurred in Iexplore.exe”, it either stops responding or even worse, it crashes! Whatever may be the cause of these errors, they are really annoying. The first thing that you should do in such a situation is to disable the add-ons that are known to cause these problems. Even though, this may solve the issue for now, the ideal option however is to reset the IE settings. This will automatically deletes all the add-ons and customizations and makes your Internet Explorer like a freshly installed version. Follow the steps explained below to reset the IE settings on your computer.

Steps:

1. Start the Internet Explorer.

2. Open Internet Options via Alt button> Tools. Go to Advanced tab in the Internet Options.

3. Click on the Reset button available at the bottom of the window to reset your IE settings.
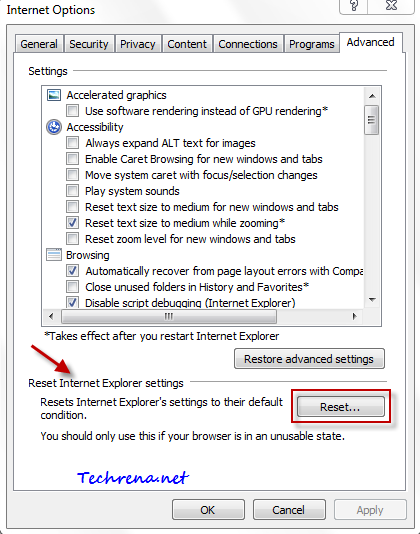
Reset IE settings in Internet Explorer

4. IE will start resetting the settings, wait until it gets finished and click Close in the Reset Internet Explorer Settings dialog box.

Restart your Internet Explorer to see the changes. IE should behave in the usual way from now on.

[Download] IE8 & IE9 Compatibility View List

Internet explorer logo

Even though we are in the age of Internet Explorer 9 , there are still handful of websites that were designed specifically for use with IE7 (or even IE6!) and which may break when rendered in the Inter Explorer 8.

To solve the issues with such websites, Microsoft has included “Compatibility Mode” in IE8. Whenever the browser finds that the URL entered by the user points to a website that is mostly compatibility with IE7 and older versions, the browser will quickly switch to the Compatibility Mode to render the content as it would be seen in the older versions of the Internet Explorer.

IE8 (as well as IE9) maintains a native list of websites that are to be rendered “Compatibility Mode”. To view this Compatibility view list in your browser, type the following in the address bar:

res://iecompat.dll/iecompatdata.xml (IE8)

File:\\%LOCALAPPDATA%\Microsoft\Internet Explorer\IECompatData\iecompatdata.xml(IE9)

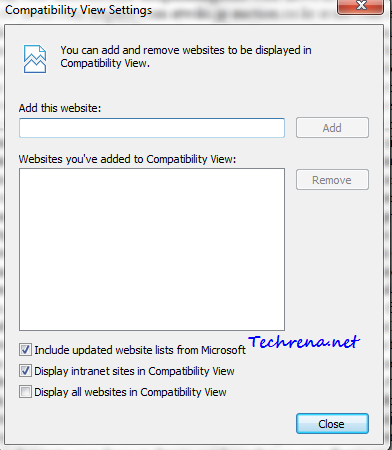
You can also add your own websites  to the list (IE8 or IE9) by clicking on the Alt button > Tools > Compatibility View Settings:

compatibility view settings

Microsoft now and then updates the Compatibility View List by including or removing websites to the list. It is rather surprising to find that websites from Microsoft own domain are featured in the list (Microsoft.com and Live.com). Download the latest Compatibility View lists in (xls format) for IE8 and IE9 from the links given below:

IE8 Compatibility View List (Updated on 04/17/11 – Link expired)

IE9 Compatibility View List

[Tip] Prevent Programs From Changing Default Search Engine In IE9

IE9 beta logo

Once you have set a default search engine in your browser, it should remain as it is, right ? But it’s not always like that some programs can easily change your default search engine in your default browser just by adding some keys to your windows registry. It has always been a big problem. Imagine like you install a program like Yahoo Messenger (changes default search engine to Yahoo) or Windows Live Essentials (changes default search to Bing), are just examples of such programs. Even though many of these programs do prompt you when they are going to change your browser (Internet Explorer here), we can hardly notice it as it’ll be asked during the program installation and most of the time we does this in a hurry without exploring all the options provided during the installation.

In this post, I’m going to guide you about how to prevent programs from changing your default search engine in case of the Internet Explorer 9.

1. Open the Internet Explorer.

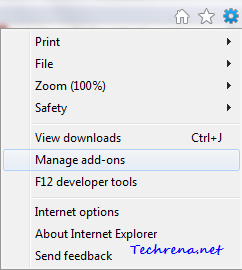
2. Click  on Tools icontools in IE(Found on the top right corner of the window).

3. Select “Manage add-ons” from the menu items.

Tools menu IE9

Alternative you can access the same settings from the “Tools” sections in the IE9 menu bar.

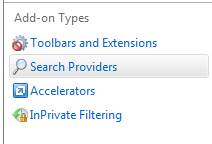
4. In the Manage Add-ons window, click “Search Providers” in the left pane.

Manage addons in IE9 left pane

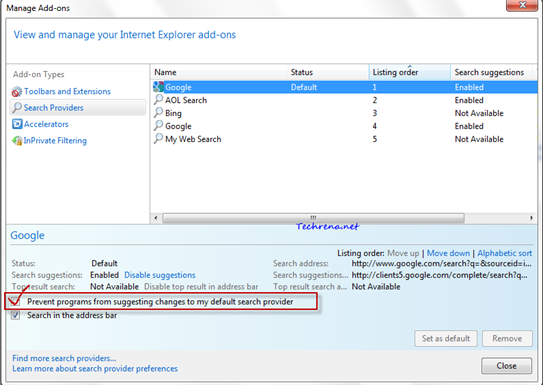
5. Select your default search engine (Google in my case), you will find an option “Prevent programs from suggesting changes to my default search provider”. Check against it and close the window.

Manage Search Providers in Manager Add-ons IE9

That is it. Now your default search engine in IE9 (& IE8) can’t be changed by any program. You might also want to read how to change the address bar search provider in Firefox.

[Tip] Clear Cookies And Cache For A Particular Domain In IE9

Internet Explorer 9

Microsoft’s latest innovation Internet Explorer 9 is slowly turning out to be the best ever browser that the Redmond based software giant has ever produced. With all the positive reviews creeping in from most of the users and experts, IE9 can now be viewed as the browser that will dominate the internet in the upcoming years. If you haven’t explored IE9 fully, yet there’s absolutely no reason why you should start doing it right away now.

There’s one useful feature in IE9 that most of us might not be aware of. Until now to delete cookies in the browser, we needed to delete the entire browser cache, in the same way, to delete cookies, we had to delete all the stored cookies. It’s not the same anymore with IE9. Thanks to IE9 developer tools, you can now clear cookies or clear cache for a particular single domain in Internet Explorer 9. It can be done if you follow the steps briefed below:

1. Open the Internet Explorer 9.

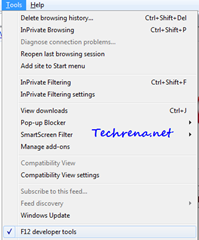
2. Press F12 to open the Developer tools. You may also access this via Tools (by pressing ALT) > F12 developer tools menu item.

Developer tools menu item

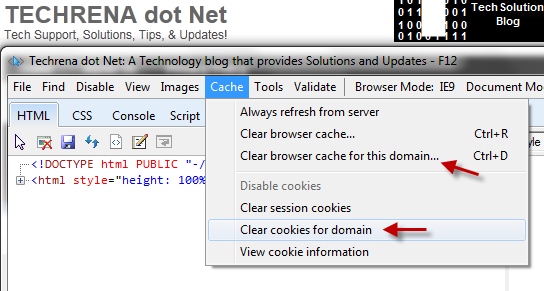
3. In the developer tools, you will see two options:

i) Clear cache for this domain

ii) Clear cookies for domain

Clear cookies and cache for this domain in IE9

These two options are very much handy especially if you are a developer.

Disable Internet Explorer First Run Welcome Screen Pop Up

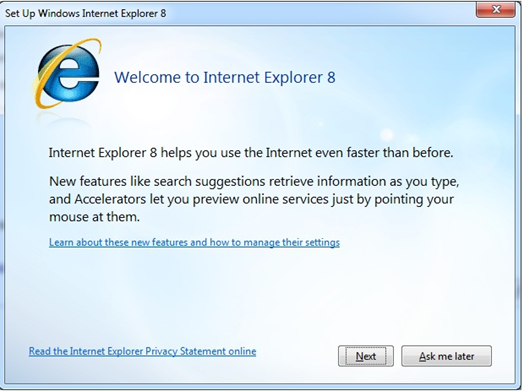
When you install Internet Explorer 8 or IE9 and launch it for the first time (or even when you reset the settings), you might have noticed the Set Up Windows Internet Explorer 8 (applies to Internet Explorer 9 as well) screen (Tour and RunOnce) appears asking you to go through a few steps to change the configuration of the search and accelerator settings.

IE8 Set Up Welcome Screen

You might not want to see this popup every time you install IE (IE8 or IE9) or reset settings in IE. Unfortunately Microsoft hasn’t made it easier to disable this initial set up. However there are workarounds to achieve the same.

In this post, I’ll discuss about different methods to disable this initial set up popup:

Method-1: Using Group Policy Editor:

If you are using Professional, Ultimate or Enterprise versions of Windows 7 or Vista, you can tweak Group Policy Editor (gpedit) to disable the initial set up for Internet Explorer 8/9.

1. Press Start button + R and type “gpedit.msc” in the text field and press Enter to launch the Group Policy Editor.

2. In the left pane, expand User Configuration, then find and expand Administrative Templates, next find Windows Components under it and expand it. Then finally find “Internet Explorer”, click on it.

So the path would be: User Configuration> Administrative Templates> Windows Components> Internet Explorer

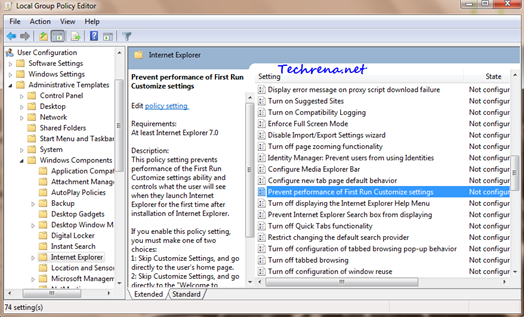
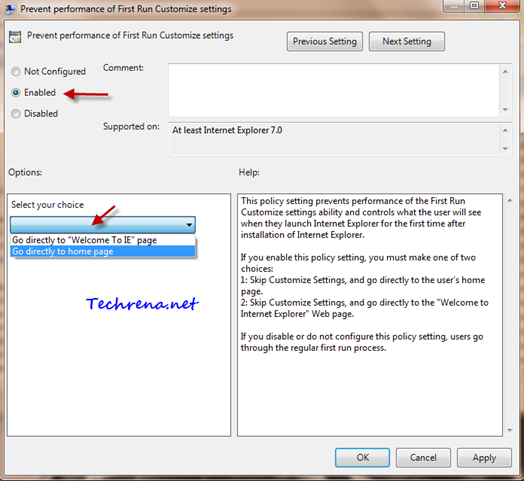
4. On the right pane, find “Prevent performance of First Run Customize settings” and double click on it. A new settings window will open up.

IE settings in GPEDIT

Prevent Performance of First Run Customize settings

5. Set the value to “Enabled” and then go for the options section. You will have two options from the dropdown menu:

i. Go directly to “Welcome To IE” page

ii. Go directly to home page

Select the first option (i) to skip the IE first run Customize Settings and go directly to your home page.

Select the second option (ii) to skip the IE first run Customize Settings and and go to the “Welcome to Internet Explorer” page directly.

6. Click Apply to save the settings then click OK and close the Group Policy Editor window.

Method-2: Using Registry Editor:

Warning: Using Registry Editor to modify Registry settings without much knowledge is deemed dangerous as it may cause some serious problems. Proceed to the Registry Editor at your own risk.

1. Press Start button + R to open run command dialog box. Type “regedit” and press OK to open the Registry Editor.

2. Before we work further, save a backup of the Registry Editor. Go to File > Export and save the .reg somewhere on your Hard disk or USB disk drive.

3. Navigate to the following path carefully in the Registry Editor:

HKEY_LOCAL_MACHINE\>Software\>Policies\>Microsoft\>Internet Explorer\>Main

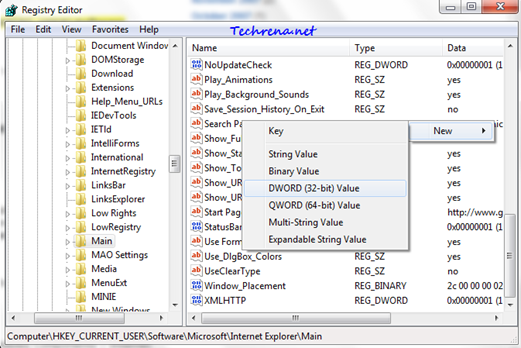
4. Right click on the right pane and select New > DWORD (32-bit) Value.

IE8 regedit

5. Give it a value DisableFirstRunCustomize as shown:

DisableFirstRunCustomize

6. Now right-click on it and choose “Modify”.

DisableFirstRunCustomize modify

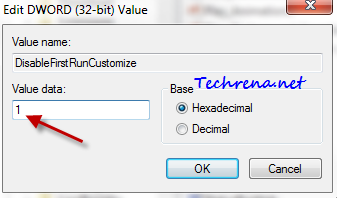
7. Modify its DWORD (32-bit) Value to “1” from “0” and click OK.

DisableFirstRunCustomize edit DWORD

8.Exit the Registry Editor.

Note: If you follow the Group Policy Editor method, the settings will be applied to all the users accounts, where as if you follow the Registry Editor method, the settings will effect only the currently logged in user account.

[Tip] Change The Default Menu Bar Position In Internet Explorer

Internet explorer logo

If you are using Internet Explorer 7, 8 or even the latest IE9 beta, you might have noticed the change in position of the menu bar from IE or even from other browsers like Firefox, which shows the menu bar above the address bar. Of course, even though there’s no harm when the menu bar is at the top or beneath the address bar, but given the fact that you might have been accustomed to using it at the top. Here we have come up with a small tweak involving registry editor, which can change the position of menu bar in the Internet Explorer.

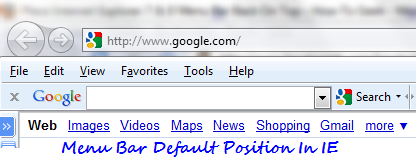
Default menu bar position in IE:

menu bar position in IE

As you can see the menu bar is located beneath the address bar (location bar) in the Internet Explorer. Follow the steps mentioned below to change its position:

Steps:

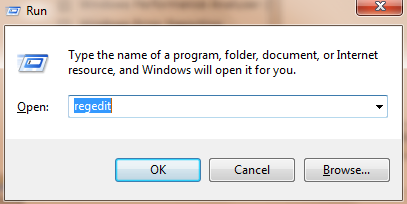
1. Press Start button + R to open the run command bar. Type “regedit” and press enter.

regedit run command

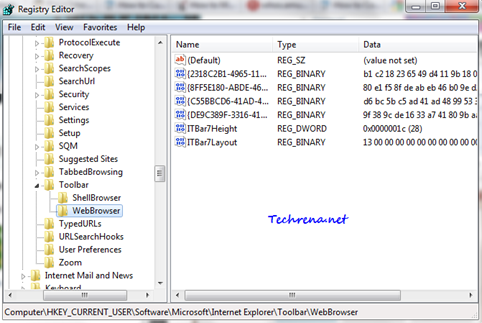
2. In the registry editor, navigate to the following path:

HKEY_CURRENT_USER> Software> Microsoft> Internet Explorer> Toolbar> WebBrowser

Registry Editor webbrowser

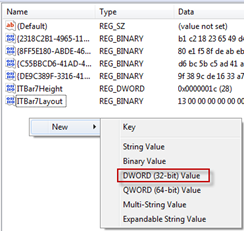
3. Right-click on the right hand side pane and select “New > DWORD (32-bit) Value“.

New DWORD

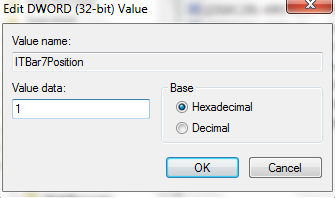
4. Give the DWORD value ITBar7Position:

ITBar7Position

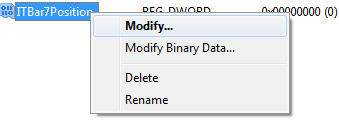
5. Right click on ITBar7Position and choose “Modify”.

Modify DWORD ITBar7Position

6. Enter “1” under the value date filed instead of “0” and click OK. Close the Registry Editor.

Editing DWORD Value Data

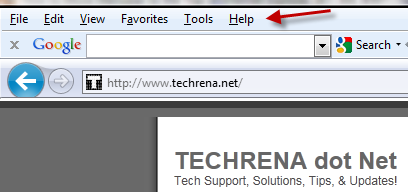
You are done with the tweaking. Open Internet Explorer now and you should see the IE menu bar being moved to top like this one:

Menu bar at top in IE

Warning: If you are a novice user of Windows and doesn’t know much about Registry Editor, stay away from this tweak. A wrong edit at the wrong place in Registry Editor can make your Windows corrupt. Always take a backup of the registry editor before working with it (use File > Export > save location).

[Tip] Change Default Download Location In IE9

IE9 downloads

As promised earlier, we have come up with another tip for the new Internet Explorer 9 users. Internet Explorer 9 (as it is only compatible on Windows 7 and Vista) by default stores the files downloaded to %windir%/Users/Username/Downloads (C: > Users> Username> Downloads is the most common path). But you might want to keep all the downloads through Internet Explorer to a different folder other than the default “Downloads” folder. Follow the steps given below to get this done:

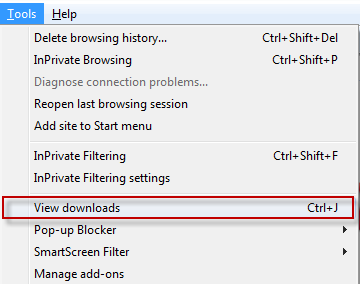
1. Open Internet Explorer 9 and hit Ctrl + J to launch the “View Downloads” window. Alternatively, you can open the same via Alt > Tools > View Downloads from the Tools menu.

Tools menu options in IE9

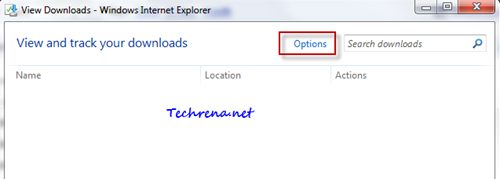
2. In the View Downloads window, click on “Options”.

View Downloads in IE9

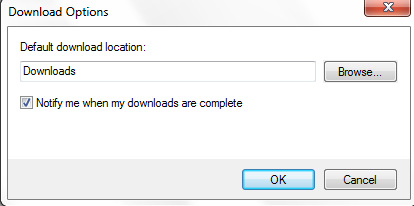
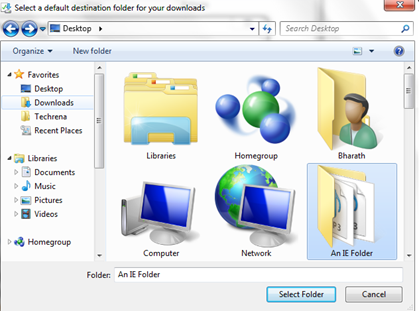
3. In the “Download Options“ window, change the default folder by browsing and selecting a custom folder. Click OK once you have chosen the desired folder.

Download options in IE9

Select download folder for IE9

4. Click OK and close the “Download Options” window and “View Download” window.

[How To] Uninstall Internet Explorer 9

Internet Explorer 9

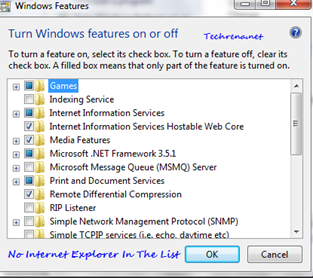
Recently I have downloaded and installed Internet Explorer 9 beta on my laptop to see what Microsoft is up to with their new browser. But since then I had problem while opening some programs like Windows Live Writer (it is the older version of WLW of course), which was getting crashed even before it could start. I was quite sure that the IE 9 could be the culprit and in fact an article at Windows support knowledge base suggested me that I was right. Ok, all I need to do is to uninstall the Internet Explorer 9 from my PC. I followed the usual routine: Control Panel > Programs> and clicked Turn Windows features on or off.

But I was rather surprised to see that there’s no Internet Explorer in the list !

IE 9 missing in Windows features

The fact is that when you choose to install Internet Explorer 9 beta, it’s going to be installed as an windows update. So if you want to uninstall this program, you need to uninstall from the installed windows updates list.

Steps:

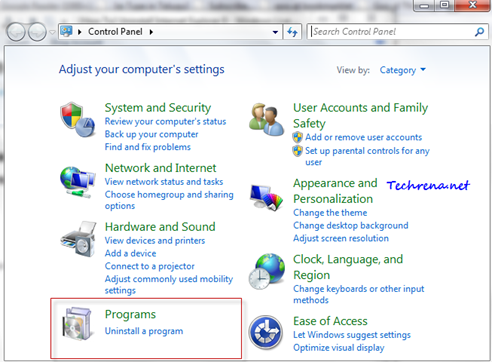
1. Go to Control Panel > Programs > Click “Uninstall a program”.

Uninstall program in control panel

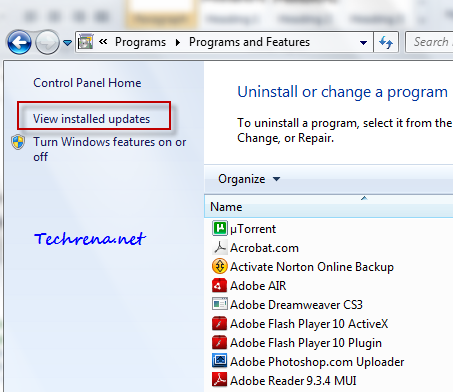
2. And yes, you don’t find it under the installed programs list. Click on “View installed updates” link.

Programs and features and installed updates

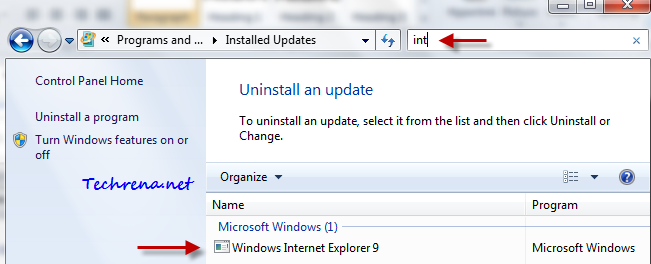
3. Now search for “internet explorer” in the installed updates list.

ie 9 uninstall

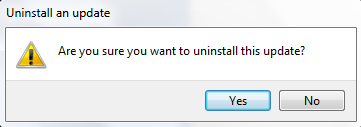
4. Just right-click and choose “uninstall” and accept the confirmation.

IE9_uninstall_confirm

Just restart the computer once the uninstallation is over and there you go, you have Internet Explorer 8 back on your PC instead of Internet Explorer 9.

This marks our 500th post at Techrena.net. To receive the updates from our site subscribe to Techrena’s RSS feeds via email.