[Download] Microsoft Security Essentials 2.0

Microsoft security essentials

Microsoft Security Essentials 2.0 has just got out of beta and is available for public download. One good reason to use this antivirus and anti-spyware program is that it is coming from the Microsoft folks and even that too for free! If you are already using an earlier version of the Security Essentials, you don’t need to download the software again. Just run the program and it should automatically update itself to the latest version.
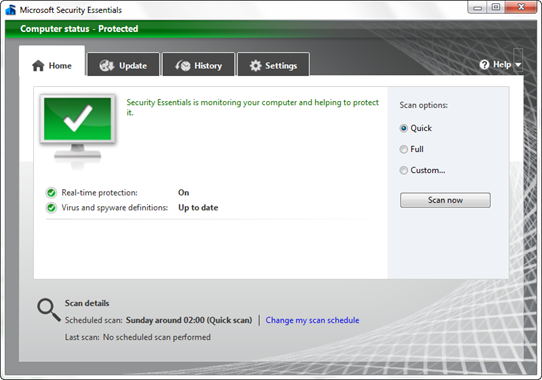
Microsoft security essentials v2

Microsoft Security Essentials runs very smoothly and efficiently in the background taking up very lesser amounts of your CPU resources.

Features of Microsoft Security Essentials 2.0 :

  • Windows Firewall integration
  • Comprehensive malware protections
  • Free to download and use
  • Automatic updates
  • Network inspection system
  • Enhanced protection for web-based threats
  • Easy to use

Microsoft Security Essential keeps itself up to date by downloading updates automatically. As long as the program is in green, your computer is running fine and you can continue working on your PC without any worries. But when it turns to red, it means that your computer is at risk and the program will show you the steps that you can follow to keep your PC secure. The interface comes with a lot of settings giving you more control over the program.
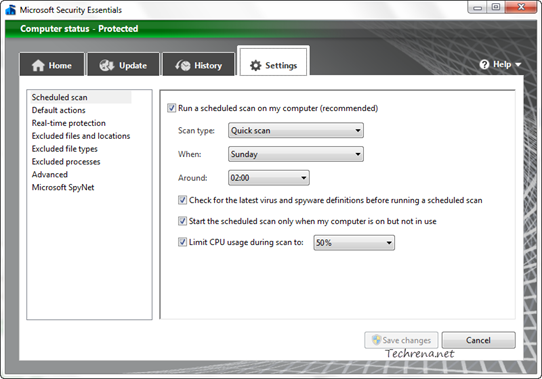
Microsoft security essentials v2 settings

You can configure various settings like:

# Scheduled scan

# Default actions

# Real-time protection

# Excluded files and locations

# Excluded file types

# Excluded processes

# Advanced

# Microsoft SpyNet

Download this free antivirus program from the following links. But please note that your PC must be running a genuine Windows to install Security Essentials.

Download Microsoft Security Essentials 2.0:

For x86 machines (7.5 MB)

For x86-64 machines (9.5 MB)

Supported OS: Windows 7, Windows Vista and Windows XP

[Download] Microsoft December 2010 Security Release ISO Image

December 2010 security release iso

Microsoft has released the December 2010 Security Release ISO Image containing all the Windows security updates released via Windows Update on the December 14, 2010.

This ISO image file would be ideal for the administrators who need to download the each security update in different languages without using automatic programs such as Windows Server Update Services (WSUS). Download the ISO image file from the direct download link added below. This ISO image contains the following updates in all languages.

The DVD5 image consists of the following Windows updates:

KB2416472 / (MS10-070), KB2160841 / (MS10-077), KB979688 / (MS10-083),  KB2416400 / (MS10-090), KB2296199 / (MS10-091), KB2305420 / (MS10-092), KB2447961 / (MS10-094), KB2385678 / (MS10-095), KB2423089 / (MS10-096), KB2443105 / (MS10-097), KB2436673 / (MS10-098), KB2440591 / (MS10-099), KB2442962 / (MS10-100), KB2207559 / (MS10-101), KB2345316 / (MS10-102)

Supported OS: Windows 7, Windows XP Professional x64 & SP 3, Windows Vista (SP1, SP 2 & 64-bit SP 1), Windows Server 2008 (R2, SP 2), Windows Server 2003 (SP 2, SP 2 x64)

Download Dec’10 Security Release ISO (3.24 GB approx.)

Related: Update your Windows and Office software offline

[How To] Change Keyboard Input Language In Windows 7

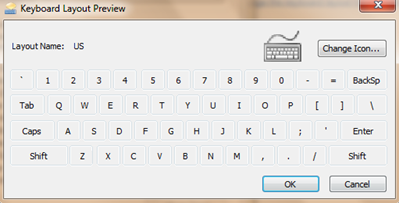
Keyboard layout preview

Windows 7 allows you to change the default input language of your keyboard like most other operating systems do. This is pretty straightforward if you follow the steps mentioned below:

Steps:

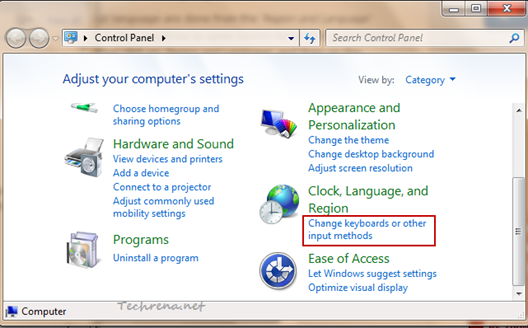
1. Go to Control Panel, click “Change keyboards or other input methods” under the Clock, Language, and Region section.

Change keyboards input control panel

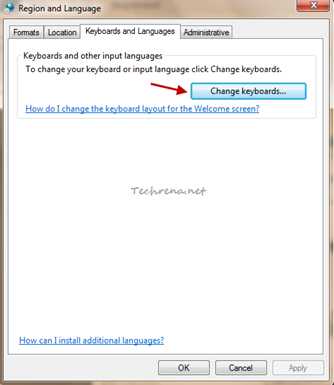
2. A new Region and Language window pops up. Click on “Change keyboards..” button:

Region and Language

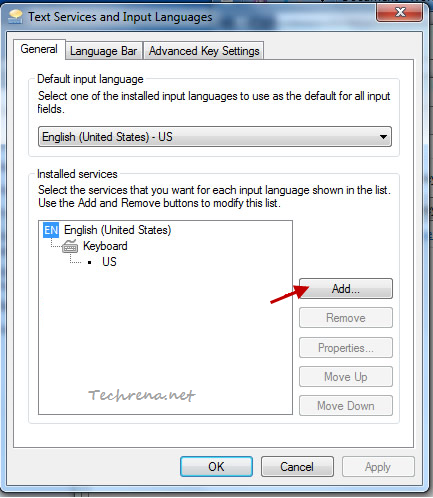
3. Again a new “Text Services and Input Languages” window opens up. To add a new keyboard input language, just click “Add” button found under the “General” tab.

Add keyboard input language

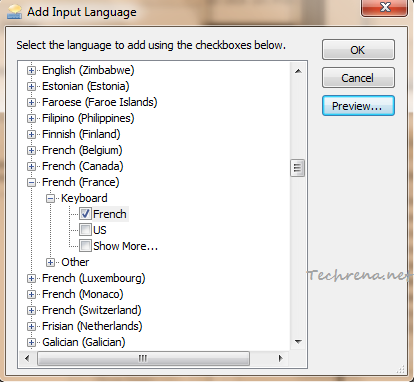
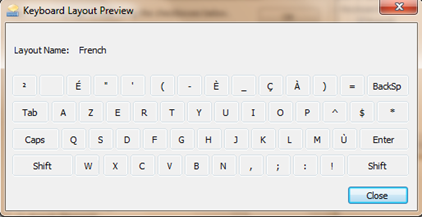
4. Choose the language that you want to add, check against it and click “Preview” too see how it looks like before adding it.

Add input language in keyboard

Keyboard french layout preview

Click OK to add this input language to your keyboard.

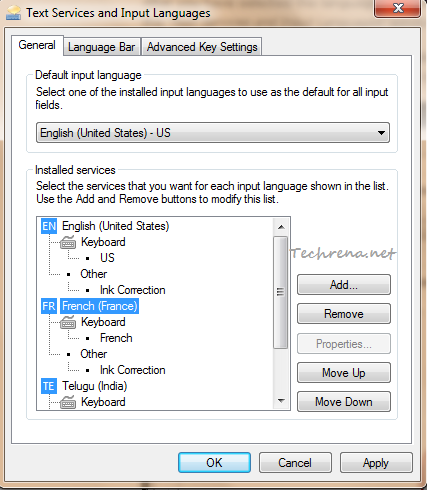
5. Your newly selected input language will appear under the “Installed services”.

keyboard input languages installed

Select the input language and you can either move it or move down on the order of priority. You will also get an option to “Remove” the added input language.

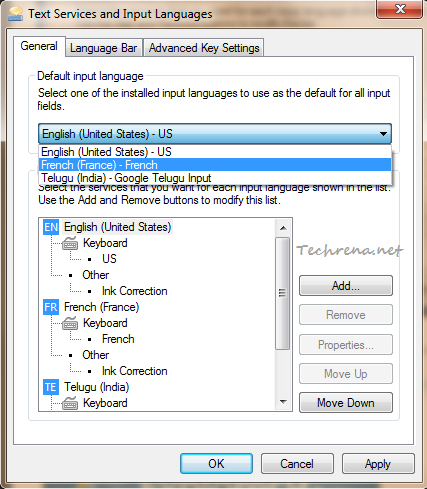
6. From the “Default input language” option, select the input language that you want to from the dropdown list and click “Apply” button.

select default input language

That is it! You have successfully changed your keyboard input language. Open notepad or any text editor to test the newly added input language.

[Tip] Disable Or Remove GoogleUpdate.Exe Process

When you install Google products like Google Chrome, Picasa and others on your system, new Google Update service gets installed on your computer, responsible for running “googleupdate.exe” process in regular intervals. This process regularly contacts Google servers to check if there are any updates available to the Google products that you have installed on your system. Agree, this is essential to keep your Google products up-to-date by installing the important security updates etc., but definitely you may not like to dedicate some of your CPU resources to the process to keep it running continuously. The same process is responsible for the Automatic Silent Update feature in Google Chrome. If you don’t want to run Googleupdate.exe process on your computer, follow these steps to stop running it on your computer.

GoogleUpdate.exe process

You can’t find the GoogleUpdate.exe in the start up items using msconfig, but you can surely find it in the Task Scheduler as it gets added to the Windows Task Scheduler.

Steps:

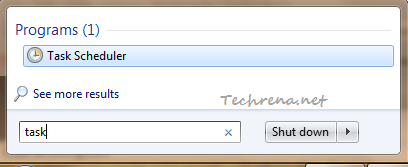
1. Go Start Menu, type “tasks” in the search box and click “Task Scheduler” from the results under “Programs” section.

Task Scheduler from Start Menu search result

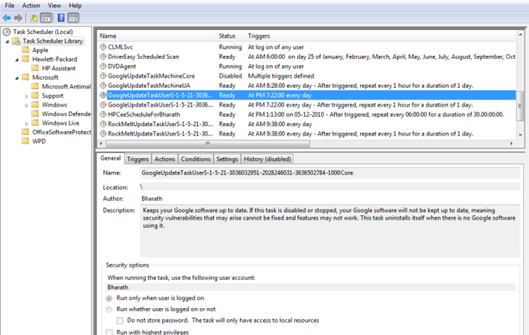
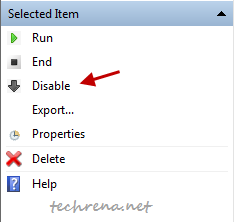
2. Find an entries starting with “GoogleUpdate” in the tasks and disable or remove them to stop running again on your computer.

GoogleUpdate in task scheduler

disable google update tasks

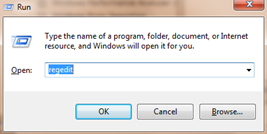
3. Press Windows + R to open the RUN command box, type “regedit” and hit OK.

regedit in run command

4. In the registry editor, try and see of you can find an entry with value “Google Update” in the following paths:

   HKEY_LOCAL_MACHINE\Software\Microsoft\Windows\CurrentVersion\Run                                                     
                        and       
   HKEY_CURRENT_USER\Software\Microsoft\Windows\CurrentVersion\Run

If you could find a value with that name, right-click on “Google Update” and select “Delete”. Restart your system to see the changes in effect.

Please note that when you remove GoogleUpdate.exe, the Google software will not be updated automactically you might need to download the updated versions manually. Also when you install any other products like Google Earth, the GoogleUpdate.exe comes back to your system and you might need to repeat the above steps all over again!

[How To] Find The Date When The Windows Was Installed

Windows logo

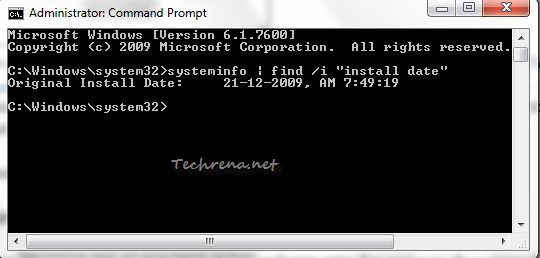
If you have installed Windows long back like me and not sure the exact date when you installed it, there is a simple way you could find this. As a part of the “systeminfo” command, Windows shows this info through the command prompt window. This trick works in all the different versions of Windows including Windows 7, Windows Vista and Windows XP. Follow these steps to learn how to find the original install date of Windows.

Steps:

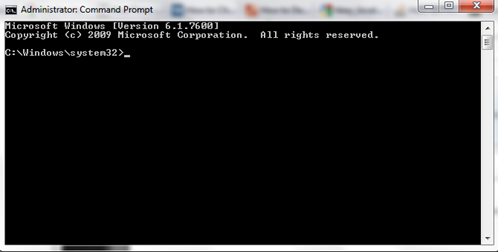
1. Type “cmd” in the Start Menu and hit Enter to open the Command Prompt (Choose “Yes” when asked by UAC in Windows 7 to open the cmd)

Command Prompt window

2. Type the following command in the command prompt window and press Enter.

systeminfo | find /i "install date"

Wait till the requested information is loaded in the window.

cmd_original_install_date

3. You will see the date of installation of Windows shown next to “Original Install Date”.

A Complex Alternative Method:

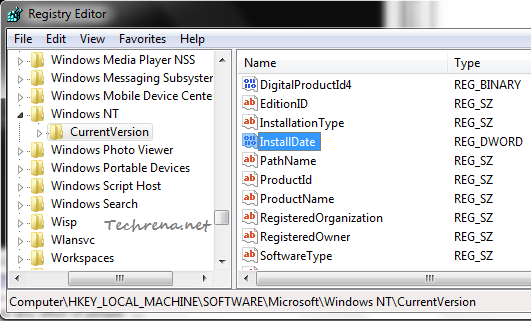
If you are curious to find other ways to find the same, open the Registry Editor (press Start button + R, type “regedit” and click OK), navigate to the following path:

HKEY_LOCAL_MACHINE\SOFTWARE\Microsoft\Windows NT\CurrentVersion

installDate regedit value

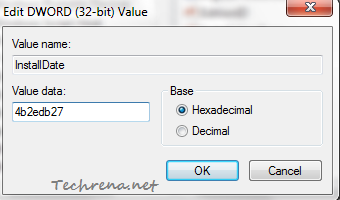
On the right hand pane, find the key with name “InstallDate”. Double-click on it to see the value data, which will be in “Hexadecimal” form.

InstallDate regedit value

For instance in my case it is 4b2edb27. It indicates the number of seconds since January 1, 1970 (1/ 1/ 1970) when converted to binary decimal. Use “Programmer” mode in Windows 7 calculator to do this conversion. In this case, the value turns out to be 1261361959. So the date of installation of Windows 7 on my system happened 1261361959 seconds after 1/ 1/ 1970 12 AM. Do the math and find the value Smile , if you are patient enough and the result should match the date found using the first method.

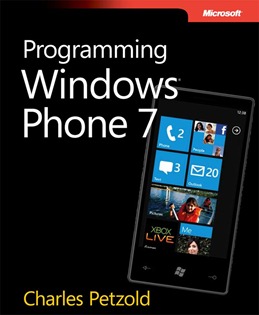
[Download] Programming Windows Phone 7 Free Ebook

programming windows phone 7

If you are a C# programmer and willing to develop application for the newly launched Windows Phone 7 platform, here is a good news for you!

Microsoft has released a 1013-page long free ebbok , Programming Windows Phone 7 written by the popular author Charles Petzold. Charles Petzold, who has authored various programming books on Windows OS for the last 24 years has complied this book as a gift to programming community from the Microsoft Windows Phone 7 team. The book contains 24 chapters which have been divided into 3 parts: The Basics, Silverlight, and XNA. While this is available as a freely downloadable ebook , the book will also be available for sale as two print editions: Microsoft Silverlight Programming for Windows Phone 7 and Microsoft XNA Framework Programming for Windows Phone 7, and should be available in stores starting from December 2010.

Download Programming Windows Phone 7 : ebook (pdf format) |  ebook’s sample code (zip file)

[Download] Cumulative Security Update For Internet Explorer KB2360131

Windows Update

Microsoft has released security update KB2360131 to  address the vulnerability that was mentioned in the Microsoft Security Bulletin MS10-071.

The users of Windows Vista and Windows XP have been advised to install the update KB2360131 to address the security issue that could allow an attacker to gain control over a computer running Microsoft Internet Explorer by executing a remote code.
The update has been issued for Internet Explorer 7 and Internet Explorer 8 versions running on Windows XP, Windows Vista. Find the download links added below to download the update patch to keep your computer and Internet Explorer safe from the attackers.

Download Links:

  Windows Vista Windows XP
Internet Explorer 8 x64 (18.2 MB): x86 (9.3 MB) x64 (40.1 MB): x86 (9.9 MB)
Internet Explorer 7 x64 (36.7 MB): x86 (7.6 MB) x64 (14.7MB): x86 (8.8 MB):
     

Microsoft had released similar updates in the past: Cumulative security update for IE.

[Live] Watch Windows Phone 7 Launch Event

Windows phone logo

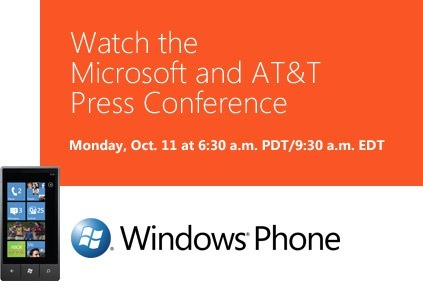
Microsoft and AT&T are jointly hosting the major Windows Phone 7 launch event in New York on October 11, 2010. Microsoft CEO Steve Ballmer and the President & CEO of AT&T Mobility and Consumer markets, Ralph de la Vega will be hosting the event to discuss the things that we haven’t yet heard about the Windows Phone 7 (formerly known as Windows Mobile or WinMo)and its availability details.

The features of Windows Phone 7 include:

Live Tiles

Unified Social Media Posting

Lost Phone Tracker

PeopleHub

Office Hub

Marketplace Hub

Bing Search

etc., .

The event will start on Monday, Oct. 11 at 9.30 AM EDT (6.30 AM PDT / 11.30 PM GMT / 19.00 Indian Standard Time). Microsoft will be exclusively telecasting the full event live on the internet (live webcast).

Windows Phone 7 conference live

Watch Online:

Watch the live streaming action from the Windows Phone 7 launch: Link

Meanwhile, get acquainted with all the new promising features in Windows Phone 7: Watch the Windows Phone 7 Video Highlights.

[Tip] Change The Registered Owner And Organization Name in Windows 7

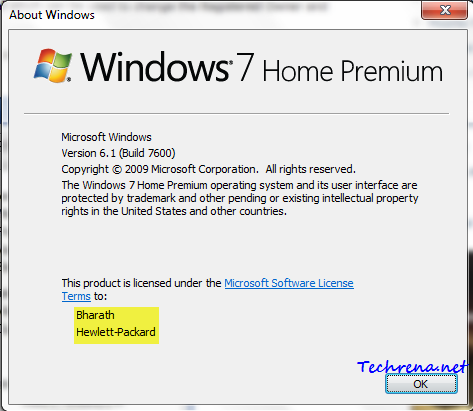
When you are installing Windows 7 or Windows Vista, you will be prompted to enter your name and your organization name during the setup. Once you have given that, the Windows will be registered on the names that you had provided during the Windows initial setup. To see the current Windows owner name and organization name according to Windows, type “Winver” in the Start Menu and launch the windowsver.exe program.

Winver from start menu programs

About Windows

As you can see in the above screenshot, my Windows has been registered with my name and the Organization name (manufacturer name here).

This will show up even when you open any native Windows application and click “About”. For example, “About Notepad” from the Notepad application also will lead to the same window as shown above.

Unfortunately, Windows 7 or Vista do not provide a native support to change this data after the installation process. But then, we have the pretty useful Registry Editor , through which we can tweak this to whatever we like. Follow the steps written below carefully to to perform this editing.

Warning: As always, working with Registry Editor can be extremely dangerous. Do make a backup of the registry . Even a small mistake can lead to utter disorder of the OS.

Steps:

1. Press Start + R and type “regedit” in the text filed and press OK. Accept the User Account Control (UAC) prompt and proceed to the next step.

regedit run command

2. Navigate to the following path in the Registry Editor:

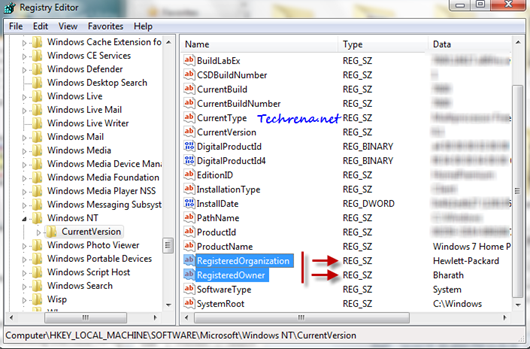
HKEY_LOCAL_MACHINE> SOFTWARE> Microsoft> Windows NT>  CurrenVersion

Reg_key_win_owner_name

3. Find two registry key entries “RegisteredOrganization”, “RegisteredOwner” in the left pane (see the screenshot below).

regedit owner and organization

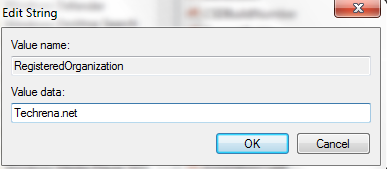
4. Change the data values against “RegisteredOrganization” and “”RegisteredOwner”  to whatever you like:

Edit owner and registered owner info

That is it. You can again open the Winver command to see if the change has happened.

[Tip] Change Default Action For The Power Button In Windows 7

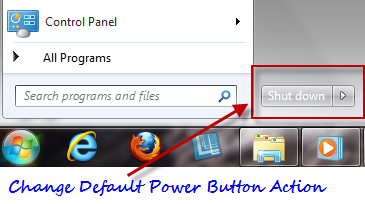
change power button action

In Windows 7 and Windows Vista, when you open the start menu, you can find the power button being displayed at the bottom of the start menu. This has been placed at the similar position where you find “Log Off” and “Turn off Computer” buttons in Windows XP. By default this power button will have “Shit down” option for Windows 7 and “Sleep” option in case of Windows Vista. But according to your usage and need, you can change the default action for this power button. This article explains you how to change the default action for this power button, with reference to Windows 7 (also works on Windows Vista).

Steps:

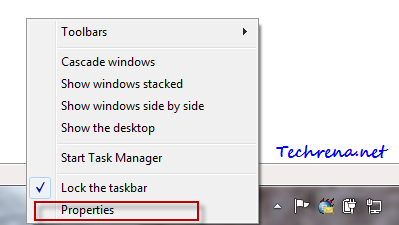
1. Right click on the Task bar and choose “Properties”.

taskbar and start menu properties link in right-click

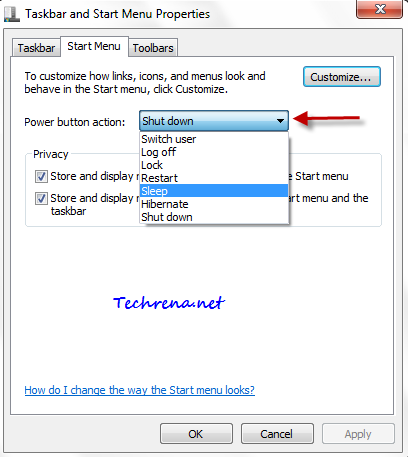
2. Click on “Start Menu” tab in the Taskbar and Start Menu Properties Window

Start menu tab in taskbar and start menu properties

3. Choose your desired action for the power button from the dropdown menu. You can choose an action from the following:

Shut down, Switch User, Log Off, Lock, Restart, Hibernate

Power button action in start menu properties

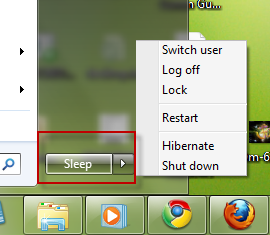
4. Click on “Apply” to save the settings and click “OK” to close the window. Go and check back the Start Menu, the action for the power button should have changed to what you chose in the previous step.

Power button action