Configure Google Friend Connect For WordPress Blogs

Google Friend Connect made its debut to WordPress.Google Friend Connect was previously available only to Blogger blogs through a simple gadget (although you can insert in any other non-blogger sites). Now there’s a more simpler way to this for WordPress , thanks to Mauro Gonzalez, Globant who developed this FriendConnect plugin  plugin to extend GFC to WordPress blogs.

He adds in a guest post in Google Social Web blog,

This plugin allows your visitors to authenticate using any OpenID account such as Google, Yahoo, or AIM and then comment on your posts with no need to complete a registration form.

Now, Let’s see how to setup Google Friend Connect for your WordPress blog:

Step 1: Go to google.com/friendconnect and add your new site details
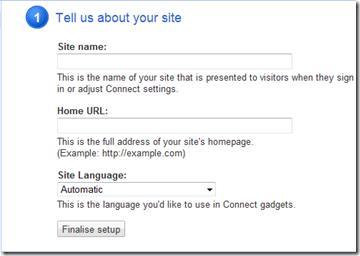
Google Friend connect adding new site

Step 2: Once you have added you blog’s details, find your unique site ID of your site and note it down.

GFC site ID wordpress

Step 3: Download Google Friend Connect  WordPress Plugin and upload it to plugins folder in your WordPress installation.

Step 4: Under Settings in your dashboard visit ‘FriendConnect’ to configure that plugin.

Enter your site ID in the filed Google FriendConnect ID:
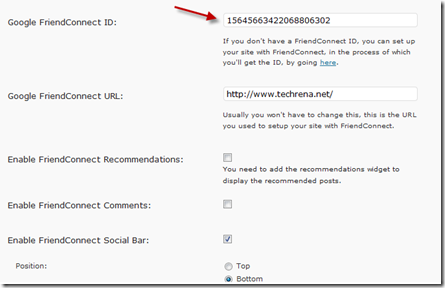
Google FriendConnect wp plugin configuration

Step 5: You can customize the GFC using various colour schemes.

Step 6: If you want to add various GFC widgets, visit widgets tab, you’ll find the widgets like

‘GFC Members’, ‘GFC Recommendations’ & ‘GFC Site Wide Comments’

GFC widgets wordpress

you can also try out various possible settings under them to find out which one best suits your blog.

WordPress 2.8.5 – Security Hardening Release is Out

Popular Blogging Platform WordPress has released the update to the earlier version as WordPress 2.8.5 terming it as the “Security Hardening Release” with the following changes:

    • A fix for the Trackback Denial-of-Service attack that is currently being seen.
    • Removal of areas within the code where php code in variables was evaluated.
    • Switched the file upload functionality to be whitelisted for all users including Admins.
    • Retiring of the two importers of Tag data from old plugins.

WordPress 2.8.5 Download wordpress logo

The Issues:

Many bloggers today have reported some minor issues while upgrading to version 2.8.5

An error message

Fatal error: Allowed memory size of 33554432 bytes exhausted (tried to allocate 2354671 bytes) in …”

was prominent among the issues raised by the bloggers.

The fix to this issues is pretty much simple:

First disable all your plugins while upgrading and revert to the default theme of WordPress.

Now perform the auto-install upgrade to WP version 2.8.5.You’d have a very smooth upgrade.Now try to enable all your desired plugins.Now you may find that some plugins are still causing the above said error message.

Here’s the fix for it:

Open your FTP client, and open wp-config.php file in your WordPress installed directory.Add the following line:

define('WP_MEMORY_LIMIT', '64M');

This would increase the amount of memory that is being consumed by the PHP script.

    • A fix for the Trackback Denial-of-Service attack that is currently being seen.
    • Removal of areas within the code where php code in variables was evaluated.
    • Switched the file upload functionality to be whitelisted for all users including Admins.
    • Retiring of the two importers of Tag data from old plugins.