[How To] Display Run Command Button In Start Menu

Run start menu link

Run Command in Windows is so handy to run programs and other commands quickly. Even though it has lost it’s charm a bit in Vista and Windows 7 due to the wonderful “search and run” addition to the Start Menu, it still does hold it’s prominence among users who are used to it from the days of Windows XP.

By default RUN command option is hidden in Start Menu for Windows 7 and Vista and one needs to either press Windows Key + R or search for “run’ in the Start Menu and press enter to open the RUN command. Fortunately Windows 7 and Vista allow you to add  this “RUN” command button to the Start Menu for quicker access. Here are the two ways in which you can add this button.

Method-1:

1. Right-click on Start Menu and click “Properties”.
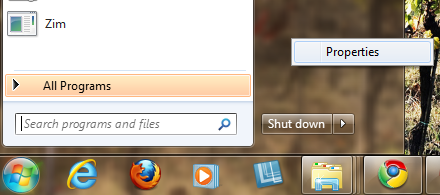
Start menu properties option

2. In the “Taskbar and Start Menu Properties” window, click on “Customize” option found under the “Start Menu” tab as shown:
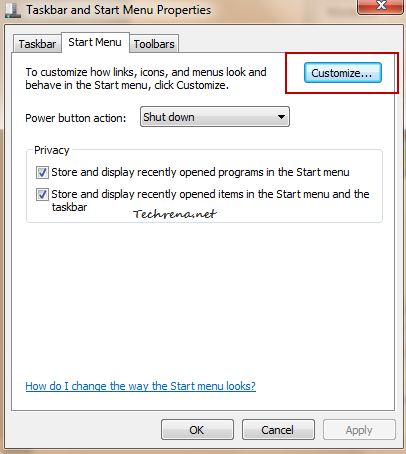
Start menu properties customize option

3. A new window will open up, scroll down the list until you find “Run Command” option. Just check against it and click OK.
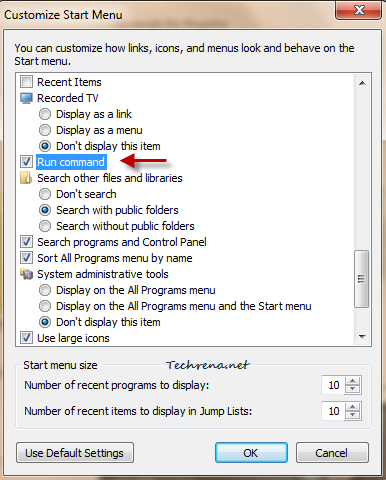
Run command option in start menu customize

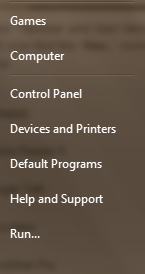
4. Click OK in the “Taskbar and Start Menu Properties” window to save the settings and close the window. You will now find the “Run..” command option right inside the Start Menu as shown in the screenshot below:
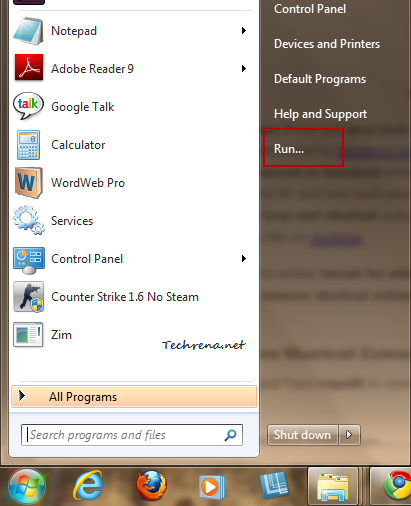
run option in start menu

Method-2: Using Registry Editor:

1. Type “regedit” in the Start Menu search bar and hit Enter to open the Registry Editor.

2. Go to the following path in the Registry Editor:

HKEY_CURRENT_USER\Software\Microsoft\Windows\CurrentVersion\Explorer\Advanced

3. On the right side pane, look for a key named “Start_ShowRun” :
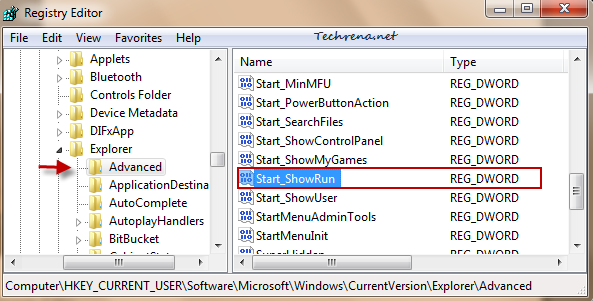
Start ShowRun key in regedit

4. Double-click on the key to change it’s DWORD value. Enter “1” in the “Value data” field and click OK.
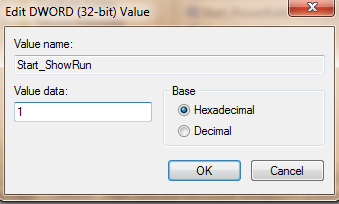
DWORD edit for Start ShowRun key in regedit

5. Close the Registry Editor and as usual Logoff and log back into notice the change (you may instead restart your explorer.exe process as well). Your Start Menu should showup the “Run..” button as shown in the above pic.

[Tip] Find System Uptime In Windows 7

Sometimes you will leave your system running for too much of time and later you forget for how much time you had kept it running like that. Wouldn’t it be just useful if we can find the exact system boot time or uptime (the amount of time for which your computer is running since it’s turned on) of your Windows?

Here are the simple tricks that you can use in your Windows 7 or Windows Vista based computers to find the system uptime or exact boot time.

Method-1: Using SystemInfo

Here we’ll make use of systeminfo command, using which we wrote a tutorial earlier to find the windows 7 original install date.

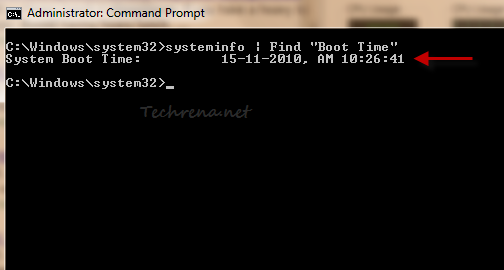
Type “cmd” in the Start Menu search bar and press enter to open the Command Prompt window. Type the following command in the cmd window and hit Enter:

Systeminfo | Find “Boot Time”

And you will see the System Boot Time in the next line in the CMD window as shown:

system boot time in cmd

Once you know the boot time, you can easily calculate the System Up time or vice versa.

Method-2: Using Task Manager

Right-click on the taskbar and choose “Start Task Manager” to open the task manager. Alternatively you can press CTRL + SHIFT + ESC to open it directly.

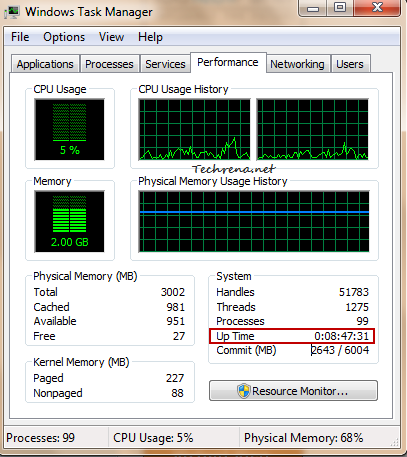
Under the Performance tab, you will find Up Time being listed as shown:

uptime in task manager

As you can see from the above screenshot, Up Time for my system is shown as 0:08:47:31 which translates to 0 days, 8 hours, 47 minutes and 31 seconds.

Note:

These values turns up accurate only when you keep your system running. These values may deviate slightly from the actual values if your system goes to stand by mode or sleep mode in the middle.

[Download] Windows 7 Harvest Time & Windows Live Clouds Themes

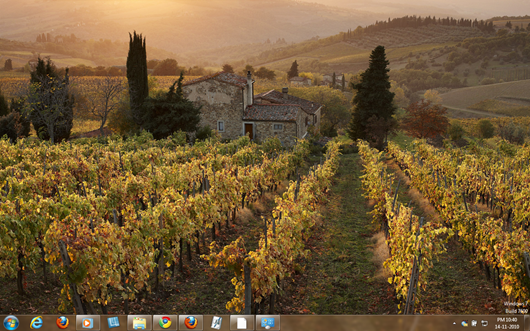
Microsoft as always released two exclusive theme packs for Windows 7 keeping the upcoming Thanksgiving season in mind. Windows 7 themes gallery has been updated with two high quality themes Harvest Time and Windows Live Clouds theme. Harvest Theme for Windows 7 is for created especially for the Thanksgiving season and contains 18 beautiful wallpapers related to harvest.

Harvest time theme for windows 7

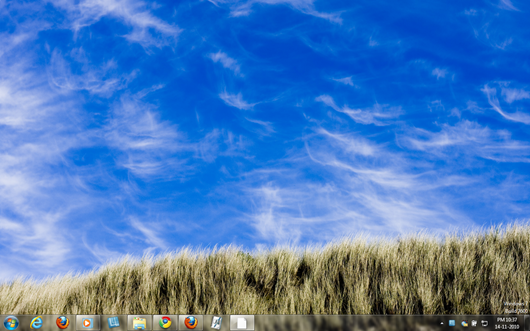
The Windows Live Clouds theme contains 10 high resolution images (with 1920 x 1200 dimension) of clouds, which are selected from the photo submission to Bing.

Windows live clouds theme for Windows 7

Download the theme files (.themepack files) from the following links and double-click on them to install and apply them immediately.

Download Harvest Time Theme

Download Windows Live Clouds Theme

[Download] Windows 7 SP1 RTM Blocker Tool

Windows 7 logo

Microsoft has released Windows 7 Service Pack 1 blocker tool kit that allows you to block all Windows 7 Service Pack 1 updates without disabling the Windows Updates. If your organization wants to wait till the official RTM release of Windows 7 which is expected around the first quarter of 2011, and don’t want to install Service Pack updates via Windows Updates.

Download the Windows Service Pack Blocker Toolkit  (for Organizations) from the direct download link given below to temporarily stop the installation of Windows 7 and Windows Server 2008 R2 SP1 updates and will be valid for 12 months from the date when the service pack gets general availability.

The toolkit contains three components:

  • A Microsoft-signed executable
  • A script
  • An ADM template

And you need to use the component that best serves the computer management infrastructure in your organization from the above three.

Download Windows Service Pack Blocker Tool Kit [ 96KB – For Windows 7 Service Pack 1 & Windows Server 2008 R2 Service Pack 1 ]

[Tip] Enable High Quality Video Chat In Gmail

Gmail logo new

If you use Gmail video chat for making video calls to your friends, you might be pleased to know that the Google has announced a enhancements to the video quality in Gmail video chats.

Gmail video chat quality used to be very poor particularly when you switch the video to full screen mode. The new enhancements are available as a labs feature and will not be enabled by default. For this video enhancement to work, the other party with whom you are chatting must also have enabled this feature.

gmail video chat before after

Follow these steps to enable high resolution for video chat in Gmail.

Steps:

1. Open Gmail and Login with your Gmail account

2. Click on the little green labs icon towards the right top corner of the screen, next to your username. Alternatively you can open this Gmail Labs Settings link.

gmail labs settings

3. Scroll down the window until you find “Video chat enhancements” tab and choose “Enable” against it.

Gmail Video chat enhancements

4. Click “Save Changes” button to save the settings.

You can always revert back to the default video quality settings at any time by simply choosing “Disable” option for “Video chat enhancements” under the labs settings as shown in the step 3.

[How To] Remove “All Programs” From Start Menu

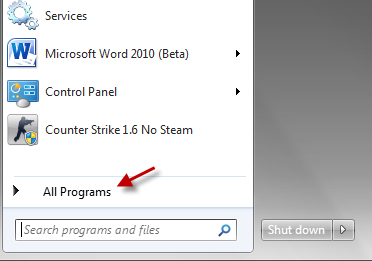
All programs in start menu

All Programs in the Start Menu shows a list of all the programs installed in your Windows to open and run a particular program. It was an essential button in case of Windows XP and other older versions of Windows, but not so much when it comes to Windows Vista or Windows 7. You can use the Start Menu search to search and run a program immediately without navigating through the list of programs under “All Programs”. If you don’t use “All Programs” list much, you can always disable (or hide or remove) it from the Start Menu. I have provided here, the two ways of doing it. While the first method works only for Professional, Business and Ultimate editions of Windows 7, the second method (which uses registry hack) is universal and can be applied to all editions of Windows 7 (including Home Premium).

Method-1: Using Group Policy Editor

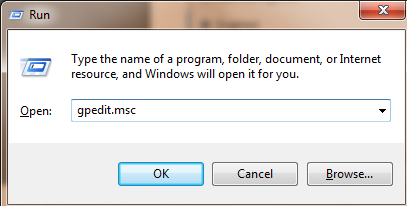
1. Press Start button + R to open the RUN dialog box, type “gpedit.msc” in the text field and press OK to open the Group Policy Editor.

gpedit run command

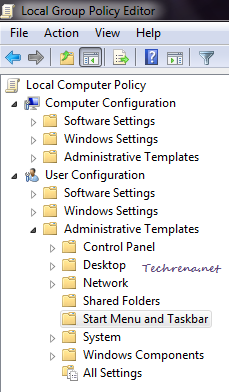
2. Go to the following path in the Group Policy Editor:

Local Computer Policy > User Configuration > Star Menu and Taskbar

Start Menu and Taskbar in GPEDIT

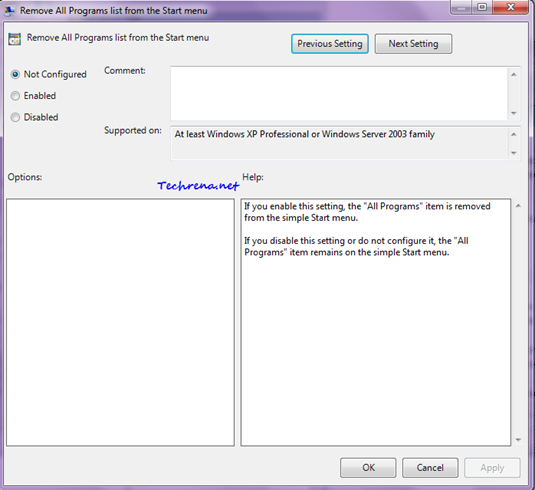
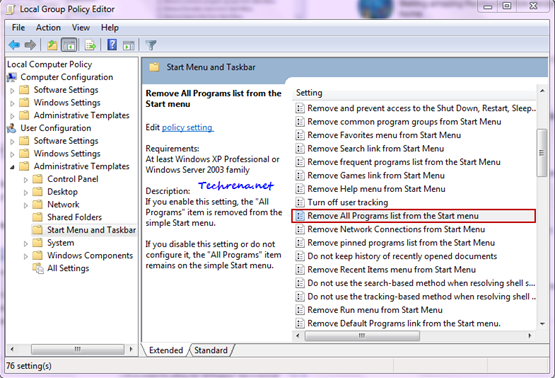
3. On the right side pane, find an entry by titled “Remove All Programs list from the Start Menu”.

Remove all programs list gpedit

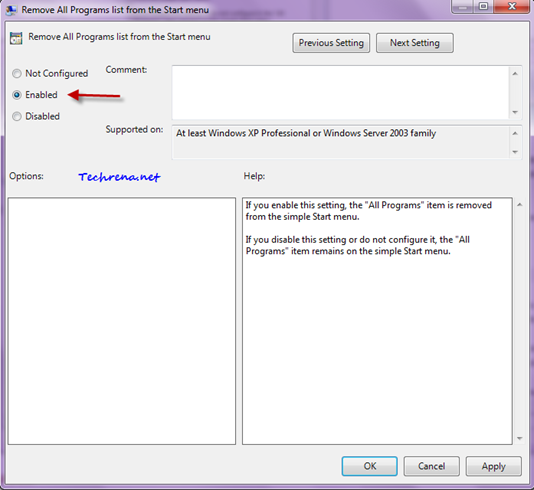
4. Double-click on it to change the settings. Choose

all programs remove from start menu gpedit setting

Change the setting from to “Enabled” from the default value of “Not configured”.

all programs remove from start menu gpedit setting

5. Click “OK” to apply the changes and close the settings window.

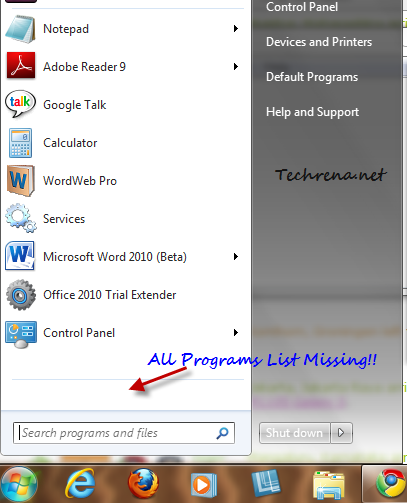
Logoff from your user account and then log back in to see the change:

all programs missing from start menu

Method 2 – Using Registry Editor

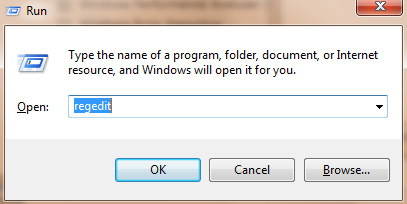
1. Press Start button + R to open the RUN and type “regedit” and press the Enter key to open the Registry Editor.

regedit run command

2. In the Registry Editor, find the following key:

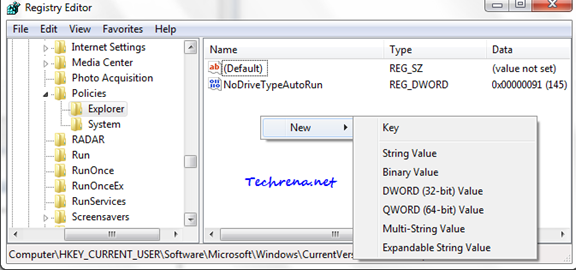
HKEY_CURRENT_USER\Software\Microsoft\Windows\CurrentVersion\Policies\Explorer

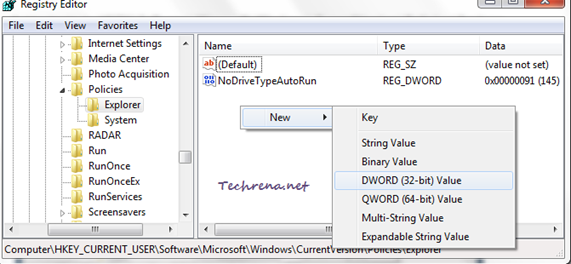
3. On the right side pane, create a new 32-bit DWORD. To create one, right-click on the empty space on the right hand side and choose “New > DWORD (32-bit) Value”.
regedit_new_dword_explorer

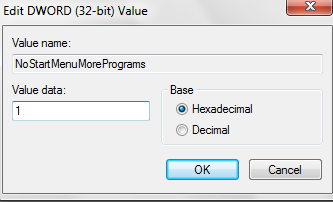
4. Name it as “NoStartMenuMorePrograms” as shown:

NoStartMenuMorePrograms in regedit

5. Double-click on the NoStartMenuMorePrograms and change its value data to “1” (the default value would be “0”).

NoStartMenuMorePrograms value data change

6. Click OK to save the settings.

Logoff from your account and log back in to see the change as shown in the above pic.
To Undo The Change:

# Choose the setting for “Remove All Programs list from the Start Menu” to either “Not Configured” or “Disabled” in method-1.

# Change the Value data field back to “0” or completely delete the newly added NoStartMenuMorePrograms DWORD on the right side pane in case of method-2.

[How To] Add A “Delete” Button To The Windows Explorer Toolbar

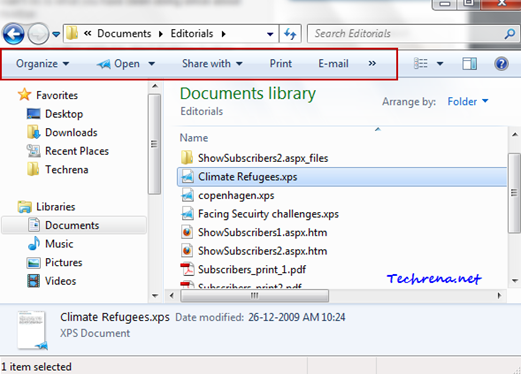
Windows explorer toolbar default options

Windows 7 has a nice and handy toolbar in all explorer windows which contains the important commands that you can use on the files selected in the window. Only few options will be shown here and you need to right-click on the file to get all the possible commands in the context menu that you can use on the file.

Wouldn’t it be nicer if we have default commands like “Delete” permanently hooked to this explorer toolbar? Let’s see how to add “Delete” button to the Windows 7 explorer toolbar.

Steps:

1. Press Start button + R to open the RUN, type “regedit” in the text field and press OK or hit Enter to open the Registry Editor.

2. Navigate to the following path in the registry editor:

HKEY_LOCAL_MACHINE\SOFTWARE\Microsoft\Windows\CurrentVersion\Explorer\FolderTypes

3. You need to take ownership for the following keys:

* {5c4f28b5-f869-4e84-8e60-f11db97c5cc7}

* {5fa96407-7e77-483c-ac93-691d05850de8}

* {7d49d726-3c21-4f05-99aa-fdc2c9474656}

* {94d6ddcc-4a68-4175-a374-bd584a510b78}

* {b3690e58-e961-423b-b687-386ebfd83239}

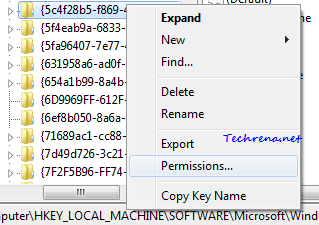
Right-click on the key and choose “Permissions”.

Permissions in context menu right-click regedit key

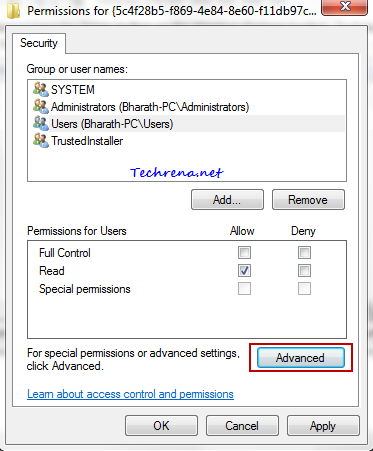
Permissions settings window for registry keys

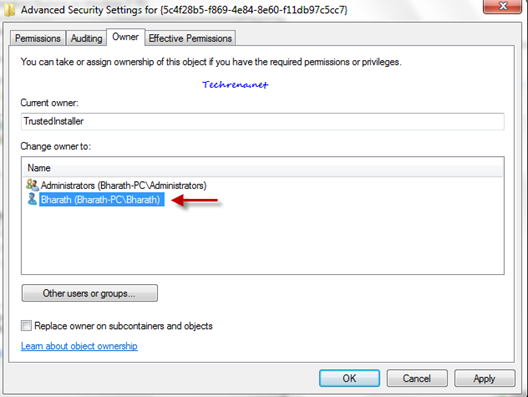
Then Click on “Advanced” button and head over to the “Owner” tab in the Advanced Security Settings window. Select your user account name and click OK to apply the settings changes.

Advanced security settings window for registry keys

Now, in the Permissions window, choose your user account and check against “Allow” field against “Full Control”checkbox.

Click OK to apply the changes and close the window. Repeat this for all of the keys mentioned above.

4. Now download the following registry file (.reg file) which is complied with all of the registry changes that you need to perform to achieve our desired result. Save it somewhere on your desktop.

Adding Delete Windows Explorer Toolbar button

Right-click on the file and choose “Merge”.

5. Logout from your account and log back in or restart the explorer.exe process to observe the changes.

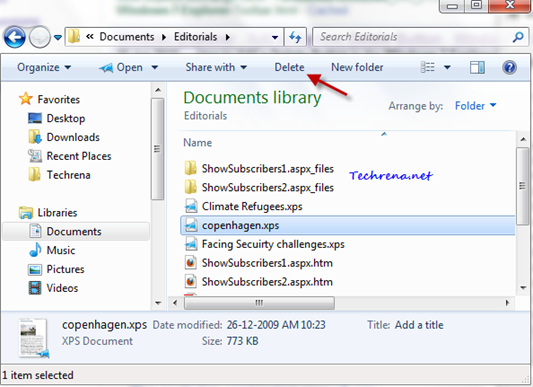
Delete button in Windows explorer toolbar

The “Delete” button from now on should appear in all of your Windows Explorer windows as shown in the above screenshot. This button will start appearing in all of the explorer Windows including Documents, Music, Pictures, Videos etc. and for all other folders as well.

Removing The Delete Button From The Explorer Toolbar:

To undo this change and revert back to the original settings, download and save the following registry file, right-click on it and choose “Merge” as said above.

Remove Delete Windows Explorer Toolbar button

Again, as said above, you need to logout and long back in or restart the windows explorer process to see the changes.

Note:

  • In case you get the error during the “merge” operation after downloading the registry file in the step 4 or while removing the “Delete” button, it is to be understood that you haven’t taken ownership for all of the keys mentioned in the step 3.
  • It is recommended that you take a backup of the registry before proceeding with editing the registry keys. Right-click on the “FolderTypes” hive and choose “Export’ to save a backup of the whole registry keys and sub-keys present in it.
  • This registry hack works for Windows 7 only.
  • The “Delete” button in the explorer toolbar only moves the files to the Recycle Bin. It will not delete the files for permanent in any case.

[How To] Remove Shutdown, Restart Options From Start Menu

no shutdown and restart option in start menu

Do you want to prevent other users from shutting down your computer when you are away? Are you serving a server on your computer which needs to be up all the time and hence want to remove the Power button and other options including Shut Down, Restart, Sleep, and Hibernate from the Start Menu so that gets to difficult to turn off the system?

Whatever may be the reason, if you want to remove the Shut Down button et al., follow the steps discussed below. You have two methods to choose from: The first method is universal and applies to all the editions of Windows 7, while the second method is applicable to Professional, Business or Ultimate editions only.

Warning: If you have followed this tutorial and removed the “Shutdown” and “Restart” options from your Start Menu, the “Turn Off” option that would normally shows up when you hit CTR+ ALT+ DELETE would also go missing and the only way to shutdown your computer in such a case is to use the command line tool which can be a bit difficult. Try these methods only if you are really need to do so.

Method-I: Using Registry Editor

1. Press Windows key + R to open RUN and type “regedit” in the text field and press OK.

regedit run command

2. Navigate to the following path in the registry editor:

HKEY_CURRENT_USER\Software\Microsoft\Windows\CurrentVersion\Policies\Explorer

3. Right-click on the right side pane and choose New > “DWORD (32-bit) Value”.

New_Dword_regedit_shutdown_remove

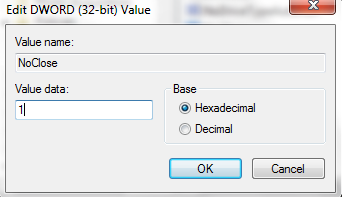
4. Give it a name as “NoClose”.

NoClose new dword in regedit

5. Double-click on the newly created DWORD (NoClose) and change the “value data” to 1.

Regedit edits to remove shutdown options

Click OK and close the registry editor. You might have to log out and then log back in or restart the “explorer” (kill explorer.exe and run it again using the task manager) to see the changes.

Method-II: Using Group Policy Editor :

Group Policy Editor will not be present in the Windows 7 Home edition. So if you have other editions of Windows 7 like Professional, Ultimate or Business, you can proceed with this method which is relatively simpler than the first method.

1. Press Windows Key + R and type “gpedit.msc” in the text field and hit OK to open the Group Policy Editor.

gpedit in run command

2. Navigate to the following path:

Local Computer Policy > User Configuration > Star Menu and Taskbar

Start Menu and taskbar in GPEDIT

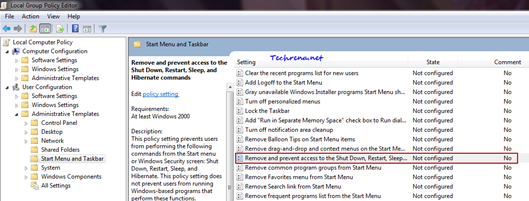
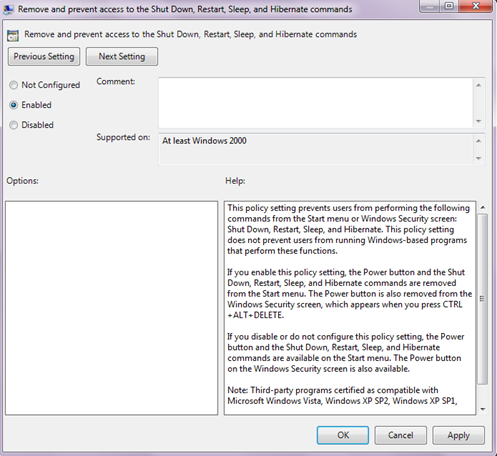
3. On the right side pane, you will find an entry “Remove access to the Shut Down, Restart, Sleep and Hibernate commands”.

GPEDIT shutdown button access settings

Double-click on it to change the settings.

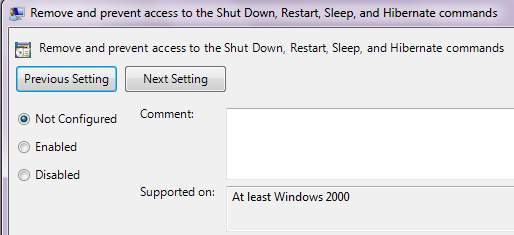
4. You need to change the option in settings window to “Enabled” from the default value “Not Configured”.

shutdown button access settings

New setting:

shutdown button access settings

Click OK to apply the changes and close the window. The changes can be seen immediately. The Power button and the Shut Down, Restart, Sleep, and Hibernate commands will be removed from the start menu as shown in this pic.
To undo this change:

Delete the NoClose DWORD entry in the method-1.

Change the value back to “disabled” or “not configured” in case of method-2.

[Download] Apple Mac OS X 10.6.5

Mac OS X logo

Apple Mac OS X 10.6.5 is now available for download. The users can download the fifth maintenance update for Snow Leopard using native Software Update feature available from the Apple menu. The update fixes a wider number of issues reported since the launch of Mac OS X 10.6.4 in June 2010.

The updates contains as many as 25 major general fixes and improvements (plus tons of minor fixes) for several issues found in the earlier version of Mac OS X. Here are the some of the fixes and improvements issued in the Mac OS X v10.6.5 update:

– Improve reliability with Microsoft Exchange servers
– Address stability and performance of graphics applications and games
– Resolve a delay between print jobs
– Address a printing issue for some HP printers connected to an AirPort Extreme
– Address an issue where dragging an item from a stack causes the Dock to not automatically hide
– Resolve an issue with Wikipedia information not displaying correctly in Dictionary
– Improved performance of MainStage on certain Mac systems
– Resolves a VoiceOver issue when browsing some web sites with Safari 5
– Improved reliability of Ethernet connections.

In addition to the above updates, Apple has also announced the release of Security Update 2010-007 for users using the Mac OS X 10.5 Leopard. Direct download links for all the above said updates added below.

Download:

Mac OS X version 10.6.5 Update – Size: 644.48 MB

Mac OS X version 10.6.5 Update (Combo) – Size: 977.21 MB

Mac OS X Server version 10.6.5 Update – Size: 858.02 MB

Mac OS X Server version 10.6.5 Update (Combo) –- Size: 1.12 GB

Security Update 2010-007:       Leopard Client – 240.74 MB                         Leopard Server – 448.1 MB

[How To] Add, Edit & Manage Windows Contacts

Windows 7 contacts

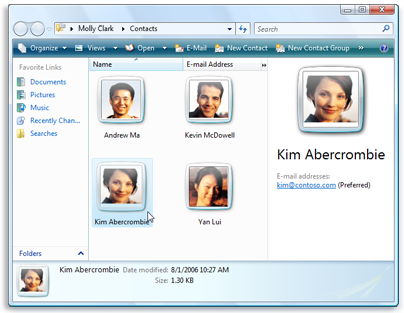
Windows Contacts is a nice little feature that lets you create contacts for people and organizations to keep track of them in your computer. You can create a dedicated contact for one person or organization. All Windows Contacts added here will automatically serve as address book for Windows Mail, meaning that you can choose the recipient from this Contacts folder.

All the details in the Contacts folder can also serve as multi-purpose contacts and contain various information including E-mail addresses, picture, phone numbers, street addresses, family information, website addresses, notes etc.
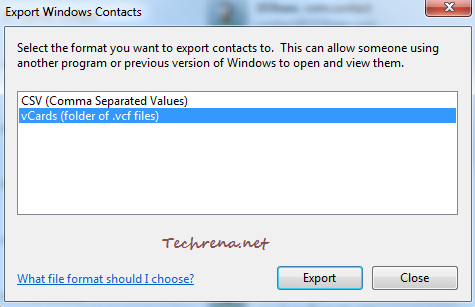
You can also synchronize Windows Contacts to your mobile phone or vice-versa. Nokia and Samsung mobile phones support contacts in vCard(.vcf) and CSV format and Sony Ericsson mobile phones support .contact format. The good thing with Windows Contacts is that you can export all the contacts inside this folder to the above formats.

export windows contacts

To open Contacts folder in your Windows, go to Start Menu, and type “contacts” in the search box and open the Contacts from the results.

contacts search results in start menu

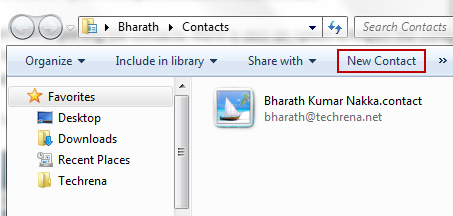
Click on “New Contact” link below the location bar in the Window to create a new contact.

New contact link in contact folder

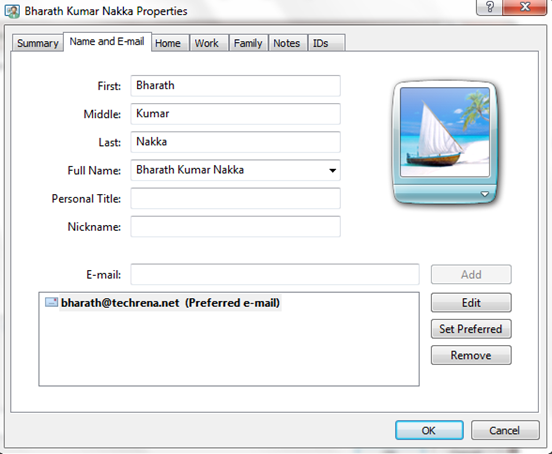
Add as much details as you can, you can even add a picture to it:

Editing Windows Contacts details

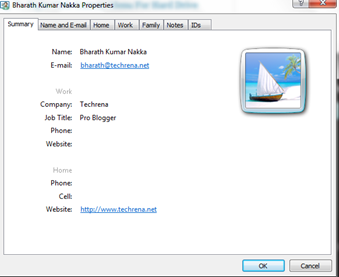
Windows contact summary

That’s it. Now you have successfully created a new contact in the Windows Contacts. Add as many contacts as you can, and you will be ready use to these contacts with Windows Mail or sync with your mobile phone and other supported devices.