[Tip] Turn Off Auto-Saving Email Addresses To Contacts Feature In Gmail

Gmail logo

Google’s Gmail has got whole bunch of features that makes it as one of the top free email service providers on the internet. But who says that it hasn’t got any annoyances? It surely does. Gmail automatically saves email address of the person and adds it to your contact lists when you communicate with that sender even though you might not communicate with him future. Most users would find it annoying as your contacts list just keeps growing bigger with additions of such unknown contacts. If you look at it from the other side, it indeed is a nice feature for so many who are just lazy to manually add those email addresses to their contact list. I don’t know why it took so long, but apparently Google has decided to let users have the option of turning this ‘auto-save contacts feature on or off.

Steps:

1. Login to your Gmail and click “Mail settings link found at the extreme top right corner of the window.
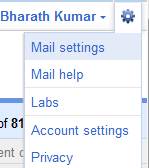
Gmail mail settings link

2. Go to ‘General’ tab under the settings. Scroll down until you find the settings “Create contacts for auto-complete”.

3. Choose the “I’ll add contacts myself” radio button and click the “Save Changes” button.
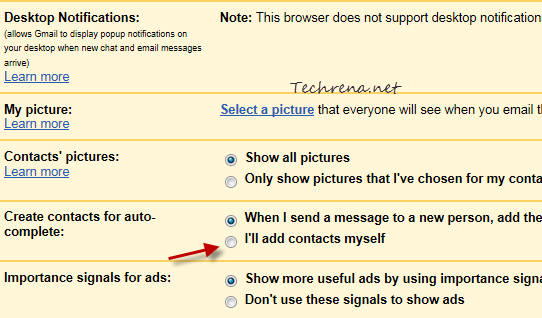
gmail contacts auto complete settings

That is it. But then, keep in mind that you will have to add contacts manually once you have turned this feature off.

[Tip] Enable Gmail Smart Labels

Gmail smart labels

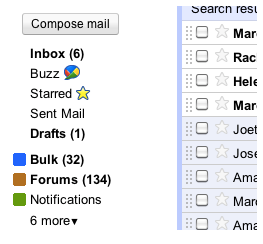
Gmail has just added new “Smart Labels” feature to its labs section that helps you to ‘classify’ and ‘organize’ your email messages. Gmail users already have features like ‘filters’, ‘labels’ and ‘Priority Inbox’ (launched last year).

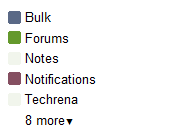
Smart Labels works this way: Smart Labels automatically organizes your mail into Bulk, Notification and Forum messages (labeled as ‘Bulk’, ‘Notifications’, ‘Forums’ respectively). All the newsletters and other promotional messages would under the ‘Bulk’ label. All your social networking notifications, credit card statements etc. would go with the ‘Notifications’ label and finally all the email messages coming from online groups or forums that you have joined would go with the ‘Forums’ label.

Enable Smart Labels In Gmail:

Smart Labels is available as Gmail Labs feature. To enable this for your Gmail account, go to Mail Settings > Labs, locate “SmartLabels” and choose “Enable” radio button against it. Click “Save Changes” button to save your settings.

You should now see the new labels in your inbox.

Gmail smart labels inside inbox

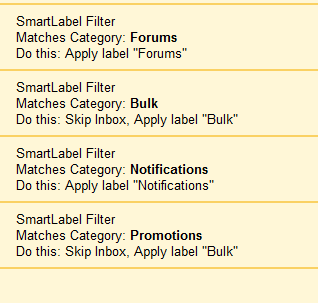
If you have been using Gmail filters, you must find really easy to edit these new Smart Labels as well. To edit any of the Smart Labels (Bulk, Forums or Notifications), just visit “Filters” tab under your Gmail settings and you can edit these labels as you do with usual filters.

Gmail Smart Labels in filters

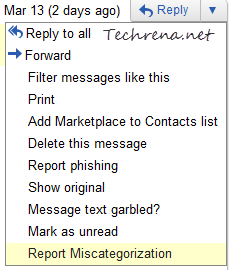
In case you feel any email message is wrongly labeled, you can report it by hitting the dropdown menu next to the message and choosing “Report Miscategorization”.

Miscategorization Smart labels

[Tip] Turn Off Sounds In Gmail Chat

Gmail-logo-small

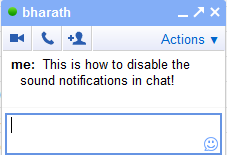
If you frequently chat with your friends using Gmail chat, I’m sure there would have been times you might have definitely thought you would be better off disabling the notification sounds or alerts whenever a new chat message arrives for various reasons. We can draw many cases so as to why someone would want to turn off or mute these sounds in Gmail chat, but then at the end of the day we would just like to be have a choice. Follow the below steps to disable the sound notifications for chat in Gmail.

Gmail chat screenshot

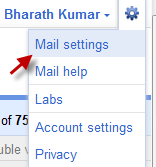
1. Login to Gmail and open the chat settings (hit the link, you will be directly take to the page). Alternatively, you can open the same page this way: Click on the dropdown button next to your name (if you are seeing the new Gmail navigation bar) and then choose “Mail settings”.

Gmail settings link at navigation bar

And then go to “Chat” tab under the settings page.

gmail settings for chat

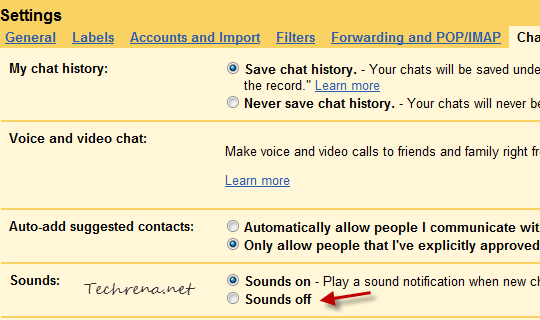
2. Under the “Chat” tab, locate the settings for “Sounds”. Now, to disable the sounds for chat notifications,

gmail chat sounds settings

Choose “Sounds off” radio button to completely disable the sound notification for new chat messages.

That it it! Just revert back to “Sounds on”, to enable the sound alerts again.

[via]

Related reading: Schedule emails in Gmail

Activate 2-Step Verification Process For Your Google Account To Make It More Secure

Google 2-step verification

Google had previously announced the new 2-step verification for Google apps users. The same is now being rolled out to all the Google account users. The 2-step verification would make your Google account more secure by verifying you are the real owner of the account that you are trying to access. You can verify your authentication by using a smartphone, or via a SMS text code that you receive similar to how you do it while making online banking transactions or even you could use a landline to verify your identity through a voice call in case you don’t have a mobile phone with you.

How To Enable 2-Step Verification In My Account?

To set up the 2-step verification, login to your Google account and navigate to the Manage Account page, and if the feature has been enabled for you, you should see a “Using 2-step verification” link under Security column in your Personal Settings.

Google account personal settings

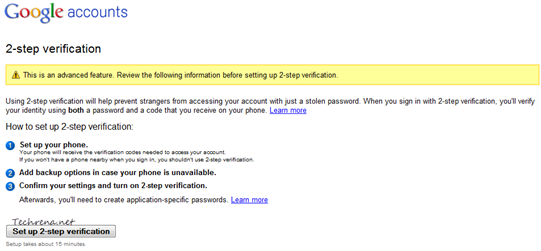
And the whole setup should take about 15 minutes. You will see this page on the next screen:

google 2-step verification setup

Click on the “Set up 2-step verification” to continue and complete the setup process. It involves 3 steps: 1. Setting up your phone 2. Adding backup option when your phone is unavailable 3. Confirm your settings

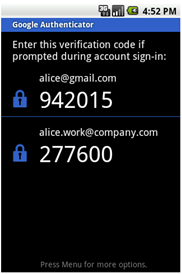
If you have a smartphone, you can install Google Authenticator application from (available for Android, iPhone and BlackBerry devices).

Google authenticator screenshot

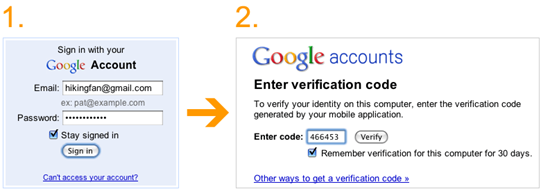
The application generates a verification code that is required in the second step during the sign in. You can also check the “Remember verification for this computer for 3 days” option and you don’t need to re-enter the code again for the next 30 days. In case you don’t have a smartphone, you can receive the verification code through a text message or through a voice call as well. You can also generate application specific passwords to sign in to non-browser based applications that use Google account like mobile Gmail, Picasa or AdWords Editor. But all these are advanced options and might confuse you. For now you have completed the 2-step verification process and you have added more security for your Google account and lets not bother too much about the advanced settings.

[via] Official Google blog

[How To] Schedule Emails in Gmail with Boomerang

I would say Google’s Gmail is the best email service. We do not need any introduction to Gmail here.

Well, if you use Gmail this is going to be an interesting post. Here, I am going to write how to schedule your emails. Means you can send or receive your mails at a particular time set by you in prior. Let me explain how it is going to be useful. Say one of your good friend’s birthday is coming and you do not want to miss wishing him. So how do you make it 100% sure that you wish him at midnight? Just write a beautiful email and schedule it to the time you want it to send using Boomerang for Gmail.

Boomerang-for-gmail

Boomerang is an add-on for Firefox and Chrome which lets you to schedule the emails in Gmail.  Follow the following steps to install it and schedule the mails.

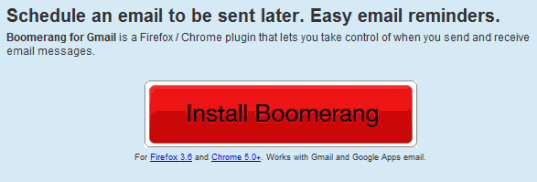
Step 1: Download Boomerang. Click the Install Boomerang button below.

download-boomerang

Step 2: Click on Allow Button to install the Add-on. If you are installing on Chrome, Click the Continue button in the left lower corner of the window. (Click to enlarge the image below).

Install-boomerang

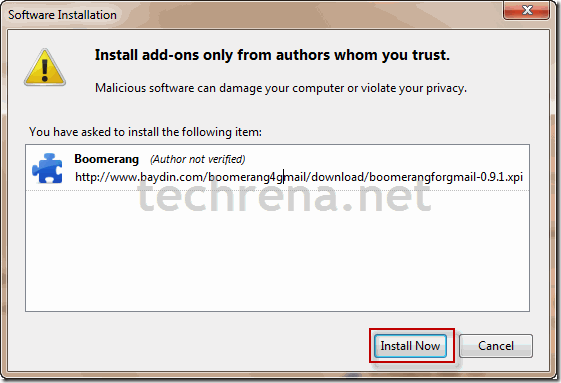
Step 3: Click on the Install Now button to install the add-on.

install-now-plugin

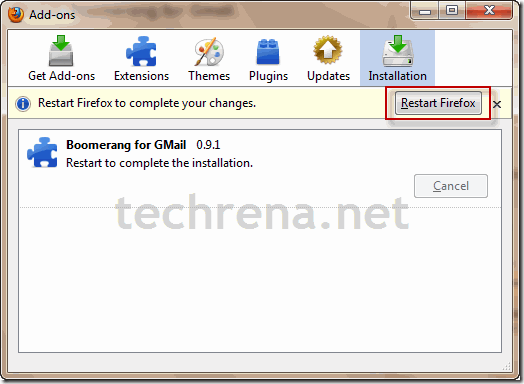
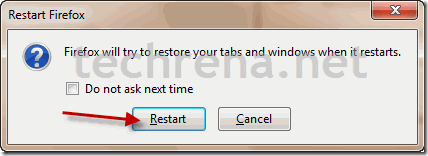
Step 4: After installation, it will ask you to restart the Browser. Restart the Browser to use the add-on.

restart-firefoxrestart-firefox-window

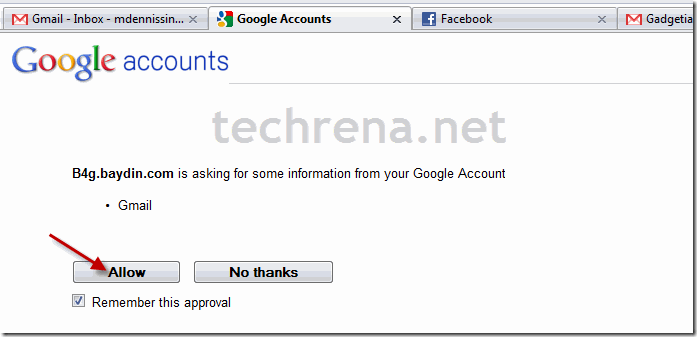
Step 5: Now after restarting the browser Google will ask you if you want to share information to  Boomerang. Click on allow.

allow-information

Step 6: Now you should be able to see Boomerang on the top right corner.

boomerang-installed

As Boomerang is finally installed you can schedule your emails. As follows:

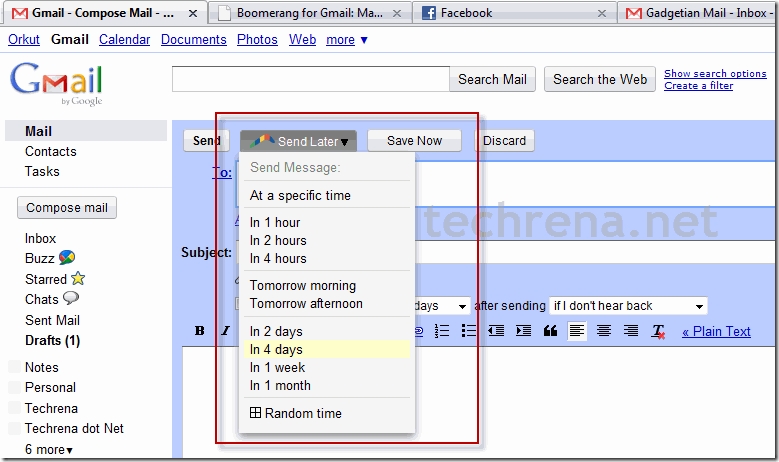
To send a mail at a scheduled time, click on Send Later Button and select any time.

send-email-later

If you select At a specific time, you can enter the exact time and date.

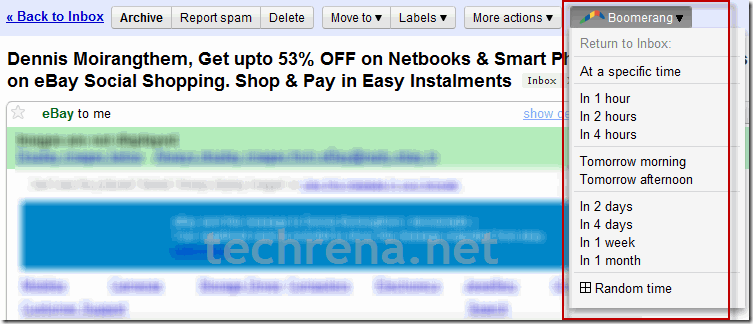
To re-receive an already received mail, click on Boomerang after opening the main and select the time you want it to return to your inbox.

return-to-inbox

I hope that this add-on will be really helpful for all of us.

Chrome Gmail Desktop Notifications For Email And Chat Messages

gmail desktop notifications sample

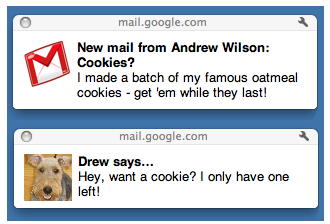
We always want to get notified for new emails (read Gmail), right? Probably because we can’t always stay online or even if we are online, we just can’t keep the Gmail window open and keep looking at it. That’s why there are so many services out there offering these kind of email alerts (both offline and online). We had earlier covered how you can get free Gmail SMS alerts whenever a new email arrives. When you are online you can just install one of those widely available desktop notification application to get alerted for new emails and chat messages.
But, wait! Google has listened to us, Google has recently integrated the desktop notifications for email and chat conversations into Gmail. But the catch? You should use Google Chrome to make this thing work. The Gmail desktop notifications is based on HTML5 and even though the most of the modern browsers support HTML5, it’s just available for Chrome! But as a Gmail fan, I would like to see this feature extended to other browsers in near future. Okay, lets get into the details about how to enable the desktop notifications in Gmail if you are using Google Chrome.

1. Login to your Gmail using Google Chrome.

2. Click on the Settings link found towards the top right corner of your inbox.

Gmail settings link

3. Under the General tab, locate the settings for “Desktop Notifications”.

4. Choose the right options for you. You can get notifications for both chat messages as well as usual email messages or for just important mails.

Gmail desktop notifications settings

5. Click the Save Changes button once you are done.

Gmail desktop email alert

That’s it! You will get the notifications for  new emails or chat messages like the one shown above. In case, if you want to turn these desktop notifications off for your Gmail account, select the respective options in the step 4. Note that desktop notifications isn’t available for Google Apps users yet.

[via] Official Gmail blog

Search Gmail Labs Features As You Type

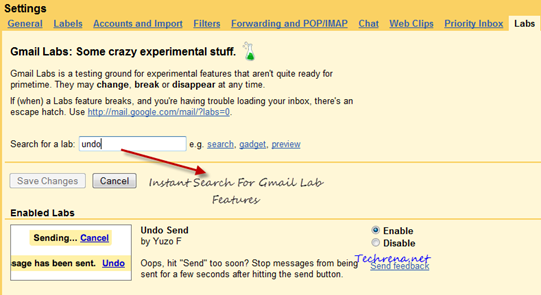
Gmail is great, and so are its labs features that would come handy for most of the Gmail users. To enable a particular lab feature in Gmail, users just had to go to the “Labs” tab under the settings page and choose the required lab feature from the list. But over the time, what happened was a huge in the number of such labs features added to the Gmail. As such now there are more than 50 labs features available under Gmail Labs section. Finding and selecting the item needed from them is just getting troublesome for few users like. Agree that there is always the built-in search feature (using CTRL + F) feature available in all the browsers to narrow down your search, it would have been better had Google, the giant search engine had added a small search engine to their Labs section to avoid scrolling. Gmail engineers have now responded quick enough to add not just a search feature but with Google Instant-like “search-as-you-type” feature.

Gmail labs instant search

If you haven’t really figured it out, go try it and enable this Google HD Video chat option from the Gmail Labs.

Make Phone Calls From Gmail For Free All Through 2011

Gmail logo small

If you are located in US and Canada, Google has some very good news for you. You can now make free phone calls to all your pals till the end of 2011. When this feature was launched initially in August 2010, Google said that it would offer free phone calls service to the U.S. and Canada till the rest of 2010. According to a recent blog post at Official Gmail blog, the free service has been extended through 2011.

gmail phone call free

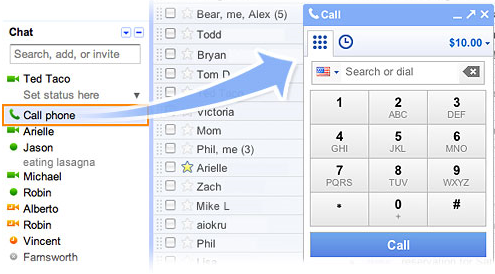
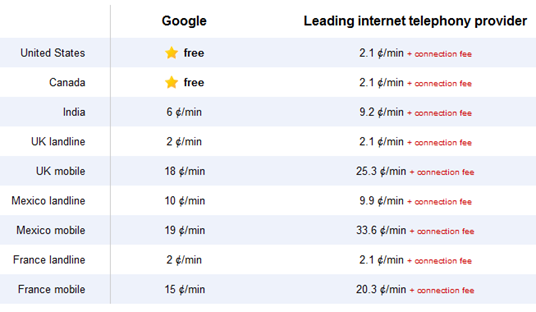
To get started with calling phone numbers in Gmail, get the Gmail voice and video chat plugin click on the “Call Phone” that appears at the top of your chat list and you will see the dial pad. You can either dial the phone number or enter a contact name to start a voice phone call. If you have a Google Voice phone number, you can even display it as the outbound caller ID and receive calls made to this number inside Gmail as well. It may not be as good as other leading VOIP solutions like Skype but still a decent one.While calls to the U.S. and Canada are free, calls to phones outside the United States are charged as per the following rates list.

gmail phone call rates

For more information, go visit gmail.com/call.

[Tip] Restore Accidentally Deleted Contacts In Gmail

gmail logo

Have you accidentally deleted any contact in Gmail while syncing the contacts between various devices that you possess? Have you ever mistakenly deleted a wrong contact that had almost similar name to the contact that you wished to delete?

Yes, these sorts of things do happen now and then! But Gmail think-tank seems to be wary of these accidental deletions that happen to users like us. Gmail has announced highly useful “Restore Contacts” feature that lets you quickly recover contacts that you had previously deleted. With this, you can restore any deleted contact information deleted from your Gmail account in the past 30 days.

How To Use?


To use “Restore Contacts” feature in Gmail,

1. Login to your Gmail account.

2. Go to the Contacts page inside your Gmail.

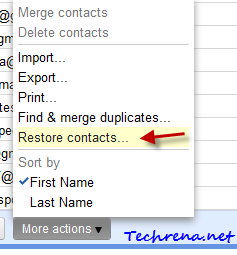
3. Click the “More Actions..” drop-down button and choose “Restore Contacts”.

restore contacts link under more actions in gmail

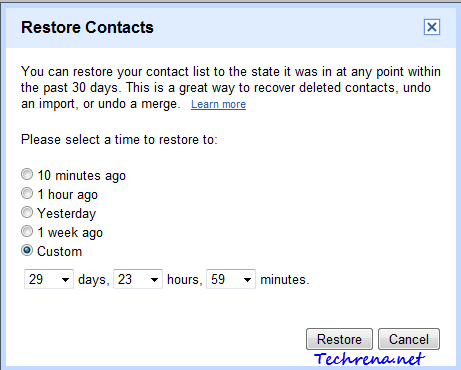
4. In the new “Restore Contacts” dialog box, choose the time stamp to where you want to restore your contacts. You can restore the contacts to any point within the past 30 days.

Restore contacts in gmail

When you restore the contacts to an earlier time frame, all the contacts added since then will be deleted. All the contacts that you had deleted will be back.

[Via] Official Gmail blog

Gmail For Android Gets Priority Inbox

Google has just updated the Gmail Android app (version 2.3.2) with some really interesting feature additions. Gmail app for Android devices now supports the Priority Inbox feature which is already available in the desktop version of the Google’s free email service.

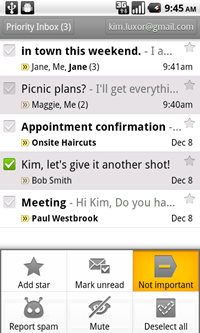
Priority inbox includes all the important messages (both read and unread) in your inbox. All the important messages will carry priority-inbox-gmail-marker marker.

Gmail priotiy inbox in Android

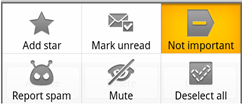
You can always change the importance of a message from the menu.

Gmail Android menu

What’s more? You can also get notified (vibrate, notify or ring) when an important mail arrives in your inbox. To set this, just go to Menu > Settings > Priority Inbox and configure the settings.

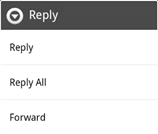
The other improved features in the Gmail for Android 2.3.2 include the improved compose mode. When composing a reply, you can quickly choose to reply only to sender, reply to all or to forward the mail.

Reply options in Gmail for Android

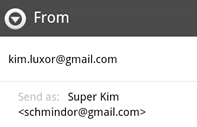
You can also choose a custom from address while composing a new email message, a feature which is already available in the desktop client from long time.

Custom from address in Gmail for Android

The update is available only for the users of Android 2.2 (Froyo) or later versions (Gingerbread). To get the latest version of the Gmail Android app, go to this Android Market Place link from your Android device or scan the following image your barcode or QR reader app. Have Android 2.1? Sorry, no luck!

QR Code:

Gmail for Android QR code