Upgrade To Facebook New Profile

facebook

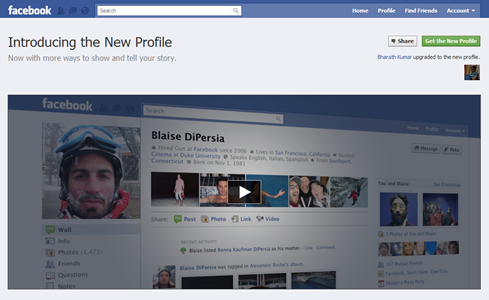
Facebook has finally decided to give a facelift to the Facebook profiles. The new Facebook profile page will have basic information like where are you from, where you studied, your work location etc. Below that, there are some recent pictures where you have been recently tagged.

Facebook new profile look

Below your profile pic, you will find some of your featured friends. Facebook lets you to choose the features friends from your list of friends, whom you feel are more important to you. You may create new groups of friends or may also choose to feature existing friend lists.

Featured friends in facebook

The new Facebook profiles also enables you to share your interest and activities. You can list the projects that you worked for your employer (you can also tag co-workers who worked with you!), favorite music bands, sports teams, political affiliations, and your favorite people you admire etc.
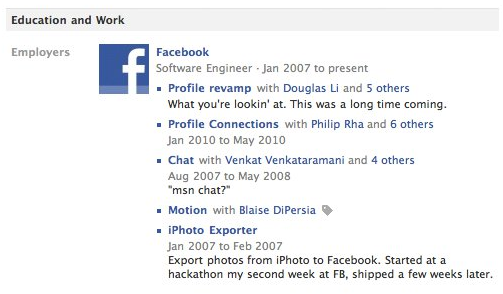
Facebook new experiences

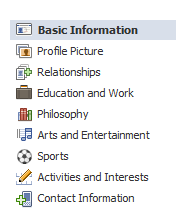
Facebook new profile sidebar

Facebook’s new “infinite scroll” feature lets you easily browse your photos. You can now search in the Friends page with number of dimensions like: search by name, hometown etc.

How To Start Using New Facebook Profile ?

1. Go to facebook.com/about/profile and click “Get the New Profile” button.

Facebook new profile

2. The page will list some of your information that Facebook already has. Click the “Edit Profile” link to add some more details about you.

Add information in new Facebook profile

When you are done, your new profile page will look like the one shown in the above pic, and all of your friends will be notified showing that you now have the new profile.

Have new Facebook profile

Please note that once you upgrade to new profile, there is no option to get back to the older version of the Facebook profile as of now. All the Facebook profile pages of your friends will be shown in the newer format no matter whether they are using the new profile version or older one.

via Facebook blog

[Download] Realtek R2.55 HD Audio Drivers

Realtek logo

Realtek has recently released a new updated version of the HD audio driver codecs, Realtek High Definition Audio driver R2.55. Apparently there are no feature updates or fixes released with this version. This may be the reason why they haven’t released any release notes with the release of Audio Codes Driver R2.55.

If you are happy with using earlier version of Realtek HD Audio Codecs Driver you may choose to skip this update. However, if you are having with HD audio output of your audio device, download this HD Audio Driver R2.55 for Windows 7, Windows Vista and Windows XP systems. Download the driver package from the direct download links added below.

Download Realtek HD Audio Driver R2.55:

Windows 7/Vista [32/64 bits – 77.92 MB – Exe file] [link expired]

Windows XP [32/64 bits – 30.55 MB – Zipped file] [link expired]

Related: Download Realtek R2.48 High Definition audio driver

[How To] Change Keyboard Input Language In Windows 7

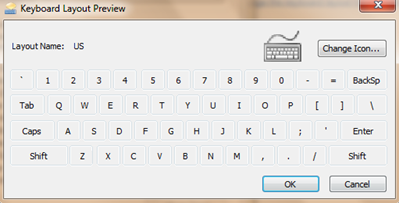
Keyboard layout preview

Windows 7 allows you to change the default input language of your keyboard like most other operating systems do. This is pretty straightforward if you follow the steps mentioned below:

Steps:

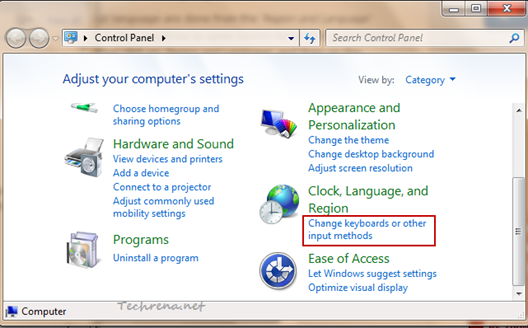
1. Go to Control Panel, click “Change keyboards or other input methods” under the Clock, Language, and Region section.

Change keyboards input control panel

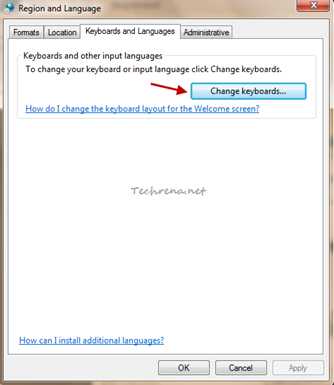
2. A new Region and Language window pops up. Click on “Change keyboards..” button:

Region and Language

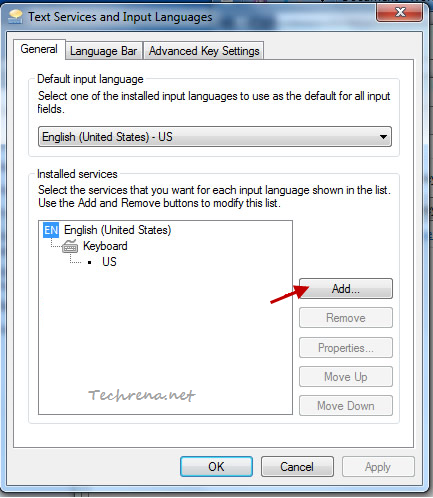
3. Again a new “Text Services and Input Languages” window opens up. To add a new keyboard input language, just click “Add” button found under the “General” tab.

Add keyboard input language

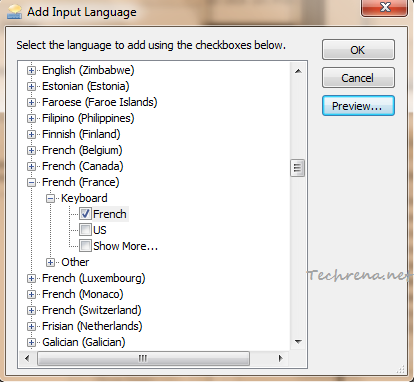
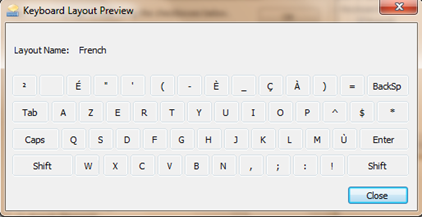
4. Choose the language that you want to add, check against it and click “Preview” too see how it looks like before adding it.

Add input language in keyboard

Keyboard french layout preview

Click OK to add this input language to your keyboard.

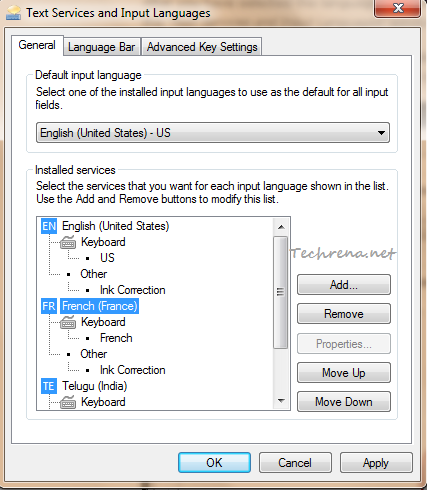
5. Your newly selected input language will appear under the “Installed services”.

keyboard input languages installed

Select the input language and you can either move it or move down on the order of priority. You will also get an option to “Remove” the added input language.

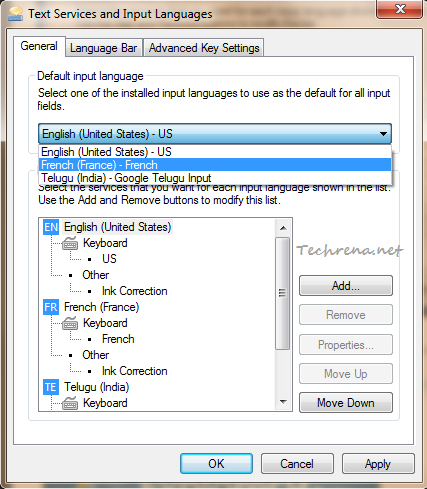
6. From the “Default input language” option, select the input language that you want to from the dropdown list and click “Apply” button.

select default input language

That is it! You have successfully changed your keyboard input language. Open notepad or any text editor to test the newly added input language.

[Tip] Force Chrome To Use Flash Player 10.2 Beta

Google Chrome logo

Adobe has recently updated the Flash Player and released the beta version of the Flash Player 10.2. The newer version included a major feature upgrades like Stage Video hardware acceleration which decreases your CPU utilisation when playing HD videos. When you download the flash player and install, you will understand that it’s only going to be used by all the browsers except Google Chrome. You may wonder why is Google Chrome left alone! But the fact is that Google Chrome (32-bit browser) includes a built-in Adobe Flash Player. Chrome automatically updates the Flash Player whenever there is new version of Chrome is released.

So even though you have installed the beta version of Flash Player 10.2, Chrome still uses the stable version of the flash player. To make Google Chrome use the 10.2 beta version instead, follow these steps:

1. Open Google Chrome, type about:plugins in the address bar and hit enter.

2. Expand the “Details” details button in chromebutton on the upper right corner

3. Under the “Flash”, you should see two versions, one is the integrated plug-in and the other is the system plug-in file.

If you are on Windows, the location of the integrated plug-in would be :

C:\Users\<UserName>\AppData\Local\Google\Chrome\Applications\<version>\gcswf32.dll

location of the system plug-in would be:

C:\Windows\system32\Macromed\Flash\NPSWF32.dll

If you are on other platforms, these are file names for the integrated and system plug-ins:

Platform

Integrated Plug-in

System Plug-in

Windows

gcswf32.dll

NPSWF32.dll

Mac OS

Flash Player Plug-in for Chrome.plugin

Flash Player.plugin

Linux

libflashplayergc.so

libflashplayer.so

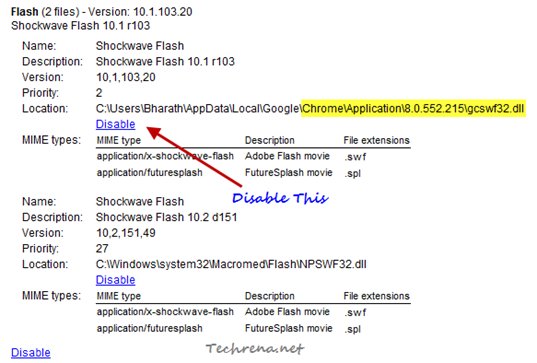
4. To force Chrome to use the beta version of the flash player, you must disable the integrated plug-in gcswf32.dll (i.e the plugin that is found in the Chrome folder) as shown. Click “Disable” button against it.

Disable integrated flash plugin in chrome

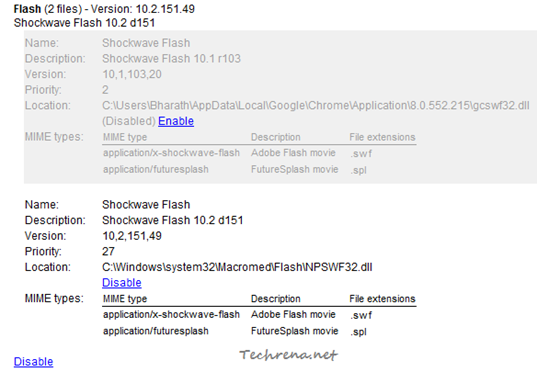
And when you have done that, it should look like this:

Disabled integrated flash plugin in chrome

That is it! Restart Google Chrome and see if the browser is able to load the flash content on the pages( ex: this Stage Video). If it is able to do, then it is to understood that the it is making use of the beta version of the flash player.

Note:

If you disable the Google Chrome’s integrated flash player plug-in, you will no longer receive the important security updates for the built-in plug-in and you need to use the system installed plug-in which has to be updated manually. Also, disabling this built-in Chrome plug-in will disable the Google Chrome’s sandboxing techniques incorporated to make the plug-in more secure. It is highly recommended that you use the integrated plug-in unless you really want to test some features using flash player beta on Chrome.

If you want to enable the integrated plug-in back, enable it in the step 4 to make run Chrome using it.

[via]

[Tip] Disable Or Remove GoogleUpdate.Exe Process

When you install Google products like Google Chrome, Picasa and others on your system, new Google Update service gets installed on your computer, responsible for running “googleupdate.exe” process in regular intervals. This process regularly contacts Google servers to check if there are any updates available to the Google products that you have installed on your system. Agree, this is essential to keep your Google products up-to-date by installing the important security updates etc., but definitely you may not like to dedicate some of your CPU resources to the process to keep it running continuously. The same process is responsible for the Automatic Silent Update feature in Google Chrome. If you don’t want to run Googleupdate.exe process on your computer, follow these steps to stop running it on your computer.

GoogleUpdate.exe process

You can’t find the GoogleUpdate.exe in the start up items using msconfig, but you can surely find it in the Task Scheduler as it gets added to the Windows Task Scheduler.

Steps:

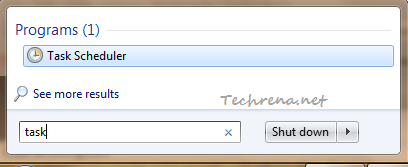
1. Go Start Menu, type “tasks” in the search box and click “Task Scheduler” from the results under “Programs” section.

Task Scheduler from Start Menu search result

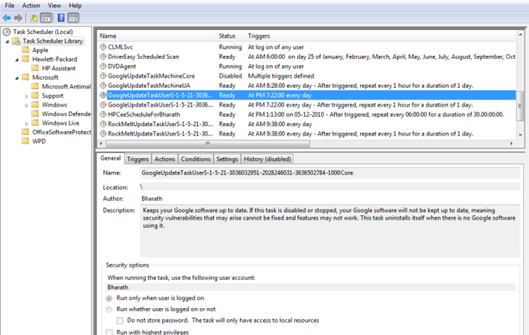
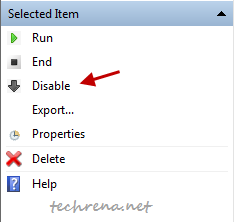
2. Find an entries starting with “GoogleUpdate” in the tasks and disable or remove them to stop running again on your computer.

GoogleUpdate in task scheduler

disable google update tasks

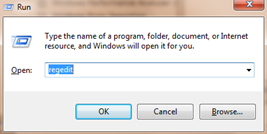
3. Press Windows + R to open the RUN command box, type “regedit” and hit OK.

regedit in run command

4. In the registry editor, try and see of you can find an entry with value “Google Update” in the following paths:

   HKEY_LOCAL_MACHINE\Software\Microsoft\Windows\CurrentVersion\Run                                                     
                        and       
   HKEY_CURRENT_USER\Software\Microsoft\Windows\CurrentVersion\Run

If you could find a value with that name, right-click on “Google Update” and select “Delete”. Restart your system to see the changes in effect.

Please note that when you remove GoogleUpdate.exe, the Google software will not be updated automactically you might need to download the updated versions manually. Also when you install any other products like Google Earth, the GoogleUpdate.exe comes back to your system and you might need to repeat the above steps all over again!

Fix The AVG Post Update Issue With Windows 7 64-Bit Computers

AVG logo

64-bit Windows 7 users who are using the free AVG 2011 edition and downloaded the free update 271.1.1/3292 (432/3292) released yesterday have found that this update conflicts with Windows 7 and make it non-bootable, when they tried to restart the system just after installing the update. The affected systems fail to boot the Windows leaving an error message:

STOP: c0000135 The program can’t start because %hs is missing from your computer. Try reinstalling the program to fix this problem.

AVG responded quickly to do the damage control and issued a few fixes addressing this post update 3292 issue. Apparently AVG has pulled the update from their servers and issued a detailing on how to fix it:

Fixing the Windows 7 64-Bit Issue Post AVG Update:

According to the information issued by AVG,

>> If you have installed the AVG 271.1.1/3292 (432/3292) update and haven’t restarted your system even after the prompt by the AVG to do so, you are lucky. Just install this Fixcorex utility from AVG, this will undo all the changes affected by the update and you can safely restart your Windows after you run this program.

[or]

Alternatively you can delete the following files manually from your system:

C:\Program Files\AVG\AVG10\avgrsx.exe

C:\Program Files\AVG\AVG10\avgrsa.exe

C:\Program Files\AVG\AVG10\avgchsvx.exe

C:\Program Files\AVG\AVG10\avgchsva.exe

>> Critical- If the AVG update has dumped your Windows: If you have already installed and restarted your machine and not able to get into your Windows 7 installation, read this tutorial to fix the issue.

The issue was reported in some Windows 7 users running 64-bit OS. If you have not downloaded the update your system is fine and no need to worry at all.

[Download] Google Chrome 8 Stable Version

Google Chrome 8

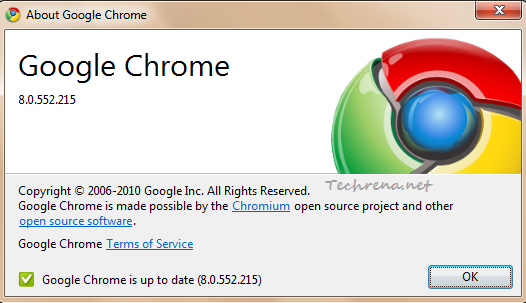
Google Chrome has just been updated to stable version 8.0.552.215. Google Chrome 8 is coming with over 800 bug fixes and other minor improvements. The big feature enhancements in Chrome 8 is the addition of a built in PDF viewer (and yes, it is secured in Chrome’s sandbox) and the latest version also updated to support the upcoming Google Chrome Web app store .

Download:

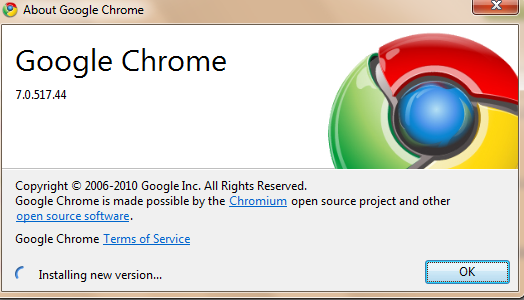
If you are already using an earlier version of Chrome, just click the wrench Chrome Tools button and choose “About Google Chrome”. Google Chrome’s “Auto update silent mode” should get you the the latest version of the Chrome. If it didn’t, it’ll for sure now when you choose to open “About Google Chrome” as shown here:

Google Chrome updating

Or if you may choose to download the Chrome online installer. If you want to download a standalone offline installer so that you can install it on any other computer without an active internet connection, you can do so by downloading the exe setup file from the following link:

Download Google Chrome 8 Offline Installer [23.42 MB]

[Download] TeamViewer 6

TeamViewer

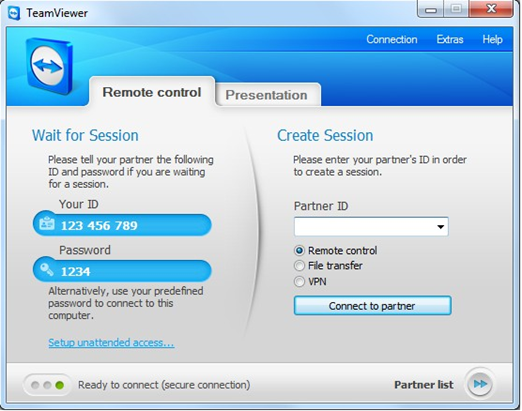
TeamViewer v6.0.9895 final is available for download. TeamViewer is widely used desktop sharing application (available for free for non-commercial use) supporting all kinds of platforms be it Windows, Mac, Linux and even iPhone, iPad and Android.

TeamViewer screenshot

Salient features of TeamViewer 6.0.9895:

* Remote Administration of unattended servers: Control unattended computers and servers and even perform remote reboot and reconnect.

* File transfer: You can easily transfer files and folders between your computer and remote computer.

* High security standard: Uses 256-bit AES encryption

* Remote support without installation

* Remote presentation of products, solutions and services: Share live demos, presentations and others with the remote partner (or client).

* Works behind firewalls: Works behind all firewalls and NAT routing.

* Browser based access: TeamViewer Web Connector (flash based) can be used to control your computer remotely using nothing but just a browser.

* Optimized performance: Even if you are slow internet connection, TeamViewer optimizes display quality and speed depending upon your connection speed.

Download TeamViewer 6.0.9895 [3.37 MB]

[How To] Change Sounds In Windows 7

Change Sounds In Windows 7

Windows always has unique styles of system sounds for various events since very long. Windows 7 just gets better in this aspect with addition of even more sound schemes. The system sounds for various events in Windows 7 are really great and they usually change whenever you change settings like changing Windows theme. Personally I’m very much impressed with these sounds and not really willing to change them. But you know, customization is the most fun part of Windows 7 and you might want to know how to apply a custom sound to a system event (program event). Follow these steps to learn about how to change these sound settings.

Steps:

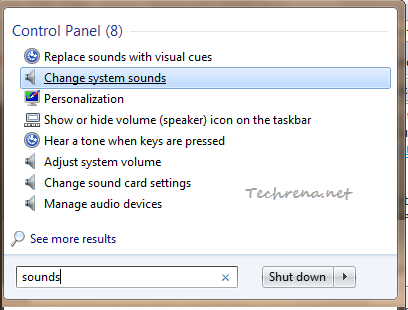
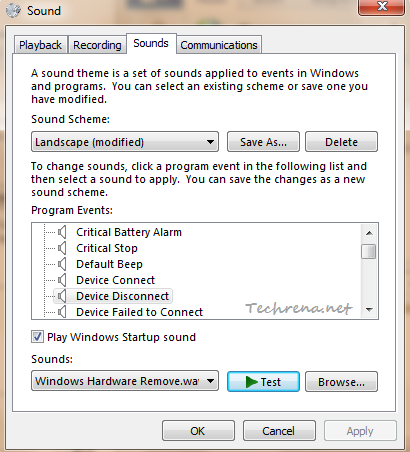
1. Search “sounds” in the Start Menu search and click “Change system sounds” from the results under “Control Panel” section.

Start Menu search result for sound

2. A new Sound settings window will open up.

sound-windows-7-settings

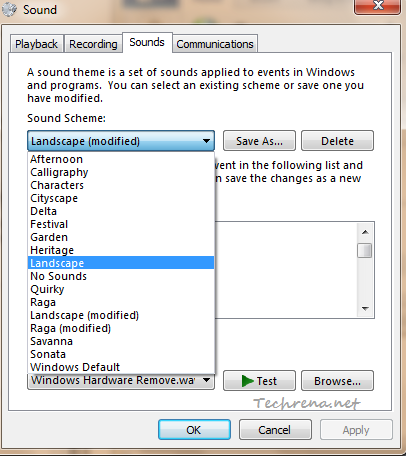
3. Select a sound scheme from the list which you want to edit:

sound-scheme-windows-7-settings

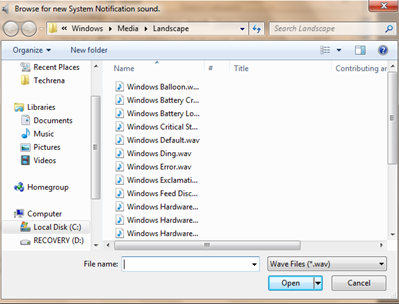
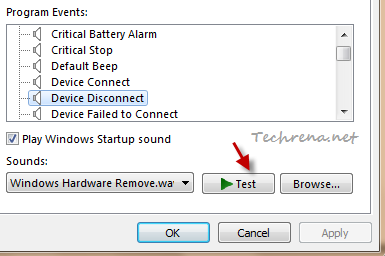
You can then select and test sounds for various program events. Click on “Test” button to preview the sound. To change the sound for a particular program event, click the “Browse…” button to browse a custom .wav (wave music format) music file from your computer to replace it with any other custom sound track.

browse-program-event-sound

Program Event sound in Windows 7

Ensure that you preview the sound before applying the customized sound track to any program event. Click “OK” to apply the sound track.

[Tip] Start YouTube Video From A Specific Time

youtube logo

We all love YouTube and the ever increasing millions of videos continually posted on it. We like to share the videos with friends over various social networking platforms (yeah, for the same reason, youtu.be URL shortening service was launched by Google!). Everything is fine and cool, no problem with sharing and watching as long as videos that you share are short in length. But what do you do when you need to share a video which is a bit longer and you wanted to emphasize on only specific portion of the video? Yeah, YouTube has added support to quickly skip or start any video from specific time frame. To do this, you just had to append the time (“t=”) parameter to the URL of the video. Where you can specify the time in seconds (or in minutes) to instruct the video to load from that particular time.

http://www.youtube.com/watch?v=suTDT6-Q8NE#t=61s                
                     or
http://www.youtube.com/watch?v=suTDT6-Q8NE#t=1m1s

If you open the above URL in your browser, you can see that the video starts from 1 minute 1 second mark.

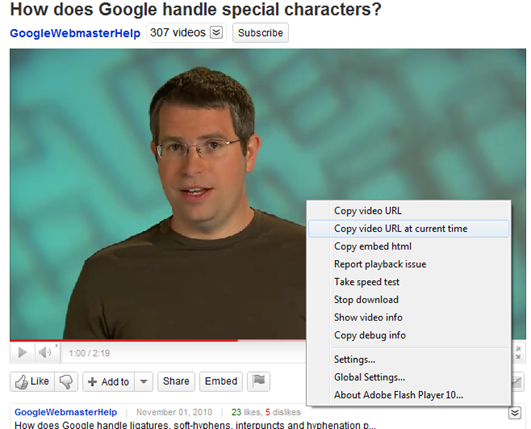
Now YouTube has decided to cut down this manual work on the users’ part. When you watch any video, just right-click on it and you will see a new “Copy video URL at current time”. You will now have the URL with “t= “ parameter appended to the video automatically corresponding to the point of the time in the video at which you selected this option.

Copy Video URL at current time

[Via] Labnol