Partition Hard Disk Drive in Windows 7 Using Disk Management

Creating and partitioning Hard Disk Drives have become very easy in Windows 7 and Vista with its inbuilt Disk Management. We do not need any third party software to create and format Disks in Windows 7. Previously we used to rely on software like Partition Magic etc. but now it has become very easy.

For those who are completely new to partitioning Disk drives, before starting the steps understand the following example:

If you have a drive, say C drive of 200GB and you want to partition it into two more drives, then you need to shrink C drive first. Suppose you have shrunk it to 100GB, then you will have 100GB of unallocated space. Now you can create new drives from the unallocated space, say first one for 60GB drive, and then you can create the second drive for 40GB. Totally you will have three drives now of 100, 60 and 40 GB respectively, after completing the process.

Follow the steps below to shrinking existing drives and creating new partitions in Windows 7.

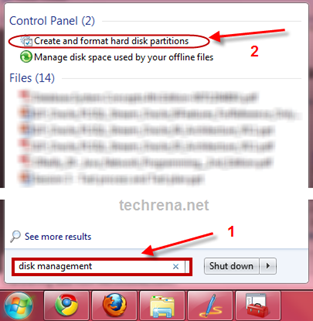
Step 1: Click Start and type DISK MANAGEMENT in the search box. Click “Create and format hard disk partitions” from the search results.

Hard Disk partition in Windows 7

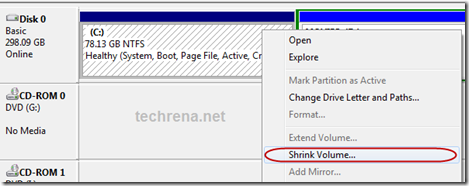
Step 2: After opening Disk Management successfully, you can see the existing drives in your system. Right click on the drive you want to shrink. Click on Shrink Volume. It may take few seconds to configure the available shrinkable volume.

Hard Disk partition in Windows 7

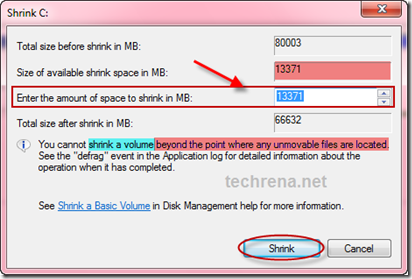
Step 3: Now type in the amount of space(in MB) you want to shrink. It should be less than or equal to the available shrink space. Then click Shrink.

Hard Disk partition in Windows 7

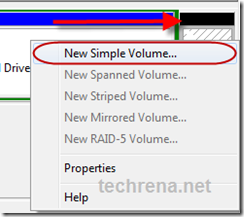
Step 4: After shrinking the volume, you will find a new volume in the right side labelled as Unallocated Space(the one with BLACK colored label). Right click on it, and select New Simple Volume.

Hard Disk partition in Windows 7

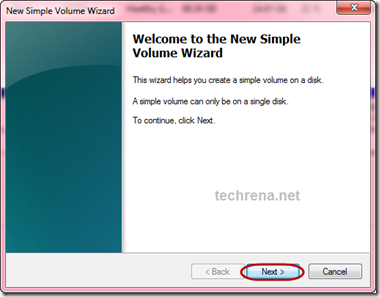
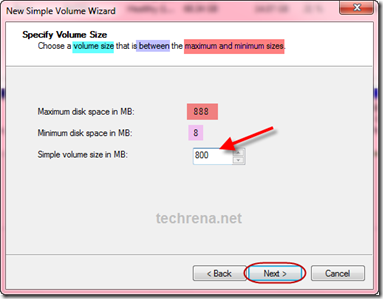
Step 5: Click next in the New Simple Volume Wizard. Then enter the size of the new partition you want to create. It should not exceed the maximum sizes.

Partition Disk Windows 7 e Hard Disk partition in Windows 7

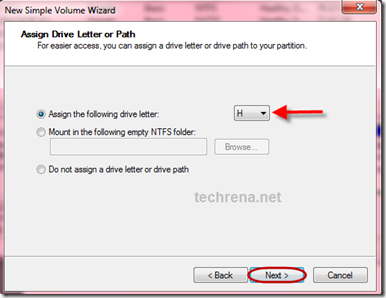
Step 6: Select the Drive letter you want to assign, then click next. Now, select the file system. Usually, we use NTFS(more common) or FAT32.  Type in the Volume label, then click next to format the partition.
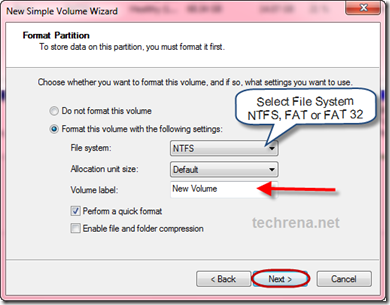
Hard Disk partition in Windows 7

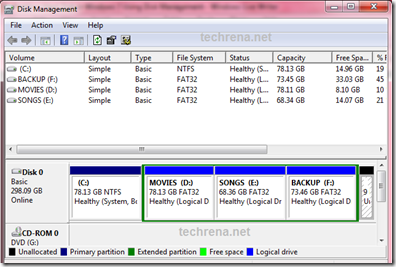
Hard Disk partition in Windows 7 After the formatting is done a new disk drive can be seen. That’s it you have successfully partitioned your hard disk drive. I have created four drives for my computer which is shown below:

Disk Management

Note: This steps will also work in Windows Vista but not in Windows XP.

Nokia 5233 Launched In India

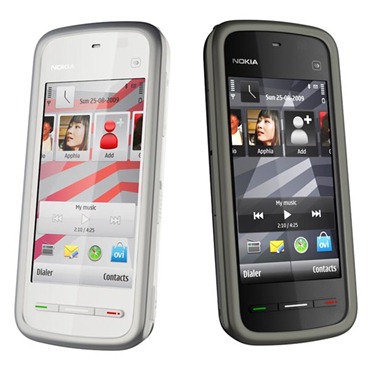
Nokia today released another touch screen Symbian series 60 music phone Nokia 5233 in India. Nokia 5233 is an affordable touchscreen mobile phone with only 2G and without Wi-Fi which are the only features different from Nokia 5230.

nokia logo

Nokia 5233 has all the other features of 5230 like full touch screen, 3.2 inch display which supports up to 16.7 million colors, 70 MB internal memory and expandable up to 16 GB, up to 33 hrs music playback time, 3.5 mm audio jack, 2 megapixel camera with 3x digital zoom and many more.

Nokia 5233

Check out the main features and specifications below:

Features Description
Touch Screen Responsive touchscreen with tactile feedback, Handwriting recognition
Display Size: 3.2 inch, Up to 16.7 million colours
Camera 2 megapixel camera, 3x digital zoom, JPEG format, CMOS sensor
Video Recording Up to 640 x 480 pixels and up to 30 fps
Music 3.5 mm stereo, file formats: MP3, MP4, AAC, eAAC+, WMA, Nokia Ovi Player, FM radio with RDS
Video Playback Supports MPEG4-SP playback 30fps VGA, MPEG4-AVC playback 30fps QVGA, WMV9 playback 30fps QVGA, MPEG4-SP playback 30 fps nHD
Memory microSD memory up to 16 GB, 70 MB internal dynamic memory
Connectors Micro-USB connector, USB 2.0 high speed, 3.5 mm Nokia AV connector
Messaging MMS, SMS, Email, Nokia Xpress audio messaging
Browsing GPRS/EGPRS/EDGE 177/296 kbps (DL/UL), WCDMA 384/384 kbps (UL/DL)
Software S60, 5th Edition, FOTA (Firmware update Over The Air)
Application OVI Music, Nokia Maps 3.0, Facebook, You Tube,Mobile Dictionary, Document viewer (Word, Excel, PowerPoint) and many more
Colors Available White/Red, White/Silver, Black/Dark silver, Changeable colour battery covers

With the emergence of low cost touchscreen phones, Nokia is trying to produce affordable ones. Touchscreen has become the trend and till now Samsung has been leading in this affordable sector. Now Nokia is targeting to capture the market with such products.

The Nokia 5233 launched today in India will be priced at about Rs 7800 (INR)

How to turn off UAC in Windows 7 and Vista

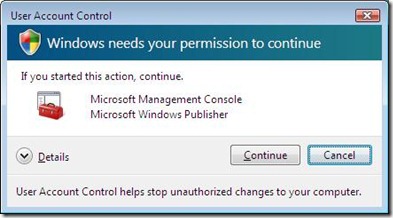
Are you getting annoyed of the permission dialogues like “Windows needs your permission to continue”?

If yes, you can easily disable these messages in Windows 7 and Vista.

This is a new security feature and can be controlled using the User Account Control(UAC) Settings.

The dialogue boxes looks like the one shown below.

You can follow the steps below and easily remove the messages every time.

Windows needs your permission to continue

If you are using Windows 7 then it is very easy.Follow the steps below:

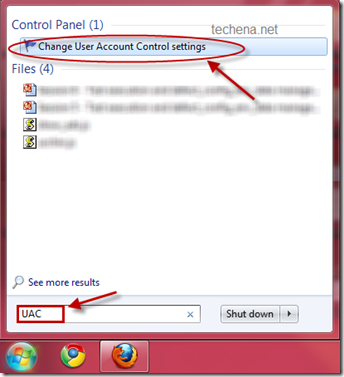
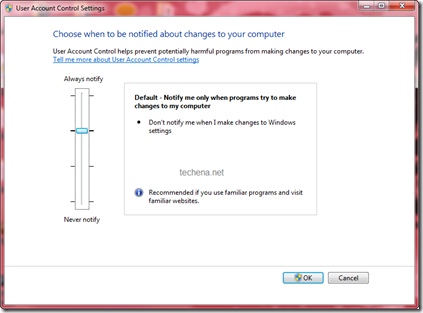
Step 1: Click Start Button. Type UAC in the search box of the Start Menu and press enter. You can see the UAC panel as shown below.

User Account Control from start menu

User Account Control Settings

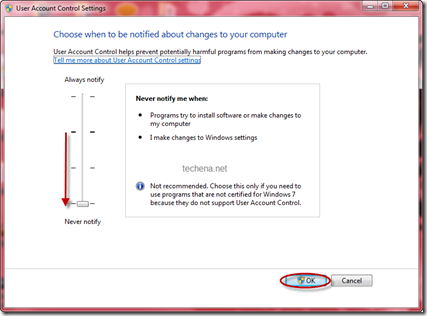
Step 2: Now drag the slide to Never notify and click OK.

User Account Control Never Notify

Now you can restart the computer and you will not see any more permission dialogues.

If you are using Windows Vista, then follow the steps below:

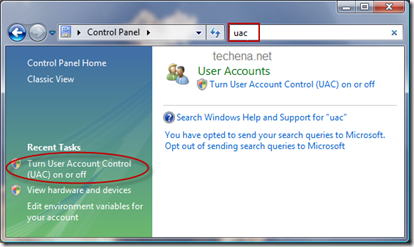
Step 1: Open Control Panel. Type UAC in the search box. Click the “Turn User Account Control (UAC) on or off” link in the left pane.

User Account Control panel

Step 2: Uncheck the “Use User Account Control (UAC)” checkbox and click OK.

User Account Control Check box

Now you can restart your Computer.

Note: Some functionalities like Windows Side Bar may stop working if you keep the UAC as Never notify. In that case you can refer this post to enable the sidebar: Enable Windows 7 Sidebar in easy steps

Nokia 6303i classic released

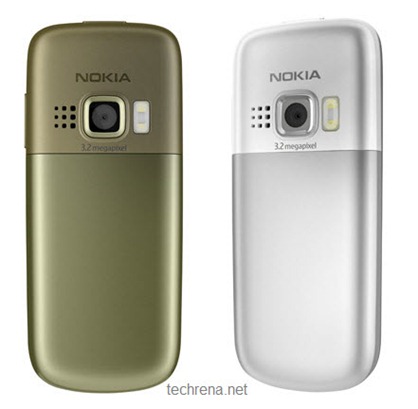
The Nokia 6303i classic has just been released today. This updated “i” version has a few enhancements and improvements to its predecessor.The main focus of this model is on its battery life. Another main thing can be its low price also, only 105 Euros.

The Nokia 6303i has  only a small update in the design to the original model which is under the bonnet. But the talk time has now been improved to eight hours and music playback up to 30 hours. And it now also supports instant messaging using the Nokia Messaging Solutions.

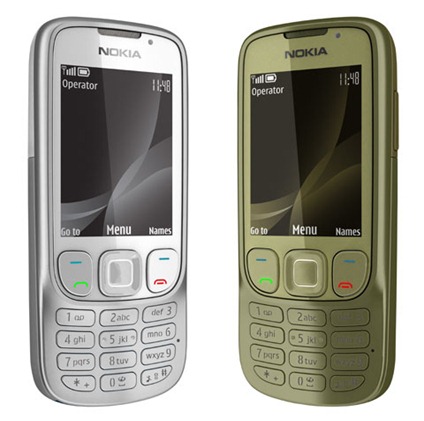
Nokia 6303i classic silver gold

Nokia 6303i classic gold silver

Review the key enhancements and specifications below:

Specification Description
Enhanced battery life Up to 8 hours talk time, up to 3 weeks on stand-by
Built-in music player and FM radio Listen Up to 30 hours of music
Camera 3.2-megapixel camera with dual LED flash, 4x digital zoom
Design Bar, Durable stainless steel design
Headset Connector 3.5mm AV connector
Memory Card Up to8GB microSD memory card, 2GB microSD included
Bluetooth Yes, Bluetooth 2.1
USB Yes, Micro-USB connector
Display 2.2-inch QVGA, Supports 16.7 million true colors
Email & Messaging email and instant messaging combined using Nokia messaging solutions
Colors Available Silver and  Khaki gold
Lower priced 105 Euros, INR 6800

It is priced at 105 Euros and Its Indian edition may cost Rs 6800 only.

Remove Google Analytics Tags In Your Blog Posts and Feedburner URL

Feedburner is an amazing tool for managing RSS and atom feeds. Many of us use this service for burning our own feeds, may be from our own sites and blogs.  We can also use the email subscription feature and integrate the feeds with Google Adsense.

feedburner logo

Recently Feedburner has enabled Google Analytics to analyze the feeds, clicks and track them.  But when we use this feature to track the feeds, we have found out one problem. We had enabled this feature in our Blog and the URLs of our posts included the Google Analytics tracking tags like “utm_source=feedburner &utm_medium=feed &utm_campaign=Feed%3A “ . An example of such URL can be seen below:

Original URL:

http://www.techrena.net/internet/google-nexus-one-launch-jan-5-price-530/

URL indexed in Google after enabling tracking:

http://www.techrena.net/internet/google-nexus-one-launch-jan-5-price-530/?utm_source=feedburner&utm_medium=feed&utm_campaign=Feed%3A+TechrenaDotNet+(TECHRENA+dot+Net)

There are some problems incorporated in such kind of URLs. The main problem is that the Search Engine Optimized(SEO) URL has been changed and indexed. Another thing is that duplicate URLs of the same content may be indexed and your Google ranking may decrease or may stop crawling of your posts.  It may lead to a broken link also.

SOLUTION:

The solution is very simple. Follow the steps below:

Step 1: Login to Feedburner.

Step 2: In the Analyze tab, click Configure Stats

feed burner configure stats

Step 3: Uncheck the Track clicks as a traffic source in Google Analytics Check Box

feed burner track clicks

Step 4: SAVE it.

Now you have successfully disabled Google Analytics tags in your post URLs.

If you are done with this, you can read our previous post about finding number of email subscribers to your feeds.

Is Google Chrome OS Virus Free? A Review

It has been a very exciting news for all of us with the announcement of the Google’s first Desktop Operating System last week. This has been filling up good hopes for all of us as this OS is said to be free, I mean Open source. Moreover the Google Chrome team has claimed it as virus free. We will check the validity of their claim and will this OS will be a hit or will be lost in the air in the near future.

Chrome OS

Google has already launched the light weight Chrome Browser nine months ago. They have claimed that already 30 million people are regularly using it. Google Chrome OS will be an open source OS which will be available for consumers in the second half of 2010. But they have not made the code open source yet. It seems the code will be available for us later this year.

Well coming to the point we will have a brief discussion whether it is going to be possible to make a virus-free Operating System. Well we have different views over this one. Some say that this claim is idiotic and it is not possible to make a virus-free OS. Others claim that it may be possible that if we take into account the various security concerns in the developing stages.

In my opinion, if Google has been redesigning an operating system from scratch, taking security into account all the way bottom up, they could make for a more secure OS than ones that  have been developed so far. As they have promised that users won’t have to deal with viruses or malware, we have to assume that they have addressed all the security concerns. Anyhow we have to hope for the best. Well nothing can be labelled virus proof but lets hope that the Chrome team is making the OS more tougher to be attacked.

Another thing is that this will be available for free to everyone and everyone can take part in the development process. The Chrome team has intimated that after the release of the source code later this year they are looking forward to work with the Open Source community and make the OS better to be used. We have been told that the Google Chrome OS team is currently working with a number of technology companies like Acer, Adobe, ASUS, Freescale, Hewlett-Packard, Lenovo, Qualcomm, Texas Instruments, and Toshiba.

Well talking about the coming OS and its future, there are a lot of tough competitions to be taken care of. The OS giant Microsoft had already seen Google as a potential threat when it emerged a decade ago. They have been trying to beat Google and introduced Live search, now Bing! In order to survive in the market they need to make better products, name and provide better services than others. Seeing the current condition like Google had recently taken off their Beta tag off the Non search services, the OS will also be available to us for testing like Beta. But testing an Operating System in the Beta format is not an easy job over web services.

To summarize, there are a lot that can be done in an OS to reduce the threat of viruses and malwares. If the Chrome team started from scratch and took security seriously all through the design and development process, they have to potential to develop something really secure. And if they have done so, and they have developed a n OS really secure then I am sure that their effort will never go to vain whether the competition is tough or not.

NVIDIA GeForce Windows 7 Drivers Download

The Windows Aero experience you expect in Windows 7 is definitely not going to work if you are not installing the right drivers for your NVIDIA GeForce Graphics present in your computer. For this purpose NVIDIA has released a driver for your GeForce. The released Driver is GeForce Driver Release 181 Beta released on March 02, 2009. This is expected to work well for Windows 7 Beta. But some people are facing some problems with the Windows 7 RC (Release Candidate). Moreover the GeForce Versions for Laptops and Tablet PCs are not supported by this 181 driver, like the GeForce 7400. Anyhow I am going to address the solution below.

If you want to download the GeForce Driver 181 Beta, then you can see the link below. But before see the Products Supported list to know whether your product is included or not.

Download windows 7 nVidia 181.71 driver

Anyhow even if you have installed the driver or not, please perform the steps below to update the driver you are using.

Step 1: Go to start, type Update in the Search box and open Windows Update.

start windows update

Step 2: In the Windows Update page click the optional Update link.

windows update

Step 3: Now select the nVidia Driver update available and click OK to download.

nvidia update

If the Update is not shown then you can click Check For Update in the Windows Update page.

After downloading install the updates. You may need to restart the system for it to work. Hope this solves the problems for your graphics in Windows 7.

Intel Processor Identification Utility – Know Your Intel Processor

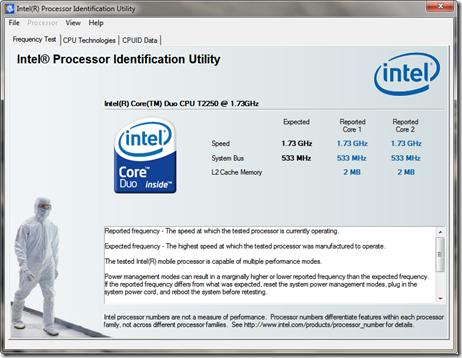
How much do you know about the Intel processor you are using in your computer? Well here I am suggesting a useful utility software from Intel itself which will help you find out the properties of your processor and its capabilities. Intel PIU Just download the software from the Intel website given below. Install it to your system and start the program. http://www.intel.com/support/processors/tools/piu/ Intel PIU Frequency Test

The first thing it shows is the frequency test. In the above image I have used a sample T2250 processor. The expected frequencies are the ideally laboratory tested ones. The reported ones are the currently operating ones.  Sometimes we can find that the expected and the reported may differ in some points. If the difference is more then you need to go for servicing.

Intel PIU Technologies

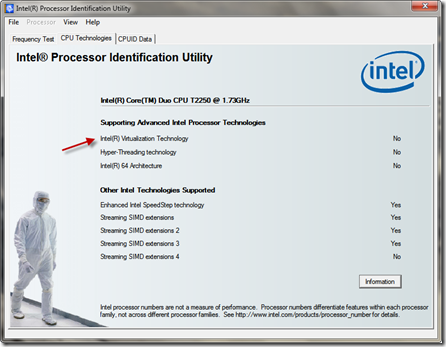
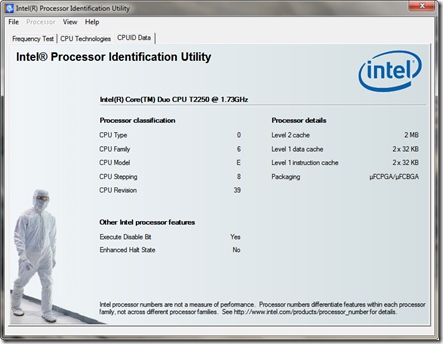
The next tab will show you the advanced technologies that are integrated to your CPU.  The Intel Virtualization technology is needed for running virtual Operating systems. Well if you are planning to install Windows 7 RC version and running Virtual XP then this technology is needed. It also shows the total number of streams of Simple Instruction Multiple Data extensions present in your CPU. Intel PIU CPUID DATAThe last tab shows you the details and features of your CPU. The capacity of your Level 1 and Level 2 Cache are shown. The other details can also be noted. At last you can even save the details of your CPU to a text file. The thing why I thought of writing this post is that many of us are naive about our processors and expected it to run in the expected details. But we can find out more like the CPU BUS speed, Virtualization and HT technologies which are very much required when some critical operations are to be done.

Install Windows XP in Vista Installed Computers

Installing Windows XP in a computer which is installed with Windows Vista has been an issue. Some of the laptops which are pre-installed with Vista have problems downgrading to Windows XP. As many users are familiar with Windows XP and prefer XP to Vista, downgrading is needed.
If we simply insert the Windows XP Installation CD and try to install Windows, we get this error:

Setup did not find any hard disk in your computer.

Setup did not find any hard disk in your computer

This error is due to the AHCI Sata drivers which are not present in the Windows XP Setup CD.

This problem can be solved in two ways:

Method 1: (Disable Sata Native Support )

If your BIOS Setup has the Disable Sata Native Support option then it can be solved easily by disabling the feature. You can follow the Guide given here for performing this procedure:

How to install your own Windows XP in Laptops

Method 2: (Using nLited Installation)

Some of the laptops do not have the Disable Sata Native Support option. In that case the only way to install is to integrate the AHCI Sata drivers to your Windows XP installation disk. For this you need a freeware called nLite to integrate the components The full procedure and the sata drivers are given here:

Integrate your own drivers in the Windows installation CD using nLite

Once you have nLited your XP CD then it can be used for Computers which may be having sata support or not.

How to Download Video From YouTube in Google Chrome

Google Chrome is becoming popular day by day with the increasing features of customization and user scripts. Using GreaseMonkey in Google chrome is also possible in the newer Version from Google Chrome 2.0 onwards. As for now it stands in the 4th position in popularity.

We know that  to download videos from YouTube is much easier in the case of FireFox, thanks to the number of wonderful add-ons available, but how can we actually do this if you are using Chrome browser, come let’s get into it.

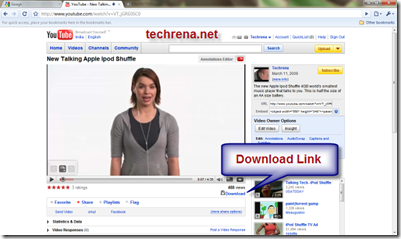
Here we are going to see another user script customization technique for Google Chrome. Everybody uses YouTube for video sharing and all. Now if we want to download the video from YouTube in Google Chrome, we can keep a download link for each video in YouTube. This will download the video in flv format.

YouTube Video Download in ChromeTo Enable the Download Link in YouTube follow the steps below:
Step 1: If you have not enabled GreaseMonkey User Scripts feature in Google Chrome then Enable it using the Guide: Enable GreaseMonkey User Scripts in Google Chrome

If you have already enabled Grease Monkey then skip Step 1.

Step 2: Download the DownloadYoutube.user.js file from the link below: (Right Click and Select Save Link As)

Size: 2 KB

http://www.techrena.net/downloads/Grease%20Monkey/DownloadYoutube.user.js

Step 3: Save the DownloadYoutube.user.js file in your computer location given below:

Windows XP Users:

Documents and Settings\%userprofile%\Local Settings\Application Data\Google\Chrome\User Data\Default\User Scripts

Example: C:\Documents and Settings\DENNIS\Local Settings\Application Data\Google\Chrome\User Data\Default\User Scripts

Windows Vista and Windows 7 Users:

Users\%userprofile%\AppData\Local\Google\Chrome\User Data\Default\User Scripts

Example: C:\Users\DENNIS\AppData\Local\Google\Chrome\User Data\Default\User Scripts

YouTube Video Download in Google ChromeAfter successfully saving the file, open any YouTube Video. You should get the Download Link as shown in the image above.

Important:

1. This method is possible only if you have Google Chrome version 2.0 or higher. To install the Newer version go to: Download Google Chrome 2.0.172.2 Beta Open Source Web Browser

2. It is compulsory for you to enable GreaseMonkey User Scripts for this method to work.

3. You need to show hidden System files and folders in order to find the Application Data folders in Windows Explorer. Otherwise you cannot see them.