Windows 8 Pro Download, Upgrade, and Clean Install FAQs

In my last post you had seen how to download the newly released Windows 8 Pro version from Microsoft. Yes, there are a lot of other question on how do we install it etc. But first of all let me clear some questions which I had in my mind for all of you to see.
Will Microsoft allow Installation of the Upgrade version to any other PC instead of the Windows PC you used while buying the Upgrade key?

YES! Well it is very good in the part of Microsoft that they allow you to keep both Windows 7 and Windows 8 PCs! The FAQs in the Upgrade Offer page says:

“The upgrade offer is tied to a Windows 7 PC purchased between 2 June 2012 and 31 January 2013, but you can choose to redeem the offer and install the upgrade on any compatible Windows-based PC with a qualifying base operating system.”

The last part says “with a qualifying base operating system.” Well this is not necessary when you go for a clean install using the backup media. FYI, the base operating systems Microsoft is talking about is Windows XP, Vista, and Windows 7

Selecting “Keep Nothing” while running Windows 8 Upgrade program mean Clean Install?

NO. Clean install means installing the Windows to a formatted partition, meaning there will be no Data present before. “Keep Nothing” is an option during the Upgrade install where none of your Apps or files will be retained while Upgrading to Windows 8 from your previous Windows.

I selected Keep Files or Keep Apps instead of Keep Nothing while purchasing the Key. Will I be able to do a clean install from the backup media?

YES. Those options are valid only if you upgrade using the Windows 8 Upgrade program. Once you choose to create media instead of Install, those options are no longer  relevant.

I want a 64-bit Windows 8 Pro, but my eligible PC is running 32-bit Windows. Will I be able to get and Install a 64-bit with the upgrade key I purchased?

YES. The upgrade is common for both 32-bit and 64-bit, meaning it works for both. You can download a 64-bit Windows 8 Pro with your key but only from a 64-bit Windows PC. This is because the Upgrade/Setup program will downloads the version which is only compatible to your Base OS. You can follow my last post on How to download Windows 8 Pro.

If you have any other questions while Installing or upgrading to Windows 8, do let me know. Just leave a comment below.

[How To] Connect Your IDE PATA HDD, CD/DVD Drive to SATA Motherboard and Vice Versa

We all used the Parallel ATA (PATA) Hard Drives or Optical Drives with the IDE interface. With the rapid advancement of technology, currently we shifted to the Serial ATA (SATA) Drives which does not require the IDE Interface and which have faster data rates. This means that all our IDE HDDs, Optical Drives etc. are obsolete to the current world. But, do you need to throw it or dump with your Old Desktops?

The answer is no! Your old 40GB, 80GB HDDs can be still useful now. Here we will show you how to interface these obsolete devices to your brand ne computer using a very cheap interface available in the market.

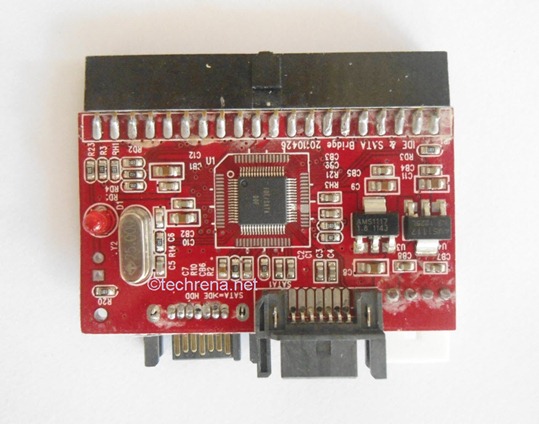
All you need is the device shown below. It is the “IDE to SATA” or “SATA to IDE” 2 in 1 Converter. It is easily available in the market. You can find one in eBay or Amazon for less than 5 bucks.

IDE to SATA Converter

Connecting Old PATA HDD or IDE Optical Drives to your new SATA Motherboard


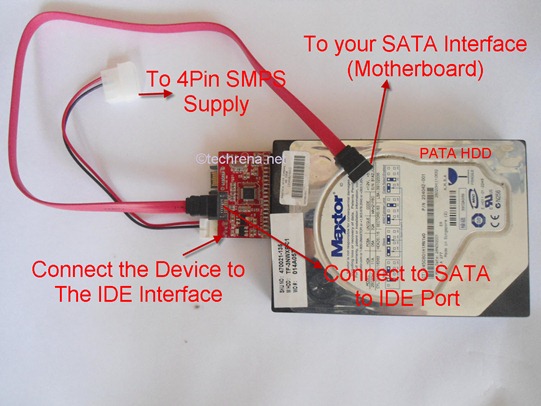
Suppose you have a PATA HDD with IDE Interface, Then connect the IDE interface (Female) to your HDD’s Male interface. Connect the power supplied to the standard 4 Pin supplied. Connect the SATA interface cable to the SATA to IDE marked port in the device. The other end of the SATA cable to your CPU’s motherboard. That’s it, now use can use some extra disk space instead of throwing the HDD. The connection process has been shown as follows.

SATA-to-PATA-HDD

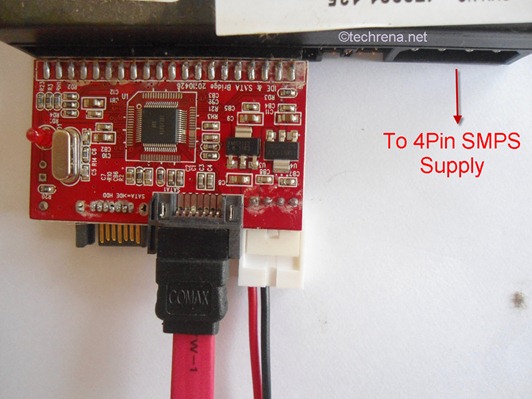
Make sure you do not forget the Power supply to the drive.

SATA-to-IDE

The same procedure is applied for Optical drives too.

Connecting new SATA HDD or Optical Drives to your Old IDE interface Motherboard

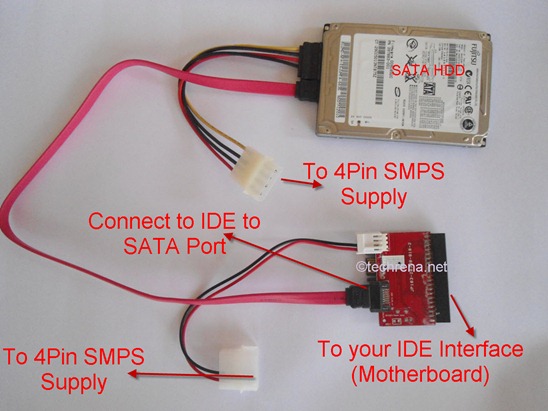
What about the reverse, that is if you have a SATA HDD and you want to connect to your OLD Computer? Then connect the IDE interface (Female) to your Motherboard’s Male interface. Connect the power supplied to the standard 4 Pin supplied. Connect the SATA interface cable to the SATA HDD and the other end to the device’s port marked as IDE to SATA. That’s it, now use can use some extra disk space instead in your old Computer. The connection process has been shown as follows.

IDE-to-SATA-HDD

Note: Please turn off your Computer completely, i.e. even the power plug is to be disconnected in order to prevent any hazard or damages.

We hope you have found this post useful. Like us on Facebook or leave a comment!

[How To] Schedule Emails in Gmail with Boomerang

I would say Google’s Gmail is the best email service. We do not need any introduction to Gmail here.

Well, if you use Gmail this is going to be an interesting post. Here, I am going to write how to schedule your emails. Means you can send or receive your mails at a particular time set by you in prior. Let me explain how it is going to be useful. Say one of your good friend’s birthday is coming and you do not want to miss wishing him. So how do you make it 100% sure that you wish him at midnight? Just write a beautiful email and schedule it to the time you want it to send using Boomerang for Gmail.

Boomerang-for-gmail

Boomerang is an add-on for Firefox and Chrome which lets you to schedule the emails in Gmail.  Follow the following steps to install it and schedule the mails.

Step 1: Download Boomerang. Click the Install Boomerang button below.

download-boomerang

Step 2: Click on Allow Button to install the Add-on. If you are installing on Chrome, Click the Continue button in the left lower corner of the window. (Click to enlarge the image below).

Install-boomerang

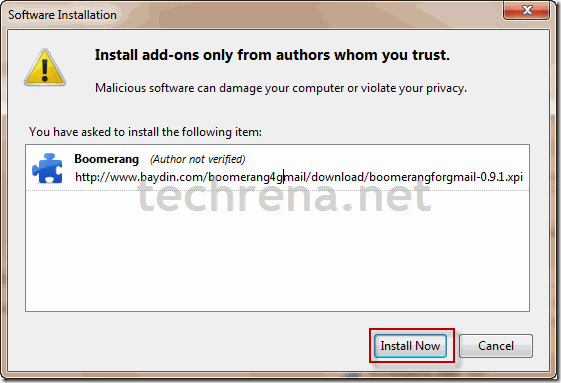
Step 3: Click on the Install Now button to install the add-on.

install-now-plugin

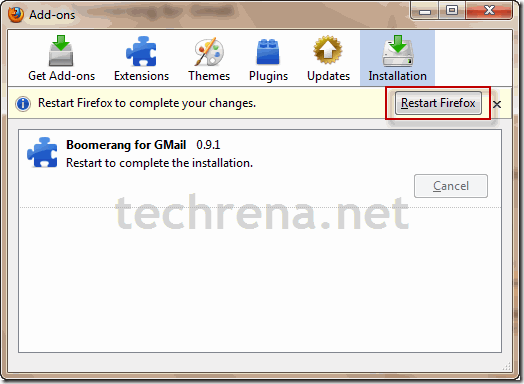
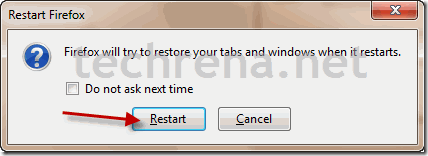
Step 4: After installation, it will ask you to restart the Browser. Restart the Browser to use the add-on.

restart-firefoxrestart-firefox-window

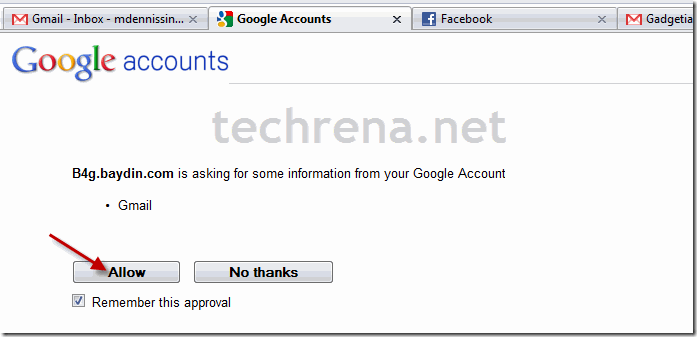
Step 5: Now after restarting the browser Google will ask you if you want to share information to  Boomerang. Click on allow.

allow-information

Step 6: Now you should be able to see Boomerang on the top right corner.

boomerang-installed

As Boomerang is finally installed you can schedule your emails. As follows:

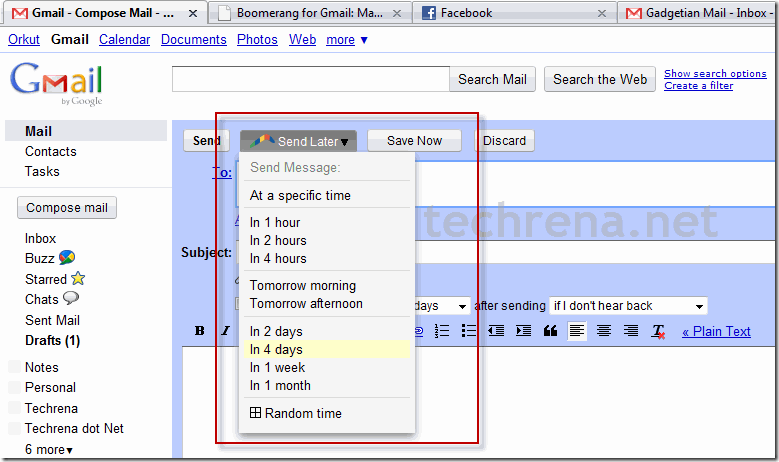
To send a mail at a scheduled time, click on Send Later Button and select any time.

send-email-later

If you select At a specific time, you can enter the exact time and date.

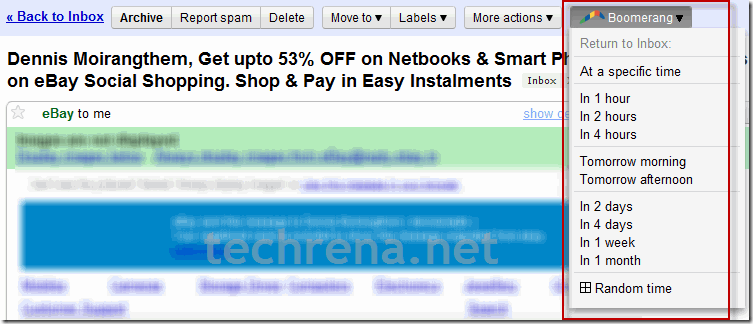
To re-receive an already received mail, click on Boomerang after opening the main and select the time you want it to return to your inbox.

return-to-inbox

I hope that this add-on will be really helpful for all of us.

Download HP Media Card Reader Drivers for Windows 7

Well I have a HP Pavilion dv-5000 series notebook PC. There has been a problem since I had upgraded from Windows XP to Windows 7. The problem is that, my Media Card Reader is not working. I have been trying to find the driver but all in vain, until today.

I have downloaded the driver from HP Website, where they have given the driver is meant for Windows Vista. Well I have tested it in Windows 7 Ultimate and it works perfectly fine.

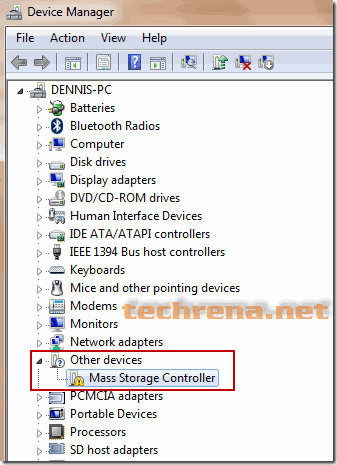
The problem I faced looked like this:

Mass Storage controller

There it is seen that, in Computer Properties->Device Manager->Other Devices, The Mass Storage Controller Driver is missing. The Automatic Driver update eventually fails.

The Solution steps are as follows:

1. Download the Texas Instruments Media Card Driver from the link given below:

Operating System: Windows 7 32 bit
Tested in HP dv-5200tx
Size: 6.31MB
Link: Click here to Download from HP

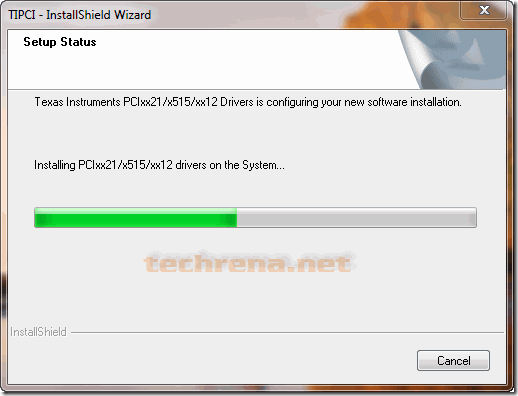
2. Install the driver.

install-texas-instrument-pci-drivers

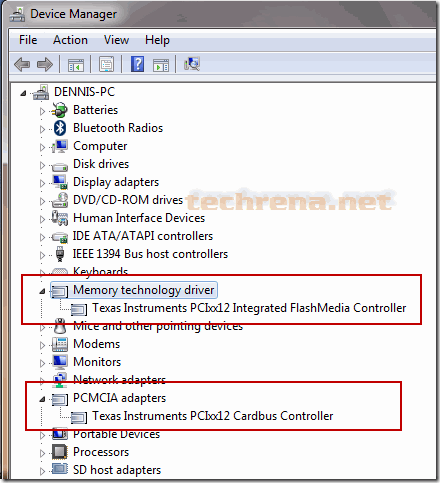
3. Now check the Device Manager. The Missing Driver in Other Devices should be gone. The Texas Instruments PCI Devices should be visible.

texas-instrument-card-bus-controller

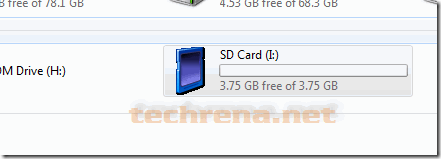
4. Test by inserting a compatible card to your reader.

HP-card-reader

Hope this will solve your card reader problem in your HP Laptop.

[How To] Create a Shortcut To Clear Your Clipboard

Whenever you copy anything while using your computer,  the computer uses a special place known as Clipboard to place the data. Suppose you copy some text from a text file, the information(data) gets copied into the Clipboard. Then when you paste the text to your desired location, the data is transferred from your clipboard. The clipboard is used for any type of copy action done.

Now, you have copied some data and hence it is now present it in your computer’s clipboard. Suppose the data you are handling is a sensitive one and hence you don’t want to leave any trace, even in your clipboard. So how do you do it? Here is the simplest answer known.

Steps to create a shortcut to clear your clipboard:

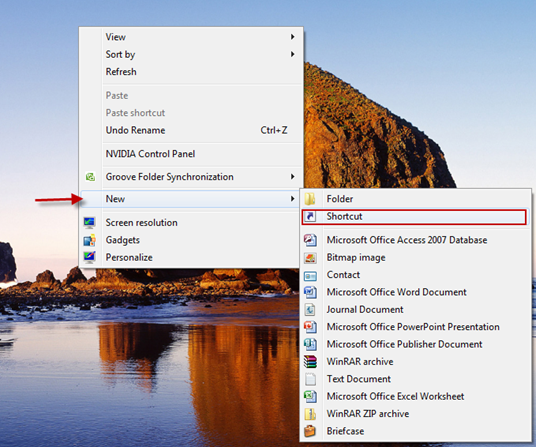
1. Right click on your desktop, go to New—>Shortcut.

Create a Shortcut

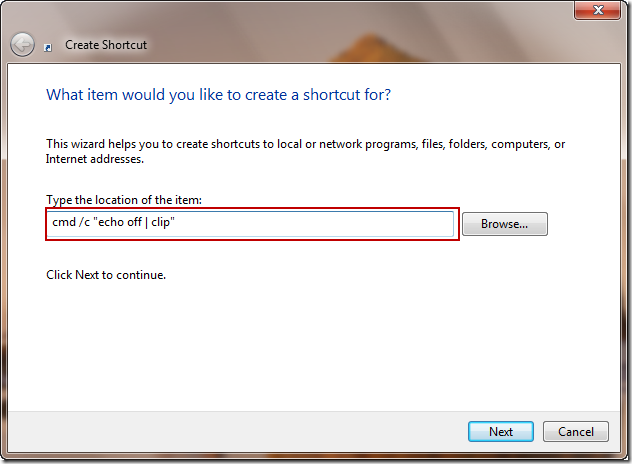
2. In the New Shortcut window, Type

cmd /c "echo off | clip"

and press Next

Clear clipboard shorcut

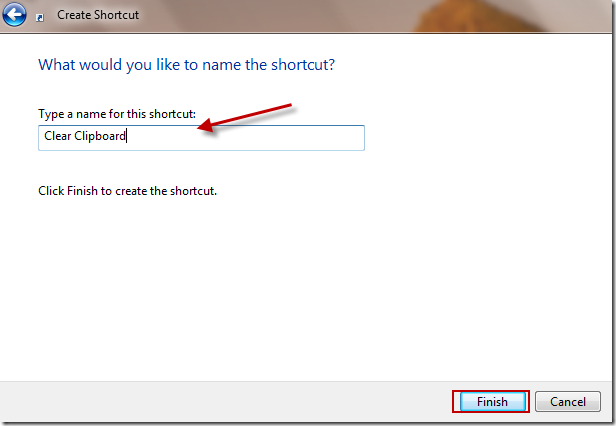
3. Type in a Shortcut Name of your choice and Finish.

Shorcut name

Now you can click on the shortcut anytime you want to clear your data off the clipboard.

[Tip] Remove System Volume Information Folders

System Volume Information: Is it really a virus?

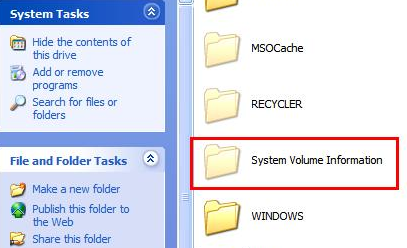
Myth: System Volume Information is a virus and it suddenly appears in your Windows XP computer and it doesn’t let you open its contents. It may have virus or suspicious files within it.

System Volume Information in Windows XP

Fact: System Volume Information (and even “Recycler”) folder is a standard Windows folder. System Volume Information folder stores the restore points data and the Recycler folder belongs to the Recycle bin. So first up, you don’t need to delete them and treat them as virus. These files do exist in later versions of Windows too. Here’s the proof: (Windows 7 screenshot)

System value information folder in Windows 7

These are system folders and are hidden by default. They will show up once you change the settings under “Folder Options’ to show the hidden system files and folders.

Thankfully Windows (Vista, Windows 7) doesn’t give you access to this folder so that averts any probable mess up if at all you access them and change the files inside it. Having said that , a virus can work around this and gain access to this folder to corrupt the restore points and create some .exe files inside it.

So to remove (actually to hide) the folder, just change the settings back in the folder options to not to show hidden system files and folders. However if you still insist on removing the System Volume Information completely (highly not recommended), here’s what you have to do:

Windows XP:

1. Right-click on My Computer and select Properties.

2. Click on the System Restore tab.

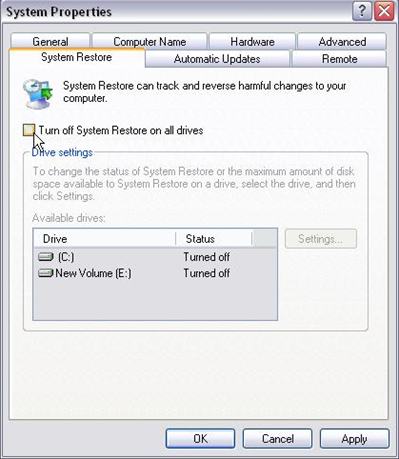
3. Click the Turn off System Restore on all drives check box and click OK.

Turn off System Restore

Windows 7 & Vista:

Read the How to disable System Restore in Windows 7 post written here at Techrena.

[How To] Remove The “Test Mode” Watermark From Windows 7

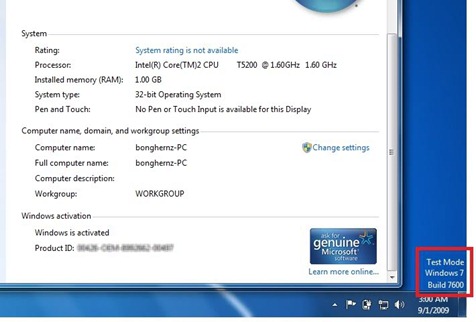
Test Mode Windows 7 Watermark

Legitimate Windows 7 users who are using the original and activated copies of Windows 7 versions are lately getting kind of weird “Test Mode Windows 7 Build 7600” watermark/message on the bottom right corner of their desktop just above the time zone area in the taskbar. This is really annoying as it appears suddenly anytime, users hardly knowing anything about the reason why it’s being showed up.

This message may appear when you follow one of the methods to disable driver signature checking in Windows 7. While implementing the method you may accidentally use the following commands

bcdedit.exe -set loadoptions DDISABLE_INTEGRITY_CHECKS

bcdedit.exe -set TESTSIGNING ON

and these commands are found to cause this problem. Having known the cause of the problem, we just need to do the reverse (enable “Integrity_checks” and set “Testsigning” off). Let’s see the full solution to disable this message on your Windows.

Solution:

1. You need to first run the command prompt as an administrator before you could proceed to the next steps. Refer to this old post at Techrena to know how you can run the command prompt program as an administrator.

2. In the command prompt window type the following command

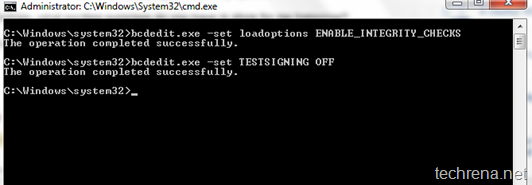
bcdedit.exe -set loadoptions ENABLE_INTEGRITY_CHECKS

and press enter and you must see “the operation completed successfully” message

now enter the following command and hit Enter again

bcdedit.exe -set TESTSIGNING OFF

and again you should get the same above success message. Refer to the screenshots posted below:

removing test mode cmd

3. Reboot your Windows and see the changes, the “Test Mode Windows 7 Build 7600” watermark disappears. That’s all.

[How To] Type The Rupee Symbol Using Your Keyboard

Indian_Rupee_symbol

With the release of the Rupee symbol (`), everyone in India is excited and curious of how to use this new symbol. Well, here we are suggesting a unique way of how to type this new symbol using your keyboard.

With the release of the Rupee font by Foradian Technologies, it is easily possible to type the new symbol in your computer.

Follow the simple steps below:

Step 1: Download the Rupee font from the link below:

Download: Rupee Font Version 2

Size: 60KB

Step 2: Copy the Rupee_Foradian.ttf file from the location you have saved.

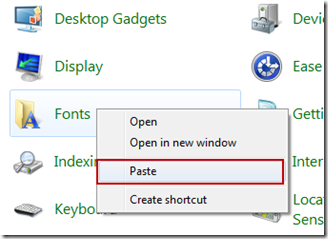
Step 3: Go to Control Panel with non category view. Find Fonts, right click and paste. The font gets installed automatically.

install_font

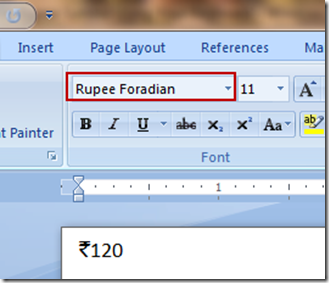
Step 4: Now you can use the ‘~’ key which is in the left of ‘1’ key to type the font. First, whenever you want to type the Rupee symbol, change the font to Rupee Foradian and press the ‘~’ key without shift.

type_rupee_symbol

After typing the symbol, you can change the font to the normal one. We are hoping that this symbol is included in the keyboard soon. Hope you have got to know how to type it now at least for the time being.

[How To] Disable or Enable Registry Editor In Windows 7

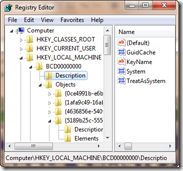
regedit

With viruses trying to attack your system and change the registry, why don’t we try disabling the registry editor now itself before the viruses do it?

Yes, this question is a clear one and why don’t you disable the registry editor by yourself before someone changes your registry and mess with your computer.

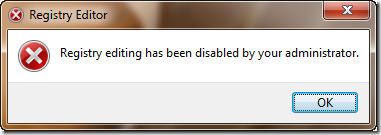
regedit_disabled Well we have a lot of methods to disable or enable the registry editor. Some of the easiest ones are given here.
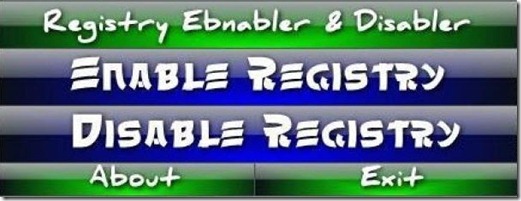

1. Disable or enable Registry Editor using Registry Enabler & Disabler 3

Registry Enabler & Disabler 3 is a freeware which can be used to enable or disable Windows Registry editor. It is a safe program.

Download: Registry Enabler & Disabler 3

Size: 276 KB

Registry_Enabler_Disabler_3

By using this program, you can directly enable or disable the Windows registry editor.

2. Disable or enable Registry Editor using Local Group Policy Editor

Press Start + R and type gpedit.msc and press Enter.

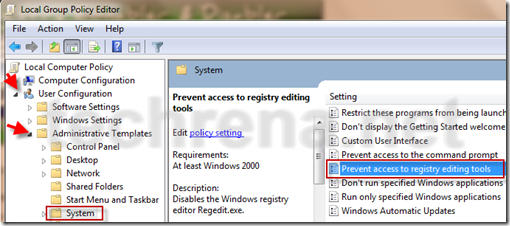
In the Local Group Policy Editor go to the location:

User Configuration—> Administrative Templates—> System

Under System, find Prevent access to registry tool. Double click on it and set Enabled to disable access to registry editor.

disable_registry_editor

Set it to Disabled to enable access to Registry Editor.

Note: Local Group Policy Editor which is not available in Home versions of Windows

3. Enable Registry Editor Using VBS script.

This method is given in techrena.blogspot.com. To read more visit:

How to enable Registry Editor (REGEDIT)

You can subscribe to our RSS feed via email for more tutorials under Solutions.

[How To] Remove Trojan.Vundo.H or Vundo.H Virus

danger

Trojan.Vundo.H also known as Vundo.H is a back door trojan horse program  that will activate corrupt infected local and network computers and download further malware programs onto the system. The Trojan.Vundo.H trojan horse is considered at severe security risk that can alter registry files and radically slow down computer speed.

Though popular anti-virus programs like AVG can detect the virus, it is found that some special anti-spyware program is needed to remove this virus application

Trojan.Vundo.H  infects and alters certain registries which include:

* HKEY_CLASSES_ROOT\CLSID\{39458c53-4dae-471a-a480-e3bc0b1d7dd9}
* HKEY_CLASSES_ROOT\CLSID\{65d46614-611d-4af2-aa13-a34fc317a96e}
* HKEY_LOCAL_MACHINE\SOFTWARE\Microsoft\MS
* HKEY_LOCAL_MACHINE\SOFTWARE\Microsoft\dslcnnct

Some of the known infected files by Trojan.Vundo.H are given below:

* C:\WINDOWS\SYSTEM32\ugohwe.dll
* C:\WINDOWS\SYSTEM32\subapade.dll
* C:\WINDOWS\SYSTEM32\edapabus.ini
* c:\WINDOWS\SYSTEM32\voriyeji.dll
* C:\WINDOWS\SYSTEM32\pefedamu.dll

Removal of Trojan.Vundo.H program:

It is very difficult to remove the virus program manually, though it is possible. To monitor the activity and registries of the program we can use Hijack this. To know more follow step 2 in this post.

After a detailed research we have found that this spyware virus can be removed using the spyware program: Spyware Doctor with AntiVirus 2010 for Windows. You can download the program from the link below:

Download: Spyware Doctor with AntiVirus 2010 for Windows

Size: 34.9 MB

Run a full scan and remove the Virus files.

You can subscribe to our RSS feed via email for more tutorials under security.