How to Take Ownership and Grant Permissions to a File or Folder In Windows 7 or Vista

There are certain Files and folders in Windows that we cannot access, modify or delete. Such kind of files are system files which have limited access rights to the users.

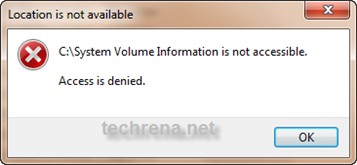
But sometimes we need to access some files or change some file according to our need. Such an example is System Volume Information. This folder is not accessible but if we want to know how much size its taking and what files are there inside, we have to take ownership and grant access to this folder. Another example is with the mfpmp.exe file of Windows Media Player which users like to delete for problems with subtitles and all.

permission denied

So, here we have given the easiest way of taking ownership and granting full access to the files and folders in Windows 7 and Vista.

Method 1: Using Command Prompt. (Preferred One – easier)

Step 1: Open Command Prompt in Administrator Mode. Press Start + R,

Type cmd and Press Ctrl+ Shift + Enter.

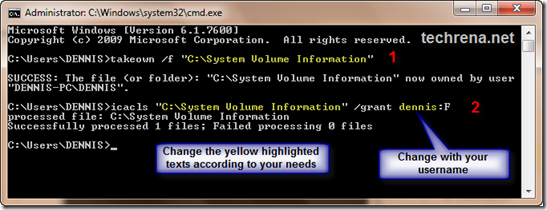
Step 2: In the Command prompt type takeown /f “location path +file name or folder name”. See the example below:

Step 3: Again type icacls “File or folder path and file name” /grant <user name>:F. Example:

This will look like:

take ownership of a folder

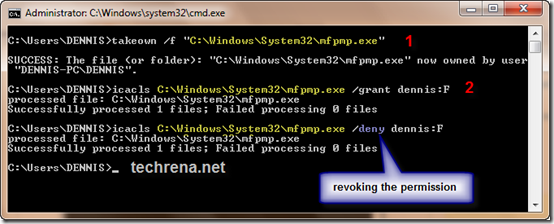
Same thing for a file. Below example is for mfpmp.exe.

take ownership of a file

To revoke the permissions just replace the grant with deny.

Note: If you have a space in Between your User name then put “”. Example:

icacls  “C:\\System Volume Information” /grant “Techrena dot Net” :F

Method 2: Using the properties menu.

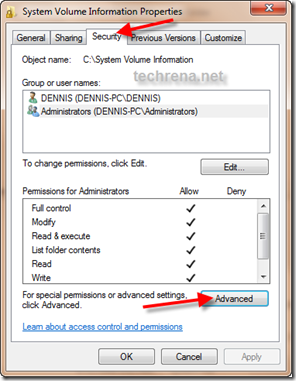
Step 1: Right Click on the File or Folder you want to own and select Properties.In the Properties go to Security Tab from General Tab. Then Click On Advance.

Take_ownership_setting_properties

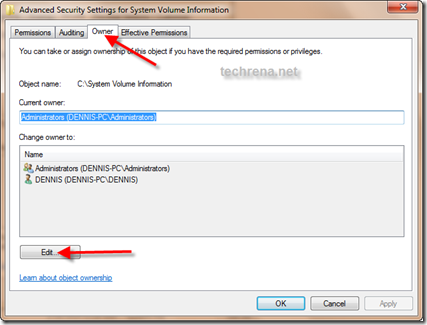
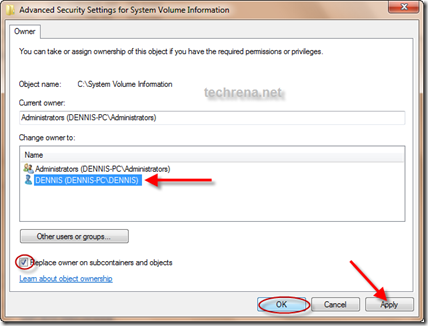
Step 2: In the advanced menu go to Owner tab, Click on Edit. Select your Username. If you want to own the Subfolders and files then Check the box. Click Apply and then OK.

edit_ownership

select_owner

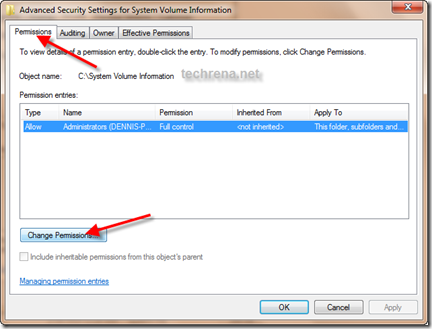
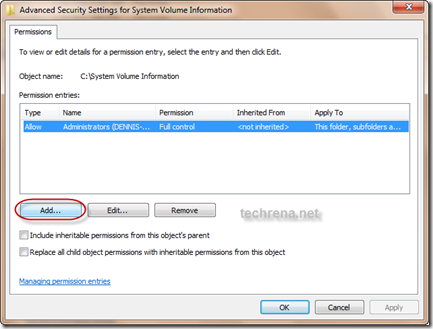
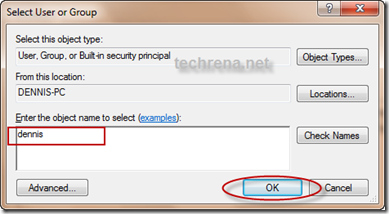
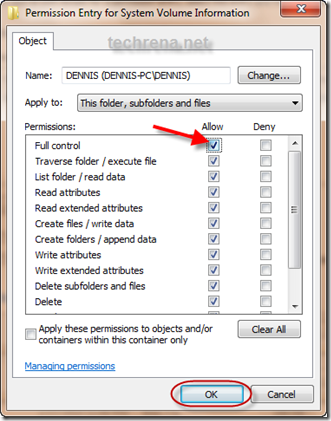
Step 3: Not to grant the permissions, Go to Permissions Tab. Click on Change Permission. Then Click on Add..Type your username and click OK. Now, it will show the Permissions Entry menu.  If you want Full control(Edit, Delete, Modify) then Check Full, else select the permissions you want. and click OK.

Chang_ File_Access_Permission

Add_user_permission

Type_username_permission

Selct_permission_type_fill_modify_read

Now you have successfully completed taking ownership of a file or a folder. You can do whatever you want with the file or folder.

Important Note: Please be careful with the System Volume Information folder. It was given here just as an example. Do not modify any permission to this folder as it contains all your system restore information. If you have changed to see the files, then please revoke the permissions after you are done. Any changes in the folder may lead to unwanted results especially in case of virus attacks,

Install Windows 7 or Vista Using Bootable USB Disk Drive

Installing an operating system to computers that don’t have an optical drive has been a problem. For example, if we want to install Windows 7 in netbooks like ASUS Eee PC, Dell Mini Netbooks, Acer Aspire One, HP Mini 1000 etc. , then we need to use a bootable pen drive to install it. With the release of the full version of Windows 7 and its gaining popularity, many people have decided to go for Windows 7 over Vista.

windows7_logo

Well the method given here is one of the easiest techniques known which does not need any kind of download and the clear screen shots have been given. The advantage of using this method is that, the whole process of installation finishes in lesser time than installing via an DVD.This method will also work for Windows Vista Installation. But if you want to install Windows XP using a flash drive then you can refer to this post: Install Windows XP from USB Disk Drive. Now lets Start.

Requirements:

1. A USB Drive of minimum 4GB space

2. Windows 7 installation DVD or ISO file (Back Up will also do)

Before starting, plug in your USB drive into your system.

Step 1: Open Command Prompt as Administrator. ( Press Start + R, then type cmd and Press Ctrl + Shift + Enter OR In the Start menu type cmd and Press Ctrl + Shift + Enter )

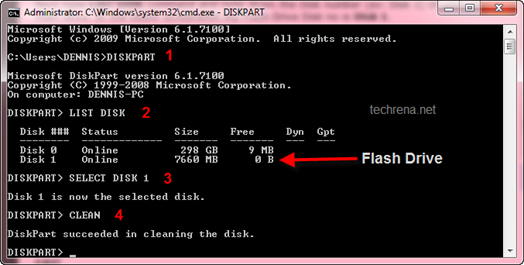
Step 2: After opening Command Prompt, Type the two commands below:

DISKPART

LIST DISK

Windows 7 install from usb

Step 3: Now you can see the disks present in your system. See the disk number for your drive. In my case the number is Disk 1. Enter the Commands below replacing the disk number with yours.

SELECT DISK 1

CLEAN

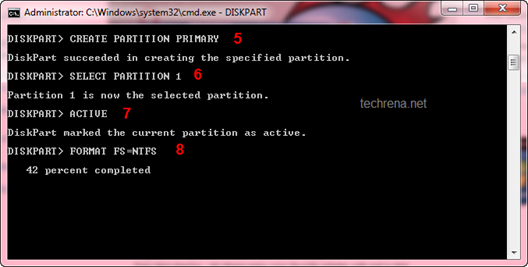
CREATE PARTITION PRIMARY

SELECT PARTITION 1

ACTIVE

Windows 7 install from usb

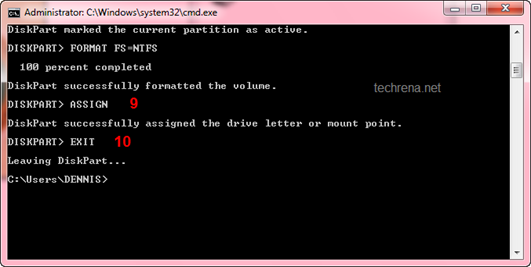
Step 4: Now we need to format the disk and then exit. It may take few minutes. Type the commands one by one:

FORMAT FS=NTFS

ASSIGN

EXIT

Windows 7 install from usb

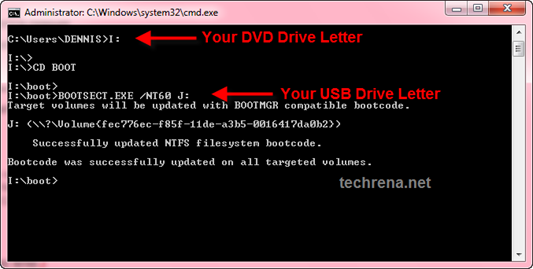
Step 5: Now insert your Windows 7 DVD to your Optical Drive or Mount your ISO file in the Virtual Drive(you can use Virtual Clone Drive ). Note the Drive letter of your DVD Drive and USB Flash Drive. Type the commands below, in the Command Prompt replacing the drive letters as yours. In my case they are I and J.

I:

CD BOOT

BOOTSECT.EXE /NT60 J:

Windows 7 install from usb

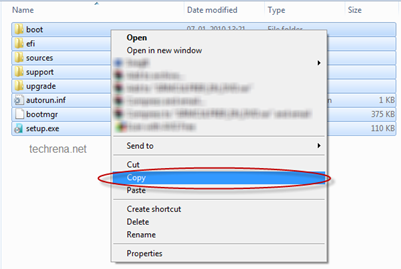
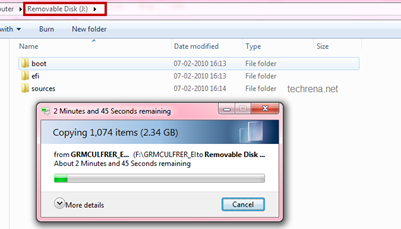
Step 6. Now copy all your Windows 7 DVD contents to the USB flash drive.

Windows 7 install from usb Windows 7 install from usb Windows 7 install from usb

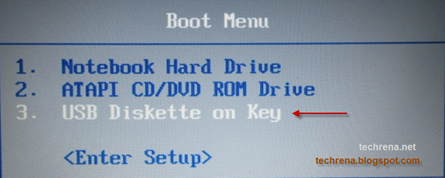
Step 7: Now your USB Drive is bootable. You can restart your computer and boot from the USB drive. In order to boot from your flash drive, you have to change the boot menu. Many computers have DELETE, F10, F2, F12, ESC keys as Boot menu key (the boot menu key information is usually displayed during Start Up). In the boot menu Select USB Diskette on Key and boot it from the USB.

Windows 7 install from usb

Now the Windows 7 installation will boot,  follow the instructions to install.

Do comment if you face any problem while executing the method.

Note:

1. If you have the installation file as a back up in your hard drive( not in the form of an ISO) then, in Step 5 execute the BOOTSECT.EXE command by changing the directory in the command prompt(use CD command) to the folder where your installation files are present.

2. You can use Microsoft USB DVD Download Tool as an alternative to this method.

3. This method will not work for Windows XP. If you want to install it then refer this post: Install Windows XP from USB Disk Drive

Install IIS Server in Windows 7

Internet Information Services (IIS) is a set of Internet based services from Microsoft. The services provided currently include FTP, FTPS, SMTP, NNTP, and HTTP/HTTPS. In Windows 7 the IIS program is already present, but it is not enabled or turned on by default when you install Windows 7.

It is now very easy to install IIS in Windows 7, without requiring to download anything. You just need to enable the Service in Control Panel.

Here we have given how to enable IIS feature in Windows 7.

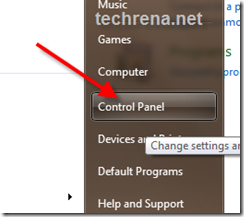
Step 1: Open Control Panel. Click on Start and click on Control Panel.

open control panel

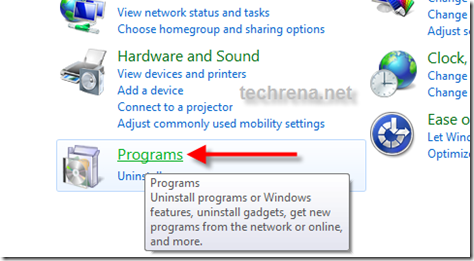
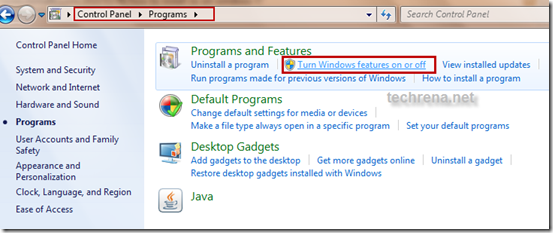
Step 2: In Control Panel look for Programs and click to open it.

programs in control panel

Step 3: In programs under Programs and Features you will find Turn Windows features on or off. Click on it. It will display the List of available Windows services.

Turn Windows features on or off

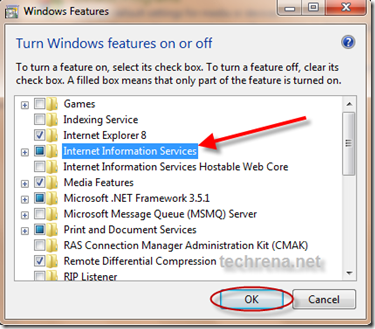
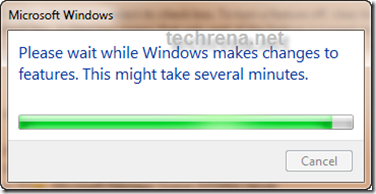
Step 4: Check the check box in Internet Information Services and Press OK. It may take some time to turn it on.

Windows features

Changing Windows features

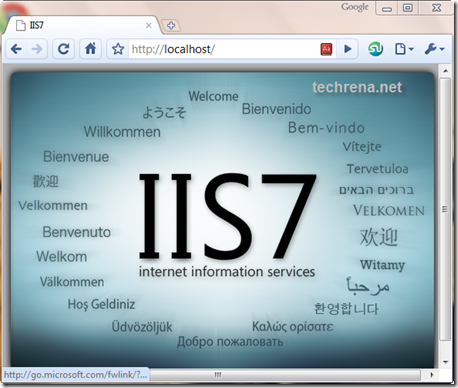
Now after successful installation Of IIS7 you can type http://localhost/ in your browser to check. It should display the IIS7 home page as shown below.

IIS7

Now as you have successfully installed IIS in your Windows you can start using the service.

Install and Run Windows XP in Windows 7 Using VMware Player

Windows XP has been the most famous and most useful operating system to its users till date. Well even if we are have to migrate to Windows 7, we will never forget the ability of Windows XP. There are a lot of programs which were supported by Windows XP but not in the later versions like Windows Vista and Windows 7. Now when we migrate to Windows 7, we will not be able to run such programs.

In order to solve the problem of incompatibility of software and drivers in Windows 7, we have been given the option of installing Virtual Windows XP using Microsoft Virtual PC. But the lone problem in this option is that the processor should support Virtual Machine.

Windowx XP and Windows 7

Here we have given a technique with which you will be able to run Windows XP in Windows 7 without any Virtual XP software or Virtualization Supporting Processor. Moreover you can use your own CD or ISO backup of Windows XP to create the Virtual Machine and no need of downloading the XP Virtual PC from Microsoft.

Requirements:

Windows 7 installed Machine

Minimum 1 GB RAM.

Minimum 4 GB Free Hard Disk Space

Windows XP backup either CD or ISO file

OR

If you have downloaded Microsoft Virtual XP Mode, then refer the instruction at Step 6.

Step 1: Download and Install VMware Player 3.0.1. The download Links are given below.

Size: 90.0 MB

Download VMware Player 3.0.1 from VMware

or

Download VMware Player 3.0.1 from FileHippo.com

Follow the normal instructions and install. Restart your computer after installation.

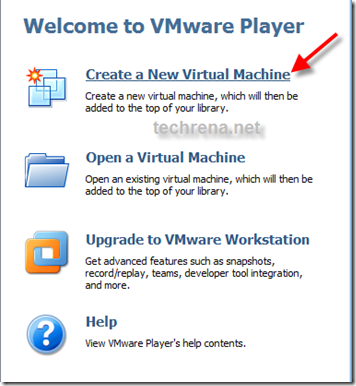
Step 2: Now we have to create a new Virtual Machine. Open VMware and click Create a New Virtual Machine as shown below.
VMware-New-virtual-XP-Machine

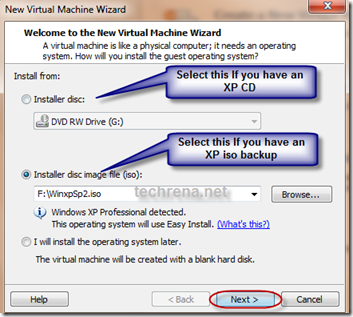
Step 3: Select the location from which you are going to create the new Virtual Machine. If you have a CD then select the drive. If you have a back up file in an iso, then you can select the file.
Select-disc-iso-XP-Machine

Step 4: Enter the Windows XP key and the user name and password.
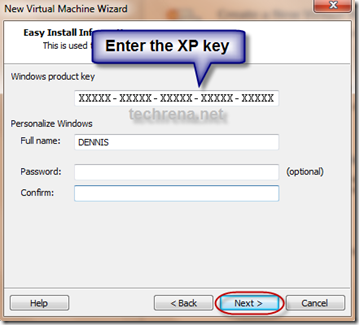
Enter-key-XP-Machine

Step 5: Then you can set the location to be installed, maximum Disk space size and the RAM size. Follow the instructions normally. Finish the setup. It will continue to install Windows XP in your Virtual Machine.
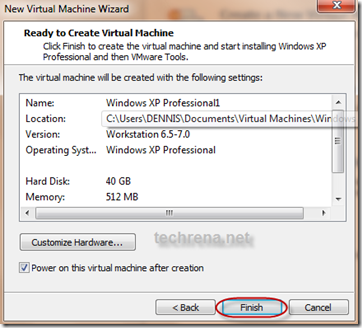
3-6-2010 12-35-50 PM

Optional Note: While installing the Virtual Machine it may ask you to download VMware Tools for Windows 200 or later. It is recommended that you download it or you can download it later also.
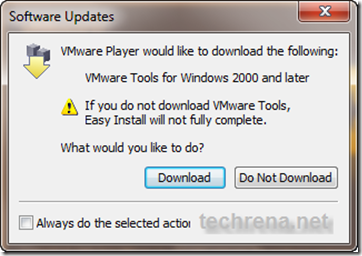
download-vmware-tools-for-Windows

After that, the installation process will continue by itself and Windows XP will start.
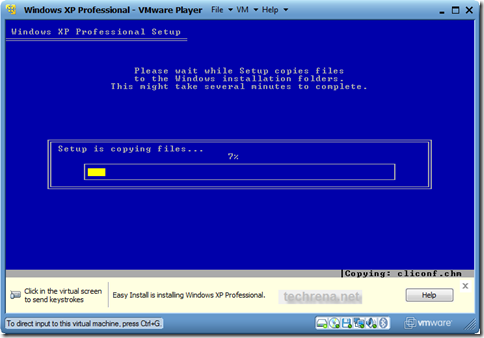
Windows Xp installation

Windows Xp installation process

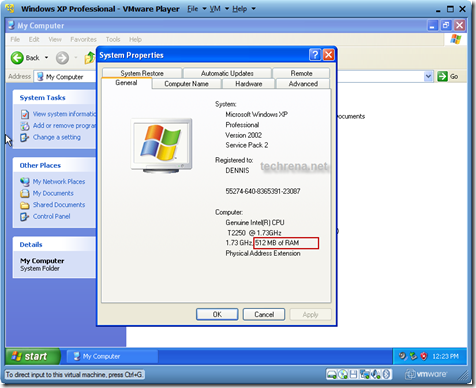
After successful installation Windows XP will start and you can see the System properties as shown below. 512 MB of RAM is set when installation(you can change the size in VM settings).
Virtual-xp-properties

Now, you have successfully installed Windows XP virtual PC using VMware player. In order to quit Windows XP you can simply shutdown and quit VMware player.

To start the Windows again in virtual mode, open VMware Player and Select Windows XP in the left pane and Click Play virtual machine.

VMware

Let us discuss some of the issues which should be known by the users.

How to Transfer Data to and from Windows XP virtual Mode?

As you are running two different machines drag and drop will not work if you have not installed VMware tools. Even if you can copy directly, it takes more time. You can either use a flash drive or Disc drive to transfer data between Windows 7 and XP virtual mode. But this is not the optimal way. You need to map network drive in Windows 7 which has been shared from Virtual XP.

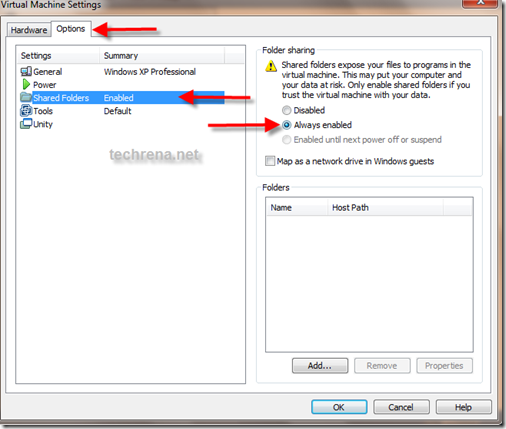
To enable file and folder sharing in Windows XP virtual Mode, you need to edit the settings. Click on Virtual Machine Settings as shown above to edit the settings.

Select Options and select Shared Folders. Set Always enabled and click OK.
VMware-settings-folder

Now you need to share a folder with write permission as shown:

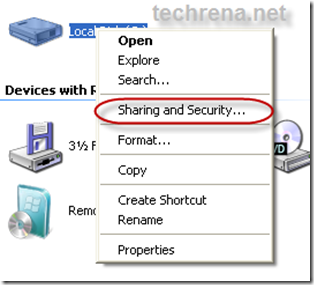
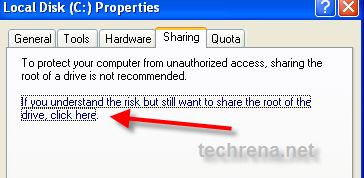
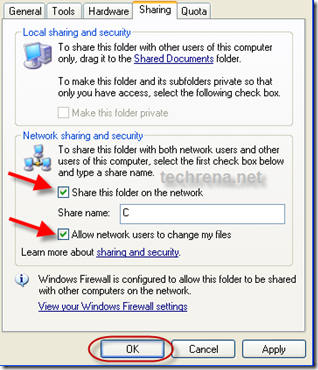
In Windows XP, right click on the folder or drive you want to share and select Share and Security. Do not forget to check Allow network users to change my files.
Share a folder in XP

share-folder-in-virtual-xp

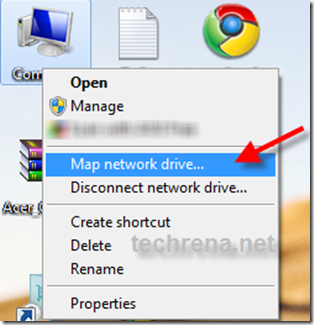
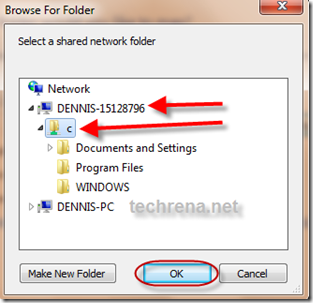
Now after sharing the folder in Virtual XP, you need to map the folder in Windows 7 as shown below:

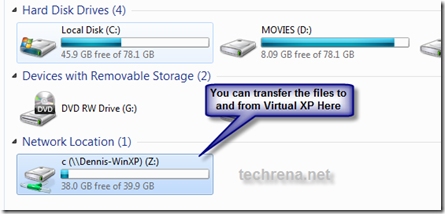
Right Click on My Computer and Select Map network drive. Under Network search for the folder you have shared in Virtual XP Machine and click OK.
set-virtual-drive-windowsset-virtual-drive-windows-7

virtual-drive-windows-7

You can copy or paste anything from or to the network location drive in Windows 7. This is how you can transfer files between Windows 7 and Windows XP virtual mode.

Removable Devices:

Now if you want to use a removable device like a flash drive, you can connect the device using the following setting:

VMware-set-devices

You need to disconnect the device from the host in order to connect to the Virtual machine.

Step 6. Running Microsoft’s Windows XP Virtual PC:

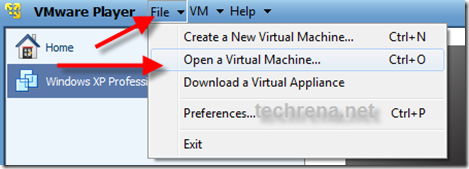
All the above installation is not done using the Microsoft’s Virtual  Windows XP PC. Above we used normal Windows XP installation CD. If you have downloaded Virtual XP PC from Download Windows XP Mode then,  install it on your PC and then you can open the Virtual Machine from the VMware Player as follows.
VMware-open-virtual-PC

Browse for the .vmx file in the folder you have installed the Virtual XP PC and  Click Open. You can run it.

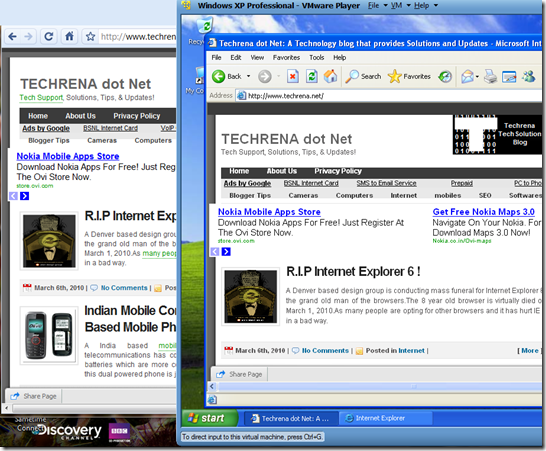
Finally, as you have successfully installed Windows XP Virtual PC in Windows 7 using VMware Player 3.0.1 you can enjoy the unbeatable features of Windows XP in Windows 7 also.
windows7-and-virtual-windows-xp

Note: No new Partition is created in your hard disk for the Virtual PC. Just a virtual disk file is created in your drive which will increase in size according to what you copy and install in your Virtual PC. The maximum size of this file is the size you have set as maximum disk size.

PS: If any problem occurs or if you are not able to follow the steps and instructions, please leave a comment below.
How to Find Your Location In Windows 7 Using Geosense

Geosense is a Windows Sensor that uses the Location and Sensors platform in Windows 7 accurately using IP lookup, WiFi and Cell tower triangulation positioning without the assistance of GPS hardware, enabling more practical location-based applications and scenarios on Windows 7.

Today most of the laptops are not equipped with GPS, so  the Windows 7’s new Sensors and Location platform is practically not much useful to the users. But with the help of Geosense, we can use this location sensor platform.

Geosense if free to download and it is available for  both 32 and 64 bit editions of Windows 7. Please note that Geosense will work only with Windows 7 editions having Location and Sensor platform. For example this functionality is not available for Windows 7 starter. All other higher editions have this feature.

Follow the instructions below to install and use Geosense For Windows.

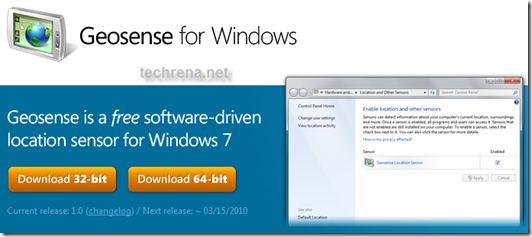
Step 1: Download Geosense For Windows from the link below. Select your compatible edition while download.

Click Here to Download Geosense for Windows

Download Geosense  for windows

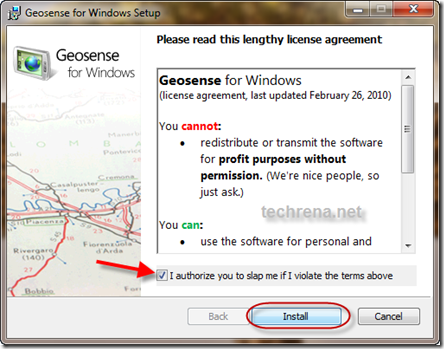
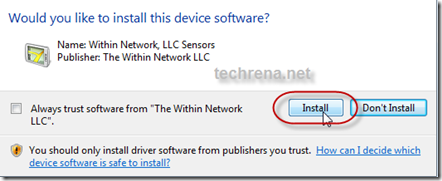
Step 2: Install Geosense for Windows. Accept the agreement, and accept to install the device.

install Geosense for windows

Allow install Geosense for windows

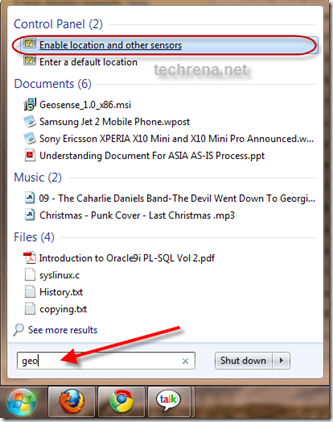
Step 3: After successfully installing the sensor, Click on Start button and type geo in the search box. Click on Enable Location and other sensors.

Open  Geosense for windows

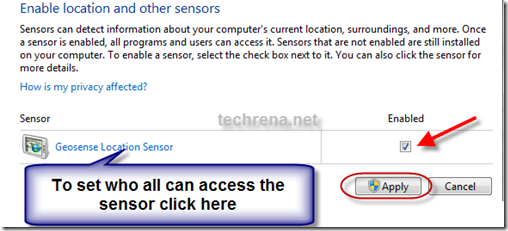
Step 4: Select the enabled Check Box and Apply.

enable Geosense for windows

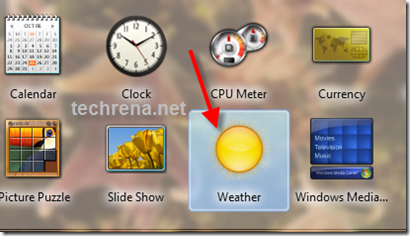
Step 5: Now on the desktop right click, and open Gadgets. Double click on Weather. You can see your location in the Weather gadget as shown.

Weather Gadget for windows 7

Once you have added the gadget, you can see the Location in the desktop Weather gadget as shown below. My location shown here in Delhi, India.

See location using Geosense for windows

But the location sensor displaying only the location in the gadget is not quite impressing. As there in not much of Location aware Windows 7 applications, Geosense has made a Google Maps Client Demo to make use of the sensor in a proper way. Hope that in near future we will be able to use this Windows 7 Location sensing feature in a proper way.

Download Microsoft’s New Windows 7 Theme “Czech Spring”

Microsoft which keeps on updating feel good themes for Windows 7, it’s newest Operating system has released yet another series of themes (following Valentine Win 7 theme, Samsung winter games theme) called “Czech Spring”.
Wallpapers Included in Czech Spring:

There are 8 sizzling spring wallpapers (desktop backgrounds) added to this theme pack, I just took screen shots of two of them:

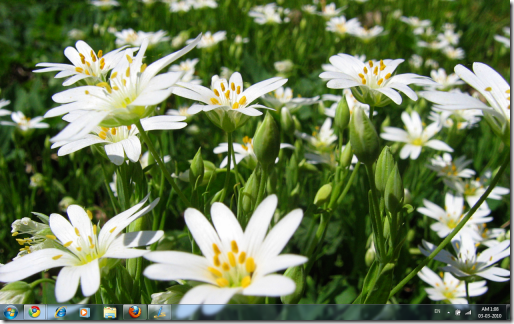
Czech soring theme background 1

Czech soring theme background_2

They are beautiful, aren’t they? Just go and grad this theme from the below link :

Download Czech Spring Windows 7 Theme [5.5 MB]

Saving YouTube Videos From Temp File To Your Hard Drive

You must be knowing that whenever you open a webpage, the data in the page would be first stored in your computer’s windows internet cache temporary folder and later retrieved from there.This is true in case of YouTube also.

So whenever you open a YouTube video and let it to stream fully, it will be saved in your Windows temp folders as “flaXXX.tmp” file.So now our hack will be using this concept to save YouTube (or any flash content based streaming site for that matter) directly on your hard drive without needing to install any extensions in your browser.

The Process:

1 Step 1: Go to windows temp folder from the following path:

for Windows vista/ Windows 7:

C:\>Users\>User Name\>AppData\>Local\>Temp\

2 Step 2: As said earlier, the temporary flash files would generally be of the format flaXXX.tmp.In my case the required filename is flaDEBD.tmp.This file contains the flash content from YouTube video that you have just allowed to stream fully.

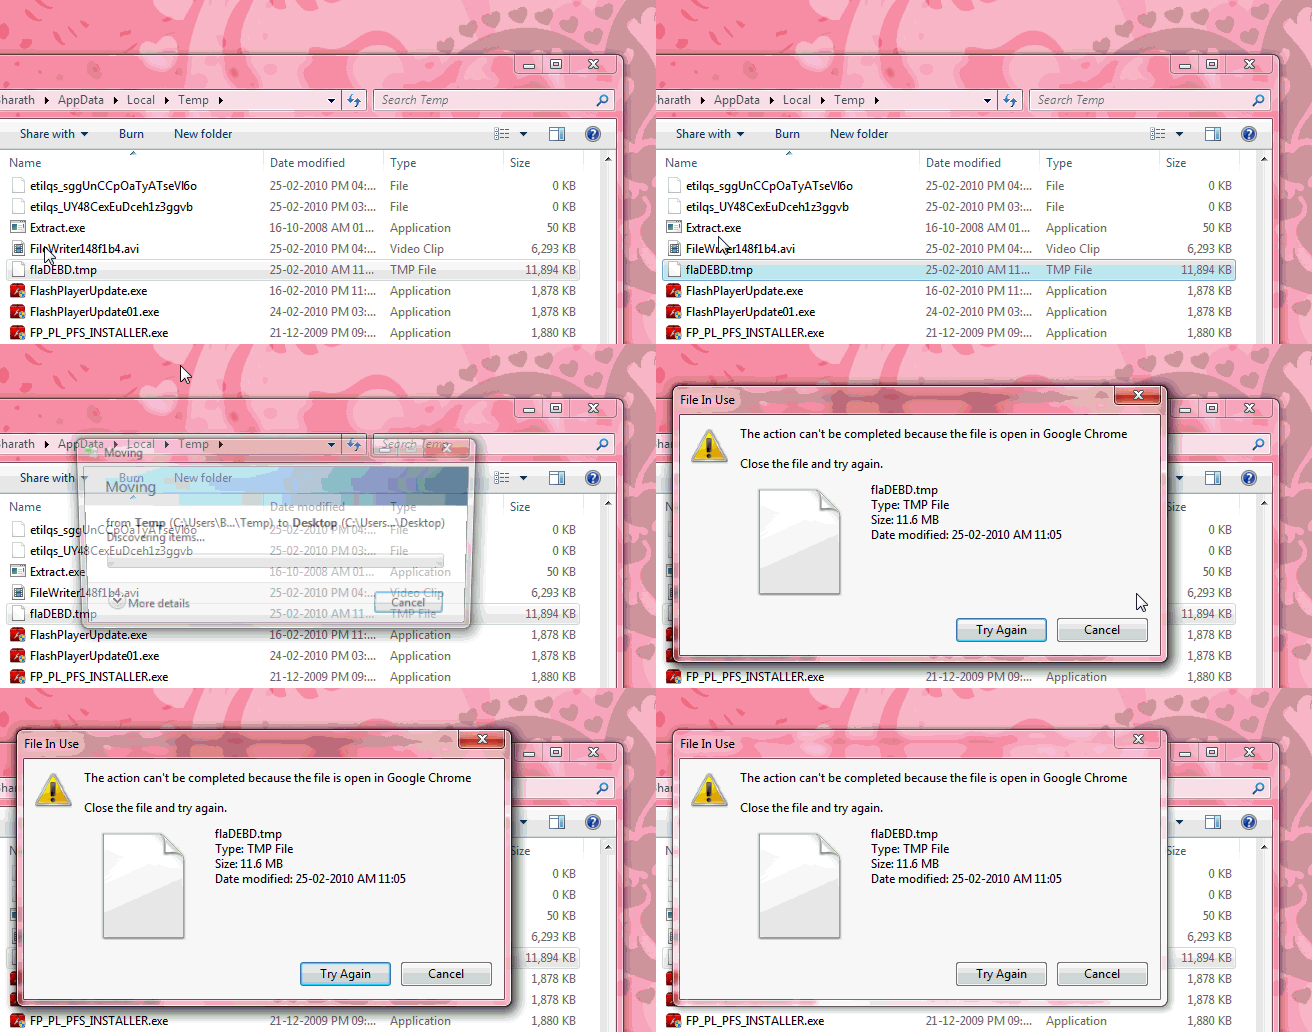
3 Step 3: This is the temp file that we are looking for.If we can copy it to some other location on your PC and rename it as *.flv file, our headache is over, but unfortunately Windows doesn’t allow you to copy a temporary file that is already in use by another application like browser for instance.

The following animated image would reflect the same situation.

Can't copy file

4 Step 4: Luckily we have a free open source program called HoboCopy that makes this copying process easier for us.Download the zip file and place HoboCopy.exe in your C:\ drive (or in any directory from where you can actually run this exe file through command prompt).

5 Step 5: Now open Administrator command prompt (Windows XP users can make type cmd in the run prompt but Windows Vista and Windows 7 users have to run cmd.exe using “Run as administrator” from the menu, you can actually figure out the difference between normal command prompt and Administrator command prompt, the window name starts with the word “Administrator” as you can see from the below screen shots.

6 Step 6: Go to C:\ and type the following commands (assuming that you have placed HoboCopy.exe in your “C” drive).

Pass the target file name that you want to copy like flaXXX.tmp at the end of the command.

C:\>hobocopy C:>Users>User Name>AppData>Local>Temp\ G:>FLV-Video> flaXXX.tmp

Replace “User Name” with your Windows administrator user name and “flaXXX.tmp” with your actual target file. In my case  the User Name is “Bharath” and the target filename is flaDEBD.tmp

C:\>hobocopy C:\Users\User Name\AppData\Local\Temp\ G:\FLV-Video\ flaDEBD.tmp

Command prompt hobocopy

Wait till the file gets copied to your target destination.

Copying windows temp file using hobocopy to another folder

7Step 7: Now that your required temporary file copied to another folder, you can change it’s extension from “.tmp” to “.flv” so that it can be opened by any player that supports FLV format files.

Temp File copying in Chrome using hobocopy

Download HoboCopy [Sourceforge.net]

Note:

1.The browser I have used here is Google Chrome, you can also refer to our guide on how to download YouTube videos in Google Chrome using greasemonkey scripts.Also make sure that you don’t use Internet explorer 6 for watching YouTube videos.

2.The above whole process has been done in my system which is running Windows 7.The procedure still remains the same for Windows Vista and Windows XP even though there may be changes in the location of Windows Temporary files.

3.HoboCopy actually intended for backing up entire folder(s).But here we are limiting it to just one file by passing the file name argument at the end of the syntax (flaDEBD.tmp in the above pics).So if you do not pass the file name at the end of the syntax, the entire temp folder gets backed up.

Restore Previous Versions of Files in Windows 7 Using System Restore

One of the exciting features in Windows 7 is that we can restore deleted files using the Windows System Restore.  If you ever delete an important file or a document unintentionally then this feature of Windows 7 is going to help you in every ways.

Windows 7 copies the image of your files everyday or when a restore point creation is triggered. This service is known as  the volume shadow copy service. The Previous Version feature is available in all editions of Windows 7.

Windows 7 logo

Now to restore your files or to explore this feature, just follow the easy steps below.

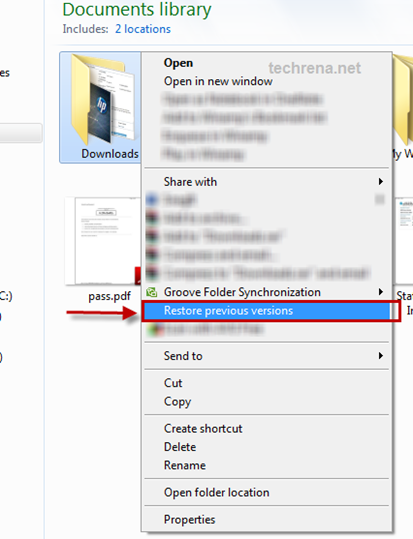
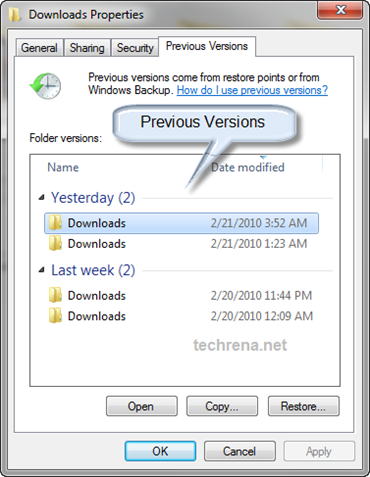
Step 1: Find out the Previous Versions of the files available. In order to do this, right click on the folder where your files are present and select Restore previous versions. All available versions of the folder is shown where the content of the folder will be Yesterday’s or Last week’s and so on.

Restore Previous Versions in Windows 7

Step 2: Select which operation you need: Open, Copy or Restore. You can see three buttons Open, Copy, and Restore.

Restore Previous Versions in Windows 7

Open: Select the folder on the particular day or date which you want to open and click on Open. It will show you the files present in that folder on that day. You can simply copy the particular file you want.

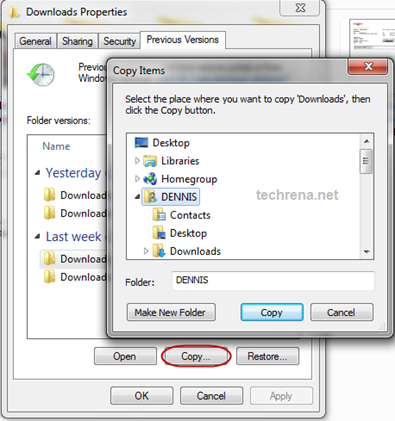
Copy: Copy lets you copy the whole folder on the particular day to a different location. This will be useful if you do not want to disturb the current files present in the folder. Select the destination of the files to be copied.

Restore Previous Versions in Windows 7

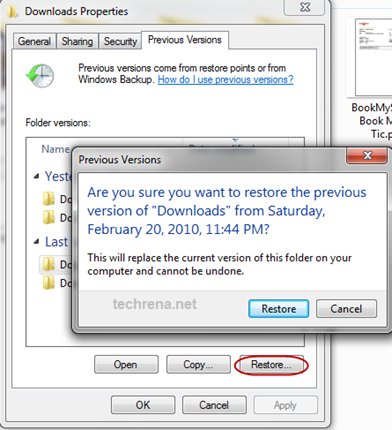
Restore: This option will restore the files to the day which you have selected. It will be useful if you want to restore the folder exactly same as on the selected day. This can be used for restoring source files of an installed software which you had changed erroneously.

Restore Previous Versions in Windows 7

Now you have learnt how to restore deleted files and folders in Windows 7. I hope it was an easy one.

Note:

1. This feature is available in all versions of Windows 7.

2. If you want to have restore points of the files and folders for longer duration, you have to increase the size of the Disk Usage Space for System Restore in System Restore Properties. Follow:

My Computer—> System properties—>System protection—>Configure…—>Max usage

3. Restore Previous Versions feature will not support for Disk Drives, libraries and external drives(including the folders present in the external drives).

Windows Activation Technologies Update To Detect Pirated Copies Of Windows 7

Windows Activation Technologies(WAT) is set to release a new Update for Windows 7 which will detect Pirated Windows 7 copies activated using the different Cracks and Activators available. This update (KB971033) is said to be released today at www.microsoft.com/genuine and from 17th Feb it will be available at Microsoft Download Center.

windows 7 logo

Windows Activation Technologies formerly known as Windows Genuine Advantage (WGA) will run this anti-piracy program using this Windows Update. This update will reach Windows 7 Home, Premium,Professional,  Ultimate, and Enterprise users.

According to the Genuine Windows Blog, this update will be voluntary which means, users can choose whether to install this update or not when it appears in the update list.

After installing this update, it will check for the validity of the certificates and keys in your Windows 7 installation. If found to be non-genuine, the notifications built into Windows 7 will inform the user that Windows is not genuine by displaying dialog boxes with options for the user to either get more information, or acquire genuine Windows. The desktop wallpaper will be switched to a plain desktop.

But this time Microsoft has assured that the customer will see no reduced functionality in their copy of Windows which is fount to be non-genuine.  The Update will run periodic validations (initially every 90 days).

Install Windows 7 using Microsoft USB/DVD Download Tool

We have already discussed the Installation of Windows 7 from a USB Device without using any external software. The technique we used was easy, but now a days people want automation. Just install a program, let the program handle everything. No headache, no worries. As this is the current trend, we are sharing this fully automated method of making a bootable USB device for installing Windows 7 using the Microsoft Windows 7 USB/DVD Download tool.

But we need to download a software from Microsoft store for this method. In case, if you don’t want to download any software, you can use this technique:

Install Windows 7 or Vista Using Bootable USB Disk Drive

Now to start, check the requirements and then follow the steps below.

Requirements:

1. A USB Drive of minimum 4GB space

2. Windows 7 installation ISO file

Step 1: Download Windows 7 USB/DVD Download tool from the Microsoft store

Link: Click here to download Windows 7 USB/DVD Download Tool

Password: techrena.net

Size: 2.6 MB

Step 2: Install the tool in your computer.

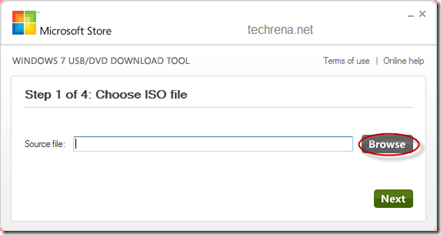
Step 3: Connect your USB Flash Drive or Pendrive. Open the program. Click on Browse to select the ISO file.

Microsoft Windows 7 USB/DVD Download tool

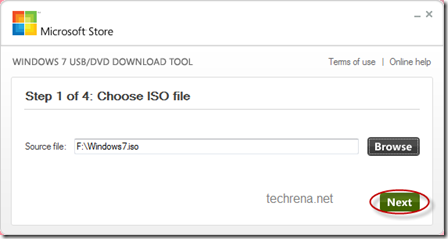
Step 4: Select the proper Windows 7 ISO file and click Open. Then Click Next.

Microsoft Windows 7 USB/DVD Download tool

Microsoft Windows 7 USB/DVD Download tool

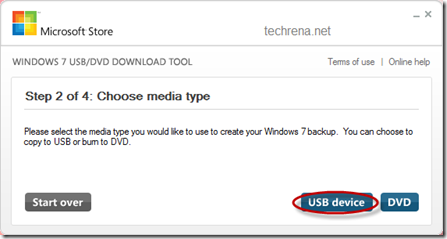
Step 5: Now Click On USB device. If you want to burn the ISO to a DVD, you can select the DVD mode.

Microsoft Windows 7 USB/DVD Download tool

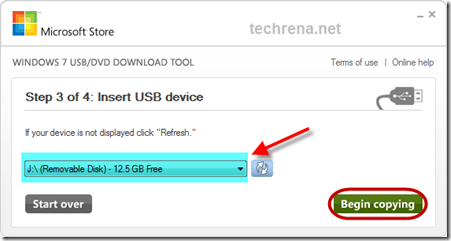
Step 6: Select the correct USB device from the drop down menu. If your Device is not seen in the menu, connect it properly and then press the refresh button which is present right next to the menu. After selection, Click on Begin copying. Note that, this will process format your USB Device. All unsaved data will be lost.

Microsoft Windows 7 USB/DVD Download tool

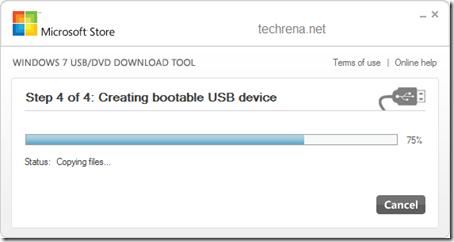
Step 7: Now the tool will make your USB disk drive Bootable and then copy the files to it. After completion of the process, you can use the USB device for installing Windows 7.

Microsoft Windows 7 USB/DVD Download tool

Note:

1. To start the installation you need to boot from your USB device. In order to boot from your flash drive, you have to change the boot menu. Many computers have DELETE, F10, F2, F12, ESC keys as Boot menu key (the boot menu key information is usually displayed during Start Up). In the boot menu Select USB Diskette on Key and boot it from the USB.

Windows 7 install from usb

Now the Windows 7 installation will boot,  follow the instructions to install.

2. If you do not have the ISO file or if you have only the DVD or the installation files in your hard drive, then you cannot use this tool, you need to follow the technique given here: Install Windows 7 or Vista Using Bootable USB Disk Drive

3. Windows 7 USB/DVD Download tool is a property of Microsoft. It is intended to be used according to the terms and conditions provided by Microsoft Corporation. Techrena is not responsible for any kind of misuse of this product.