[How to] Install Google Android OS In Your PC

Google is giving us the opportunity to use Google Android OS for free in out x86 PCs. LiveAndroid is a live CD or Live USB with which you can try Android even without installing it to your PC. This Live CD/USB is available for free download.

More than that, the LiveAndroid disc image can be used in virtualization software like VMware and Microsoft Virtual PC.

Google LiveAndroid  is an open source project which will allow you to download the different releases and versions of the Google Android Operating System.

LiveAndroid

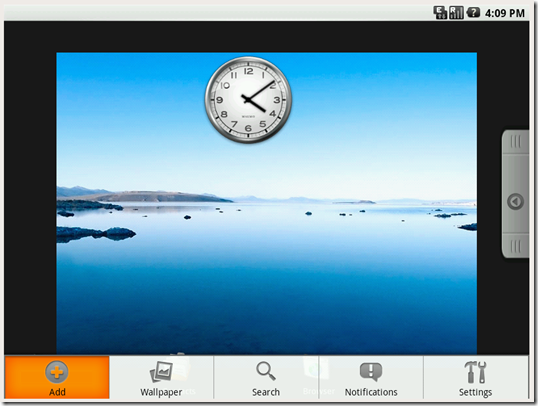
Google Andoid OS in x86

LiveAndroid Screenshot

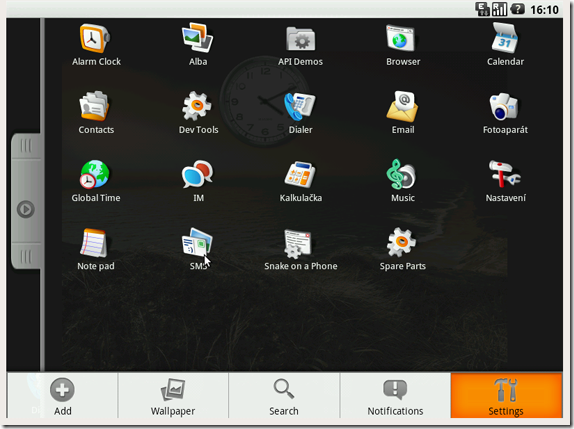
LiveAndroid Screenshot

To download the Live CD or Live USB visit:

Link: http://code.google.com/p/live-android/

Once you have done downloading the image file you can burn it the Image to a CD or use a USB and boot it in your PC. You can use VMware to use this OS. You can follow the steps given in this post Install and Run Windows XP in Windows 7 Using VMware Player

.

Think Before Using USB Flash Drives To Run Applications or OS: Advisory

I am writing this post on an advisory note. With the extensive use of USB flash driven in our day to day activities, now we have been aiming to make even our Operating System(OS) portable by installing it in a USB Flash Drive and carrying around in our pocket. Moreover we can run applications such as Mozilla, Anti Viruses etc. from a USB pen drives. Here I am going to explain, why you need to think twice before using your USB Flash Drive to run an Operating System from it.

Why you should think twice before using a USB Flash Drive to run an OS or applications for prolonged period?

All flash memory devices can sustain only a limited number of write and erase cycles before failure. While running a normal OS or an Application from a Flash drive, the system will write and erase a huge number of files and data in the flash drive. With prolonged use, the write/erase cycles of your flash drive may come to an end and may eventually fail.

The write/erase cycle performed while running an Operating System(OS) such as Windows XP or 7 will be very much more than what we can perform manually, by copying and deleting data. So this should be a consideration as it may make your flash drive run out of Write/erase cycles much faster than expected.

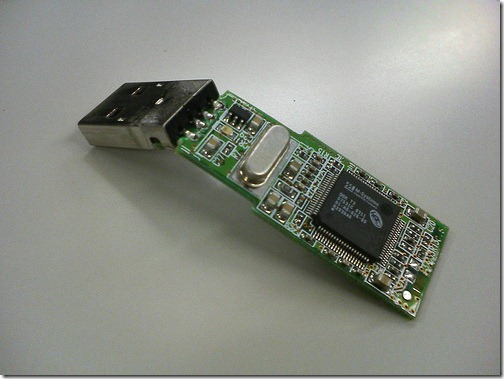
a failed usb flash drive

Another usage of USB is Windows ReadyBoost. Windows 7 and Vista can make use of a USB flash drive as a cache memory to improve the performance.  In this case also the cycles are be used a high rate.

Points to be Noted:

  • Flash memory devices have a limited number of write and erase cycles before failure
  • Running an OS or an Application from a Flash drive will write and erase a huge number of files or data in the flash drive per second.
  • Running an Operating System(OS) will perform these cycles much more than what we can perform manually
  • Prolonged use will make your flash drive run out of write/erase cycles and may eventually fail much before expected

How to address this issue?

To address this, as well as space limitations, some developers have produced special versions of operating systems such as Linux in Live USB or portable applications such as Mozilla Firefox designed to run from flash drives. These are typically optimized for size and configured to place temporary or intermediate files in the computer RAM rather than store them temporarily on the flash drive.

Compared to other portable storage devices such as external hard drives, USB flash drives still have a high price per unit of storage. But Hard drives have a higher minimum price.

Alternatives:

  • Run applications or OS which are configured  for Flash Drive use only
  • For Prolonged usage, try buying an external Hard Drive
  • If you are using your USB Drive as a Cache device to improve performance, why not upgrade your RAM size?

Notes:

1. Manual usage of your USB Drive will take years to use up the Write/erase cycles available, so no need to worry.

2. Most Failures in USB Memory Devices are due to wear and tear

Install Portable Antivirus on a USB Flash Drive or an iPod

clamwin_portable

What will happen if your System is infected with viruses and the Antivirus you had installed failed to protect? In several cases, the virus may also disable any anti virus programs that you may try to run to disinfect.

Can we use a portable anti virus program which is installed in a USB Flash drive to scan our computer? The answer is a definite Yes! This is an easy way to disinfect an infected computer using a USB disk or your iPod.

ClamWin has come up with such an anti virus application. ClamWin Portable is a popular ClamWin antivirus packaged as a portable app, so you can take your antivirus with you to scan files on the go. You can place it on your USB flash drive, iPod, portable hard drive or a CD and use it on any computer, without leaving any personal information behind.

See the details below to install the free anti-virus in your portable USB device.

Requirements:

Windows XP, Vista or 7 Operating System

USB Flash Drive, Disk with Minimum 30MB free space

Step 1: Download ClamWin Portable from the link below:

Size: 6MB

Link: Click here to Download ClamWin Portable 0.95.3

Step 2: Connect your USB device. Then go to the downloaded file. Double click on the exe file.

Step 3: Start the installation process. Select the correct location where the application is to be installed. Then click on Install.

choose_location_clamwin]

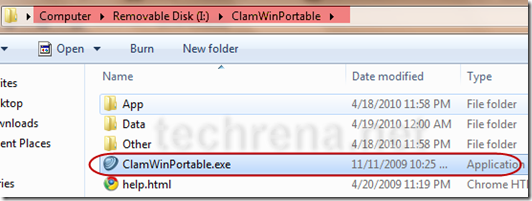
Step 4: Now after successfully installing the application, go to the location where you have installed it. Double click on ClamWinPortable.exe to start the application.

start_clamwinportable

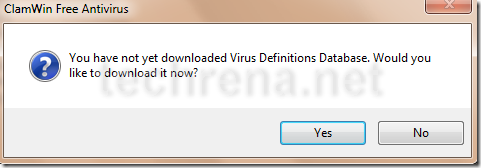
Step 5: On first startup it will ask you to download the Virus Definition database. Click on yes.

download_virus_definition_database

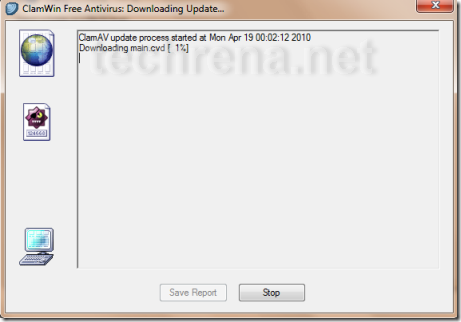
Step 6: Now it will download the update. It may take a few minutes. Note that without downloading the database update the anti-virus is useless.

Downloading_update

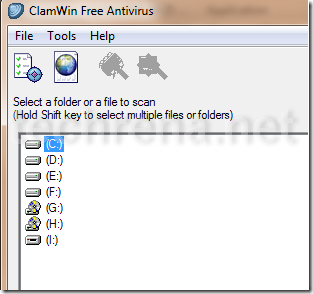
Step 7: Now you can select the drive to scan.

ClamWin_free_antivirus

Now you can easily disinfect any computer. But make sure that the virus definition database is up to date.

Install Windows 7 or Vista Using Bootable USB Disk Drive

Installing an operating system to computers that don’t have an optical drive has been a problem. For example, if we want to install Windows 7 in netbooks like ASUS Eee PC, Dell Mini Netbooks, Acer Aspire One, HP Mini 1000 etc. , then we need to use a bootable pen drive to install it. With the release of the full version of Windows 7 and its gaining popularity, many people have decided to go for Windows 7 over Vista.

windows7_logo

Well the method given here is one of the easiest techniques known which does not need any kind of download and the clear screen shots have been given. The advantage of using this method is that, the whole process of installation finishes in lesser time than installing via an DVD.This method will also work for Windows Vista Installation. But if you want to install Windows XP using a flash drive then you can refer to this post: Install Windows XP from USB Disk Drive. Now lets Start.

Requirements:

1. A USB Drive of minimum 4GB space

2. Windows 7 installation DVD or ISO file (Back Up will also do)

Before starting, plug in your USB drive into your system.

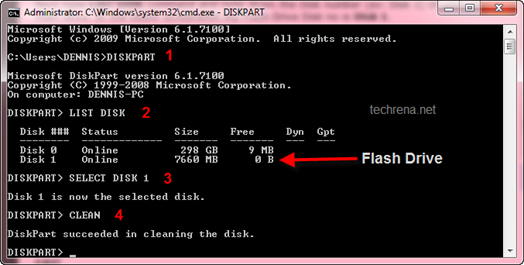
Step 1: Open Command Prompt as Administrator. ( Press Start + R, then type cmd and Press Ctrl + Shift + Enter OR In the Start menu type cmd and Press Ctrl + Shift + Enter )

Step 2: After opening Command Prompt, Type the two commands below:

DISKPART

LIST DISK

Windows 7 install from usb

Step 3: Now you can see the disks present in your system. See the disk number for your drive. In my case the number is Disk 1. Enter the Commands below replacing the disk number with yours.

SELECT DISK 1

CLEAN

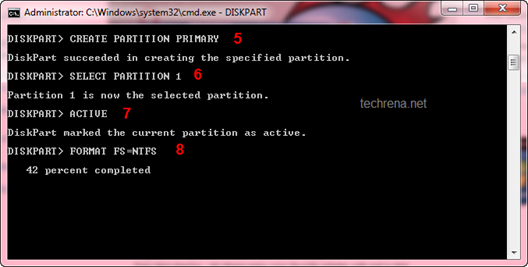
CREATE PARTITION PRIMARY

SELECT PARTITION 1

ACTIVE

Windows 7 install from usb

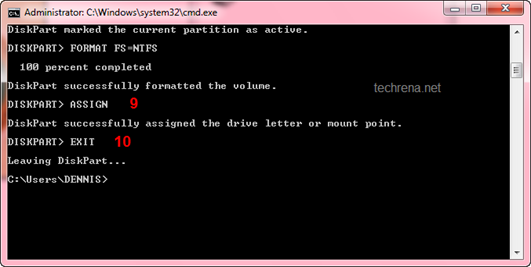
Step 4: Now we need to format the disk and then exit. It may take few minutes. Type the commands one by one:

FORMAT FS=NTFS

ASSIGN

EXIT

Windows 7 install from usb

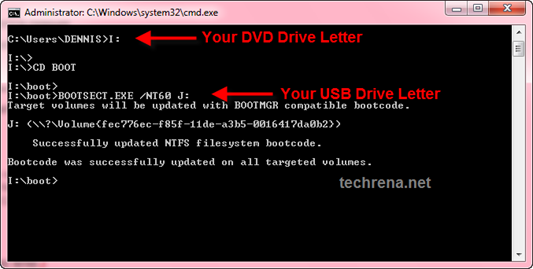
Step 5: Now insert your Windows 7 DVD to your Optical Drive or Mount your ISO file in the Virtual Drive(you can use Virtual Clone Drive ). Note the Drive letter of your DVD Drive and USB Flash Drive. Type the commands below, in the Command Prompt replacing the drive letters as yours. In my case they are I and J.

I:

CD BOOT

BOOTSECT.EXE /NT60 J:

Windows 7 install from usb

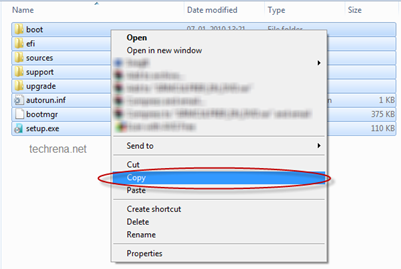
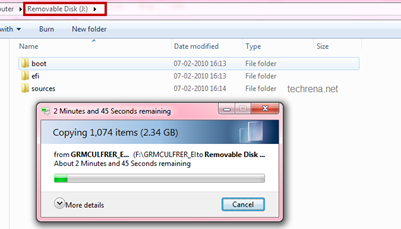
Step 6. Now copy all your Windows 7 DVD contents to the USB flash drive.

Windows 7 install from usb Windows 7 install from usb Windows 7 install from usb

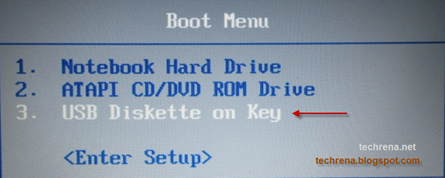
Step 7: Now your USB Drive is bootable. You can restart your computer and boot from the USB drive. In order to boot from your flash drive, you have to change the boot menu. Many computers have DELETE, F10, F2, F12, ESC keys as Boot menu key (the boot menu key information is usually displayed during Start Up). In the boot menu Select USB Diskette on Key and boot it from the USB.

Windows 7 install from usb

Now the Windows 7 installation will boot,  follow the instructions to install.

Do comment if you face any problem while executing the method.

Note:

1. If you have the installation file as a back up in your hard drive( not in the form of an ISO) then, in Step 5 execute the BOOTSECT.EXE command by changing the directory in the command prompt(use CD command) to the folder where your installation files are present.

2. You can use Microsoft USB DVD Download Tool as an alternative to this method.

3. This method will not work for Windows XP. If you want to install it then refer this post: Install Windows XP from USB Disk Drive

Install Windows 7 using Microsoft USB/DVD Download Tool

We have already discussed the Installation of Windows 7 from a USB Device without using any external software. The technique we used was easy, but now a days people want automation. Just install a program, let the program handle everything. No headache, no worries. As this is the current trend, we are sharing this fully automated method of making a bootable USB device for installing Windows 7 using the Microsoft Windows 7 USB/DVD Download tool.

But we need to download a software from Microsoft store for this method. In case, if you don’t want to download any software, you can use this technique:

Install Windows 7 or Vista Using Bootable USB Disk Drive

Now to start, check the requirements and then follow the steps below.

Requirements:

1. A USB Drive of minimum 4GB space

2. Windows 7 installation ISO file

Step 1: Download Windows 7 USB/DVD Download tool from the Microsoft store

Link: Click here to download Windows 7 USB/DVD Download Tool

Password: techrena.net

Size: 2.6 MB

Step 2: Install the tool in your computer.

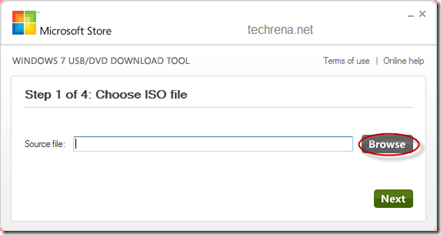
Step 3: Connect your USB Flash Drive or Pendrive. Open the program. Click on Browse to select the ISO file.

Microsoft Windows 7 USB/DVD Download tool

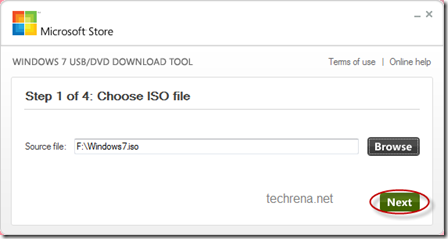
Step 4: Select the proper Windows 7 ISO file and click Open. Then Click Next.

Microsoft Windows 7 USB/DVD Download tool

Microsoft Windows 7 USB/DVD Download tool

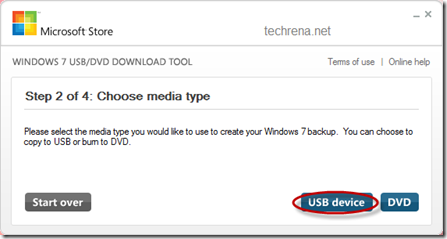
Step 5: Now Click On USB device. If you want to burn the ISO to a DVD, you can select the DVD mode.

Microsoft Windows 7 USB/DVD Download tool

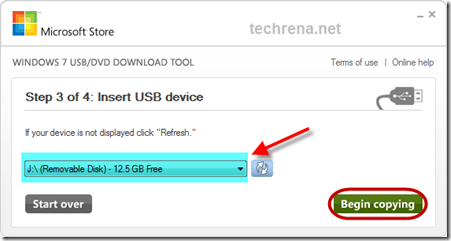
Step 6: Select the correct USB device from the drop down menu. If your Device is not seen in the menu, connect it properly and then press the refresh button which is present right next to the menu. After selection, Click on Begin copying. Note that, this will process format your USB Device. All unsaved data will be lost.

Microsoft Windows 7 USB/DVD Download tool

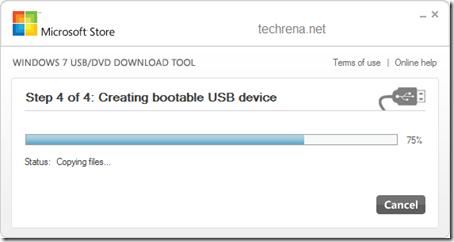
Step 7: Now the tool will make your USB disk drive Bootable and then copy the files to it. After completion of the process, you can use the USB device for installing Windows 7.

Microsoft Windows 7 USB/DVD Download tool

Note:

1. To start the installation you need to boot from your USB device. In order to boot from your flash drive, you have to change the boot menu. Many computers have DELETE, F10, F2, F12, ESC keys as Boot menu key (the boot menu key information is usually displayed during Start Up). In the boot menu Select USB Diskette on Key and boot it from the USB.

Windows 7 install from usb

Now the Windows 7 installation will boot,  follow the instructions to install.

2. If you do not have the ISO file or if you have only the DVD or the installation files in your hard drive, then you cannot use this tool, you need to follow the technique given here: Install Windows 7 or Vista Using Bootable USB Disk Drive

3. Windows 7 USB/DVD Download tool is a property of Microsoft. It is intended to be used according to the terms and conditions provided by Microsoft Corporation. Techrena is not responsible for any kind of misuse of this product.

Reset Windows XP, Vista, 7 Password Using USB Drive or CD

A lot of methods are available to recover or reset the Windows password. The famous Ophcrack is used for recovering the password. Even i have posted about using Ophcrack. But the problem is that its bulky in size. We need to download a file of size 500MB to recover the password. So I thought why to recover a lost password, instead why cant we simply reset or delete the password using a 3 MB file open source program.  That is what this post is about. I have not found any other method simpler than this one, it resets your password in the blink of an eye.

The method uses an open source program called Offline NT Password & Registry Editor. We can use a USB Disk Drive (Pen Drive) or burn a bootable CD for this method.

Follow the Steps below:

Step 1: Download the cd080802.zip file from the link below and extract it. It contains an ISO file.

Size: 3.15 MB

http://pogostick.net/~pnh/ntpasswd/cd080802.zip (Updated Working Link 13-01-10)

Step 2: Burn the ISO file to a CD. If you are using a USB drive, then mount the cd080802.iso file to a virtual drive. Open the Virtual Drive and Copy all the contents to your USB disk. If any error comes while copying just skip the file. Now to make the USB Drive Bootable open a Command Prompt(Press Start + R, Type cmd and enter) and type the following commands:

Sl. No.

Command:

Action:

1

j:

Enter

2

syslinux.exe –ma j:

Enter

Here j is my drive letter, you should enter your own drive letter.

View Commands Image

Step 3: Now start the System which you want to reset the password by putting the CD or the USB in the Computer. While start up you have to make sure that it boots up from the correct device i.e. from the CD or the USB. In order to do this go to your BIOS settings and change the boot order as CD or the USB drive as the first option. Or if you know the Boot menu key then press it and Boot from the correct device.

Note: Step 4 to Step 8 takes a very less amount of time. No need to worry!

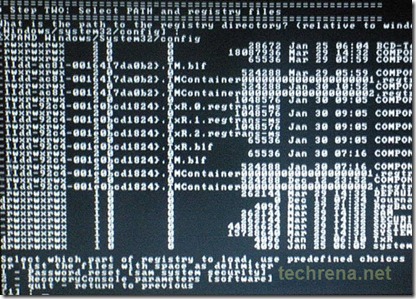
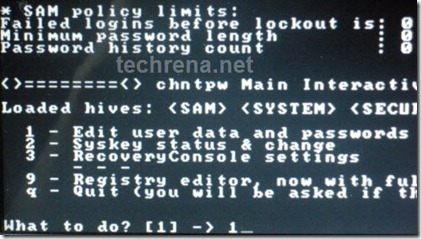
Step 4: After booting from the CD or the USB, press enter to continue the boot process. In the first step it will automatically select the disk where your windows is installed. Simply press enter to continue. In the Second Step it Will select the path and registry files. Select 1 for password reset (It will select 1 by default, just enter).

View Select Path Image

Step 5: Now after selecting the paths, It will ask “What to do?” Simply press enter as it will automatically select 1 for Edit User Password.

View Select Edit Password Menu Image

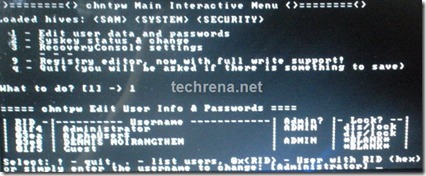
Step 6: It will show a list your system usernames and their password status. Now enter the username whose password you want to reset. It is case sensitive so, be careful and type what you see in the users list. (If the user is Administrator just press enter as it has already selected Administrator by default otherwise enter the correct username)

View Select User Menu Image

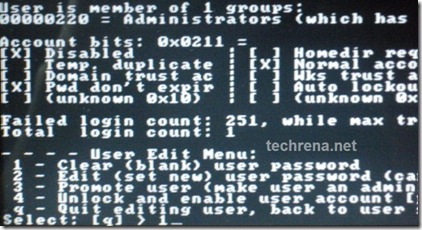
Step 7: It will show you User Edit Menu. Select 1 to clear the user password.

View User Edit Menu Image

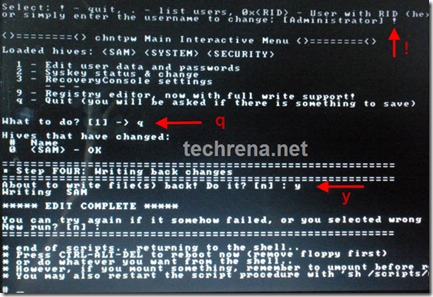
Step 8: It will clear the password. Now Enter “!” to quit from the User select menu. It will again ask “What to do?”. enter “q” to quit. Now in step four it will ask you to write the files or not. Enter “y” to write the files. It will write the files back. Now Simply press enter when it asks for “New run?” as it has selected no by default. The password reset has been successfully completed. Press the power button.

View the Final Step Imge

Now start the computer and you will find that it is not asking for password for the user you had selected. That’s it, you are done.

Important:

1. This method will remove your password not recover. If you do not want to reset the password, you can recover it. Visit: http://techrena.blogspot.com/2009/03/windows-password-recoverycrack-windows.html for password recovery.

2. The method has been tested for windows XP, Windows Vista and Windows 7 and all resulted in success.

3. This is for information purposes only. We are not responsible for any damages or illegal acts resulting from this information.

4. The information provided here should be used for legal purposes only.

5. USB Disk method will not work if your motherboard or BIOS does not support USB booting.

Windows 8 DownloadFeatured Post:

How to Download Windows 8 Pro ISO from Microsoft and Install it to any computer with Upgrade key

Download the newly released Windows 8 Pro 32 or 64-bit version from Microsoft

Install Windows XP from USB Disk Drive

Installing Windows XP from a USB drive(pen Drive) has been an issue with less number of ideal solutions available. Here we have given a solution which is easy to follow and which works. The reason why should anybody want to install Windows from a USB drive is that using a bootable CD is always been a problem. Sometimes our CD ROM may not work. Some mini laptops like Asus Eee PC may not have CD ROMs where installation is possible only through USB or an external Drive. One of the main reason why we were interested in this topic is that in the current trend Using a CD is considered primitive. A USB drive is much more easy and more portable. Hence why should anybody not want to carry their Installation files in a bootable USB drive and why would anybody rely on a CD which is easily damageable by rough handling.

The method given here is tested successfully for Windows XP 32 bit installation with SP2 and SP3. It may work with other versions of Windows like Vista and Windows 7 but we have not tested it yet.

[Update: Refer to this guide on How To Install Windows 7 or Vista Using Bootable USB Disk]

Requirements:

1. A USB Drive of minimum 2GB

2. Windows XP installation CD (Back Up will also do)

The method consists of two parts and one file download (around 499KB). We will have touse tools like PeToUSB to format your pen drive and copy the Windows XP installation files to the USB Disk using usb_prep8.cmd. Then we will boot up from the USB Drive and prepare for installation. After the process is completed your XP install is ready for the process.

Now we will start the process:

Step 1: Download the File from the link given below:

Size: 499KB

Name:  usb_boot_prep_xp.zip

http://www.techrena.net/downloads/usb_boot_prep_xp.zip

Password: techrena.net

Step 2: Extract the usb_boot_prep_xp.zip file in your C drive. It will give you two folders named bootsect and usb_prep8. Plug in your USB drive to your computer and put the Windows XP CD also.

Step 3: Go to the usb-prep8 folder and double click usb_prep8.cmd file. Press any key to continue.
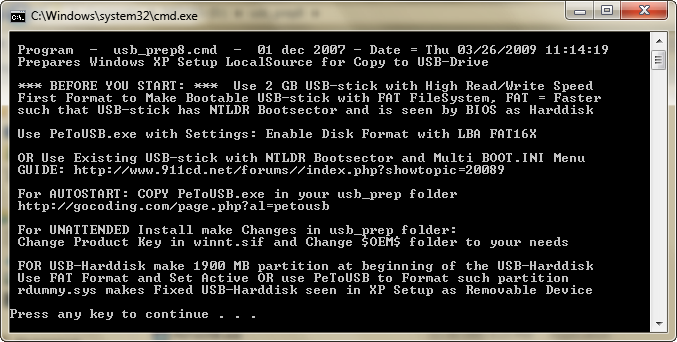
View Sart usb_prep8 Image

Step 4: Now it will open PeToUSB. Format your USB drive using it. Select the options as in the image below. Note that after formatting do not close the PeToUSB or the cmd console.
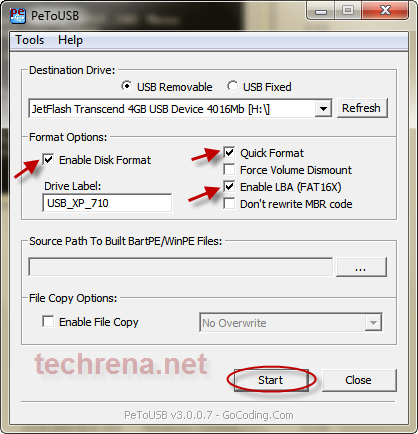
View Format Using petousb Image

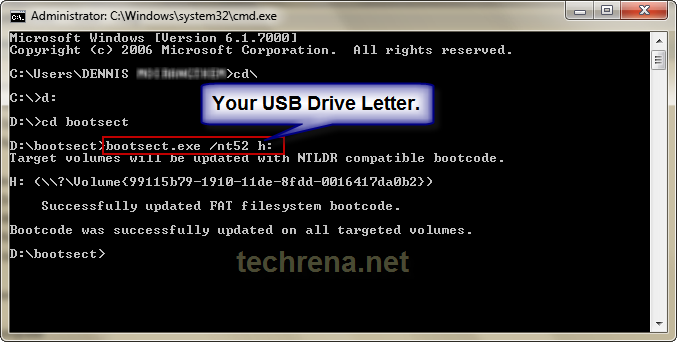
Step 5: Now open a new cmd console manually (press Start+L, type cmd and enter). And type the following command in the commands prompt. Note that you should type your own USB drive letter instead of ‘h’.

Sl. No. Command: Action:
1 cd\ Enter
2 cd bootsect Enter
3 bootsect.exe /nt52 h: Enter

View Bootsect command Image

I had copied the folder in D drive. So the image will be somewhat different with the actual display of your console. Don’t worry copy the folder in your C drive only. Now close this cmd console but not the other one.

Step 6. Close PeToUSB. Now the usb_prep8.cmd console will continue. Select 1 to set the source location. Select the CD ROM containing the XP CD.
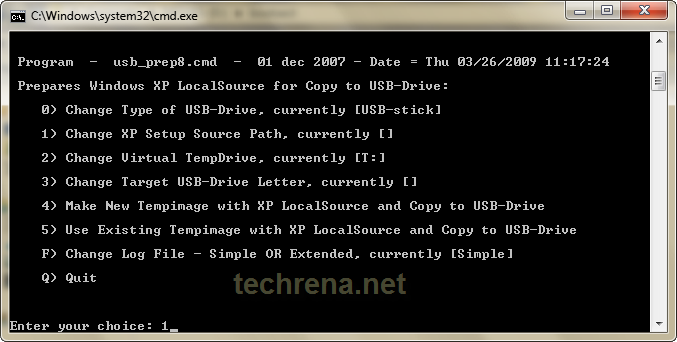
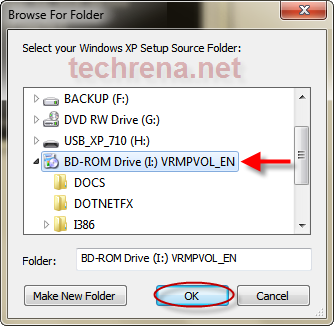
View Select 1 in usb_prep8 Image

View Select Source Image

Step 7: If you have a drive called T in your computer then check option 2 to change it to any letter which is not present. Otherwise no need to change. Select 3 to set the destination drive. Enter your USB Drive letter as shown below:
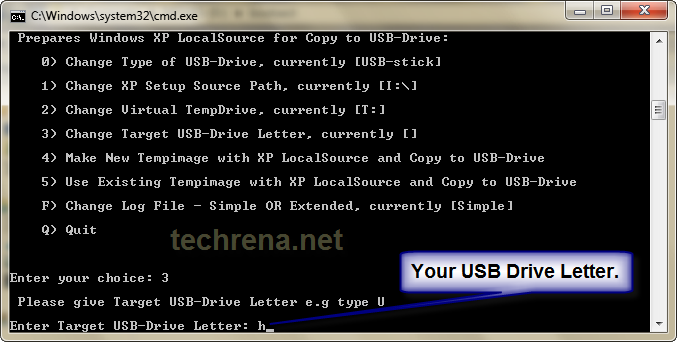
View Select USB Drive Image

Step 8: Now select choice 4 as we don’t have any Tempimage previously. It may ask you to delete the existing tempimage. select Yes.View Delete Tempimage Image
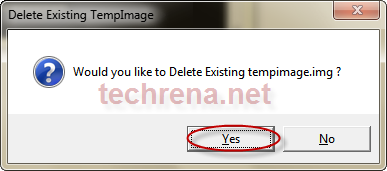
Step 9: It will ask you to format the T drive. Enter y and it will format your temp drive. Press any key to continue. Now it will start copying the XP files to the tempdrive.

Step 10: After the completion of the file copy process Press any key to continue. Now it will ask you to copy the files to your USB drive or not. Select Yes.View Copy to USB drive Image
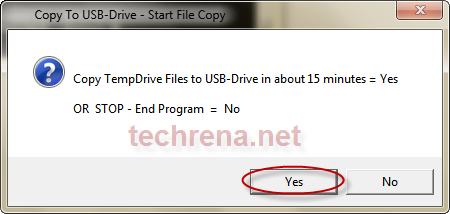
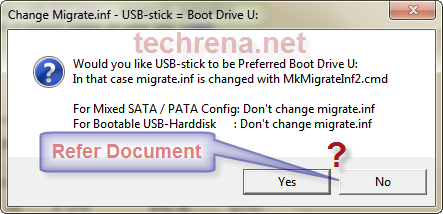
Step 11: During the copy process it will ask whether to change migrate.inf file or not. Is you are using a USB stick then Select Yes. If you are using a USB hard drive then Select No. View Change Migrate Image
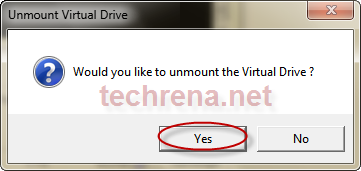
Step 12: After the successful completion of copying the files to your USB drive it will ask whether to unmount the Virtual temp drive or not. As you do not need it Select Yes.View Unmount Virtual Drive Image
Step 13: After the successful completion of the process close the cmd console. Now your pen drive is ready for the installation process.

Step 14: Plug in the USB drive to the computer you want to install XP. While start up make sure that you set the first boot choice as your USB drive. To do this you have to enter to the bios and change the boot order to USB Disk as the first choice. For entering to BIOS  press the BIOS setup key while start up. This key is usually seen in the screen in the boot screen. For most of the systems it is DEL key. For HP and Compaq it is F10 etc. Go to the boot configuration tab and change the boot order.

Step 15: While booting up from the USB it will ask you to choose between GUI and TXT mode of setup. Select TXT mode for now.
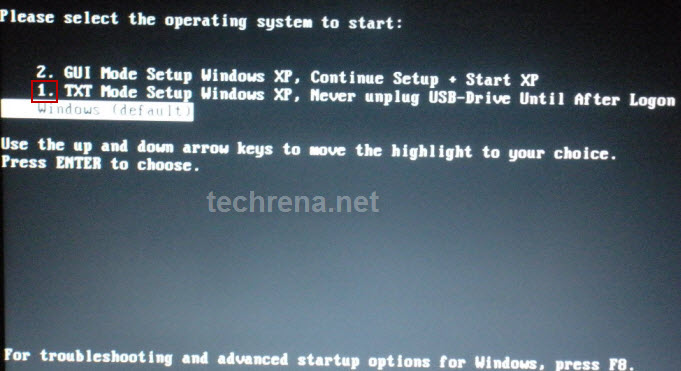
View Select TXT MODE Image

Step 16: Follow the onscreen instructions. It is same as the usual setup process. In the partition selection screen do not select you USB drive for install. And if you are installing in a new RAW hard disk then your USB Drive will be the C drive. Now first create a new partition and format your HDD using the setup. And again restart the process from step 15 by Quitting the current Install(Press F3). Then you should get your HDD partition as C drive. Continue your installation.
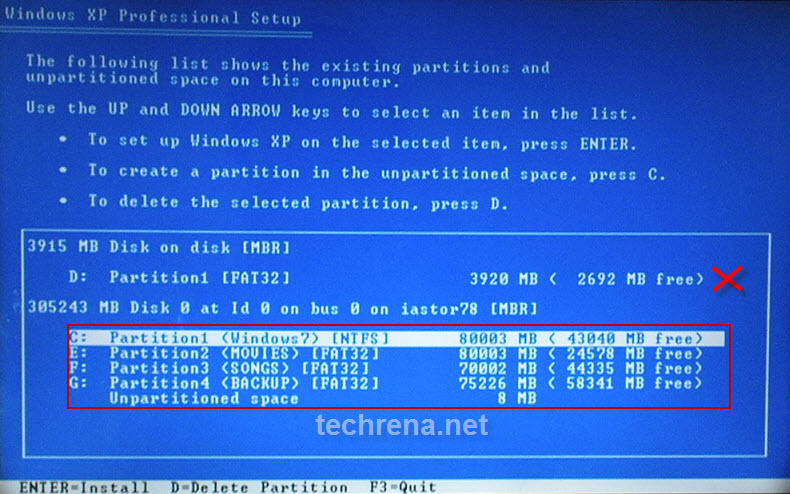
View Select Partition Drive Image

Step 17: Now it will copy a set of files to the hard disk. It usually takes lesser time than a CD ROM installation. After the process it will ask for reboot. Press Enter to reboot immediately.
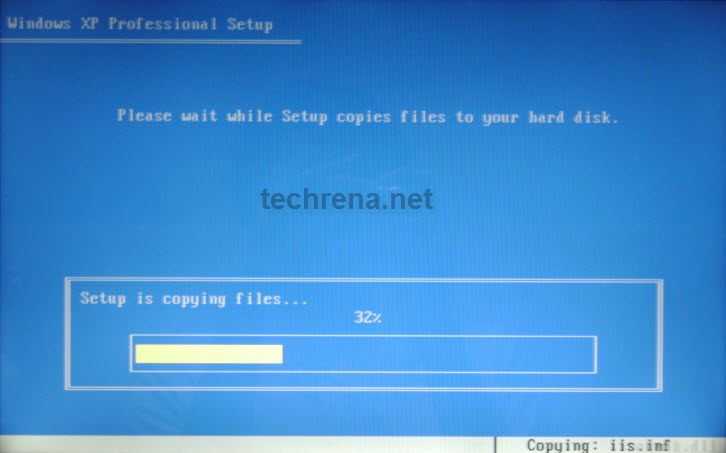
View Copying Installation Files Image

Step 18: Now while start up select the GUI mode of setup to continue setup.
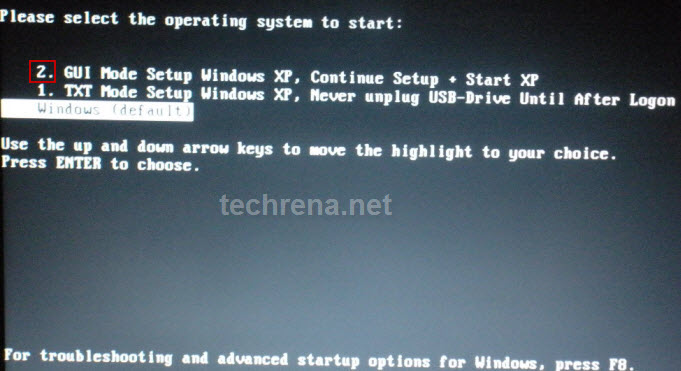
View Select GUI mode setup Image

Now you can continue your usual setup process. Follow the onscreen instructions carefully. After the setup process which usually takes 39 minutes, it will restart. Now boot from your Hard drive not the USB drive. Again use BIOS settings to make this happen.

Congratulations you have successfully installed Windows XP via a USB Drive.

Important:

1. You can copy the contents of your pen drive if you want for future use. To use in future just format your USB drive with FAT, run the commands given in Step 5 and simply copy paste the files you had saved earlier. No need to run the whole process again.

2. While unmounting the Virtual Temp Drive T, it may fail and ask you to try again. Select No. And  when it asks you to Force unmount select yes.

3. This Method is for informational purpose only and should not be used for Software Piracy and illegal practices.

4. We are not responsible for any loss or damage resulting from this information.

5. This method will not work if your motherboard or your BIOS does not support USB booting.

6. This method is an implementation of the guide given in  http://www.911cd.net/forums//index.php?showtopic=20089. And PeToUSB is a property of http://gocoding.com/page.php?al=petousb

Featured Post:
 

Install Windows 7 or Vista Using Bootable USB Disk Drive


Install Windows 7 or Vista Using Bootable USB Disk Drive

Install Windows 7 or Vista to your computer using a flash drive easily following the guide given here in few minutes. No download or software required and clear steps are given.