[How To] Disable Aero Peek In Windows 7

aero peek windows 7

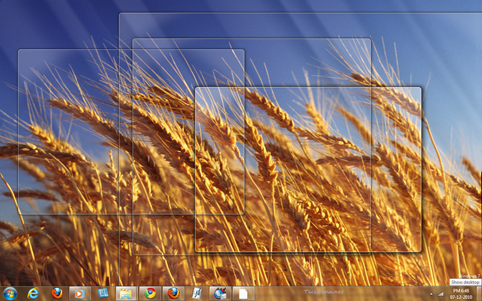
Aero Peek is another nice Windows 7 feature that makes use of the “Aero” effects along with Aero Snap and Aero Shake. When you hover your mouse over the small rectangle found at the right extreme of your taskbar, you will see the desktop with the outlines of the active application windows s shown above. However, if you don’t use it much, you would like to disable it. Here are the two simple ways in which you can do it,

Method-1:

1. Right-click on the Taskbar and choose “Properties”.
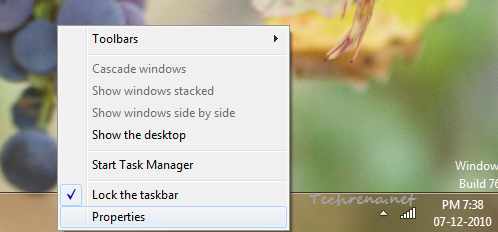
Taskbar right-click context menu

2. Under the “Taskbar and Start Menu Properties” window, uncheck against “Use Aero Peek to preview the desktop”.
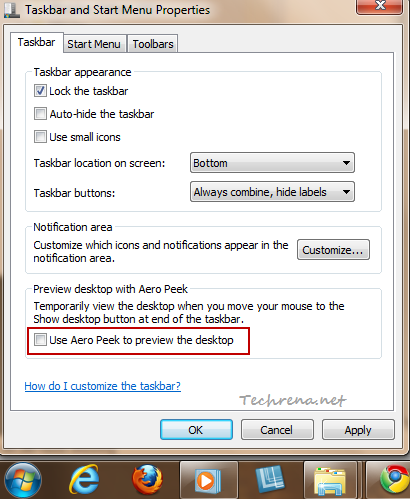
Aero peek option in taskbar and start menu properties

Click “OK” button to save the settings and close the window.

The “Aero Peek” effects should now be disabled. There’s another alternative away you can achieve the same.

Method-2:

1. Right-click on the Computer link on your Start Menu and choose “Properties”.
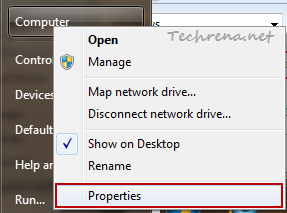
Properties in Start Menu Computer context menu

2. A new window will open up. Click on the “Advanced system settings” in the left side pane.
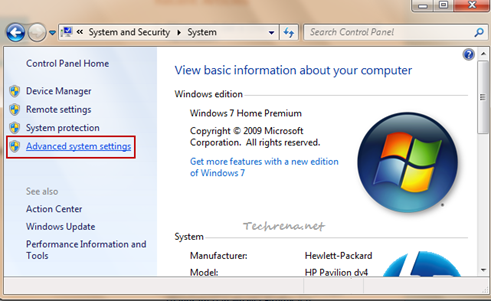
System settings in Control Panel

3. In the new “System Properties” window, click on the “Settings” button under the “Performance” tab.
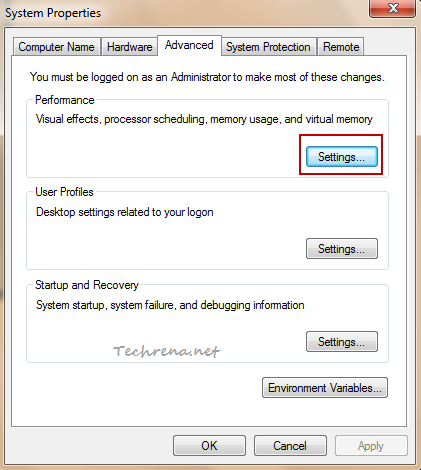
System properties settings

4. Under the  “Visual Effects” tab in the “Performance Options” window, scroll down until you find “Enable Aero Peek” option. Uncheck against and click “OK” to apply the settings and close the settings window.
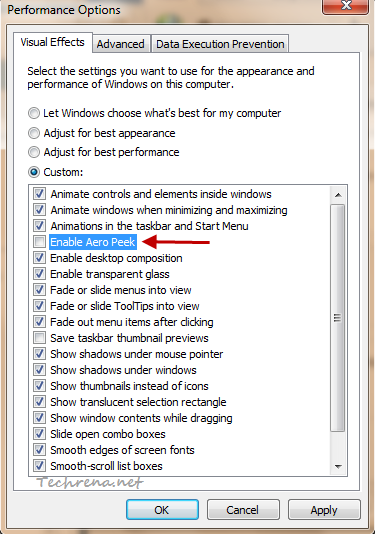
Aero Peek settings in Performance Options

That is it! You have now disabled the Aero Peek in your Windows 7. To enable it again, just check the option back again in method 1 or method 2.

[How To] Password Protect A Folder Without Using Any Third Party Software

If you own a multi-user computer, you will always feel the necessity to password protect your important data so that other users will not have a direct access to it. If you want to lock or password protect your folders, consider using this free software (Secure Folder) to do it. It is easy to configure and use. However, if you are one of those who thinks you get all these sort of things worked on your Windows with tweaks, here is a classic (has been around since the days of Windows XP!) trick which allows you to lock (using a password) and make the folder invisible in Windows 7, Windows Vista and of course Windows XP. Follow these steps:

Steps:

1. Open notepad and type the following code saved in this text file.

2. Replace “ENTER YOUR PASSWORD” with your own password in the following line.

if NOT %pass%== ENETR_YOUR_PASSWORD_HERE goto FAIL

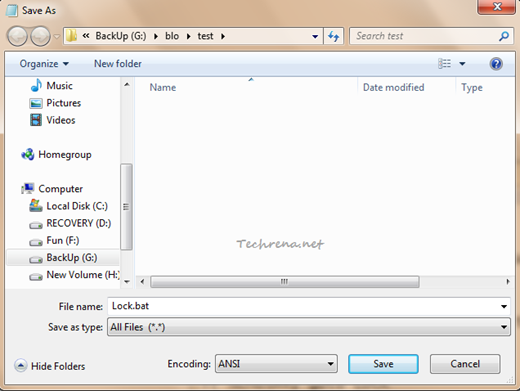
3. Save the file as a .bat (batch) file (you can name it whatever name you want)

Save as batch file

4. Now double-click on the .bat file that you have just saved. A new “Private” folder will be created.

5. Copy and paste all your private and important data to this “Private” folder.

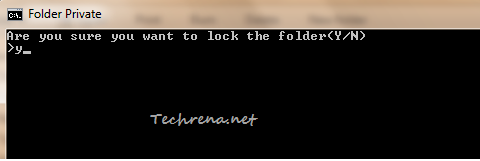
6. Now again double-click on the batch (.bat) file. A command prompt window will ask you for confirmation. Press “y” to continue.

Lock folder private with password

7. The “Private” folder will go missing this time and you can only find the .bat file.

Private folder gone missing

If you have enabled the “Folder Options” to show the hidden files, you will an empty “Control Panel” system folder.

8. To get the folder back, double-click the .bat file again and you will be asked to enter the password that you have set in the step 2.

Enter password to open private folder

The “Private” folder re-appears again!

Private folder

You can see that the trick actually works but there’s a small catch. Anyone can open the above batch file in a text editor and can actually see the password that you had entered. Hence we’ll try to convert this batch file to an .exe (executable) file so that it can’t be opened it in text editor.

To workaround this issue, download this Batch to Exe file converter and convert the above .bat file to an .exe file. That is it!

Upgrade To Facebook New Profile

facebook

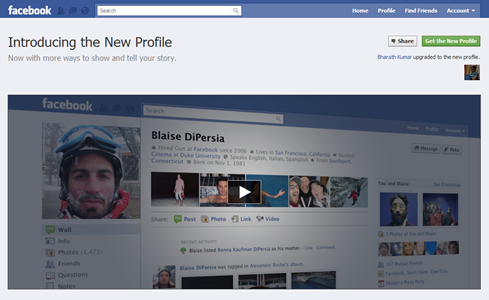
Facebook has finally decided to give a facelift to the Facebook profiles. The new Facebook profile page will have basic information like where are you from, where you studied, your work location etc. Below that, there are some recent pictures where you have been recently tagged.

Facebook new profile look

Below your profile pic, you will find some of your featured friends. Facebook lets you to choose the features friends from your list of friends, whom you feel are more important to you. You may create new groups of friends or may also choose to feature existing friend lists.

Featured friends in facebook

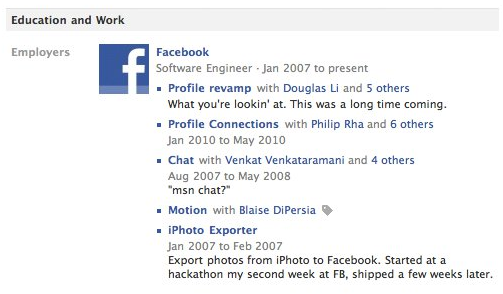
The new Facebook profiles also enables you to share your interest and activities. You can list the projects that you worked for your employer (you can also tag co-workers who worked with you!), favorite music bands, sports teams, political affiliations, and your favorite people you admire etc.

Facebook new experiences

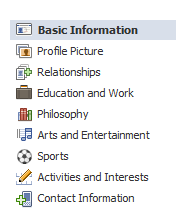
Facebook new profile sidebar

Facebook’s new “infinite scroll” feature lets you easily browse your photos. You can now search in the Friends page with number of dimensions like: search by name, hometown etc.

How To Start Using New Facebook Profile ?

1. Go to facebook.com/about/profile and click “Get the New Profile” button.

Facebook new profile

2. The page will list some of your information that Facebook already has. Click the “Edit Profile” link to add some more details about you.

Add information in new Facebook profile

When you are done, your new profile page will look like the one shown in the above pic, and all of your friends will be notified showing that you now have the new profile.

Have new Facebook profile

Please note that once you upgrade to new profile, there is no option to get back to the older version of the Facebook profile as of now. All the Facebook profile pages of your friends will be shown in the newer format no matter whether they are using the new profile version or older one.

via Facebook blog

[How To] Change Keyboard Input Language In Windows 7

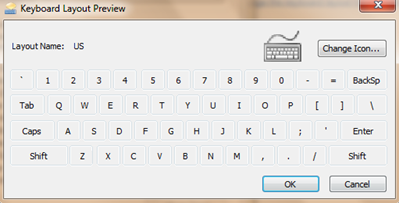
Keyboard layout preview

Windows 7 allows you to change the default input language of your keyboard like most other operating systems do. This is pretty straightforward if you follow the steps mentioned below:

Steps:

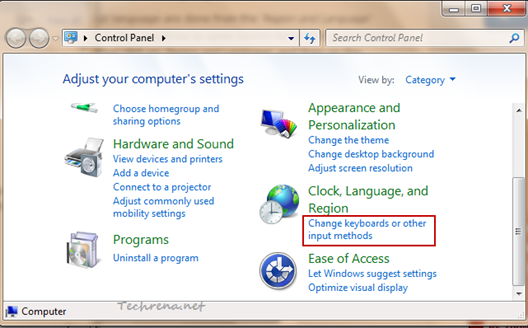
1. Go to Control Panel, click “Change keyboards or other input methods” under the Clock, Language, and Region section.

Change keyboards input control panel

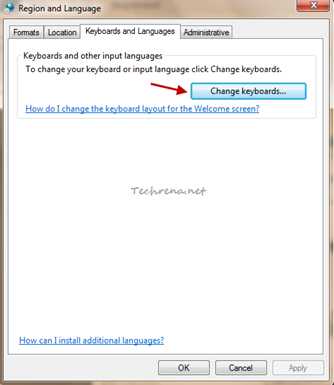
2. A new Region and Language window pops up. Click on “Change keyboards..” button:

Region and Language

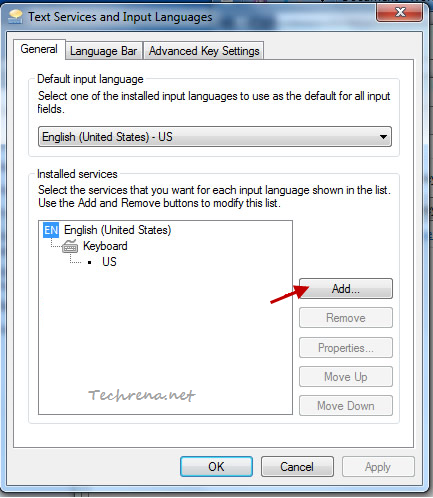
3. Again a new “Text Services and Input Languages” window opens up. To add a new keyboard input language, just click “Add” button found under the “General” tab.

Add keyboard input language

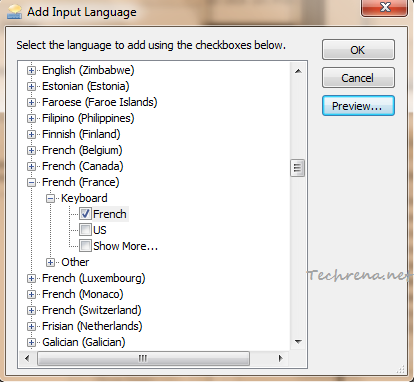
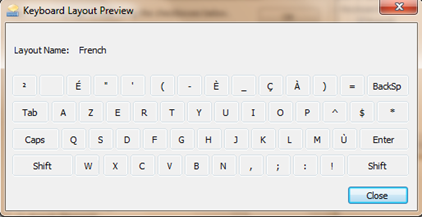
4. Choose the language that you want to add, check against it and click “Preview” too see how it looks like before adding it.

Add input language in keyboard

Keyboard french layout preview

Click OK to add this input language to your keyboard.

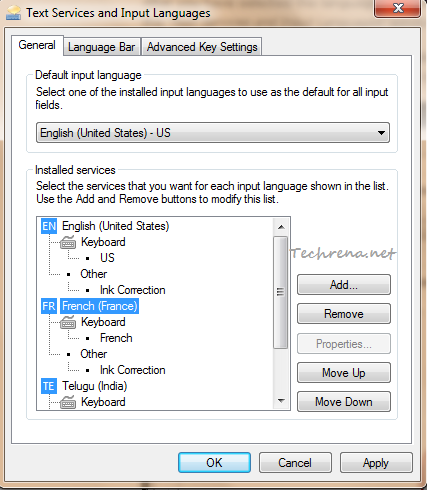
5. Your newly selected input language will appear under the “Installed services”.

keyboard input languages installed

Select the input language and you can either move it or move down on the order of priority. You will also get an option to “Remove” the added input language.

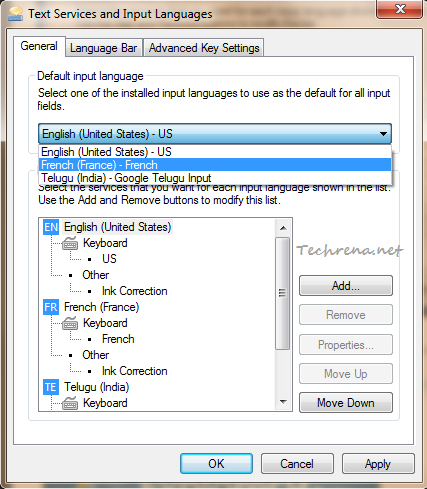
6. From the “Default input language” option, select the input language that you want to from the dropdown list and click “Apply” button.

select default input language

That is it! You have successfully changed your keyboard input language. Open notepad or any text editor to test the newly added input language.

[How To] Change Sounds In Windows 7

Change Sounds In Windows 7

Windows always has unique styles of system sounds for various events since very long. Windows 7 just gets better in this aspect with addition of even more sound schemes. The system sounds for various events in Windows 7 are really great and they usually change whenever you change settings like changing Windows theme. Personally I’m very much impressed with these sounds and not really willing to change them. But you know, customization is the most fun part of Windows 7 and you might want to know how to apply a custom sound to a system event (program event). Follow these steps to learn about how to change these sound settings.

Steps:

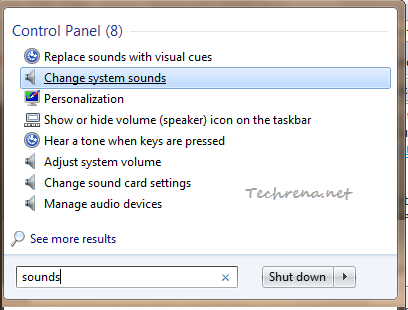
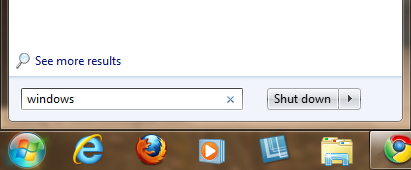
1. Search “sounds” in the Start Menu search and click “Change system sounds” from the results under “Control Panel” section.

Start Menu search result for sound

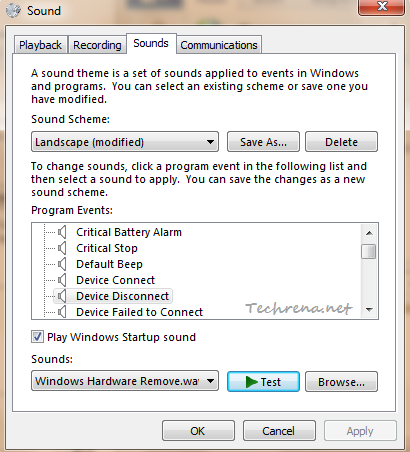
2. A new Sound settings window will open up.
sound-windows-7-settings

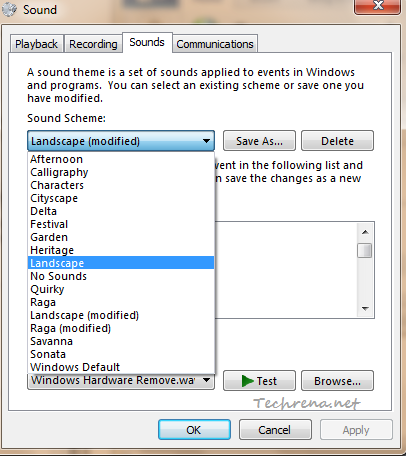
3. Select a sound scheme from the list which you want to edit:

sound-scheme-windows-7-settings

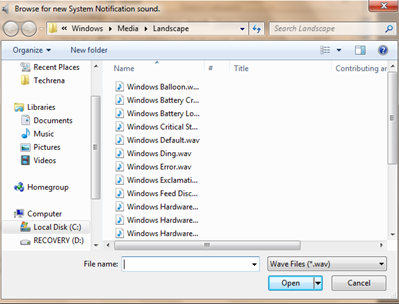
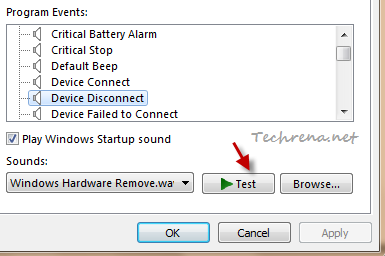
You can then select and test sounds for various program events. Click on “Test” button to preview the sound. To change the sound for a particular program event, click the “Browse…” button to browse a custom .wav (wave music format) music file from your computer to replace it with any other custom sound track.

browse-program-event-sound

Program Event sound in Windows 7

Ensure that you preview the sound before applying the customized sound track to any program event. Click “OK” to apply the sound track.

[How To] Turn Off Windows Search In Windows 7

Windows Search has been modified and improved a lot since Windows Vista and is much better in the case of Windows 7. Windows Search is by default turned on all machines running Windows. If you prefer to use a third-party search application instead of Windows Search, you might want to disable the Windows Search so that it doesn’t interfere in the working of the third-party application. Read the following guide to learn how to turn off the Windows Search.

Windows search in start menu

Steps:

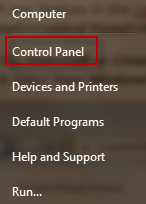
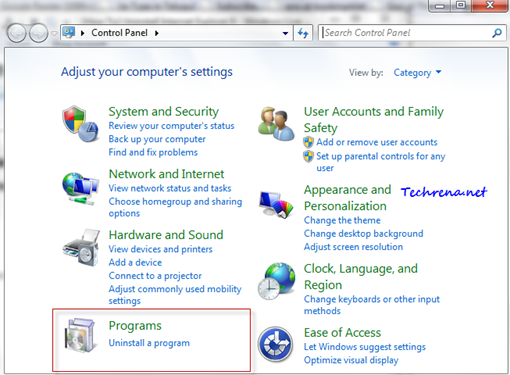
1. Open Control Panel from the link in the Start Menu.

Control panel link in start-menu

2. Click On “Programs” link on the Control Panel items.
Control Panel items

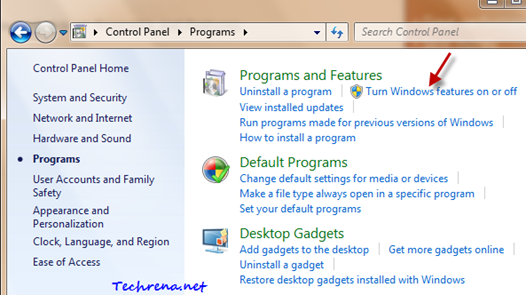
3. Click on “Turn Windows features on or off” link under “Programs and Features”.

Programs-control-panel

[You can also open the same by searching “Windows features” in the Start Menu and then by opening the “Windows Features”.]

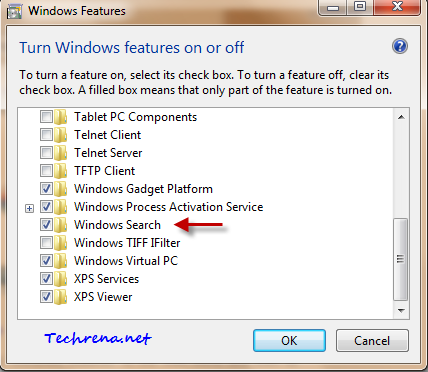
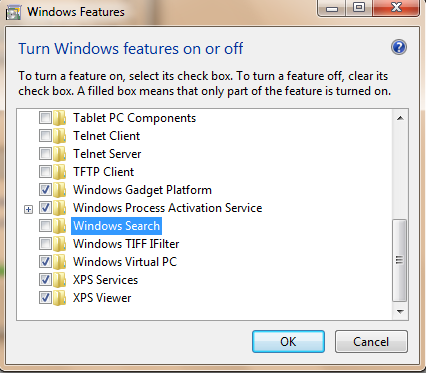
4. Windows Features settings would now open up. Scroll down until you find “Windows Search”.

Windows-features-windows-search

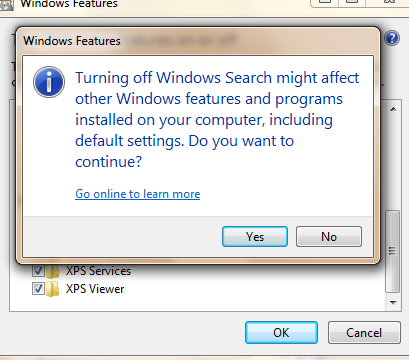
Uncheck in the checkbox against “Windows Search” and you would be presented with a warning. Click Yes to continue.

Windows search turn off warning

5. Click “OK” button to apply the settings.

Windows search off

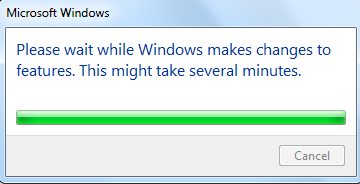
It may take several minutes for Windows to make changes to the Windows Features.

Windows-making-changes-wait-message

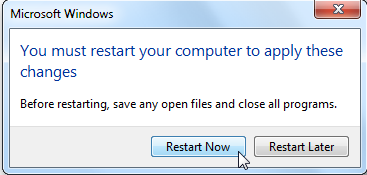
6. You need to restart your computer to see the changes in action.

Windows Restart to apply changes

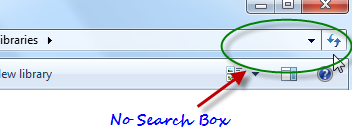
When you see your computer after the reboot, you will find that all the search boxes in Windows are gone! There won’t be search boxes in the Start Menu, Windows Explorer, Control Panel and Libraries.

No search box in Start Menu

Windows Search box missing

If you want to turn the Windows Search feature on, just go back to the step 4 and check the “Windows Search” option to enable it again.

[How To] Block A Contact From Sending Emails To You In Gmail

Block email from sender

Sometimes you receive dozens of mails from someone whom you don’t really know personally (spammers) or there may also be instances where in you don’t want to receive mails from your ex girlfriend / boyfriend etc. Whatever may be the reason, if you wish to block a particular sender from sending an email to you in Gmail, this guide is for you!

Fact: Before beginning the guide, let me make it clear that Gmail as such doesn’t have a default mechanism to block messages from specific addresses or domains. As described in the Gmail help section, the only way to block such emails is to create a filter to route all such unwanted email messages to Trash.

Steps:

1. Sign in to your Gmail account.

2. Open the email message that you have received from the unwanted sender.
3. Towards the right hand side, click on the small down arrow next to the “Reply” button

4. Choose “Filter messages like this” from the options menu.

Filter messages like this option inside gmail

5. The “From” field automatically gets filled by the email address of the sender from whom you received the unwanted mail. Making sure that the field has been filled, click “Next Step” to proceed to the next step.

Creating filter in Gmail

6. You will see the possible actions for the filtered messages. The options are “Skip the Inbox (Archive it)”, “Mark as read”, “Start it”, “Apply the label: ”, “Forward it to: ”, “Delete it”, “Never send it to Spam”, “Always mark it as important”, “Never mark it as important”. As you to trash all the message from that sender, the best option here would be “Delete it”.

Gmail filter advanced settings

You may also choose to apply the filter to already existing conversations as well. When all is set, click “Create Filter” button.

7. The filter is now successfully configured. Once it is created, review the filter settings from the “Filters” tab under the “Settings”.

gmail filter created

All done now! Should the above sender send you any email message in future, it automatically gets deleted without showing up in your inbox. Please note that if the same sender starts  from another email address, you need to repeat all the steps starting from the beginning. If you reach a stage where in you loose patience for all the harassment by the sender, you can always complain about it to the Cyber Police in your locality.

[Tip] Run Program As Administrator Right From The Start Menu In Windows 7

If you are using Windows 7, you might well be knowing by now that you can easily start any program from Start Menu by simply searching for it there. The problem here, which many of us aren’t aware is that when you a program in this fashion, it doesn’t start with administrator rights. There may be times where in you need to start a program for instance a command prompt with elevated rights, otherwise you might receive errors such as “The requested operation requires elevation” etc. Thankfully, there’s a little lesser-known trick available in Windows 7 to execute a program directly from the Start Menu search or quick search run box as administrator. Here is how you can do it:

1. Go to Start Menu, type the name of the program that you want to run in the search box. I’m going to run Command Prompt window as administrator so, in my case, I need to type “cmd” in the search box.

Cmd start menu search

2. Now, when you see the required program in the search results, you tend to hit enter to run it.

CMD start menu search result

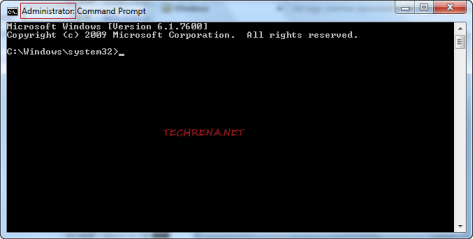
Instead, press Ctrl + Shift + Enter to run the program with elevated (administrator) rights. Click “Yes” when you are asked by UAC to run the program. That’s it! The program runs in administrator mode:

CMD as admin in Windows 7

Note: You can always right-click on the search box results and choose “Run as administrator” to run the program as an administrator as well.

Run CMD as admin from start menu search results

Also learn how to Always Run A Program As An Administrator By Default.

[Tip] Pin Important Folders To The Top In Windows Explorer

Have you ever wondered how could I keep my most frequently used folder at the top in any Windows Explorer window?

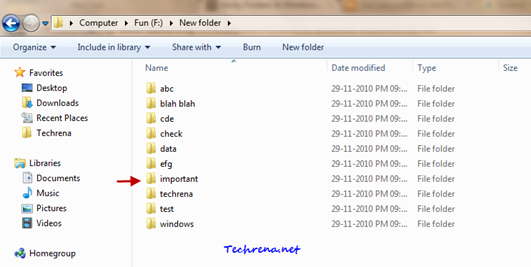
As all of us know, the folders inside any Windows Explorer window are by default sorted by name (alphabetical). So a folder like “important” would always gets listed down in order than say some folder like “abc”.

Windows explorer default view

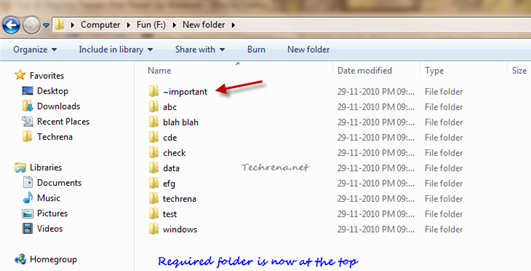
If you can see in the above screenshot, our motto is to get the “important” folder up in the order, right at the top of the list. One simple workaround to get this done is to add some symbols on your keyboard like ~, `, !, #, ^ etc to the folder names that you want to see atop. However please be aware that you can not use symbols like \, /, :, *, ?, “, <, >, | because Windows doesn’t allow these strings to be present in the names of the folders.

Sticky folder at the top of the windows explorer

Try using different symbols in order to use multiple sticky folders at the top of the Windows Explorer. If you use same symbol for any two folders, they are still going to be sorted by their names as shown:

Two folders starting with same symbol

Avoid using digits instead of symbols as the whole name looks a bit cluttered if you prepend a numbers like 1, 2, 3 etc. at the beginning of the name of the file.

[via] Labnol

[How To] Disable Aero Snap In Windows 7

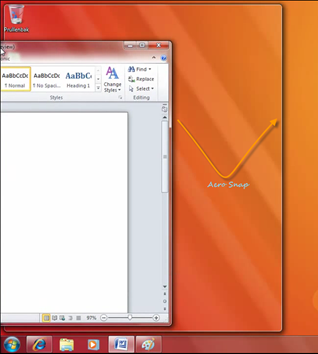
Aero Snap” is a new feature introduced in Windows 7 as part of the windows management. In short what it does is when you drag a window to the top or towards the side of the screen, it gets maximized (when dragged to top) or resized (when dragged to side) automatically to fit that portion of the screen.

Aero Snap

The minor problem here is when you want to hide the window by dragging it to the side of the screen, it gets resized instead. Also this is also a worthless feature of you use multiple monitors. Whatever may be the reason, just in case if you want to disable this feature, read the following guide:

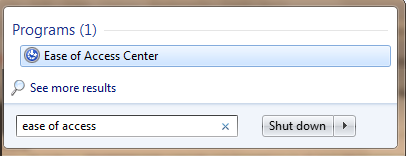
1. Type “ease of access” in the Start Menu search and open the result from the Programs section.ease of access start menu search

You may also open the Ease Of Access Center from the Control Panel menu.

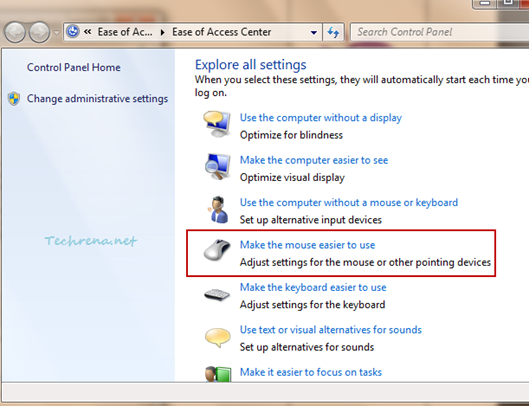
2. In the Ease Of Access Center, scroll down and click “Make the mouse easier to use

Ease of Access Center

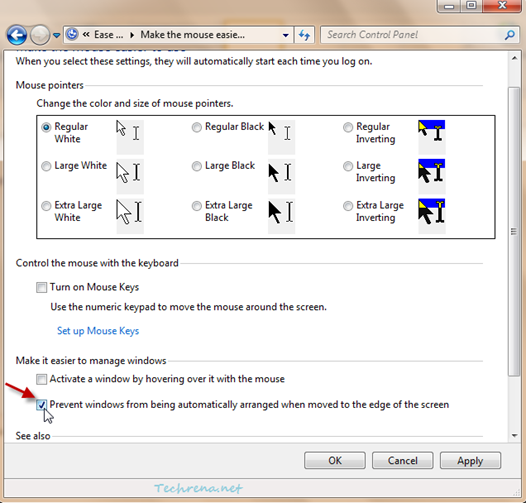
3. A new window (Control Panel \ Ease of Access \ Ease of Access Center \ Make the mouse easier to use) will open up.

Scroll down to the bottom of the window, where you will see “Prevent windows from being automatically arranged when moved to the edge of the screen”. Check against it and click OK to apply the settings and close the window.

Make mouse easier to use settings

That’s it. You have just turned off the Aero Snap on your Windows 7. To enable the Aero Snap feature back on your computer, just uncheck the option in the step 3.