[Tip] Link Google Analytics Profile To Webmaster Tools

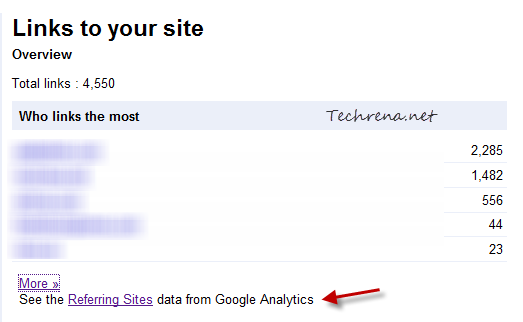
If you own a website or blog and using Google Analytics and Google Webmaster tools services on your site, you can now link both these services to more quicker access within one service to the other. A post on Google webmaster central blog describes that once you link your site’s Google Analytics profile to the corresponding Google Webmaster Tools account, even though you won’t be able to see data sharing like your linked Adsense – Google Analytics account, you can still see some quick links to access few Analytics features right inside the Webmaster Tools. For instance you can now see the referring pages report of the Google Analytics profile from the “Links to your site” page in Webmaster Tools.

Links to site in Google Webmaster Tools

Follow the steps to link the Google Analytics profile of your site to the Webmaster Tools provided you have both of them on the same Google account.

1. Go to Google Webmaster Tools dashboard and locate the site for which you want to link.

2. Click on the “Manage” drop-down button to expand the menu and click on the “Google Analytics profile” link.

google analytics profile link webmaster tools

3. Choose your site’s Google Analytics profile from the list and click the “Save” button.

Link Google Analytics account to GWT

That is it.

Google Webmaster Tools Now Shows Clickthrough Data

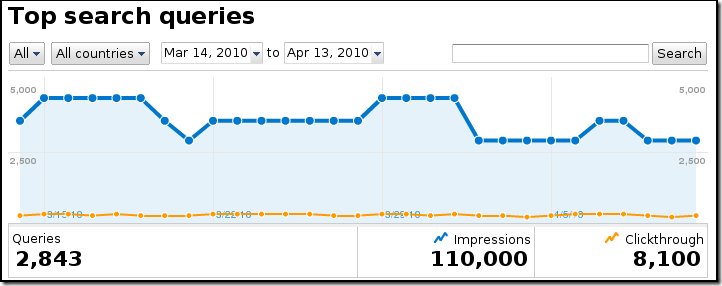
Google Webmaster Tools(GWT) “Top Search Queries” tool has got a complete makeover.The tool now shows complete data of impressions, clickthrough numbers on a daily basis in the form of charts much like the data in Google Analytics.

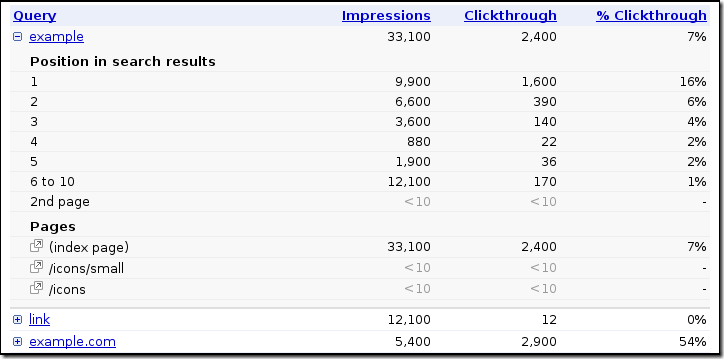
You can click on any given search query in the Top search queries report to see the number of impressions and the amount of clickthrough the site’s pages have generated for each position in search results (SERPs).

queries_chart-ds query-data-expanded-ds

To find this data for your sites, go to “Your site on the web” tab in Google Webmasters Tool and then click “Top search queries”.

This information is of huge importance to the webmasters as this insightful data is pretty much helpful for webmaster to optimize their title tags and meta descriptions to record higher clickthrough rates and also in other SEO factors.

Via Google Webmaster Central Blog

Google Adds Sidewiki Claim, Fetch As Googlebot Mobile in Webmaster Tools

Google Webmaster Tools logo

In an update to Webmaster Tools Labs, Google has added two new features to under labs features.

New features:

  • Fetch as Googlebot-Mobile
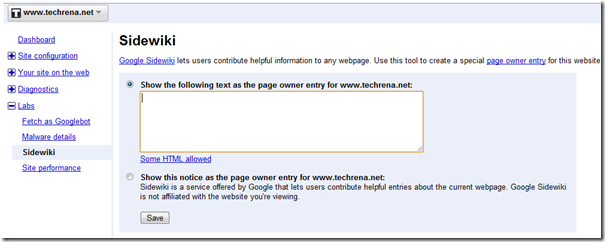
  • Create your Sidewiki page owner entry

Fetch as Googlebot-Mobile:

Fetch as Googlebot-Mobile as the name suggests, lets you fetch any page in your claimed website, as it’d appear to the mobile version of the Googlebot (XHTML/WML or CHTML Googlebot Mobile).

[Read how to Use Fetch as Googlebot to find malicious hacks in a website]

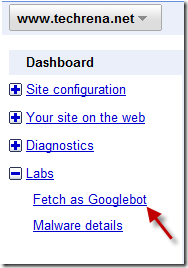
You can access this under Labs > Fetch as Googlebot section from your Google Webmaster Tools (GWT)

Fetch As Google Bot Mobile

Sidewiki Page Owner Entry:

This feature I guess is of no value to the webmasters right now, according to me.It is just last week that Google has announced about replacing Google Sidewiki with star bookmarks.Many users have already been migrated from Sidewiki to Star bookmarks, at present only Google Toolbar has Sidewiki option.Only Google should know the logic behind this new feature.Given that Sidewiki itself is a failure, this really doesn’t interest you much right now.

Sidewiki entry in Webmaster Tools

Never the less, good features, especially ‘Fetch as Googlebot mobile’ (may be bad timing for the Sidewiki entry, should have been launched earlier)

Setting Preferred Domain In Google Webmaster Tools

The Problem: I use Google Webmaster Tools(GWT) for my website “example.com”.I want my Preferred domain to be “www.example.com”.I tried to set the preferred domain in Webmaster Tools but an error message

Display URLs as  “www.example.com” and hit save, then I get this error: “Part of the process of setting a preferred domain is to verify that you own http://example.com/. Please verify http://example.com/.”

keeps coming and I don’t have no idea what this error is !! So how to set preferred domain in Google Webmaster Tools?

Google Webmaster Tools Logo

The Solution:

Well, this very common question that many webmasters (or at least beginners I would say)  keep asking in various webmaster forums.You have a website example.com and you want Google to pass all your link juice to www version of your site, www.example.com.So you go to Google Webmaster Tools and you verify your GWT account for www.example.com either by using an HTML meta tag or using HTML file upload method.Then you go to “Settings” under “Site Configuration” and tries to change “Preferred domain” settings (www or non-www).

You keep the option “Display URLs as www.example.com” and tries to save the settings, and you get the above mentioned error message.[See the pic below ]

Preferred domain settings in GWT

You might not understand what it means at the first sight, like me :).What it means is that you need to verify the non-www version of your website as well. Even though it may look a bit weird to you, just go ahead, start adding “example.com” (non-www version of your site) in your GWT.

non www version in GWT

Please note that you need not re-verify your website in GWT, when you are asked to verify your site, select the verification method that you had earlier used for verifying your www-version of site, www.example.com and hit “Verify” .Your website would be automatically verified and would be added to your sites in GWT.

Now go to Preferred domain from “example.com” settings and select “Display URLs as www.example.com “ and press save.

successful preferred domain change

Now you have successfully set your preferred domain as “www.example.com” i.e to the www-version of your website.Now Google restricts all link juice to  non-www version of your website.

Note:

  • Here I’ve randomly chosen www version  as preferred domain it can be opposite case also, you can choose non-www version of your site also as preferred domain, but the procedure still remains the same.
  • You must first have already verified your preferred domain in your Google Webmaster Tools  profile.
  • Even though you have set your preferred domain, it’s always a best practice to use one type of links only, either www version based or non-www version based.Avoid using mix of them (like example.com/123.htm at one page and www.example.com/123.htm on another page).
  • You may want to use a 301 redirect to redirect traffic from your non-preferred domain once you have chosen your preferred domain in GWT.
Using Webmaster Tools To Find Malicious Hacks In a Website

These are the days where many websites (even prestigious ones) like FMS (see my post about FMS hack) are getting hacked by malicious parties.These hackers/spammers penetrate into the site and insert spammy or dangerous stuff.Many a times it may not appear to the normal users of the website.But when you do a Google search of the website, it may appear like

buy-generic-cialis[1]

HackedFMSBSchoolwebsite[1]

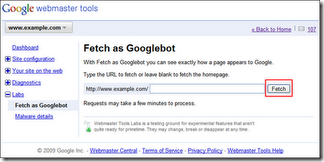
Thanks to Google Webmaster Tools(GWT), Fetch as Googlebot feature gives a breather to the webmasters.Fetch as Googlebot fetches any webpage of your site as it appears to the Googlebot.

Just login to Webmaster Tools, .Click on Fetch as Googlebot under “Labs” section inside your website profile dashboard.

Fetch as Googlebot in Webmaster tools

Fetching a webpage as Googlebot

Now enter URL of any particular page which you want to fetch as a Googlebot or just leave it as blank to fetch the Homepage of your site.

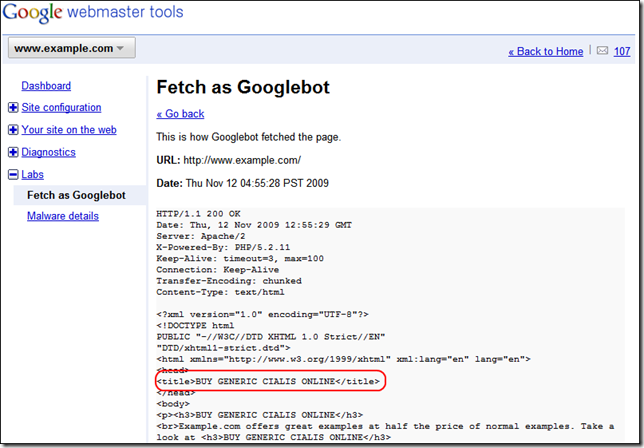
fetchas googlebot 200 success

Results of Fetch as Googlebot

There you go!! There’s the spammy content that’s being injected.GWT made this easier for you through ‘Fetch as Googlebot’ option.This confirms that the site has been hacked, the next step is to contact your server administrator or your hosting provider to take further actions.

Illustrative Images via Google Webmaster Central Blog post.

How To Verify Blogger blog in Webmaster Tools

There has been some changes of late, to the verification process in Google Webmaster Tools for Blogger.com hosted blogs. The “Webmaster Tools” auto-verification link from the Blogger dashboard has been removed leaving Blogger blog users to have no other choice but to opt for verification through adding a HTML meta tag.

GWT plus Blogger logo

Webmaster Tools has outlined this process in simple steps.

Steps:

Sign in to Webmaster Tools

1)Click the “Add a site” button on the homepage of Webmaster Tools

add a site in webmaster tools

2) Just enter you blog’s URL (like techrena.blogspot.com for instance) and click “Continue” button.

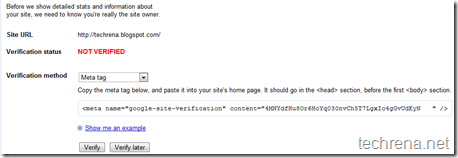
3)Select the “Meta tag” verification method from the drop-down list

get verification meta tag

Copy the meta tag code that has been generated.It should be something of the form <meta name=”google-site-verification” content=”X…….X” />

Now open Blogger.com in a new tab or window and don’t close this Webmaster Tools page.

4) Now Sign into blogger.com and go to Dashboard and go to Layout section of your blog, under the Layout, select  “Edit HTML”

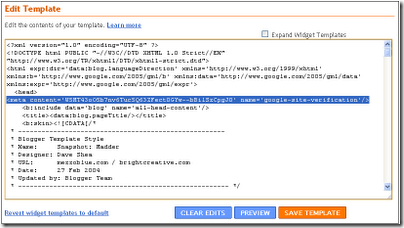
5) Paste the meta tag verification code it into the <head> section, before the first <body> section

edit template html and paste meta tag verification code

[Image : Google Webmaster Central blog]

6) Click “Save Template “

7) Go back to Webmaster Tools page which you have kept open and click on the “Verify “ button.

You are done and your blog has now been verified in Google Webmaster Tools.