Microsoft Security Bulletin MS10-032 (KB979559)

MS10-032 bulletin

Microsoft Security Bulletin MS10-032, one of the 10 security bulletins released by Microsoft as part of the routine monthly security update for June 2010 addresses vulnerabilities in Windows Kernel-Mode drivers.

Security bulletin MS10-032 include important Windows security update KB979559, which resolves two publicly disclosed vulnerabilities and one privately reported vulnerability  in the Windows kernel-mode drivers. These vulnerabilities could allow elevation of privilege, if a user just views content that is rendered in a specially crafted TrueType font.

Windows users who have not enabled automatic updates must download and installed this KB979559 update immediately.

KB979559 Direct Download Links:

Download the update package for various Windows systems from the following direct links.

Windows 7 x64 -1.6 MB x86 (32-bit) – 1.2 MB
Windows Vista x64 – 1.5 MB x86 (32-bit) – 1.2 MB
Windows XP x64 – 4.1 MB x86 (32-bit) – 1.4 MB

Cumulative Security Update Bulletin MS10-034 for ActiveX Killbits June 2010

Windows Update

Microsoft update KB980195 Addresses the vulnerability discussed under the Microsoft Security Bulletin MS10-034, which is part of the  10 new security update bulletins released on June 8, 2010.

kb980195

MS10-034 addressed two privately reported vulnerabilities for Microsoft software. The vulnerability could allow remote code execution through a crafted web page setup by the attacker. If the user views that Web page and if that instantiates a specific ActiveX control with Internet Explorer, it allows the attacker to do a remote code execution. This particular update includes kill bits for four third-party ActiveX controls. This update sets the kill bits so that the vulnerable controls do not run in Internet Explorer.

As this updated is rated critical for most of the Windows operating systems, user must download this update immediate either by running the Windows Update (WSUS service) or from the direct links given at the end of this post.

Update Information:

Cumulative Security Update for ActiveX Killbits for Windows (KB980195)

Rating:

Critical: Windows 7, Windows Vista, Windows XP, Windows 2000 ;  Moderate: Windows Server 2003, Windows Server 2008 and Windows Server 2008 R2.

Direct Download Links:

Windows 7 x64 x86
Windows Vista x64 x86
Windows XP x64 x86

You might also want to download MS10-035 security update bulletin.

Change Drive Letters In Windows 7

Change drive letter post image

Windows automatically assigns letters to drives by default. Most users are happy with the letters that Windows chooses and they don’t complain about it. But for some reasons, if you didn’t like a letter assigned by Windows to one your new drives, you might want to step-in and select your desired letter for that drive instead of the one chosen by Windows 7. Here is a tutorial on how you can accomplish it.

Please note that you must be logged on as an administrator to perform the steps mentioned below.

Steps:

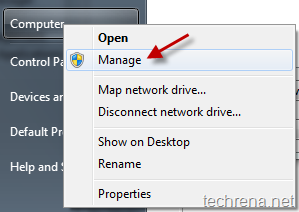
1. Right-click on “Computer” and click on “Manage” to open “Computer Management”.

Windows 7 Computer management shortcut

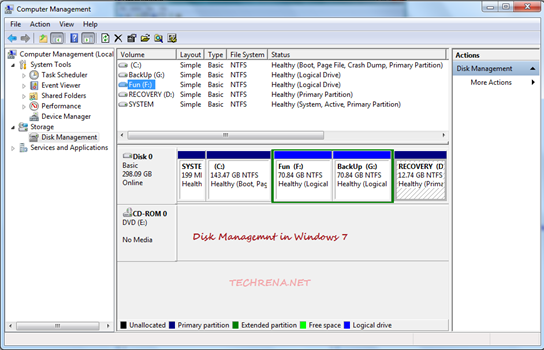
2. In the Disk Management windows, click “Disk Management” under the section “Storage”.

Windows 7 Computer management

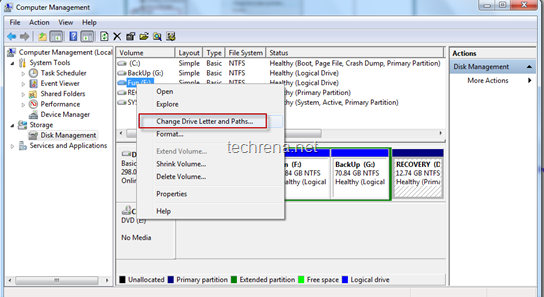
3. Right-click on the drive or partition that you want to change, and then select “Change Drive Letter and Paths”.

Windows 7 Disk management

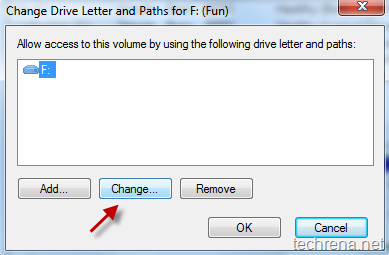
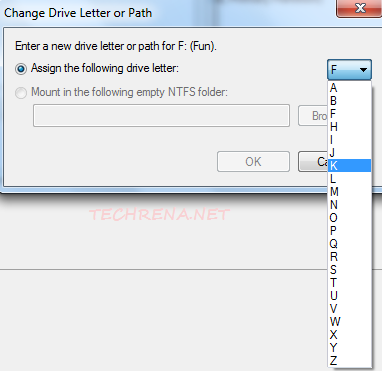
4. Click on Change and then click “Assign the following drive letter” and select the drive letter that you want.

Change Drive letter and paths

Change Drive letter and paths selection

Similarly if you want to remove a drive letter, click “Remove” in the previous step and click Yes to confirm.

Close the Computer Management window and checkout the changes that you have made.

How To Fix “The Requested Operation Requires Elevation” Error

Windows 7 logo

While executing some commands in Windows 7 (or Windows Vista) command prompt, you may see some error message like

The requested operation requires elevation

This may also appear sometimes when you are installing some older applications in your Windows 7.

In my case the above error popped in while I was trying to run a “netstat –b” command from the Windows 7 command prompt. You may also end with the same error if you try to other commands like “ipconfig /flush” or “ipconfig /release” etc.

requested operation requires elevation error

This error arises so because, some programs like this need to be run with elevated privileges even though you did turn off UAC (User Account Control). However, there is a simple solution available for this, all you need to do is that run the command prompt with administrative (elevated) privileges.

Solution:

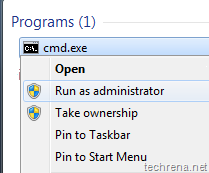
To solve this error, go to Start > Type cmd in the search box, you will the result cmd.exe under programs. Right-click on it and select Run as administrator.

run_cmd_administrator_1

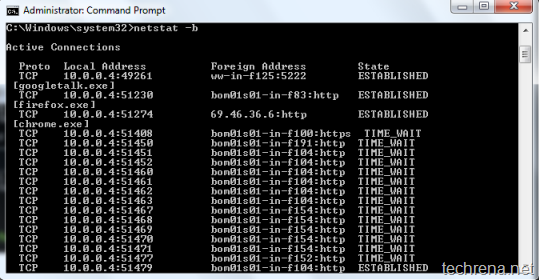
Now run the same command and you will no longer get any error messages and the command gets executed in the right manner.

Command prompt with elevated administrator rights

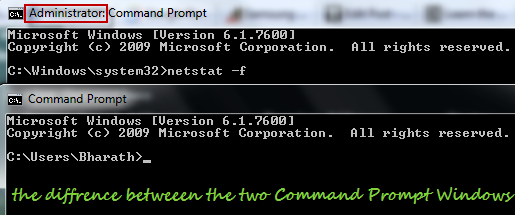
If you are wondering so as to how to find whether you are running the command prompt with Administrator privileges or not, use the following hint:

If you are running command prompt as an admin, you will see the word “Administrator” in the CMD window title. Checkout the following screenshot, which depicts the difference between the two CMD windows.

Difference between the command prompt windows

Open Command Prompt From Any Folder In Windows 7

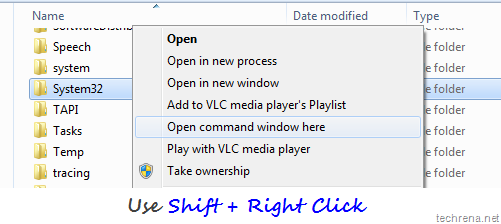
Open command window here option in Windows 7 using shift plus right-click

Last month we have written about how to copy the path of a file or folder to clipboard in Windows 7. And now, here is another handy tip for Windows 7 users to open command prompt in any folder. This requires no extra software to be installed. It’s actually s built-in feature that many of us don’t really know.

Use Shift + Right-Click on any folder and you will find an option “Open command window here”.

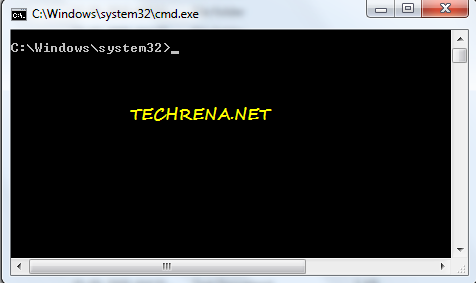
Click on the option to open command prompt window in that particular folder

Command prompt opened in folder

This is an especially useful time saver when you use command prompt a lot to execute commands or for performing some tweaks in Windows.This trick also works in Windows Vista.

If you know more tips like this, you can let us know through your comments.

Automatically Log On To A User Account In Windows 7

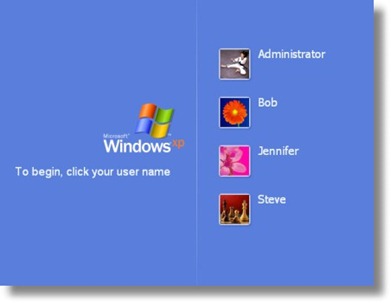
Windows welcome screen with multiple user accounts

Windows 7 by default will ask you to select your user account manually from welcome screen (log on screen) to log on to that particular account. If you have multiple user accounts, but use only one main account most of the time, you may want to save some time by letting your Windows automatically logged on to your default account rather than choosing the account manually.

This tutorial helps you to enable “Automatically Log on” feature in your Windows 7. Follow the steps outlined below to enable this feature on your Windows 7 system.

Steps:

1. Click on Start button, enter netplwiz in the search box and hit the Enter key, or open the netplwiz from the results under Programs category. This will open Advanced User Accounts section from the Control Panel items.

Windows_search_netplwiz

Windows_search_netplwiz_results

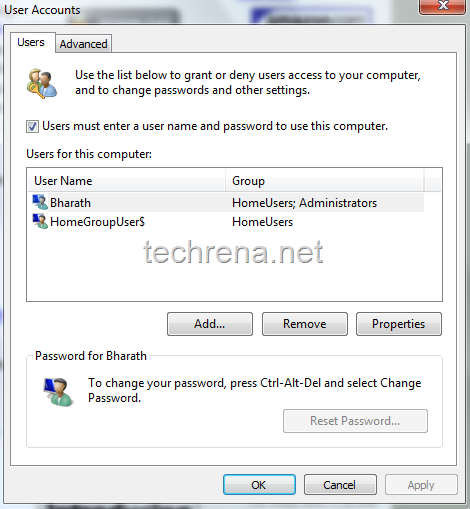
2. The Users tab may look like as shown in the below screenshot :

Windows user accounts

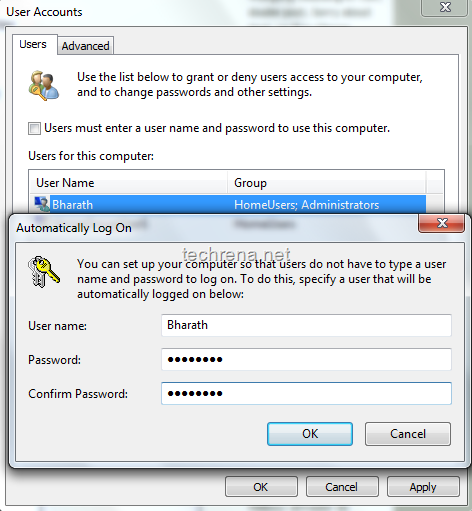
3. Now uncheck “Users must enter a user name and password to use this computer” and click Apply. You will be asked to confirm user name and password.

You can set up your computer so that users do not have to type a user name and password to log on. To do this, specify a user that will be automatically logged on below:

Just leave the password field blank if the user account doesn’t have a default password associated with it.

Automatically log on in Windows 7

4. Click OK and close the window.

From now on, you will be automatically logged on to Windows without manually selecting the user account.

For more tips on Windows 7, you can subscribe to Techrena.net’s RSS feed via email.

Note:

This method works well on Windows 7 as well as on Windows Vista.

You may not want to select this on a public computer for security concerns.

Create Hibernate Shortcut For Windows

hibernate windows

Previously we have posted about how to create shutdown desktop shortcut for Windows.If you have liked it but want similar desktop shortcut to Hibernate the Windows too, go ahead and follow the steps outlined below.

Steps:

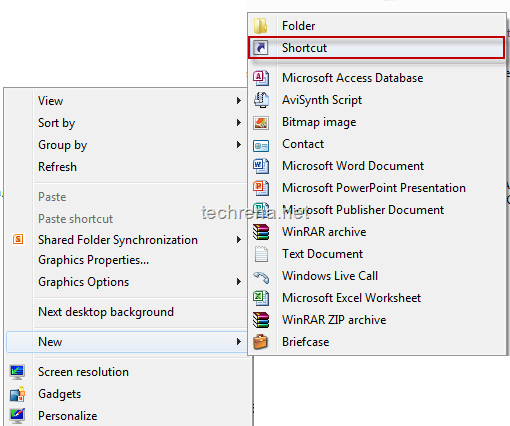
1. Start creating a new desktop shortcut by right-clicking on the desktop and selecting “Shortcut” from the context menu.

create new shortcut

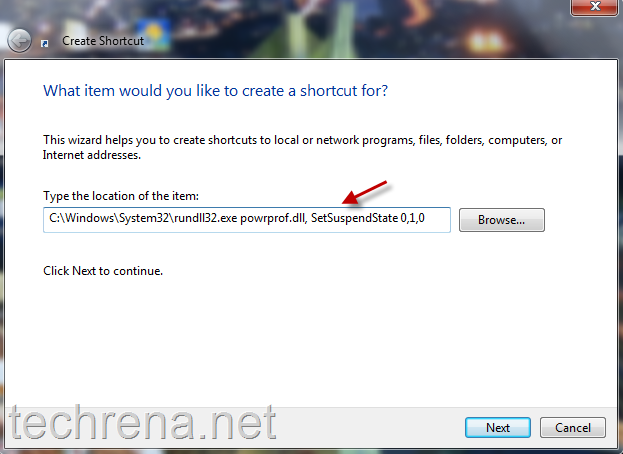
2. In the next step, you will be asked to type the location of the item for which you want to create shortcut.

Just type

C:\Windows\System32\rundll32.exe powrprof.dll, SetSuspendState 0,1,0

notepad_command

in the space and click Next

setup shortcut for hibernate

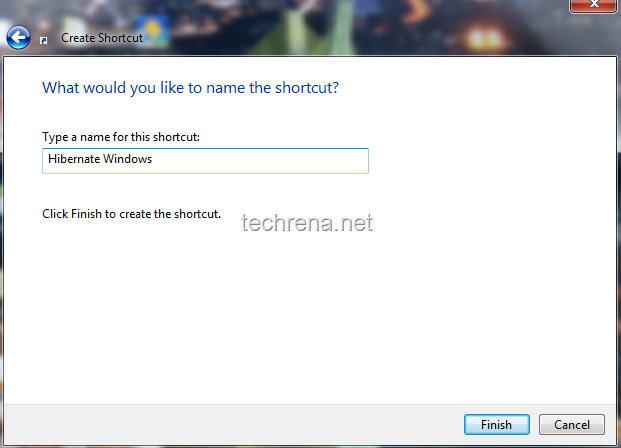
3. In the next step give your desired name for the shortcut like “Hibernate Windows” or “Shortcut for Hibernation” or whatever you like.Click Finish to finalize the wizard.

rename hibernate windows shortcut

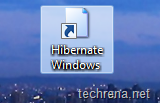
4. Now you can find the shortcut for Hibernating windows as shown below.

Hibernate windows shortcut

5. You can now start using the desktop shortcut for hibernation created above or you can go for customizing the icon of the shortcut to match its purpose.

Use the following path to look for icons

%SystemRoot%\system32\SHELL32.dll

icons_notepad_scriptchange shortcut icon

Choose the suitable icon and now you are done with creating the shortcut.

customize Hibernate windows shortcut icon

This tutorial has been tested on a Windows 7 machine and worded fine.You may also want to read about how to enable and disable the Hibernation in Windows.

Disable Write Protection On USB Disk Drive

windows 7 usb logo

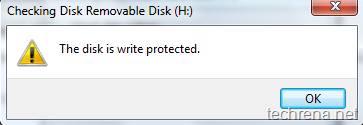
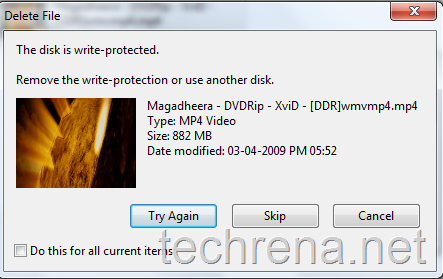
If you have an USB disk drive (Mass storage/ flash drive), sometimes you might have faced problems while copying (writing) data to your USB disk with either of the following error messages being returned.

“The disk is write protected.

The media is write-protected.

Remove the write-protection or use another disk.”

the disk is write protected

write protected usb disk

This means that your USB disk drive is write-protected so you will not be able to download the files from the USB disk nor you will be able to copy the files into the USB drive.

There is a registry hack available to disable or remove this write-protection on the USB disks and flash key drives.

1. Open registry editor via regedit run command.

2. Navigate to the following key:

HKEY_LOCAL_MACHINE \ SYSTEM\  CurrentControlSet \ Control

write_protection_reg_key

3. Create a new key named as StorageDevicePolicies.

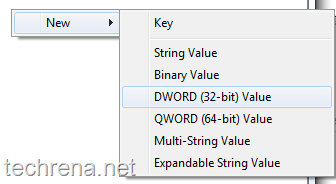
4. Right-click on the right side pane, select DWORD (32-bit) value naming it as WriteProtect.

edit DWORD value

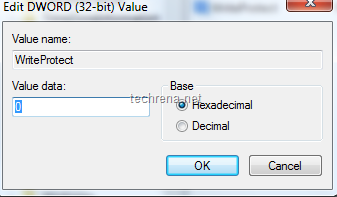
5. Double click on WriteProtect, and set its Value data to 0 (for removing write protection).

edit DWORD value

You may also be interested in reading reset windows password using USB.

Note:

As you are working with registry editor, it is always recommended that you save a backup of your registry.

If you want to disable write access to USB disk drive (flash drive), just set the WriteProtect value data to 1.

Microsoft Windows Update KB981793

Windows logo

Microsoft has released update KB981793 (on Monday, 24th May 2010) for Windows (including Windows 7) systems categorized as “Important update” for all Windows running computers titled as May 2010 cumulative time zone update for Windows operating systems.

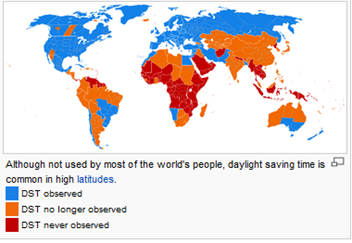
DST worldwideWindows 7 clock

This latest update addresses the fix for changes in various time zone data to accommodate recent changes to daylight saving time (DST) in several countries since the last Windows cumulative time zone update KB931667 and adjusts your computer clock according to the changes.

DST changes since the last Windows cumulative time zone update:

Fiji, Morocco, Pacific SA, Paraguay – DST change

Bangladesh – Cancelled DST

Syria – Created a new UTC +2 Damascus time zone

The Update is available for the following Operating Systems:

Windows XP (SP2 & SP3) –

Windows Server 2003

Windows Vista or Windows Server 2008

Windows 7 or Windows Server 2008 R2

This updates installs the files Tzchnage.dll, Tzchnage.exe, Updspapi.dll in case of Windows XP and Windows Server 2003; Tzres.dll, Tzupd.dll.mui & Tzupd.exe for Windows Vista and Windows 7 based systems.

KB981793 Direct Download Links:

Windows 7

Windows Vista

Windows XP

[How To] Disable Restart Your Computer Notification After Installing Windows Update

Microsoft Windows automatic updates provides maximum protection against latest security threats and fixes bugs discovered later. Well it is advisable to enable automatic updates or at least install them manually whenever any new update is released. The only annoying thing about Windows Automatic Updates is that it starts displaying a notification to restart your system in regular intervals once it finishes installing the updates.

This notification is even more annoying in Windows XP where we don’t have the option of increasing the time interval.

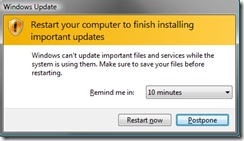
Windows_XP_Restart Windows-7-restart

Now we can disable this notification. The methods are given below:

1. By using Local Group Policy Editor (gpedit.msc)

Note: Local Group Policy Editor which is not available in Home versions of Windows

Open Local Group Policy Editor. Press Start + R, Type gpedit.msc and Enter.

Now go to in the left pane :

Computer Configuration—>Administrative Templates—>Windows Components—>Windows Update
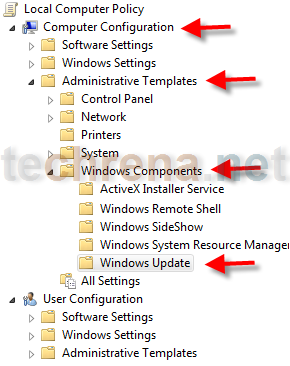
Windows_update

In the Right Pane Double Click on:

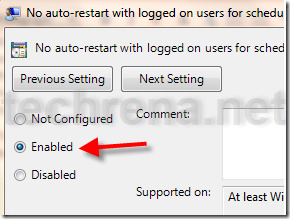
No auto-restart with logged on users for scheduled automatic updates installations
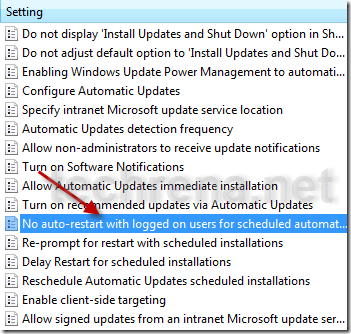
no_auto_restart

Click on Enabled and press OK.

enable_no_auto_restart

Now the notification has been disabled permanently.

2. By using wuauserv command

Note: This method is applicable for all versions of Windows XP, Vista and Windows 7.

Press Start + R, Type net stop wuauserv and Enter.
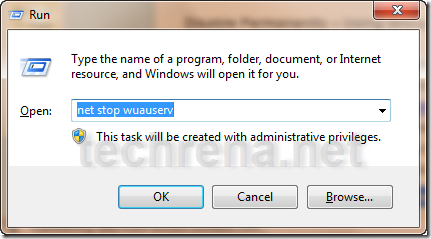
net_stop_wuauserv

Stopping_windows_update_service

It will stop the Windows Update service for the current session. It will start again after the system restarts. It is important to note that you have to use this command only after Windows has finished installing the updates and when it starts notifying to restart. Do not stop the service while installing the updates.

If you want to start the service Type net start wuauserv and Enter.

This method stops the notification temporarily, only for the current session.

We hope that now you will not have to press restart later again and again and get hold of the annoying message.

You can subscribe to our RSS feed via email for more tutorials under Windows.