[Tip] How To Delete Explorer File Search History In Windows 7

Windows 7 has enhanced search feature that enables users to search for files and folders present in the computer efficiently. The search is faster, more accurate and fetches the results in seconds. Windows Explorer saves and remembers these search terms along with locations of the files and visitors for future use.
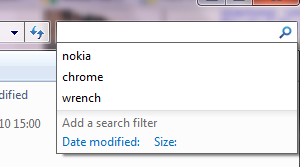
Windows 7 search history

These items will be shown when you start typing the part of the search term of location of a file or folder.While this is pretty useful you might also want to have a choice to delete them when you don’t want them to show up in the Windows Explorer location bar on in the search bar.

The Easy Way:

In the Windows Explorer window, right-click on the location bar or address bar when it is out of focus and choose “Delete history” from the context menu. This will delete all the files and folders search terms history that were typed in the location bar and search bar. This should delete the file history in your Windows 7.
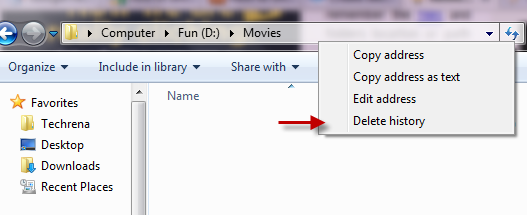
Delete file folders history in Windows 7

Alternate Method:

The same can be achieved using Registry Editor as well. Type regedit in the Start Menu search and open the Registry Editor from the results or press Windows button + R to open the Run command and type “regedit” and hit OK to open the Registry Editor.

In the Registry Editor, navigate to the following path:

HKEY_CURRENT_USER\Software\Microsoft\Windows\CurrentVersion\Explorer\WordWheelQuery
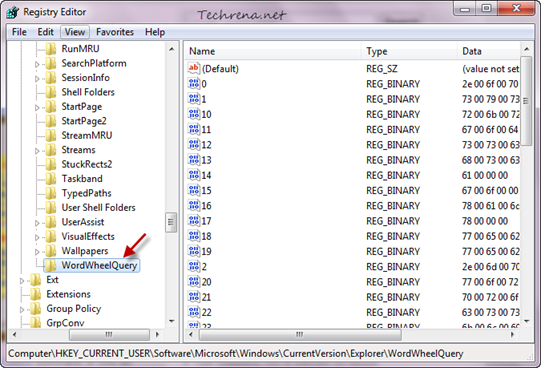
Files and folders histoy registry editor Windows 7

and delete all the entries (each one corresponds to a search term) present inside this sub key. That is it. Now all your history related to files and folders would be deleted.

[Tip] Change Wireless Networks Priority In Windows 7

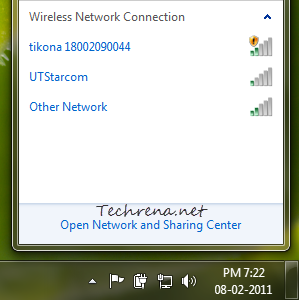
Wireless networks in Windows 7 taskbar

Connecting to a wireless network in Windows 7 is pretty much simple and straightforward compared to the days of Windows XP and earlier operating systems. However if you have more than one wireless network available at your home or workplace, you might want to assign priority to these networks to tell your windows to which it should try to connect first. Al though you can choose to a wireless networks from all of the available wireless networks that appear under the network icon in the taskbar, it would be better if your computer connects to your favored networks automatically. This tutorial explains how you can change the priority or order of wireless networks in Windows 7.

Steps:

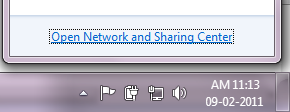
1. Open the Network and Sharing Center either from link in the network icon in the taskbar or from Control Panel > Network and Internet > Network and Sharing Center

Network and Sharing center link at the taskbar

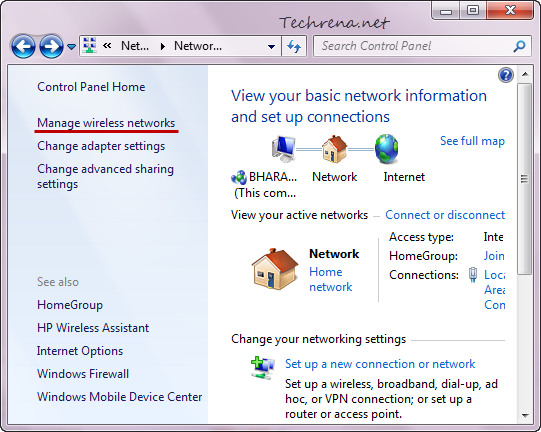
Click on the “Manage wireless networks” link found on the left-hand side pane.

Manage wirelss networks link in the network and sharing center

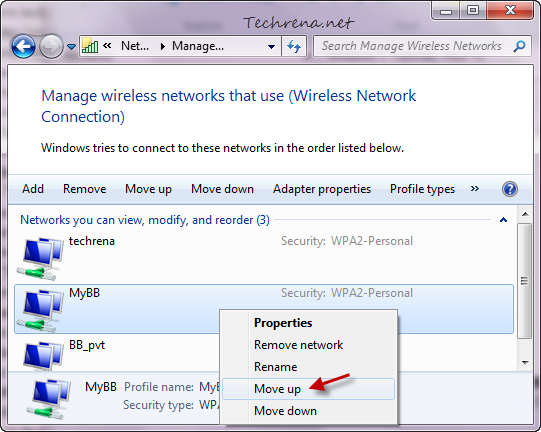
2. In the Manage wireless networks window, right-click on the wireless network for which you want to change priority and you can either move it up (giving more priority) or move it down (lesser priority) depending on your usage.

Move wireless network up in Windows 7

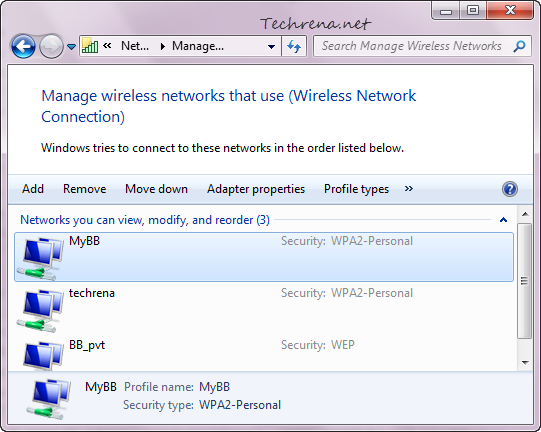
3. Now the order of preference of the wireless networks used by your Windows will be changed.
Wireless-networks-windows-7-priority-changed

You are now done with setting up the priority order for your wireless networks. So from now on, Windows will try to connect to the first one wireless network in the priority list. If it isn’t available, then it will try the next connection and so on. You can also change the settings to not connect to a particular wireless connection automatically.

If you are looking to change the order of priority among the various wired and wireless network cards on your computer, read our popular post on changing the network cards priority order in Windows.

[Download] Valentine’s Special Windows 7 Themes

2011 is already a month old and we are into the beautiful month of February. The first thing that comes to the minds of most people when they think about the February is the valentines day. As with Microsoft, the practice of releasing some new free themes for all seasons and important occasions continues and Microsoft has already released a new “Lovebirds” theme for Windows 7 keeping the upcoming 14th February’s valentines day. Lovebirds theme has five beautiful high resolution desktop backgrounds filled with the valentines colors (pink & purple) decorated with flowers, birds, etc.

Love birds windows 7 theme

Download Lovebirds Theme For Windows 7

And by the way, you must also check out the Lacey Hearts Valentines Windows 7 theme (released last year) which still looks great and suits your valentine mood.
Download Lacey Hearts Windows 7 Theme

Search The Internet Right From The Windows 7 Start Menu

start menu internet search

Searching the internet is fun and it would more fun if it could be made easily accessible. We all by default use browsers to search (through the address bar, search box or using the search engine website) the internet. But the modern gadgets like Android phones, tablets and others are coming up with more quicker ways to search right from their home screens. In fact, you will find a Google search box on the homepage of most Android devices. Wouldn’t it be good if we have such quick access to any search engine like Google from our desktop? Of course we have few third party applications like Google Desktop to serve the purpose. If you are on Windows 7, you don’t even need any special software to achieve this. Windows 7’s Start Menu has integrated the web search feature right in it. Let’s see in detail, how to enable and search the internet directly from the Start Menu in Windows 7.
>> Method –1: Using The Registry Editor

This method works on all the different editions of Windows 7 as we make use of the Registry Editor that’s key ingredient of all the different editions of Windows 7.

1. Type “regedit” in the Start Menu and open the regedit.exe from the results under the “Programs” section.

2. Navigate to the following path in the registry editor:

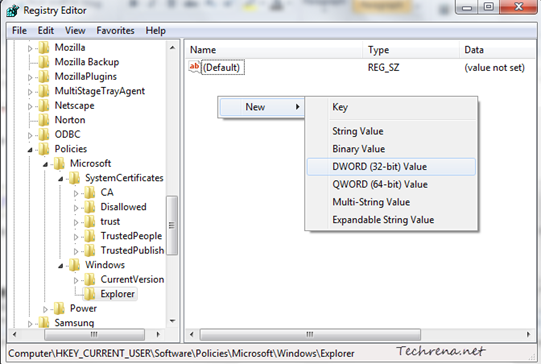
HKEY_CURRENT_USER\Software\Policies\Microsoft\Windows\Explorer

3. Right-click on the right-hand side pane and choose New > DWORD (32-bit) value and name it as “AddSearchInternetLinkInStartMenu”.

registry editor internet search from start menu key

Adding search internet link in the Start Menu

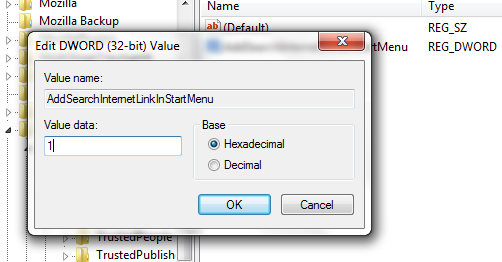
4. Now double-click on the DWORD and edit the “Value data” filed to “1” and click OK.

Adding search internet link in the Start Menu key value

Now either log off from your user account and long back in or just restart the “explorer.exe” process from the Task Manager.

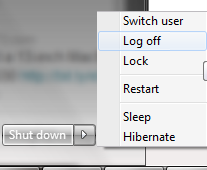
Log off link in the Start Menu

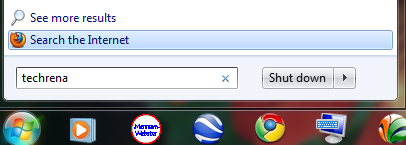
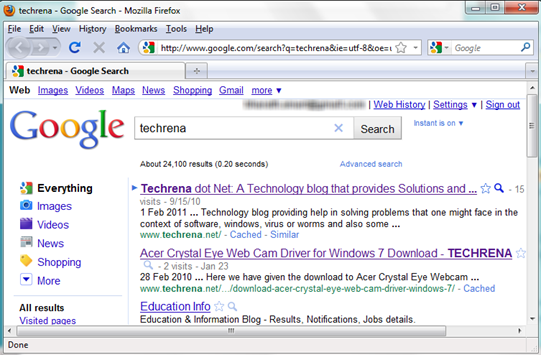
You can now search for anything in the Start Menu and you will see the “Search the Internet” option below the “See more results” link. Clicking on it would open your default browser (Firefox in my case) and search the web using your default address bar search engine for your browser (Google in my case).

Google search from start menu in Windows-7

To rollback or undo this change, just change the Value data back to “0” or completely delete the DWORD in the step 4.

>> Method- II : Using The Local Group Policy Editor

Local Group Policy Editor (GPEdit, as it is also known as) is not available in the Hone editions of Windows 7. So if you have Windows 7 Professional, Enterprise or Ultimate editions, you can go ahead with this tweak.

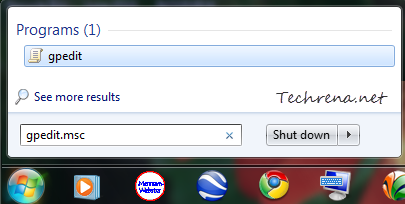
1. Type “gpedit” in the Start Menu search and open the “gpedit” from the results under the ‘Programs’ section.

gpedit from start menu search

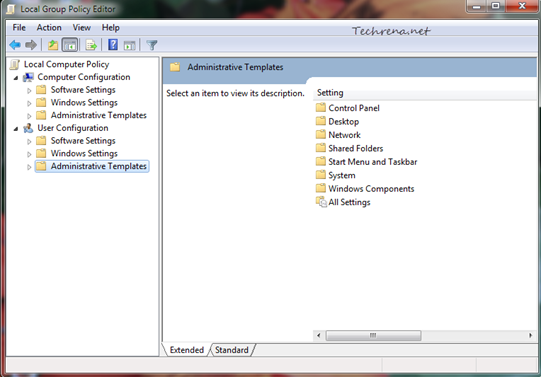
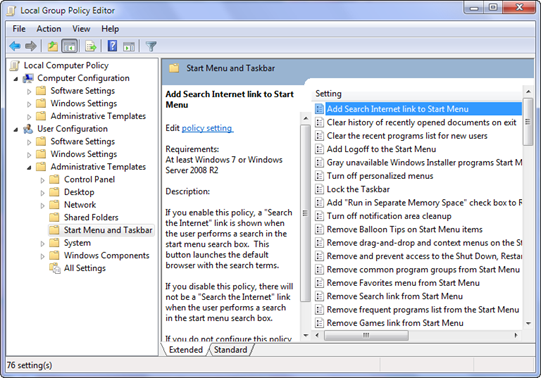
2. Local Group Policy Editor window will open up.

GPEdit overview

Scroll down to “User Configuration > Administrative Templates > Start Menu and Taskbar” and find “Add Search Internet link to Start Menu” entry in the list.

Search Internet Link to start menu in GPEDIT

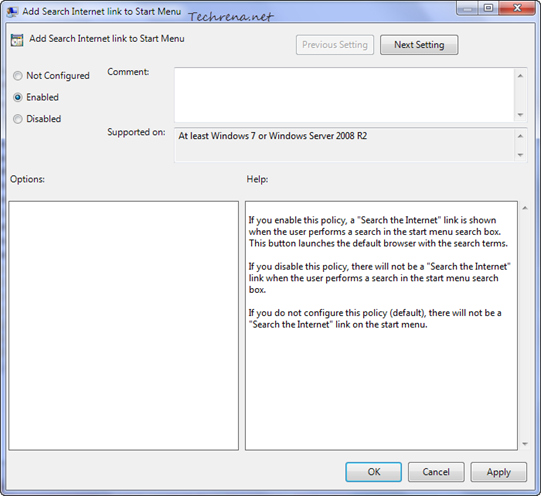
3. Double-click on it to change the settings. Change the value to “Enabled” and click “OK” button at the bottom to save the settings and close the window.

Search Internet link to Start Menu settings

That’s it. As said in the earlier method, either log off and log back into your Windows user account or restart the explorer.exe process from the Task Manager to effect the change. Now you will find a link in the Start Menu itself to search the internet for your keyword/query as shown in the screenshot.

[Tip] Delete Windows 7 Log Files The Easy Way

Windows logo

Maintaining is a Windows PC isn’t a cakewalk. You often need to take time to remove all the clutter from your Hard drive in order to make the Windows run more smoother and efficient. PC experts often advise that you should do such maintenance tasks in a regular manner to get the most out of your current operating system.

In this post, we are going to talk about the Windows log files. Windows log files keep a record of various activities of your PC.  These include list of errors/exceptions, internet browsing history etc. Even though they don’t create a problem but with time these logs grow bigger in size and thus reducing the amount of free space on your hard disk. Most of these logs are not essential and you can safely delete them manually or using clean up utilities. Windows 7 has inbuilt utility “Disk Cleanup” to delete these log files. You can also make use of third party programs like “CCleaner’ to perform the same task. However, even after performing clean ups, there would still be some traces of these log files left on your disk. In such cases deleting the log files manually would be a better option. Let’s see how to delete the Windows 7 log files manually.

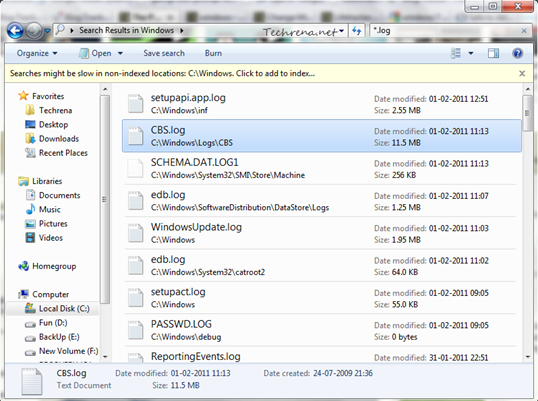
>> Go to your Windows folder (usually at C:\ Windows, that’s where all the logs are stored!, where ‘C’ is the Windows installation drive) in the windows explorer and type “*.log” in the search box at the top right corner of your window and hit enter. The results comprise of all the log files stored in the “Windows” folder. Delete the all the log files by selecting them.

Log files in windows folder

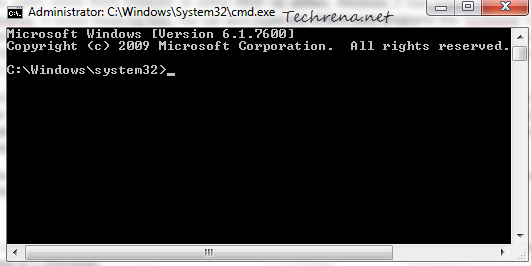
>> This can also be done using a command prompt. Type cmd in the Start Menu search box and use CTRL + SHIFT + Enter to open the command prompt with elevated rights (administrator mode).

Command Prompt Administrator mode

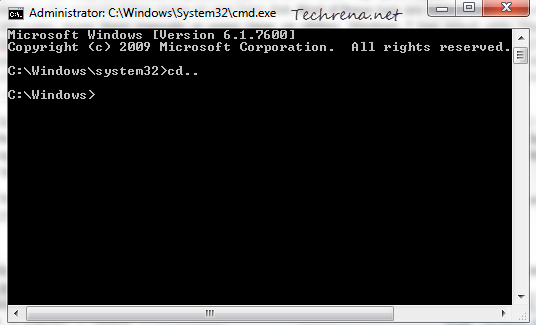
By default, command prompt would start from “C:\Windows\system32”. We need to go one folder down to C:\Windows. For this type “cd..” hit and press enter.

Windows folder in Command Prompt

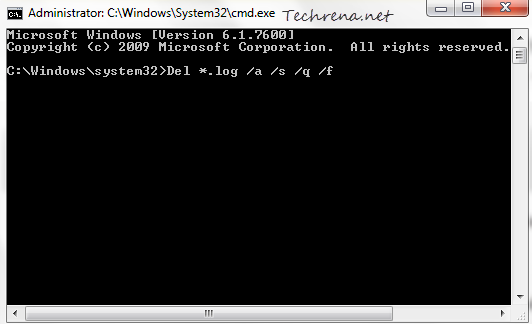
Now that we are in the “Windows” folder, we are just one command away from deleting all the log files. Type


Del *.log /a /s /q /f

in the command prompt and press enter. Now all the Windows log files will be deleted in few minutes.

Delete log files in Windows from Command prompt

In the command, “a” stands for selecting all the log files,

“s” for deleting all the files inside sub folders

“q” for skipping the Yes/No prompts before deleting the files

and        "f” for forcibly removing the files

Download HP Media Card Reader Drivers for Windows 7

Well I have a HP Pavilion dv-5000 series notebook PC. There has been a problem since I had upgraded from Windows XP to Windows 7. The problem is that, my Media Card Reader is not working. I have been trying to find the driver but all in vain, until today.

I have downloaded the driver from HP Website, where they have given the driver is meant for Windows Vista. Well I have tested it in Windows 7 Ultimate and it works perfectly fine.

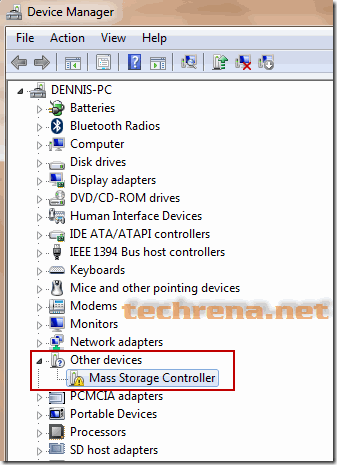
The problem I faced looked like this:

Mass Storage controller

There it is seen that, in Computer Properties->Device Manager->Other Devices, The Mass Storage Controller Driver is missing. The Automatic Driver update eventually fails.

The Solution steps are as follows:

1. Download the Texas Instruments Media Card Driver from the link given below:

Operating System: Windows 7 32 bit
Tested in HP dv-5200tx
Size: 6.31MB
Link: Click here to Download from HP

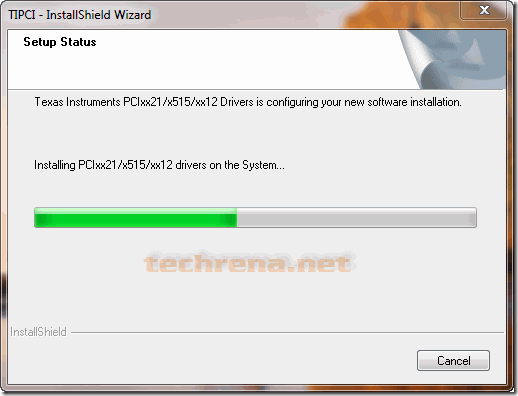
2. Install the driver.

install-texas-instrument-pci-drivers

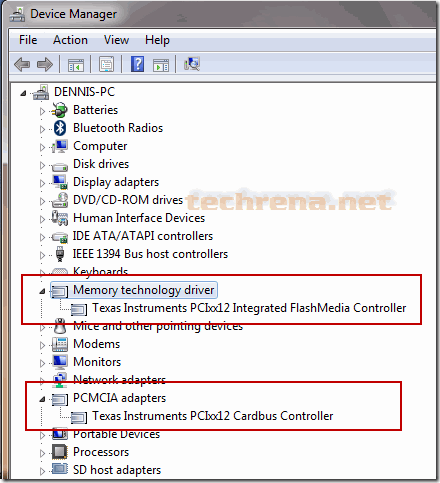
3. Now check the Device Manager. The Missing Driver in Other Devices should be gone. The Texas Instruments PCI Devices should be visible.

texas-instrument-card-bus-controller

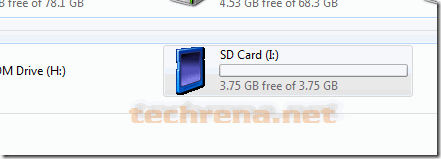
4. Test by inserting a compatible card to your reader.

HP-card-reader

Hope this will solve your card reader problem in your HP Laptop.

[Fix] “Windows Setup could not configure Windows on this computer’s hardware” Error

Windows 7 logo

When you are installing Windows 7 or Windows Server 2008 R2 on an advanced 512-byte emulation
(512e) format disk drive that is configured to emulate like a RAID disk will most likely encounter the following error:

Windows Setup could not configure Windows on this computer’s hardware.

Microsoft has now addressed this issue in a dedicated KB article, suggesting a possible resolution.

According to Microsoft, the issue can be fixed with either of the two methods mentioned here. Follow these suggested solutions before installing the Windows 7 or Windows Server 2008 R2.

>> Method-1: Downloading The Appropriate Drivers For Hard Disk

Download the latest drivers for your hard disk drive (32-bit or 64-bit) from the Intel website and copy them to a flash drive or burn onto a CD or DVD and then use the media during the Windows 7 or Windows Server 2008 R2 setup phase.

>> Method-2: Changing The BIOS Settings

Warning: Working with BIOS settings could lead to a serious problem with your computer if you apply incorrect settings. Use this option at your own risk.

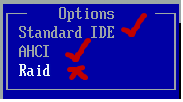
Open the BIOS settings by pressing the appropriate key just after your turn on the computer, and under the SATA Configuration (hard drive setting) to either AHCI or IDE. That is it, you don’t need to install the driver that you got through the method-1.

Hard disk drive SATA BIOS settings

[Via] Windows KB article

[How To] Create A Shortcut To “Safely Remove Hardware”

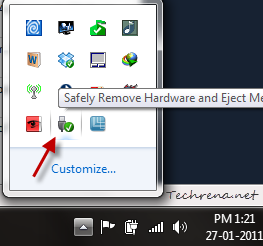
What do you do to remove your plugged in USB device like flash drive? You need to move your mouse to the system tray and locate the small USB icon “Safely Remove Hardware and Eject Media” (in case of Windows 7 and Vista) and click on it and confirm that you want to remove or stop a particular USB device.

Safely-remove-hardware-media-tray

But even though it is simple, it is often tiresome as you need to expand the arrow in the tray and locate the small icon (Windows 7). This where you wish you had a shortcut at some other easily accessible place. A desktop shortcut for this “Safely Remove Hardware” dialog would be much more handy. If you are like me, get to know how to create a Safely Remove Hardware shortcut in Windows 7 and Vista by following these steps.

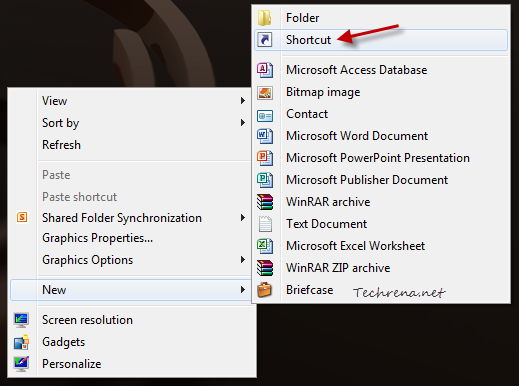
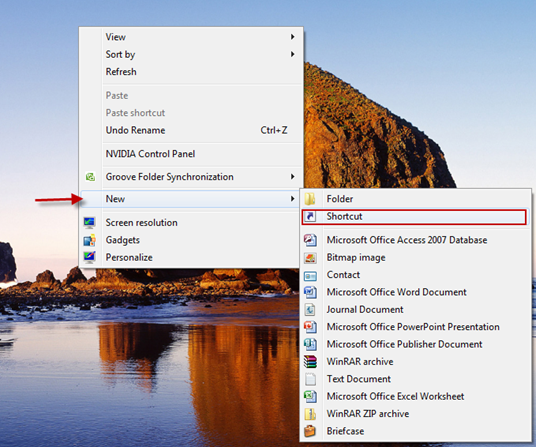
1. Right-click on your desktop, choose New > Shortcut.

New shortcut on desktop

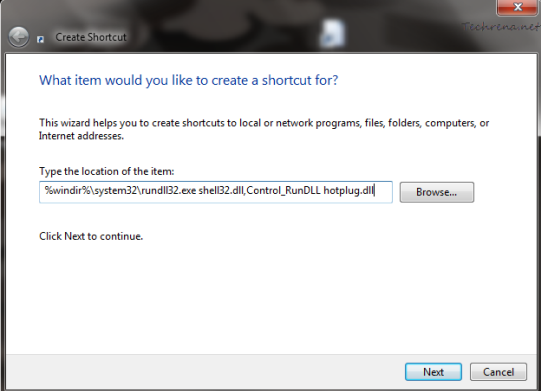
2. In the next window, paste the following code in the “location of the item”

%windir%\system32\rundll32.exe shell32.dll,Control_RunDLL hotplug.dll

Safely remove hardware shortcut code

Click the “Next” button to continue to the next step.

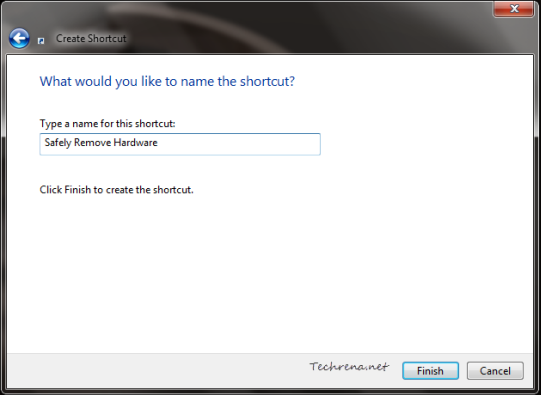
3. Give the shortcut a meaningful name and click the “Finish” button to complete the setup.

Shortcut name

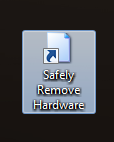
4. The new shortcut icon appears on your desktop.

Safely remove hardware shortcut

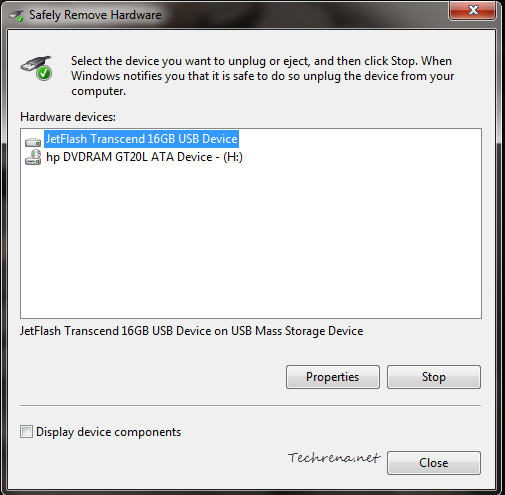
If you have plugged in the USB flash drive, double-click on the shortcut icon to see if it works. It should open the Safely Remove Hardware window, showing you the list of currently plugged in devices (USB and non-USB as well).

Safely remove hardware window

Select the particular device that you want to unplug or remove and click the “Stop” button to stop the device.

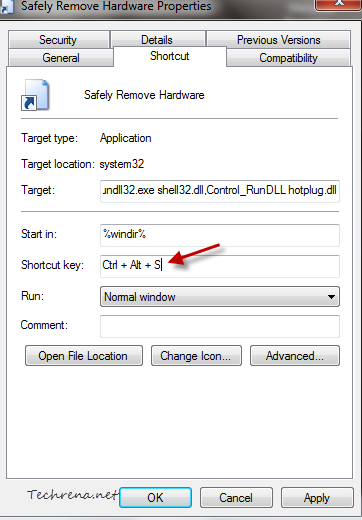
The advantage with this kind of shortcut trick is that you can choose to have a shortcut key setup for even more quicker access.

To assign a shortcut for the Safely Remove Hardware shortcut, just right-click on the shortcut and choose a unique keyboard key combination to assign as hotkey.

Safely remove hardware shortcut key

[How To] Disable System Beep Sounds In Windows 7

Windows system beep sounds turn up when your perform some invalid action (ex: pressing a wrong key or clicking or choosing a invalid button on window etc.) or when some error dialog appears. The beep sound also appears when you are using volume control.

(Click the Play button to listen to the sound; requires QuickTime Player plugin)

While the use of such beep sounds can be dated back to olden days when computers didn’t have sound cards but just built-in speakers producing various beep sounds to notify the troubleshooters help diagnosing the issues. Well, the times have changed, even though the desktops and laptops ship with internal speakers producing beep sounds, they are hardly useful when you are using advanced operating systems like Windows 7 as we have more sophisticated diagnosing mechanism to troubleshoot the OS issues. Too many beeps, you would easily get annoyed. Follow these steps to disable the system beep sounds in Windows 7.

This can be done in either of the two ways:

>> Method-1:

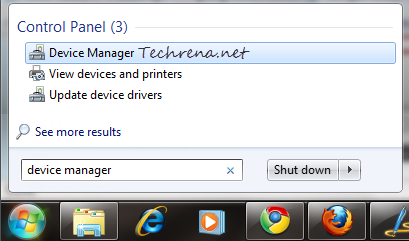
1. Type “device manager” in the Start Menu search box and open the Device Manager from the results under “Control Panel” items.

device-manager-start-menu-search

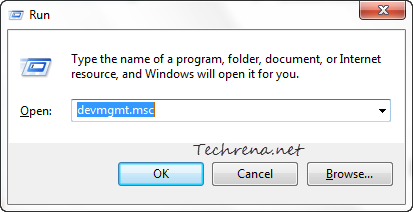
Alternatively, press Windows key + R to open the Run command. Type “devmgmt.msc” and hit enter to open the Device Manager.

device management run command

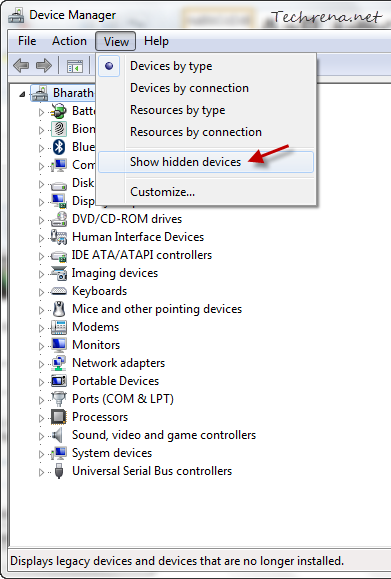
2. From the Device Manager window, choose “Show Hidden Devices” under “View” menu.

Show hidden devices in Device Manager

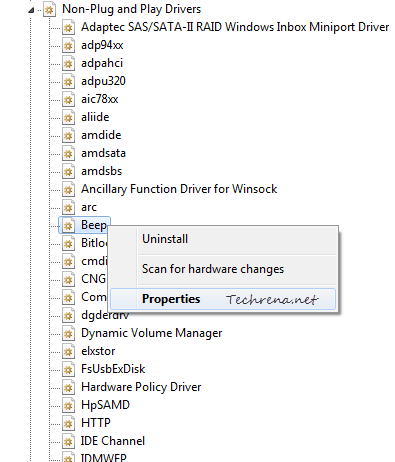
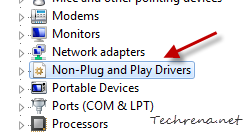
3. Scroll down the list until you find “Non-Plug and Play Drivers” and click on it to expand.

Non-Plug and Play Drivers in Device Manager

4. Right-click on the Beep item and choose Properties.

beep sound in device manager

Warning: Do not click “Uninstall” as the option will completely remove the beep sounds from your Windows 7, you might find it hard to reinstall the same again.

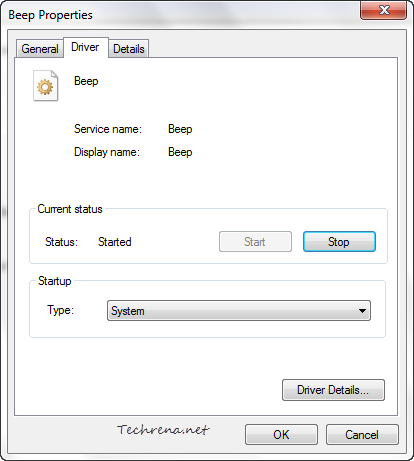
5. In the Beep Properties, click on the Driver tab

beep properties driver

From the Start up type, choose “Disabled” from the list.

Click OK to apply and save the settings. You need to restart the system for the changes to take effect. To enable the beep sounds again, just choose “System” from the list in the step-5.

>> Method-2:

We can also achieve our desired result from the Control Panel, let’s see how to do it.

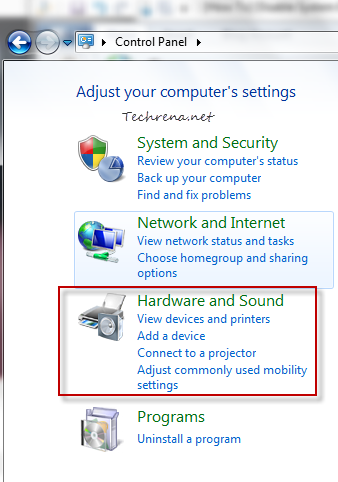
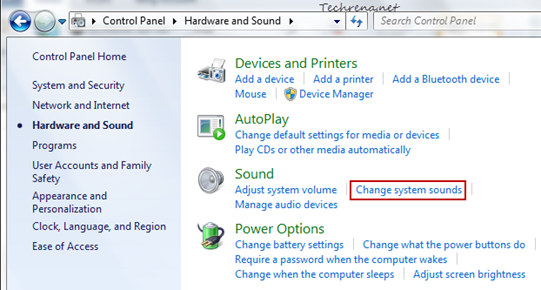
1. Open the Control Panel and click on the Hardware and Sound item link from the list.

Hardware and sound section in Control Panel

2. Click on the Change system sounds link under the “Sound”.

hardware and sound in control panel

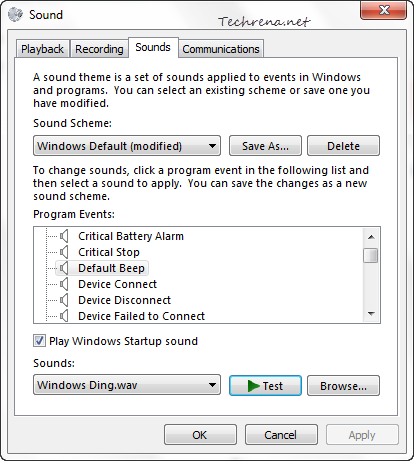
3. Under the Sounds tab, scroll down to find “Default Beep

Sounds in Control Panel setting

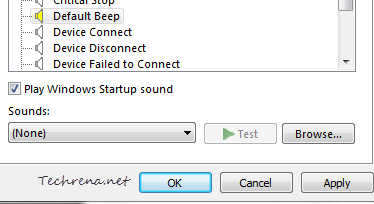
Choose “None” from the list under Sounds and click OK to save the settings.

Default Beep sound settings

You are done! But please not note that these are the settings for current sound scheme for your Windows 7. In future if you change the settings, the default beep sound may be enabled again automatically. Hence we suggest you to use method-1 if you completely want to disable the internal speakers system beep sound.

[How To] Create a Shortcut To Clear Your Clipboard

Whenever you copy anything while using your computer,  the computer uses a special place known as Clipboard to place the data. Suppose you copy some text from a text file, the information(data) gets copied into the Clipboard. Then when you paste the text to your desired location, the data is transferred from your clipboard. The clipboard is used for any type of copy action done.

Now, you have copied some data and hence it is now present it in your computer’s clipboard. Suppose the data you are handling is a sensitive one and hence you don’t want to leave any trace, even in your clipboard. So how do you do it? Here is the simplest answer known.

Steps to create a shortcut to clear your clipboard:

1. Right click on your desktop, go to New—>Shortcut.

Create a Shortcut

2. In the New Shortcut window, Type

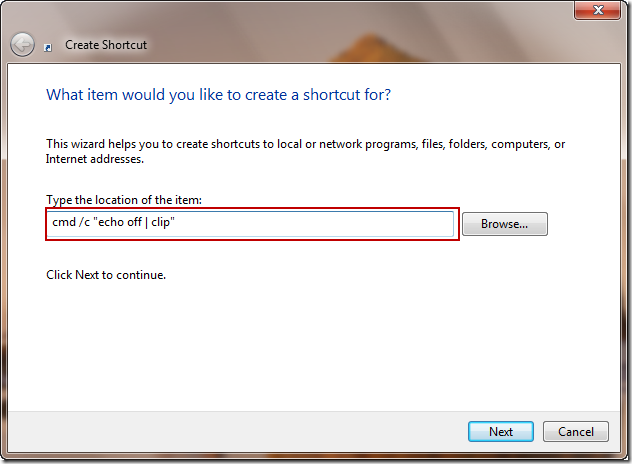
cmd /c "echo off | clip"

and press Next

Clear clipboard shorcut

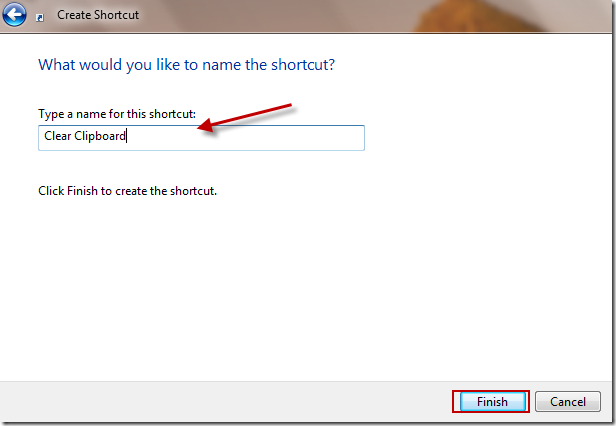
3. Type in a Shortcut Name of your choice and Finish.

Shorcut name

Now you can click on the shortcut anytime you want to clear your data off the clipboard.