[How To] Download Windows 8 Pro 32/64-bit from Microsoft with Upgrade Key

The new shiny Windows 8 featuring Tiles and all is here. Windows 8 was officially launched last week on October 26 along with Microsoft’s Surface Tablet which runs Windows RT. Windows 8 seems to be getting good reviews from users except from few. Well many of us are still thinking whether to upgrade or not.

For all those who are not aware of the Windows Upgrade program, Microsoft is offering you a Windows 8 Pro (32/64-bit) for only $39.99 (USD). This offer is valid for many countries. The criteria is you should be running Windows XP, Vista, or Windows 7. Additionally if you bought a Windows 7 PC after June 2, 2012 you can get it for $14.99.
Windows 8 Logo

Well for those who are aware and have already purchased Windows 8 key(s), you might have already downloaded it or you might be still waiting to download. We just wanted to inform everyone through this post that you need not worry about the download. You can do it whenever you are free or if you are in a limited internet plan, you can do it during your next billing cycle.

Requirements to Download Windows 8 Pro Legit from Microsoft:

# Operating System: Windows XP, Vista, or 7
# Of course an internet connection and
# Your Windows 8 Pro Upgrade Key you purchased earlier

Step 1: Download Windows8-Setup.exe from here. it is 5.2MB in size.

Step 2: Decide which Windows Pro version you want – either 32-bit or 64-bit. Well do note that you can install 64-bit only if your processor supports it. you can check if your CPU supports 64-bit OS here.

Step 3: Run the “Windows8-Setup.exe” you have downloaded  from a PC which has a 32-bit Windows if you want to download Windows 8 Pro 32-bit. Similarly run from a 64-bit PC if you want 64-bit version.
Size Details:
# 32-Bit Windows 8 Pro: 2.01GB
# 62-Bit Windows 8 Pro: 2.63GB

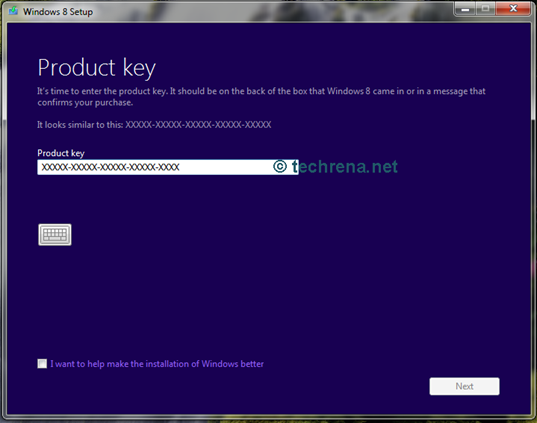
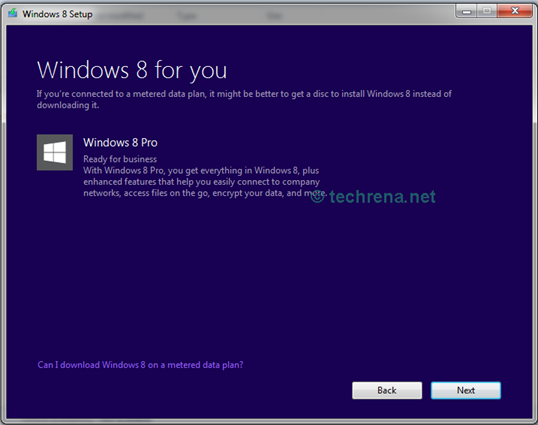
Step 4: When the Setup program starts, it will ask for your Windows 8 Pro key. Just enter your keys and viola, your download will commence.

windows 8 download

windows 8 download2

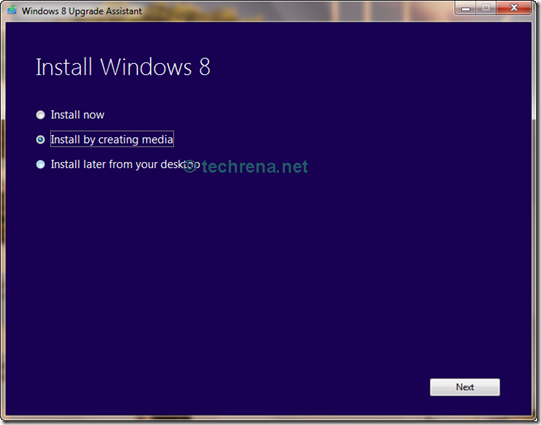
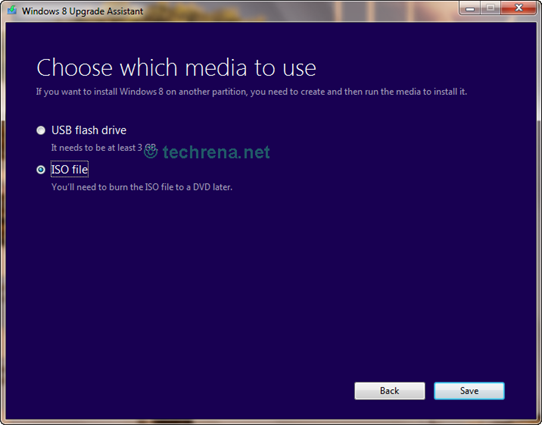
Step 5: After the download is completed, before installing the upgrade, we suggest you to create an iso or a USB drive backup for future setups. You can exit the setup program after that. Don’t loose the backup!

Windows 8 Pro Install

Step 6. While closing the setup program, it automatically creates a desktop icon(if it doesn’t you can re-start the program and it will start where you left off). So if you want to install Windows 8 as an upgrade to your existing OS, you can proceed to ‘Install’. But if you want a clean install, make use of the iso or USB drive backup. I personally recommend clean install over any upgrade install. Its up to you.

Windows 8 Pro Install by media

Important Notes:
# The back up you created to a USB drive or a DVD after download is similar to a retail version, meaning it is not linked to any key. You can use it for installing to any compatible system with any other legit key.
# The same product key can be used for downloading ether 32/64-bit Windows 8 i.e. the key is common for both versions.
# The Upgrade program will ask for your choice if you want to keep files, apps, or none. This choice is irrelevant if you are going for a clean install using a media device (USB/DVD)
# The language will depend on your location. You can install your preferred languages after installing windows 8.

If you have any questions or updates please leave a comment.

[How To] Change Computer Name In Windows 7

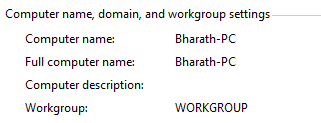
Computer name domain and workgroup settings

Computer names are pretty much useful to distinguish different computers when you are on a network with too many computers connected it. You would normally choose this computer name during the initial installation. Or if your system came with a pre-installed version of Windows 7 or Windows Vista, chances are that your manufacturer might have chosen a crappy computer name. It is always a good practice to have a unique computer name which is more descriptive so that you can easily identify your computer over others in the network.

Changing a computer name was relatively easy in Windows XP. When it comes to Windows 7 and Vista, you need to get through a couple of windows before you can land at the correct settings window. Here are the steps.

Steps:

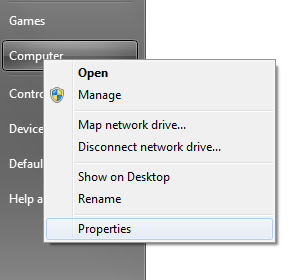
1. Go the Start Menu, right-click on the “Computer” and click “Properties”.

Computer right-click context menu from Start Menu

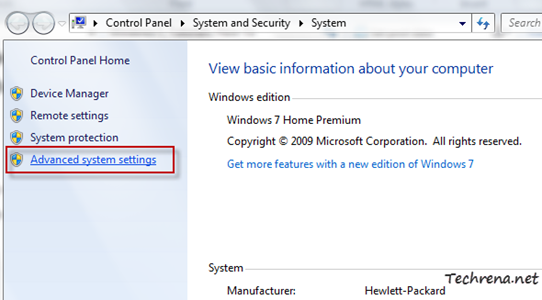
2. Click on the “Advanced system settings” link on the left hand side pane.

System settings in control panel

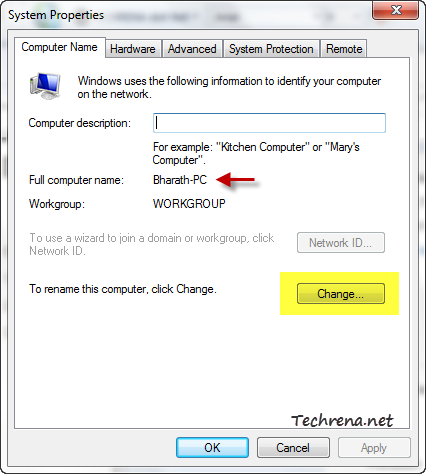
3. Go to the “Computer Name” tab in the System Properties window.

Computer Name in System Properties

Note: In Windows 7 you can also arrive at the above settings window from the “Computer name, domain, and workgroup settings” from the step 2.

change settings in system control panel

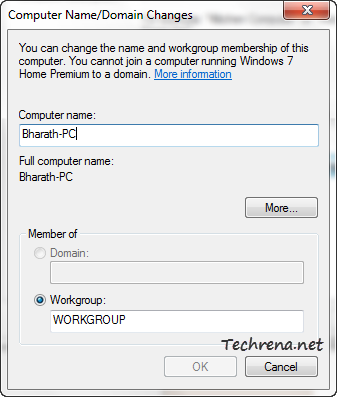
4. In the next dialog box, you can change your computer name and the workgroup membership of your computer.

Computer name and domain changes

Click OK to close the window and apply the changes. You must restart your system for the full changes to take effect.

[How To] Rebuild Icon Cache To Fix Broken Icons

Sometimes when you install some program, and place its shortcut somewhere on the desktop or Start Menu, the icon of the program might appear broken (display incorrect icons) in your Windows 7. As you can see in the following screenshot:

Program icon broken in Windows 7Program icon broken in Windows 7 taskbar

It is very annoying to see such broken icons for any programs. Not only that they confuse you what program is it, particularly when you pin such a program to the taskbar. Follow this step-by-step guide to fix the broken or missing icons and show the original icons of the program, works in Windows 7 and Windows Vista.

Steps:

1. Close all the folder windows that are currently open in the Windows Explorer.

2. Launch the Task Manager either by using CTRL + SHIFT + ESC or by right-clicking on the taskbar and choosing “Start Task Manager”.

start task manager

3. Go to the processes tab, find “explorer.exe” in the list. Right-click on it, choose end process.

End explorer process

4. Go to File >  choose New Task (Run..) from the menu.

Run new task in Windows Task manager

5. In the Create New Task dialogue box, type “cmd” and click OK to open the Command Prompt window.

Create new task in task manager

6. Type the following commands* one by one in the Command Prompt (Press “Enter” after each command).

IconCache rebuild commands

CD /d %userprofile%\AppData\Local
DEL IconCache.db /a
EXIT

IconCache command prompt

7. Again go to the Task Manager, launch “New Task” from the File Menu. Type “Explorer” in the text filed and hit enter.

Explorer from Create New Task in Task Manager

Your icons should appear fine now.

Background:

This method actually rebuilds the icon cache. The first of the three commands is used to go into the directory C:\Users> username> AppData> Local. The second command will delete the hidden IconCache.db file. And then we restart the explorer.exe process to rebuild the deleted IconCahce file.

You can alternatively, set the Folder Options > Views and change the settings to Show Hidden files and then delete the IconCache.db to the Recycle bin and restart the explorer.exe process.

[Tip] Create A Lock Down Computer Shortcut

Lockdown my PC

We have previously covered how to create desktop shortcuts for shutdown and hibernation here at Techrena. Many readers of our site found them to be useful. We thought like when we could have shortcuts for shutting down and hibernation, why can’t we have shortcut for locking the computer user ? To begin with, if you don’t know yet, there is a much simpler Win + L (press Start key while holding “L” button your keyboard) shortcut already available to do the same and is easier as well.

We are just writing this tip to let you know that you can create shortcut for locking down your computer as well. It’s up to you to use this or the most preferred Win + L short key. Follow the steps below to add the shortcut to your desktop.

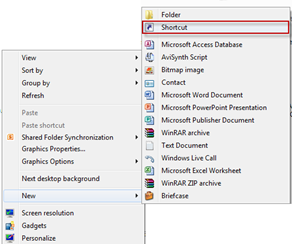
1. Right-click on your desktop (on any blank area) and select New > Shortcut.

create new shortcut

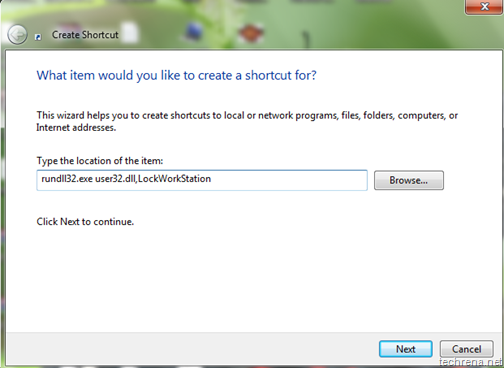
2. Type rundll32.exe user32.dll,LockWorkStation in the “Type the location of the item” filed in the window and click next.

Type shortcut location

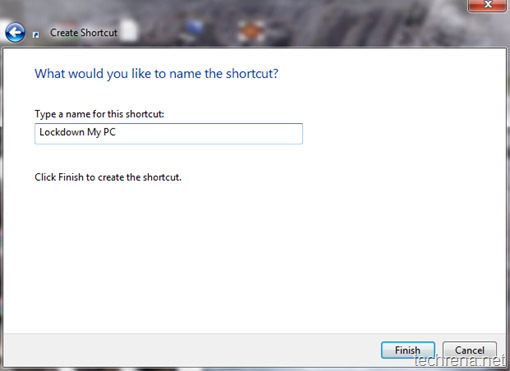
3. Give a name to the shortcut (something like Lockdown My PC) and click “Finish” to complete the setup.

Lockdown shortcut name

4. Now the shortcut for locking down your computer appears on desktop. You can even customize it by adding some colourful icon to it.

Lockdown shortcut on desktop

Clicking on it will lockdown the computer. This works well on Windows XP, Windows Vista and even on Windows 7. You need to login back to your computer by providing your credentials if you need to unlock it again. Of course I still prefer to use Win + L shortcut (to which I got used much to) than this, anyway it’s always good to explore and find new things, even if they had alternatives Smile.

[Tip] Show Additional Windows Clocks

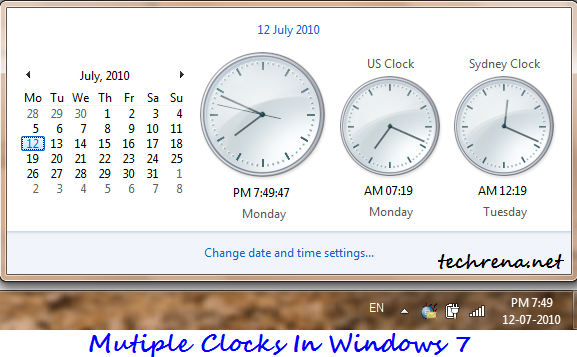
Mutiple clocks in windows 7

Windows by default shows one clock next to the calendar, based on your location in the world. Sometime you might want to see the what’s the time in your best pal’s place located somewhere in other part of the globe. This tutorial explains how you can show multiple or additional taskbar Windows clocks.

Steps:

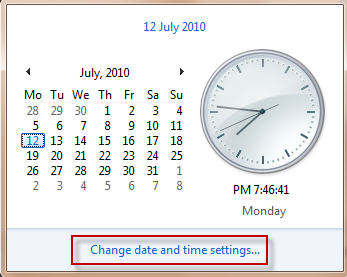
1. Open the Windows calendar by, click on “Change date and time settings..”.

Windows 7 clock

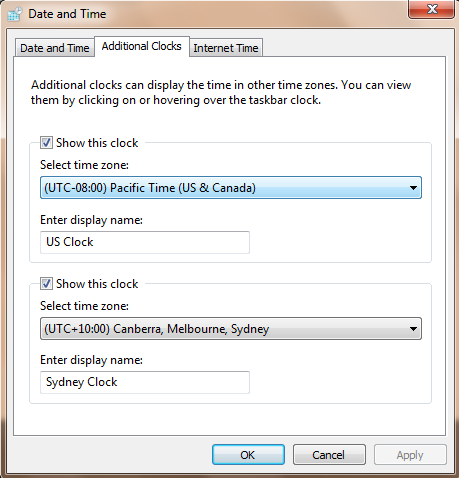
2. Under date and time settings, click on “Additional Clocks” tab. Here you can select one or more additional clocks from different cities across the world. You can also name the clocks as you would want them to be.

Additional clocks in date and time settings

3. Click OK and close the window. Now you can see the additional clocks popping up when you click on the date and time area in your Windows taskbar.

That’s it. Please note that this tutorial also applies to Windows Vista.Find out for more how-to tutorials from us on Windows 7, or subscribe to our RSS feeds via email.

Turn Off Your Laptop LCD Monitor Screen Manually With A Single Click

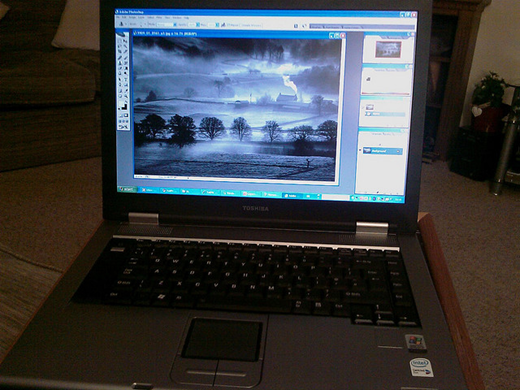
Laptop LCD screen

As all of us are quite familiar with desktop computers, where we can turn-off the monitor just by pressing a button. But when it comes to a laptop, we know that you can always close the lid to turn off the LCD screen automatically. But wouldn’t life be simpler if we had a button to turn off the LCD screen of the laptop ?

Here is a simple program that can be used on windows based systems (including Windows 7 and Windows Vista) to manually turn off your laptop’s LCD screen.

This is pretty much useful when you want to just listen to the music on your laptop keeping its lid open. This also saves some energy, knowing which some manufactures do offer this kind of option on the laptop while most of the others don’t. (Sadly, my HP Pavilion notebook also lacks this feature).

A million thanks to Taimur Asad of Redmond Pie, who has developed this simple program called “Turn Off LCD” based on his experience with HP DV2799 Special Edition notebook that he owns. He wrote this application in C# with Microsoft Visual Basic 2008. It makes use of a DLL (User32.dll) file from Windows using System.Runtime.InteropServices namespace which then calls the required function.[ More tech info at Redmond Pie post]

Turn Off LCD shortcut

Just download the zip file from the following link and run the Turn Off LCD.exe (85 KB in size). That’s all you need to do, you can now observe your laptop’s LCD screen being turned off. Just hover the mouse or press any key to turn on the LCD screen again. If you have liked this, then you might want to add similar shutdown shortcut to your notebook also.

Download Turn Off LCD (v1.01, 68.5 KB)

Photo credit

Microsoft .NET Framework 3.5 SP1 Update June 2010 For Windows 7 & Vista

Microsoft .Net logo

Microsoft has released two important updates KB982526 (.NET Framework 3.5 SP1 update) and KB982670 (.NET Framework 4 Client Profile) for the Microsoft .NET Framework.

[Tip: You may first want to find out which version of .NET is installed on your Windows]

KB982526 update rollup addresses issues with Microsoft .NET Framework 3.5 SP1 on Windows 7 or Windows Server 2008 R2 (also available as updates KB956250 and KB982525 for Windows Vista

Some users have reported errors while installing these updates (error code 80200053), if you are not able to install these updates, do a restart and try installing.

KB982526 Download:

Windows 7 x86 x64
Windows Vista x86 – KB956250 x64 – KB982525
Windows Server 2008 R2 x86 x64

Cumulative Update For Windows Media Center For Windows 7 And Windows Vista

Windows Update

Microsoft has released two important updates for Windows Media Center(WMC) running on Windows 7(KB981078) and Windows Vista (KB982480) operating systems on June 21, 2010.

Cumulative Update for Media Center for Windows 7 KB981078 addresses the following issues:

1. A “Copy Prohibited” or a black screen is displayed when the Windows Media Center is used to play protected content with a revoked version of the PlayReady PC Runtime is installed don your computer.

2. Mcupdate.exe crashes when the guide database in WMC is corrupted.

3. Schedule data getting disappeared in regions that use in-band guide data.

4. WMC crashes if you use an invalid path for a recorded TV.

June 2010 Cumulative Update for Media Center for Windows Vista KB982480 fixes the following issue #2 (in addition to various “Hotfixes”) of the issues listed above.

Download:

Windows 7 (KB981078) 32-bit (4.8 MB) 64-bit (6 MB)
Windows Vista (KB982480) 32-bit (10 MB) 64-bit (10.7 MB)

Microsoft Security Bulletin MS10-032 (KB979559)

MS10-032 bulletin

Microsoft Security Bulletin MS10-032, one of the 10 security bulletins released by Microsoft as part of the routine monthly security update for June 2010 addresses vulnerabilities in Windows Kernel-Mode drivers.

Security bulletin MS10-032 include important Windows security update KB979559, which resolves two publicly disclosed vulnerabilities and one privately reported vulnerability  in the Windows kernel-mode drivers. These vulnerabilities could allow elevation of privilege, if a user just views content that is rendered in a specially crafted TrueType font.

Windows users who have not enabled automatic updates must download and installed this KB979559 update immediately.

KB979559 Direct Download Links:

Download the update package for various Windows systems from the following direct links.

Windows 7 x64 -1.6 MB x86 (32-bit) – 1.2 MB
Windows Vista x64 – 1.5 MB x86 (32-bit) – 1.2 MB
Windows XP x64 – 4.1 MB x86 (32-bit) – 1.4 MB

How To Fix “The Requested Operation Requires Elevation” Error

Windows 7 logo

While executing some commands in Windows 7 (or Windows Vista) command prompt, you may see some error message like

The requested operation requires elevation

This may also appear sometimes when you are installing some older applications in your Windows 7.

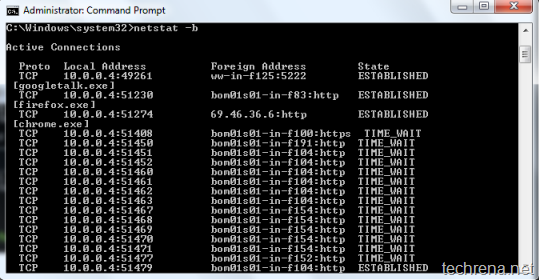
In my case the above error popped in while I was trying to run a “netstat –b” command from the Windows 7 command prompt. You may also end with the same error if you try to other commands like “ipconfig /flush” or “ipconfig /release” etc.

requested operation requires elevation error

This error arises so because, some programs like this need to be run with elevated privileges even though you did turn off UAC (User Account Control). However, there is a simple solution available for this, all you need to do is that run the command prompt with administrative (elevated) privileges.

Solution:

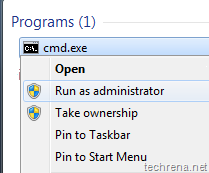
To solve this error, go to Start > Type cmd in the search box, you will the result cmd.exe under programs. Right-click on it and select Run as administrator.

run_cmd_administrator_1

Now run the same command and you will no longer get any error messages and the command gets executed in the right manner.

Command prompt with elevated administrator rights

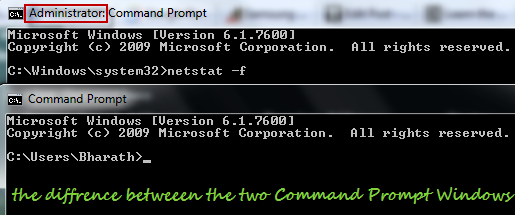
If you are wondering so as to how to find whether you are running the command prompt with Administrator privileges or not, use the following hint:

If you are running command prompt as an admin, you will see the word “Administrator” in the CMD window title. Checkout the following screenshot, which depicts the difference between the two CMD windows.

Difference between the command prompt windows