See Hidden Folders In Windows 7 Via Folder Options

If you have just upgraded your operating system from Windows XP to the latest Windows 7 version, you might have some troubles getting used to using the options and features in Windows 7.This is where we thought we could help you and hence we are starting a series of ‘Windows 7’ tips articles.These are compiled from the problems that we have faced when we started using this latest OS from Microsoft.

I’m starting with the correct way to see hidden files and folders in Windows 7.The one that we do in Win XP with a couple of clicks if you are used to it.Classical method to enable hidden folders in Windows is to go to “Folder Options” from the “Tools” menu from the top section of the window.The problem with Win 7 is that you don’t find “Tools” menu in the top section.It’s hidden actually as you can spot in the below pic.

Hidden Tools Menu and Folder Options in Windows 7

Can’t figure it , right?? Well, as I said it’s hidden.To see it, press ALT button.Now you see the hidden menu appearing in the window.Now you can see those “File, Edit, View, Tools, Help” options in the window.
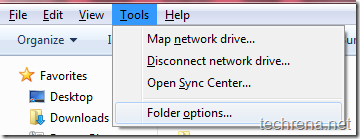
Using ALT button to open menu

Now it’s simple from here on, just go to Tools>> click Folder options, it’ll open Folder options window.

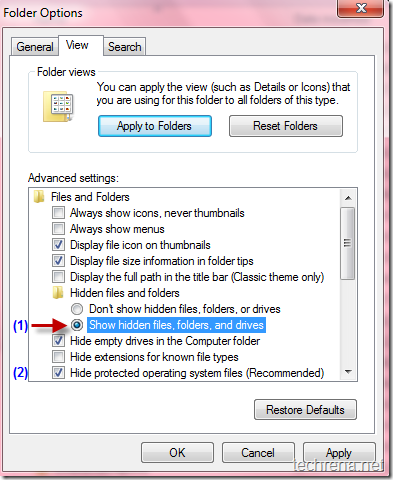
Check show hidden files, folders in Windows 7

Now Go to “View” tab and check the  “Show hidden files, folders, and drives” option.

Also sometimes you may want to see the hidden protected operating system files in your system, to enable this, uncheck “Hide protected operating system files” option.

That’s it, you have now successfully enabled hidden folders and files to show up in your windows.This process will work unless you have some virus running your system in which case your folder options may be disabled.You can refer to this guide on how to handle such a situation.

More Tips: If you have forgotten your Windows 7 Admin password, read this guide to recover or reset windows 7 password.

Create Shutdown Shortcut for Windows XP, Vista, Windows 7 on Desktop

Learn How to add/create a desktop Shortcut to Shutdown / Turn off your Windows computer.

Shortcuts are meant for making life easier. We all know how to add shortcuts to our favorite programs on desktop.Now let’s see how to add a desktop shortcut for “Shutdown”,  which when double clicked will shutdown your system.

Important: For those who are using Windows 7 please refer the NOTE given below (Please Scroll Down)

Steps:

1.Right Click on your desktop select New>>Short cut

2.Now a “Create Shortcut” window pops out which will ask you to type the location of the item (in our case it is “shutdown.exe”).

create shortcut for shutdown -www.techrena.net

3.Type the following code :%windir%\System32\shutdown.exe –s in the textbox.

[As you can see we are trying to locate an .exe file called shutdown.exe which when executed will shutdown the computer].

After entering the above code, click Next

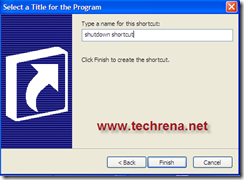
4.Now the window will ask you to select a title for the program give it a name whatever you like “Shutdown Shortcut” and click on the Finish button

give shutdown shortcut a name

5.The new shortcut will appear on your desktop.

shutdown shortcut without icon

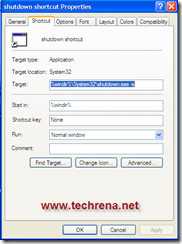
You may change the icon of the shortcut so that it’s easier for you to identify the shortcut.[In the image, I’ve used a “Power Off” icon for the same ]

shutdown shortcut properties changin icon of the shutdown shortcut

You are done  now. You may also go for advanced options like adding –f or –t after –s in the textbox area.

If you use –f it’ll immedialtely closes all running applications and shutdown without any warning

if you use –t you can specify the time after which you want your system to be Turned off.

for example you may give like %windir%\System32\shutdown.exe -s -t 100 which will trun off your system after 100 seconds.[a message will appear as shown].

Note:You may also use command prompt to shutdown your system.The same code as in the above can be typed as shutdown.exe -s -t 100 and you’ll still get the same turning off message.Once it has started the only way to stop it is using the command prompt again.Use shutdown.exe –a to stop your scheduled turn off.

The above process has been posted with the Windows XP as the base OS,  the same process can also be applied to Windows Vista based systems.

NOTE: For those who are using Windows 7 download the zip file below which contains the shortcut to Shutdown. Extract the file and place the shortcut where ever you want.

Download: Windows 7 Shutdown Shortcut.zip

Size: 850 Bytes

Contains 1 file: Shut Down Windows.lnk