How to send webpages from Google Chrome to your phone?

Do you have multiple  devices that you work on and want to continue reading  a web page that you are reading on your PC ? We already have multiple extensions in Google Chrome to achieve the same. How about having this feature  in-built in your Google Chrome browser? That’s exactly what Google has done to your favourite browser. Google has started rolling out update to Google Chrome which will bring this handy feature across multiple platforms. This means that you don’t have to worry about switching webpages across all your devices without worrying about working on technalities to get this job done. This is pretty straight forward and doesn’t require any third party extension. Let’s see how we can send a web page from your PC or Mac to your Android/iPhone or Vice-versa!

Step 1: update your Google Chrome browser right away.

Step 2: open any page from your Chrome. 

Step 3: now go to the address bar and highlight the URL. 

Google Send this Page Icon

Step 4: You will find a small ‘Send this page’ icon towards the right extreme corner of the address bar.

Send this to your devices

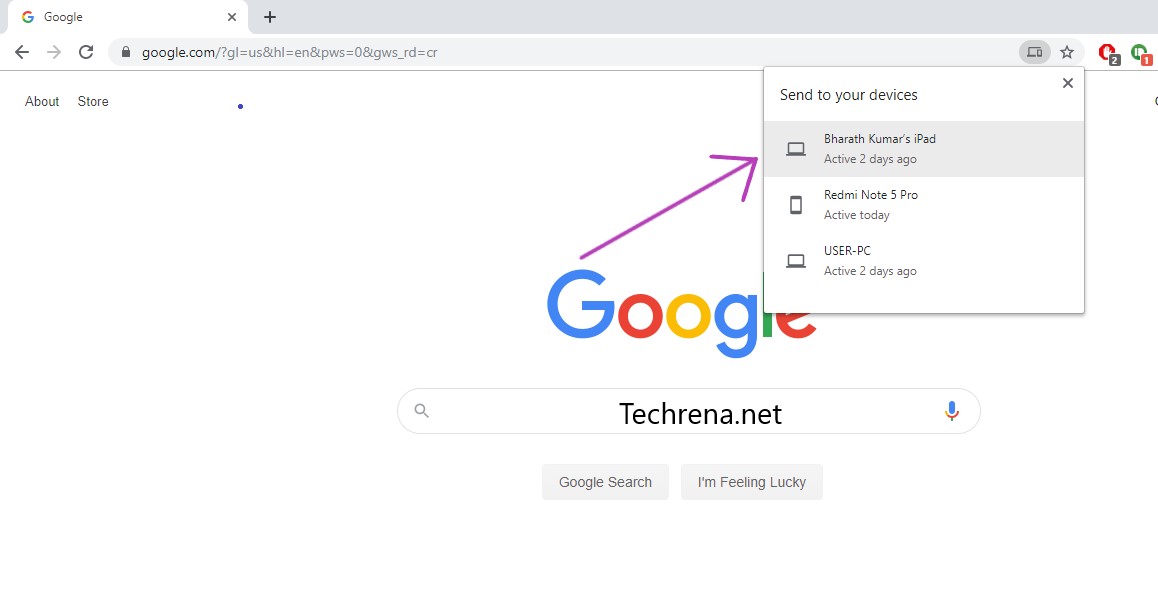
Step 5: Clicking on the icon will open the list of devices on which you are using Google Chrome with your account and you can send your current page to any of them. Viola !

Send the webpage from Google Chrome to iPhone

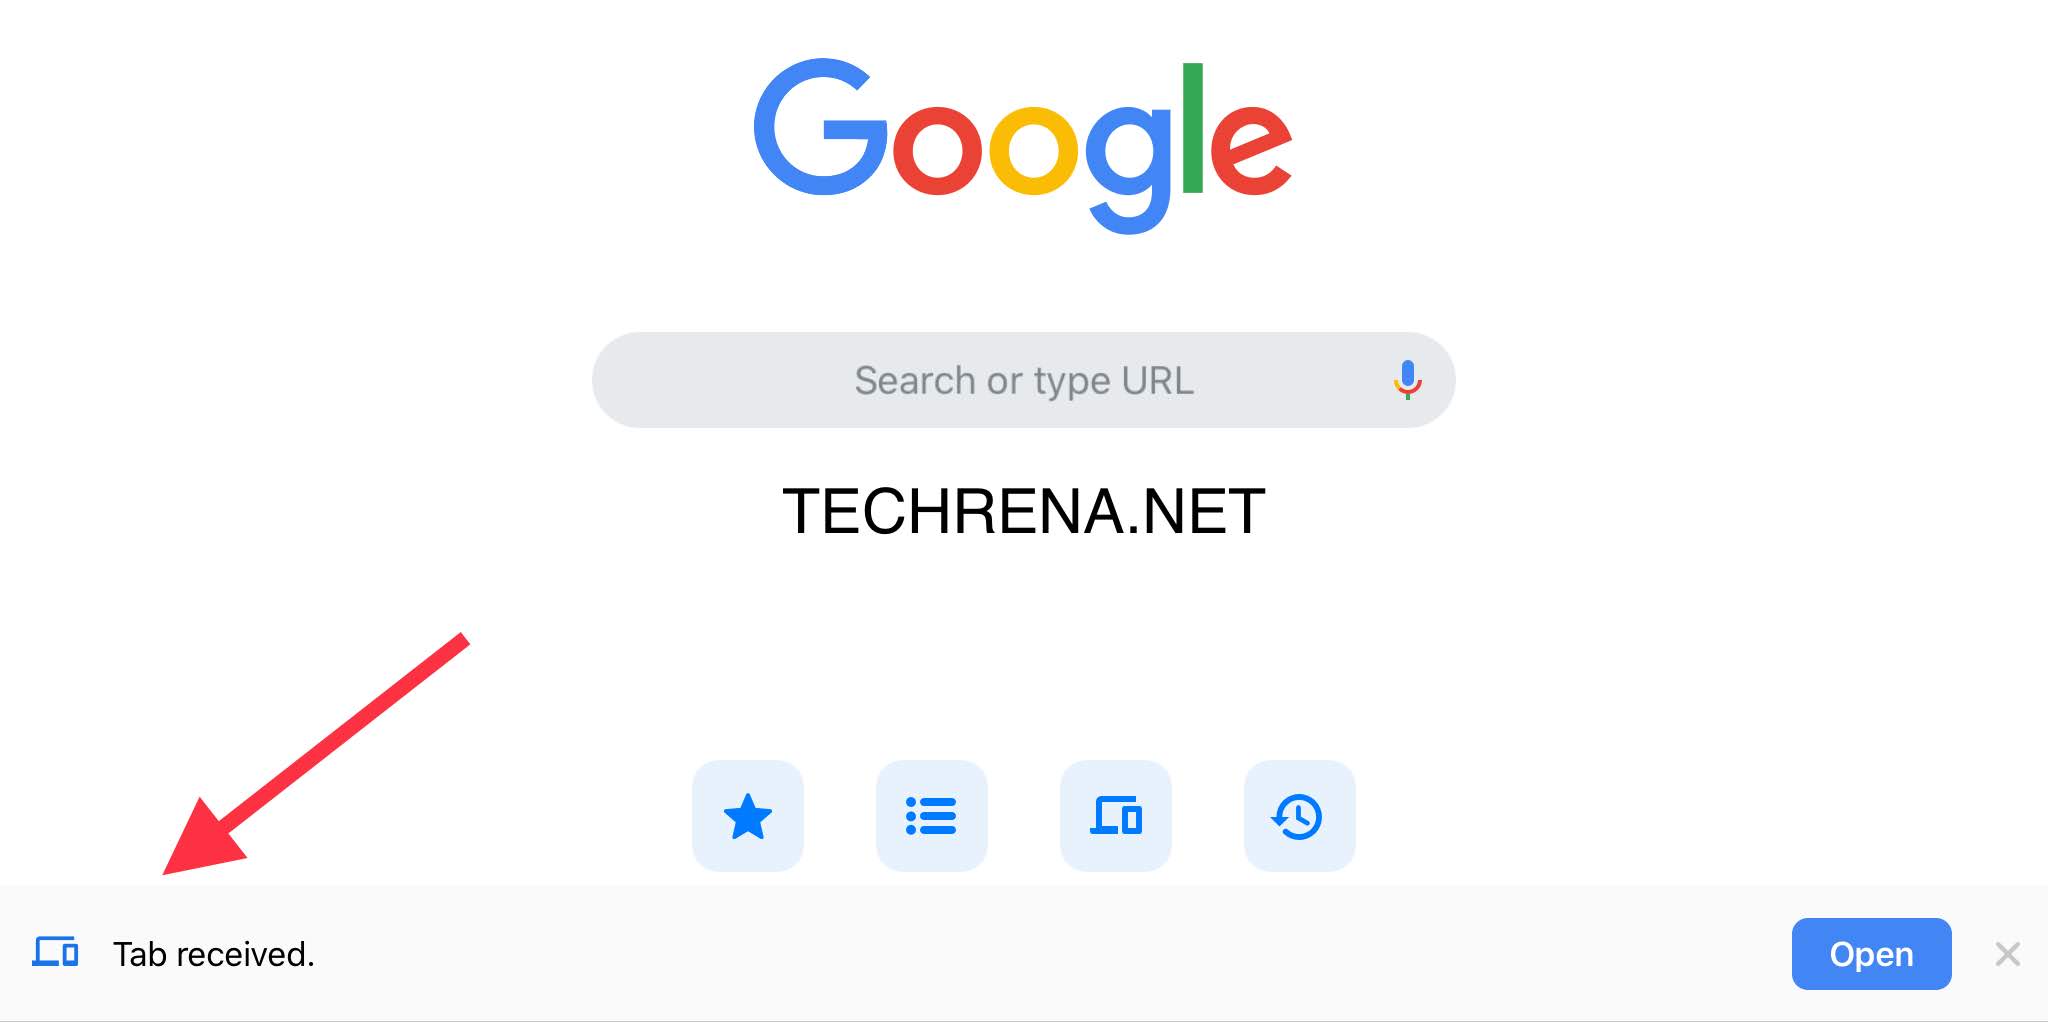
As you can see from the above, the tab has been received from my Google Chrome on PC to Google Chrome on my iPad. I can now continue reading the webpage on my iPad from whete I left off on my PC previosuly. It works seemlessly.

Slow Performing Add-ons In Firefox

Firefox add-ons

Firefox became popular when the internet was ruled by the Internet Explorer because of the whole lot of add-ons that users can install to get extra features that aren’t built natively into the browser. Since then, all other browsers had to provide similar support for extensions/add-ons to stay alive in the competition. Agree that add-ons in Firefox are a boon to browser but often they are criticized for slowing down the performance of the browser.

As Mozilla says in a blog post,

there are some add-ons that cause extreme slowdowns in Firefox because of poor coding practices, in extreme cases adding 30 seconds to start-up time.i

So if you install 10 such add-ons, Firefox start-up time may even slowdown by some minutes in extreme cases. Mozilla noticed the importance of spotting such add-ons that are causing significant performance issues in the Firefox and they even made the data public. Head over to this page where you will see a list of few top add-ons that are slowing down the start-up time of your Firefox.

firefox slow add-ons

As you can see, if you are a web developer and installed the popular “Firebug” add-on, it slows down Firefox start-up time by 74%. As of now, the list also includes other popular add-ons like “FoxyTunes”, “Video DownloadHelper”, “Xmarks Sync”. If you are a developer, you don’t want your own add-on to be featured in that list, right? Don’t worry, Mozilla wants to work with developers to solve the issues and has even listed some best practices for improving startup performance. If you have installed one or more add-ons that are listed under the slow performing add-ons page, try disabling them to improve your Firefox start-up time and performance.

[Tip] Disable Built-In PDF Viewer In Google Chrome

google chrome logo

Google has started shipping the Google Chrome browser with a built-in PDF viewer since the release of Chrome 8. Even when you install native PDF readers like Adobe Reader of any other applications to view the PDF files on your system, Google Chrome will automatically disable the browser PDF plugins and enable the built-in PDF viewer. But the built-in PDF viewer in Chrome has got some limitations compared to a standalone PDF viewer. If you want to disable the built-in PDF viewer in Chrome, follow these steps:

1. Type about:plugins in the Google Chrome address bar and hit Enter.

about:plugins in Chrome

2. All the plugins installed in the Google Chrome will now be shows in the window. Scroll down the list until you locate “Chrome PDF Viewer”.

Chrome PDF Viewer plugin settings

3. Click on the “Disable” link under the “Chrome PDF Viewer”.

Google Chrome’s built-in PDF Viewer will now be disabled and all the PDF files from now on, will be opened using the external PDF reader plugin that you have installed. In case you want to activate the built-n PDF Viewer in future, just follow the step-1 and click the “Enable” link under “Chrome PDF Viewer”.

[Tip] Edit The Firefox Maximum And Minimum Zoom Levels

Firefox logo

Readability level is one of the important aspect the modern day browsers stress upon. Different users need different readability levels for various elements on a webpage. The browsers let users to zoom in or zoom out of any webpage and adjusting them according to their comfort. Hence all the browsers including the Internet Explorer, Mozilla Firefox, Google Chrome, Opera etc. have incorporated the settings for adjusting zoom levels into the menu settings making them easily accessible. Firefox zoom levels range from a maximum zoom in level of 300% to a minimum zoom out level of 30%. While these are satisfactory for most users, there would still be some users who want to zoom in a page for more than 300% in order to see a particular element of a page like text, image or vide to more precisely, at which they feel comfortable reading it. Some people like web developers would want to zoom out to a level more than 30% to just see how all the elements in a web page are fitting into the screen. Whatever may be the reason, you need to have a choice. Internet Explorer allows you to enter a custom zoom level as you can see in the following screenshot:

Internet Explorer zoom levels

You can edit the Firefox default zoom levels via the about:config settings. Follow the steps to configure your Firefox.

1. Type about:config in the Firefox address bar and hit Enter.

About:config in the Firefox address bar

2. Accept the warning and continue.

Firefox this might void your warranty alert

3. Now search for “zoom.maxPercent’ and “zoom.minPercent”. Both of these should appear as soon as you enter “zoom.m” as search string.

Max and min zoom level settings in Firefox

4. Double-click on each item to change the default values. For instance, you can change the maximum zoom percent to 500 from the default value of 300 p.c. Similarly you can edit the default value for minimum zoom out level as well.

Changing Firefox zoom levels

Click OK when you are done. Restart your Firefox for the changes to take effect.

[Tip] Get Warned Before Closing Multiple Tabs In Google Chrome

If you are used to Firefox browser for long, you might be aware of the warning message or confirmation message that appears when you try to close multiple tabs as you can see in the following screenshot:

Quit firefox confirm

This is quite useful when you hit the close button accidentally with multiple tabs opened. Unfortunately such feature isn’t there in Google Chrome by default. But thanks to “Chrome Toolbox” extension developed by Google itself, the extension adds this missing feature and can be configured from the extension settings.

To get started, just install the Chrome Toolbox, and open the extension options. Check against the “Confirm before closing multiple tabs” and that is it. Now you will get a confirmation message like below when you try to close multiple tabs in Google Chrome.

chrome toolbox confirm before close

chrome warning before closing multiple tabs

Chrome Toolbox Options is really an interesting extension which is aimed to increase the user’s productivity. You can many find various handy options which you would otherwise feel missing in the browser. For instance when you enable “When the mouse pointer hovers an image, show image floating toolbar” options, you get additional options for each image on a page to view the original image in its natural size, or to use a magnifier or to use it as your wallpaper etc. There are plenty other useful options as well. We recommend that you install this extension from the Chrome extensions gallery to enhance your browsing experience in Chrome(link added below).

Install Chrome Toolbox

[via]

[Tip] Voice Search For Google Chrome

Voice Search for Google Chrome is a useful extension that lets you to quickly search the web using your voice input.

Voice search Google Chrome extension

Google Voice search feature is nothing new, Google has been offering this feature for various Android, iOS and other smartphones for a while but I don’t why they haven’t really tried getting this handy feature for PC users. The extension of course is not built by Google. You need to have a built-in or an external microphone to use this feature. The extension comes with preloaded search engines like Google, Yahoo, Bing, WikiPedia, Wolfram|Alpha, DuckDuckGo, YouTube etc. The extension also integrates a speech button into all the HTML5 search input boxes. Just enable your microphone say a word like for instance “Sony Ericsson Arc” just add the search engine name before your query, like “Google Sony Ericsson Arc” to search in Google.

Google Voice search for Chrome

This is experimental feature and the voice input may not be accurate. Also, English is the only supported language for now. The extension is also missing a keyboard shortcut to activate the voice search. Though the extension is not so impressive but it is a good start, we hope Google comes out with an official app for Chrome, until then try using this.

Install Voice Search for Google Chrome [from Google Chrome web store]

CTRL + Tab Tabs Preview Feature In Firefox

Firefox ctrl-tab feature

Firefox has changed a lot since the inception of the Firefox 3.6. A lot of features have been added since then. One such feature is previewing the opened tabs. We have already discussed how to enable all tabs preview in Firefox 4. Now  let’s see how to enable the other variant of tabs preview feature, the Ctrl + Tab tabs preview (similar to Windows 7’s Alt + Tab preview) in Firefox 3.6 or later versions. Ctrl + Tab preview is disabled by default and if you hit Ctrl + Tab without enabling this, you can just switch the tabs. With Ctrl + Tab preview enabled, you can actually see the preview of tabs which would be very much useful. Follow the steps to enable the same.

Steps:

1. Type about:config in the Firefox address bar and hit Enter.

2. Accept the warning message and proceed to the Firefox about:config page.

About:config Firefox warning

3. Type the following code in the filter and find the boolean key with the same name.

browser.ctrlTab.previews

ctrl-Tab preview firefox setting

4. By default, the value for this key would be set to “false”, meaning that the tabs preview feature has been disabled. As we want to enable this, just double click on the boolean entry to change its value to “true”.

That’s it! Just hit CTRL + Tab key to preview the thumbnails of all the tabs opened in a current Firefox page as shown in the first screenshot. Just change back the value to “false” in the step-4 to disable the tabs preview feature.

[Tip] Disable ‘Recently Closed Tabs’ In Firefox

Firefox recently closed tabs

Firefox lets users to quickly reopen few of the recently closed tabs for quicker access. Even though the users can go to the history and access all of the webpages that were accessed or closed previously, the “Recently Closed Tabs” that appears under the “History” menu item is surely a timesaver for many of us. But yes, there are people who don’t like this feature. You can always configure Firefox to not to remember any of your recently closed tabs or manually configure it to remember certain number of the recently closed tabs. Here is what you have to do:

1. Type about:config in the address bar and hit enter.

2. A warnings message will be shown, accept that you would be careful while working the about:config entries.

about:config firefox warning

3. In the “Filter” filed, type the following text code and look for an entry which exactly matches with it.

browser.sessionstore.max_tabs_undo

About:config settings in Firefox

4. Double click on the entry. By default it will hold a value “10”, meaning that it will remember and show the last ten recently closed tabs. Here we want none. So change the value from 10 to 0.

Change number of tabs closed undo setting

That is it! Firefox will no longer remember your recently closed tabs. If you have entered any other non-zero value, Firefox will let you see that many number of the most recently closed tabs.

[Download] Firefox 4 Beta 8

Mozilla has released the 8th version of the Firefox 4 beta few days back. As Mozilla had earlier finalized the features list for final version of Firefox 4, this Firefox 4.0b8 build doesn’t come with new features but have few feature improvements over the earlier beta release. The major improvements are:

>> Improved Firefox Sync,

>> Refined add-on manager

>> Speed, functionality and stability improvements to WebGL

Firefox 4 beta 8

To know about all the improvements in Firefox 4 Beta 8, read the release notes. Firefox 4 beta 8 has more than 1400 bug fixes listed.

Download Firefox 4 Beta 8 [7.7 MB]

[Download] Opera 11 Release Candidate 1 (RC)

Opera 11 installer

Opera has achieved another landmark with the release of Opera 11 Release Candidate. Now that has come really quick. It was just less than a month ago that the Opera 11 Beta was released and now comes the RC version.

Opera 11 now supports adding extensions much like Google Chrome, where users can install extensions from Opera’s extensions catalog.  You don’t need to restart your browser while installing or uninstalling the extensions like you do in Google Chrome.  There are loads of other improvements. Take a look at some of them.

New features in Opera 11:

  • Tab stacking: Drag and drop a tab onto another to create a tab group.
  • Extensions support
  • Visual mouse gestures
  • Enriched HTML 5 support
  • Auto-update of extensions and Opera Unite apps
  • Google search suggestions
  • On demand loading of plug-ins
  • Enhanced email panel
  • Faster installation

If you are installing Opera 11 with a stable version already being installed, you should note that the Opera 11 RC version gets installed in the same default installation folder as that of the stable version. To avoid this, click on “Options” in the installer window and change the settings.

opera 11 installer setup

Download the Opera 11 for your operating system from the below direct links:

Download Opera 11.00 Release Candidate 1 (RC 1):

Windows

Mac

Linux/FreeBSD