[Download] Google Voice App For iPad & iPod Touch

Google Voice logo

Google has just added the iPad and the iPod touch support for the Google Voice iPhone app. The newly released Google Voice app version 1.1.0.636 lets you access our Google Voice account right from your iPhone, iPod touch or  iPad. With this app installed on your iPad or iPod touch, you can make use of all the features of the iPhone version of this app (except making like cellular calls) sending and receiving text messages for free.

The new “Click2Call” feature, you can can an call to any of your phones right from the iPad or iPod touch. The other improvements in the new version of the app are auto-disabling of Text forwarding when the Push Notifications are enabled (to avoid multiple alerts for the same message) and the new “Do Not Disturb” feature (available under the Settings tab)  that lets your callers directly connect to the voicemail when you are busy. Head over to iTunes App Store from link added below to download the app to your iPad or iPod touch devices running iOS 3.1 or later.

Download Google Voice App (via iTunes App Store)

[via] Google Voice blog

[Tip] Remove Skype Icon From Windows 7 Taskbar

skype logo

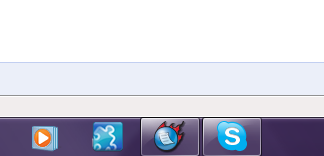
If you are using the latest version of Skype on your Windows 7 machines, you might now be very aware of the fact that Skype pins itself to the Windows 7 taskbar.

skype icon in taskbar

This is a bit annoying as you don’t want Skype to reside in the taskbar and occupy the useful space. If you are wondering how can this be removed from your taskbar, this is what you have to do:

1. Click on the Skype taskbar icon and sign into your Skype account.

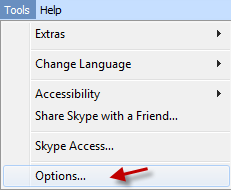
2. Click on the “Tools” menu and choose “Options” from the list.

skype options in the tools menu

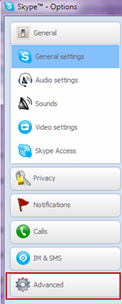
3. Click the “Advanced” button under Skype options.

Skype options list

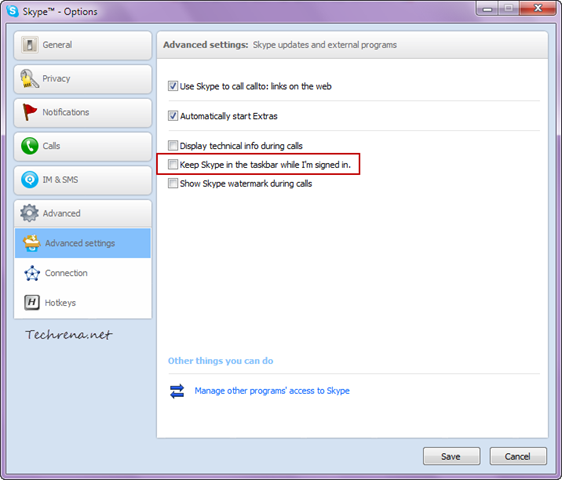
4. Under the “Advanced Settings”, uncheck against “Keep Skype in the taskbar while I’m signed in”.

Skype options advanced settings

5. Click the “Save” button to save settings and close the window.

That is it! Now, close the Skype window and it should disappear from your taskbar as well.

No Skype taskbar icon

[How To] Create A System Image Backup In Windows 7

Windows 7 logo

Backing up has been made so much easier in Windows 7. Now if you are running a Windows 7 PC, you can create and save a “System Image” (captures the current state of the system as it is) is pretty much simple and you don’t even need any third party tools like Ghost. A Windows system image will let you to quickly revert back to the state when the image was prepared. This is pretty much useful if your system crashes in future. It is always best practice to take create a system image when you install a fresh copy of Windows 7 and customise it by adding some important programs. Don’t try to add too many, as it would finally increase the file size of the system image. Let’s look into the details about how to create a system image in Windows 7.

Important: Before start, make sure that you have a safe external storage device to store your image. Although you can use another drive of the same disk, in case of a disk failure, you might loose this image as well. Also note that Windows 7 can only save system image on a storage device which is having NTFS file system.

Steps:

1. Go to Start Menu, type “backup” in the search box and click “Backup and Restore” from the search results under “Programs” section.
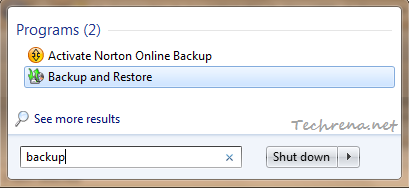
backup start menu search

2. In the Back and Restore window, click “Create a system image” link that can be found in the left hand pane of the window.
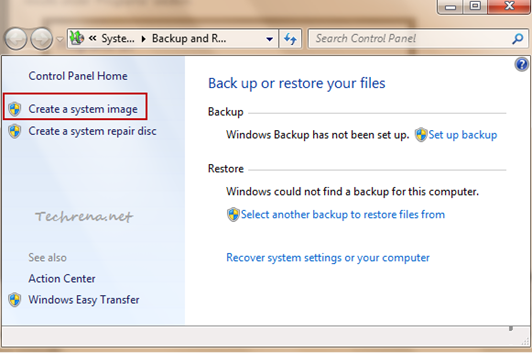
Backup and restore in windows 7

3. Now Windows will look for the available backup devices and will list them under the “On a hard disk” option.
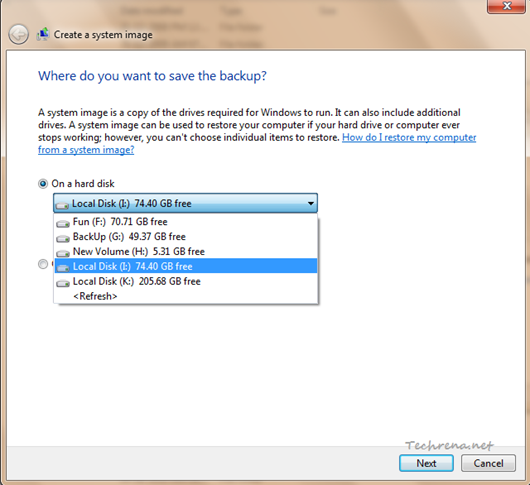
Backup devices for the system image

Here you will realise that you can’t select a drive which is not using NTFS file system. An error message will be shown up, “This drive cannot be used to store a system image because it is not formatted with NTFS”.

Error with non-NTFS formatted backup drives

Also make sure that you have enough space on our backup drive. The system image will consume space which is equal to the total amount of used spaces in the drives selected for the creating an image.

4. Choose the appropriate drive and click “Next” to proceed to the next step.

5. In the next step, you can choose the drives which you want to be included in the backup. By default, all “System” drives will be selected and you have an option to include or not to include other drives. And of course, you can not choose the drive which you are using to save the backup.
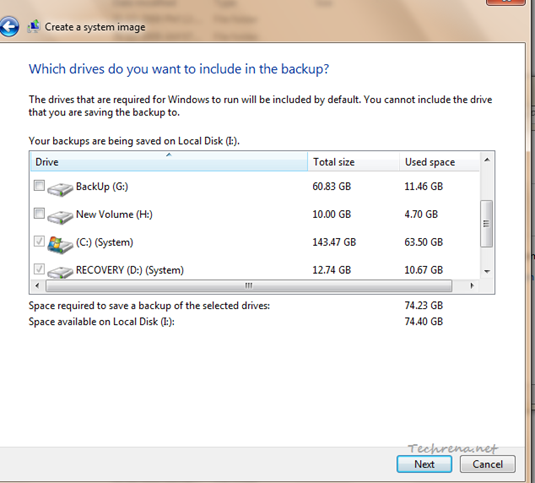
Create a system image select drives to backup

Select the drives and click “Next’ to go the next step.

6. The next window will show the backup location and the drives that you are backing up. Click “Start backup” to confirm the backup settings and start the backup process.
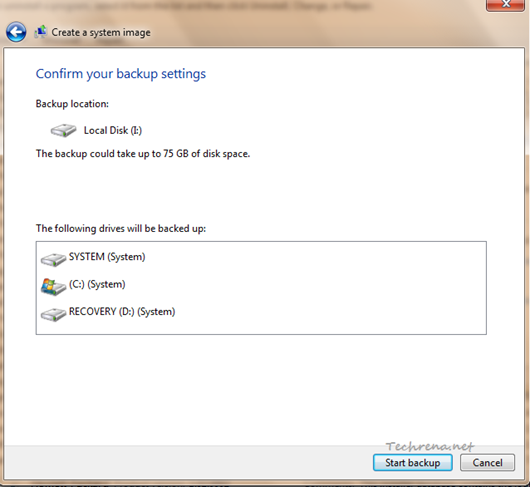
Confirm baackup settings for system image

7. Wait for few minutes for the backup process to get completed. You can stop the process at any time by creating the “Stop backup” button in the window.
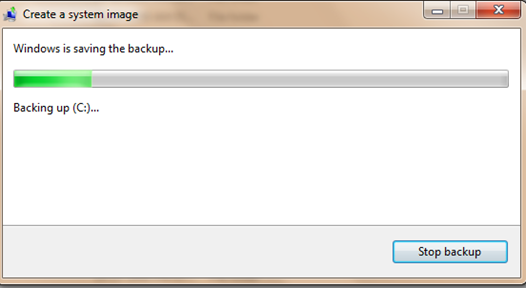
Windows is saving the backup for creating system image

8. Once the process is over, you will be asked to whether to create a system repair disc. It is your choice but we highly recommend that you go ahead and create one.
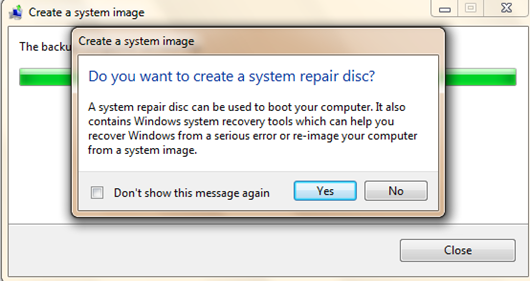
create a system repair disk after system image

Congrats! You have now successfully backed up your Windows 7 using a system image.
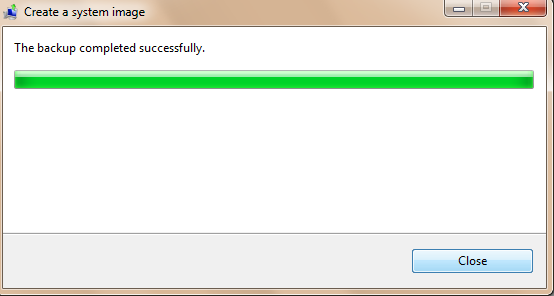
backup completed system image

You can use “Advanced recovery methods” found under the “Recovery’ section of Control Panel to restore your computer to an earlier state using the system image that you stored.
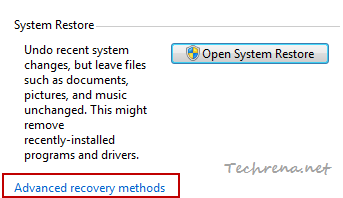

restore backup

Quick Tip: Show Or Hide Bookmarks Toolbar in Chrome

google chrome

Usage of bookmarks is surely on the rise these days, the fact that so many bookmarking related services are now increasing also explains this fact.  Google has a dedicated bookmark bar just below the address bar. Bookmarks bar in Google Chrome is pretty much useful to quickly add, or open your favorite links stored under the bookmarks folder. However you might want to have a choice whether to show the bookmarks bar or not in your Google Chrome. It’s pretty much simple and most of the Chrome users might be already knowing this tip. In case you don’t, read on..

google chrome bookmarks bar

Small tip logoTip: By default bookmarks bar is shown in Google Chrome. To toggle between enable or disable the bookmarks bar, just press Ctrl + Shift + B.

no bookmarks bar in chrome

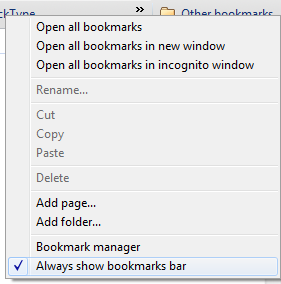
>> Alternatively, you can right-click on the bookmarks bar and choose uncheck “Always show bookmarks bar” option to hide the bookmarks bar. Once hidden, you need to use the above said keyboard shortcut to enable the bookmarks bar again.

Always show bookmarks bar in Google Chrome

[Tip] Enable Web Apps In Chrome 8

chrome web store

Google has recently launched the Chrome Web Store, where you can find number of web apps  , extensions and themes for Google Chrome. If you want to enable the web apps in the recently released Google Chrome 8 (they’ll show up when you open a new tab), follow these steps:

1. Make sure Google Chrome is not running on your computer.

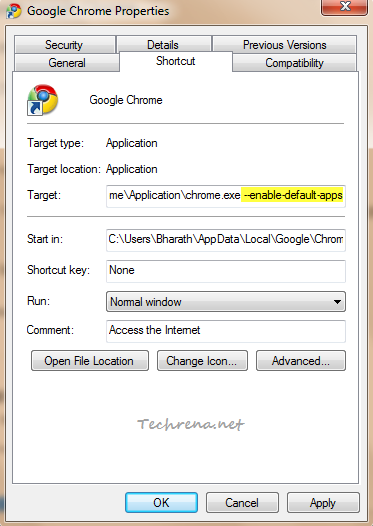
2. If you are on a Windows machine, right-click on the Chrome shortcut, and choose “Properties” from the context menu. In the “Target” filed under “Shortcut” tab, append it with   “ --enable-default-apps" (without quotes but with the initial space). In general, the target field should look like this:

C:\Users\<User Name>\AppData\Local\Google\Chrome\Application\chrome.exe --enable-default-apps

Chrome shortcut properties

3. Click “OK” to save the settings and close the properties window.

4. Click  the wrench icon, chrome tools menuTools > Extensions.

5. Expand the “Developer modeDeveloper mode iconicon.

6. Click on the “Update extensions now” button.

chrome extensions page

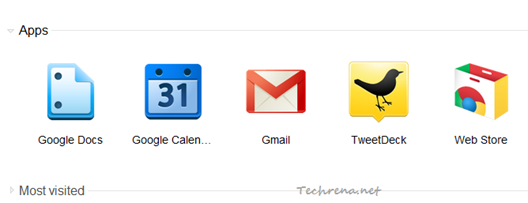
7. Open a new tab and now you must see the all the web apps that are currently enabled for your Chrome. The default web apps are Google Docs, Google Calender, Gmail etc.

Apps page in Google Chrome

This tutorial is intended for Google Chrome 8 running on Windows machine, if your are on Mac or Linux, you might want to read the original story at  Google OS blog.

Gmail For Android Gets Priority Inbox

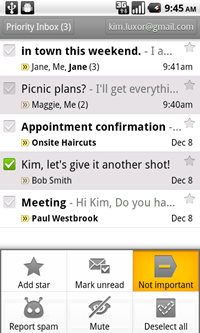
Google has just updated the Gmail Android app (version 2.3.2) with some really interesting feature additions. Gmail app for Android devices now supports the Priority Inbox feature which is already available in the desktop version of the Google’s free email service.

Priority inbox includes all the important messages (both read and unread) in your inbox. All the important messages will carry priority-inbox-gmail-marker marker.

Gmail priotiy inbox in Android

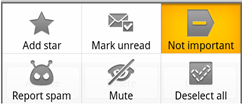
You can always change the importance of a message from the menu.

Gmail Android menu

What’s more? You can also get notified (vibrate, notify or ring) when an important mail arrives in your inbox. To set this, just go to Menu > Settings > Priority Inbox and configure the settings.

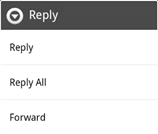
The other improved features in the Gmail for Android 2.3.2 include the improved compose mode. When composing a reply, you can quickly choose to reply only to sender, reply to all or to forward the mail.

Reply options in Gmail for Android

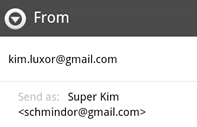
You can also choose a custom from address while composing a new email message, a feature which is already available in the desktop client from long time.

Custom from address in Gmail for Android

The update is available only for the users of Android 2.2 (Froyo) or later versions (Gingerbread). To get the latest version of the Gmail Android app, go to this Android Market Place link from your Android device or scan the following image your barcode or QR reader app. Have Android 2.1? Sorry, no luck!

QR Code:

Gmail for Android QR code

[How To] Disable Aero Peek In Windows 7

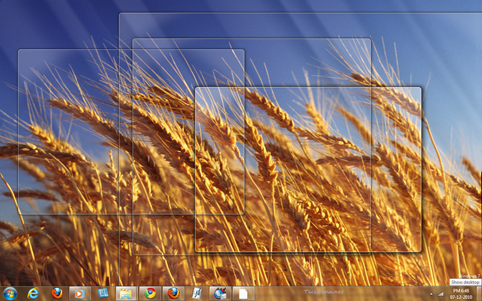
aero peek windows 7

Aero Peek is another nice Windows 7 feature that makes use of the “Aero” effects along with Aero Snap and Aero Shake. When you hover your mouse over the small rectangle found at the right extreme of your taskbar, you will see the desktop with the outlines of the active application windows s shown above. However, if you don’t use it much, you would like to disable it. Here are the two simple ways in which you can do it,

Method-1:

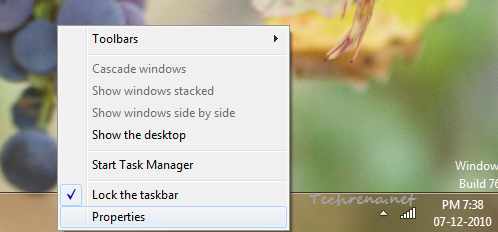
1. Right-click on the Taskbar and choose “Properties”.

Taskbar right-click context menu

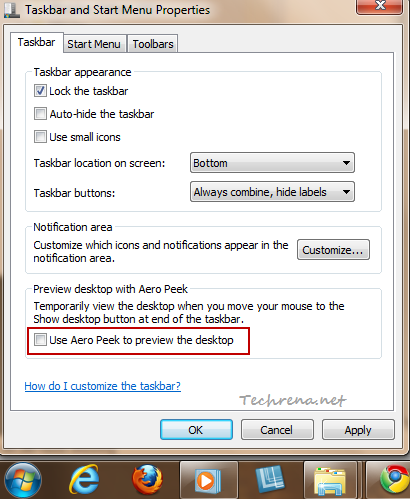
2. Under the “Taskbar and Start Menu Properties” window, uncheck against “Use Aero Peek to preview the desktop”.

Aero peek option in taskbar and start menu properties

Click “OK” button to save the settings and close the window.

The “Aero Peek” effects should now be disabled. There’s another alternative away you can achieve the same.

Method-2:

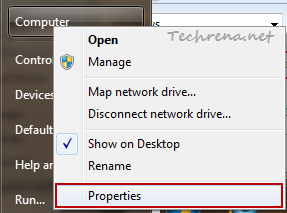
1. Right-click on the Computer link on your Start Menu and choose “Properties”.

Properties in Start Menu Computer context menu

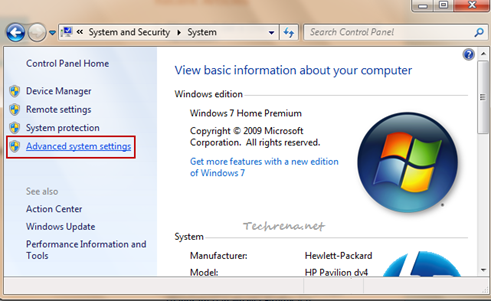
2. A new window will open up. Click on the “Advanced system settings” in the left side pane.

System settings in Control Panel

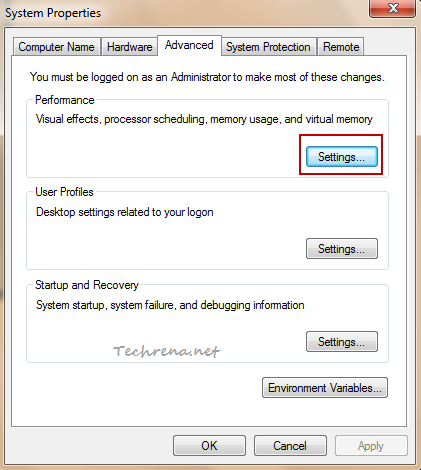
3. In the new “System Properties” window, click on the “Settings” button under the “Performance” tab.

System properties settings

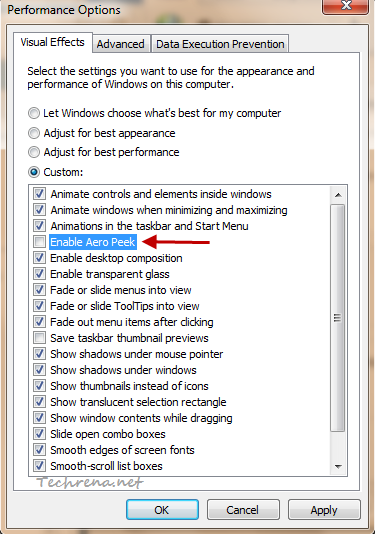
4. Under the  “Visual Effects” tab in the “Performance Options” window, scroll down until you find “Enable Aero Peek” option. Uncheck against and click “OK” to apply the settings and close the settings window.

Aero Peek settings in Performance Options

That is it! You have now disabled the Aero Peek in your Windows 7. To enable it again, just check the option back again in method 1 or method 2.

Get A Cr-48 Chrome Notebook As Part Of The Google’s Pilot Program

Google Chrome OS

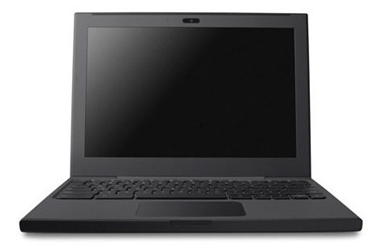
Google has yesterday officially announced the details of the upcoming Google Chrome OS and also showcased the first ever Chrome OS laptop called “Cr-48 Chrome Notebook”. The netbook will have a 12.1-inch screen with a full sized (but tweaked a bit) keyboard, Qualcomm Gobi 3G chip (Verizon-only in US), Wi-Fi, more than 8 hours of usage on battery, a webcam and flash storage. The keyboard has been made such a way that there are no traditional “Caps lock” and “function” keys on it. Instead a new “Search” key has been added in place of the “Caps lock” key, which lets you quickly access the Google search just with a click. The full keyboard looks almost similar to that of Apple’s keyboard.

Cr-48 Chrome OS laptop

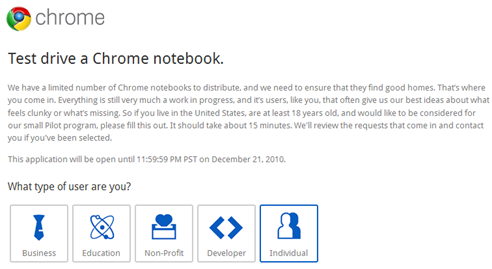
Google has launched a Chrome OS Pilot Program, through which it will initially distribute the Cr-48 Chrome OS laptops to those who are really interested in testing them out. Later, by mid-2011, laptop makers Acer and Samsung should be coming up with their own laptop models based on the Chrome OS. If you want to get this laptop, go here and apply.

Test drive Chrome notebook

Google is giving away only limited number of models for testing to interested users and if you are lucky (if you are in the US, chances are high!) you could also be one of those who get their hands on this notebook even before most of the others could get, Good luck!

via Engadget

Related: Is Chrome OS virus free?

[How To] Password Protect A Folder Without Using Any Third Party Software

If you own a multi-user computer, you will always feel the necessity to password protect your important data so that other users will not have a direct access to it. If you want to lock or password protect your folders, consider using this free software (Secure Folder) to do it. It is easy to configure and use. However, if you are one of those who thinks you get all these sort of things worked on your Windows with tweaks, here is a classic (has been around since the days of Windows XP!) trick which allows you to lock (using a password) and make the folder invisible in Windows 7, Windows Vista and of course Windows XP. Follow these steps:

Steps:

1. Open notepad and type the following code saved in this text file.

2. Replace “ENTER YOUR PASSWORD” with your own password in the following line.

if NOT %pass%== ENETR_YOUR_PASSWORD_HERE goto FAIL

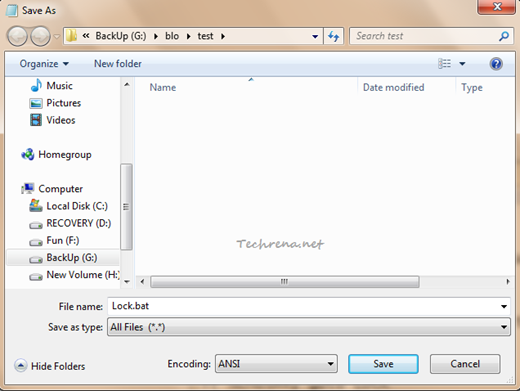
3. Save the file as a .bat (batch) file (you can name it whatever name you want)

Save as batch file

4. Now double-click on the .bat file that you have just saved. A new “Private” folder will be created.

5. Copy and paste all your private and important data to this “Private” folder.

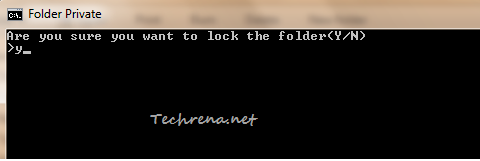
6. Now again double-click on the batch (.bat) file. A command prompt window will ask you for confirmation. Press “y” to continue.

Lock folder private with password

7. The “Private” folder will go missing this time and you can only find the .bat file.

Private folder gone missing

If you have enabled the “Folder Options” to show the hidden files, you will an empty “Control Panel” system folder.

8. To get the folder back, double-click the .bat file again and you will be asked to enter the password that you have set in the step 2.

Enter password to open private folder

The “Private” folder re-appears again!

Private folder

You can see that the trick actually works but there’s a small catch. Anyone can open the above batch file in a text editor and can actually see the password that you had entered. Hence we’ll try to convert this batch file to an .exe (executable) file so that it can’t be opened it in text editor.
To workaround this issue, download this Batch to Exe file converter and convert the above .bat file to an .exe file. That is it!

Download Dropbox 1.0

Dropbox

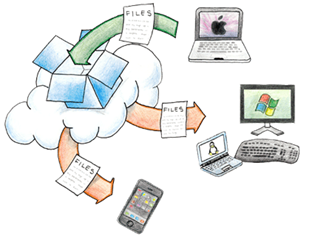
Dropbox has reached to 1.0! A nice achievement there. Dropbox team has released RC version of the Dropbox 1.0 which is  available now for free download. For starters, Dropbox is a pretty popular too which allows you to store your desktop files on the cloud, share them and access them from anywhere in the world over the internet, irrespective of the platform (be it Windows, Mac, Linux or even any mobile OS). Dropbox also synchronizes the files between your offline directories and online directories to make sure it always has the latest version of the files within it.
dropbox graphic

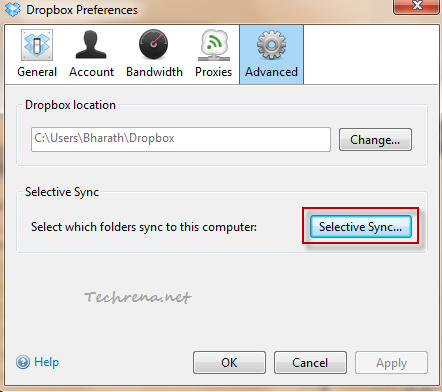
Dropbox 1.0.0 RC is coming with a plenty of bug fixes and performance improvements and the latest version will use lesser CPU resources to run. The most appealing feature in the 1.0 RC version of the Dropbox is “Selective Sync..” which allows you to control which folders should be synced to your computer.

Dropbox preferences

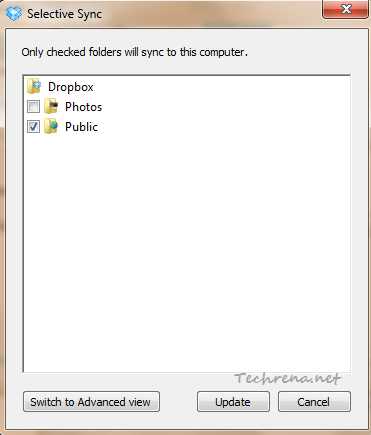
Selective sync in dropbox

Selective Sync would be very useful in saving the bandwidth for you. With Selective Sync, you can choose a folder to be on the Dropbox server as backup without still needing the folder to be synced to all the machines where you use Dropbox. Download the Release Candidate version of Dropbox 1.0.0 from the following direct links.

Download Dropbox 1.0:

Windows [13.96 MB]

Mac OS X [20.90 MB]

Linux: x86 [13.77 MB] x86_64 [14.54 MB]

Note:

There are some bugs being reported by users on Mac and Linux when upgrading from 0.7.110 to 1.0.0. You might not want to install this version if you are on any one of those two platforms. However there’s a workaround available on Dropbox forum (scroll down to note section) to get this work.