[How To] Change Fonts In Windows 7

Change windows 7 fonts

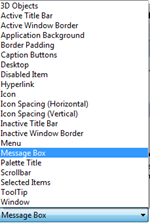
Windows 7 lets you change the font in any part of Windows including menus, Active Title Bar, Icon, Inactive Title Bar, Message Box, Palette Title, Desktop, Selected Items etc. Please note that changing these Windows fonts doesn’t change any program fonts, which means that these are the settings for changing the outer view of any program window rather than the look that we see inside the program which depends on the fonts and styles adopted for that particular program.

Follow these steps to change the default Windows 7 fonts

Steps:

1. Go to Start menu and type “window colors” in the search box:

Window colors start menu search

2. Click on “Change window colors and metrics” link from the search results in “Control Panel” section:

change window colors start menu search result

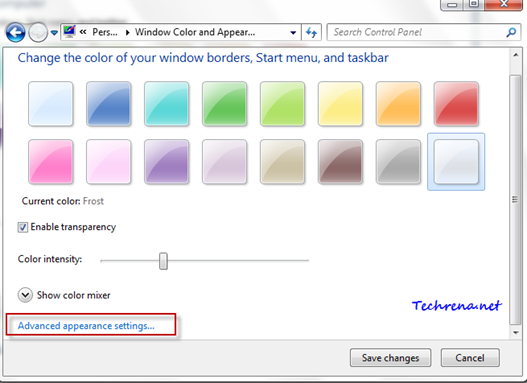
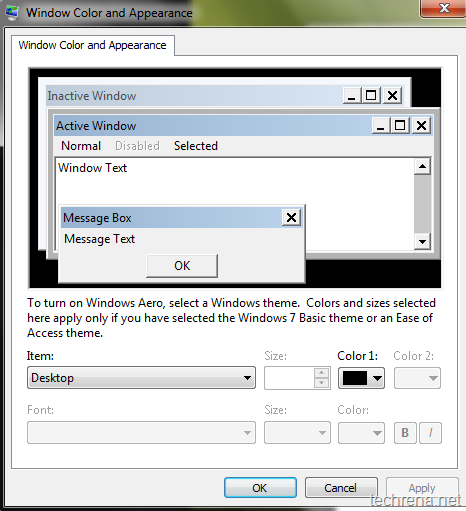
3. A new “Window Color and Appearance” window opens up *:
window color and appearance

4. Choose the part of the Windows for which you want to change fonts in the Item list.
Items list in window colors

Once you select the item from the list, you will be able to change its fonts and color settings:

Window colors & fonts change

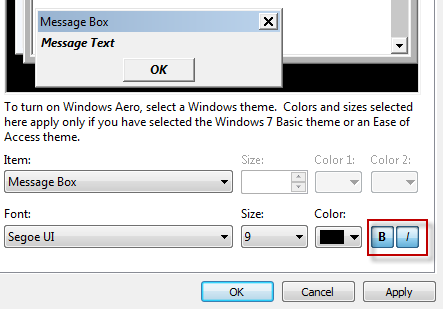
You can change the fonts parameters like the font type, size of the font, color etc.

Click on B icon to make the font bold or click on I icon to italicize the font as shown:

Repeat these steps for each item in the list for which you want to make changes.
Window fonts bold and italic

5. Click OK to apply the changes and close the window.

You are done!

[*] Alternatively, you can launch the Window color and Appearance settings from these steps:

Right-click on vacant space on the desktop and select Personalize.
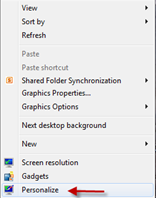
Personalize in desktop context menu

Click on the Window Color link found at the bottom of the Personalization window.

Windows color link

windows color appearance window

It will open the same Window Color and Appearance Settings window as shown in the step 3.

[Tip] Reset Internet Explorer Settings

Internet explorer logo

If you have been using Internet Explorer (IE7, IE8 & IE9) for long, it’s quite obvious that you might have added many customizations, add-ons etc. You have become its master, it does what you instruct. But a day comes where the scene goes out of your hand, Internet Explorer does respond and behaves in an unexpected manner. Doesn’t open the websites, throwing errors at your face which you never want to see like “Internet Explorer has “encountered a problem and needs to close” or “ Visual C++ “runtime error” has occurred in Iexplore.exe”, it either stops responding or even worse, it crashes! Whatever may be the cause of these errors, they are really annoying. The first thing that you should do in such a situation is to disable the add-ons that are known to cause these problems. Even though, this may solve the issue for now, the ideal option however is to reset the IE settings. This will automatically deletes all the add-ons and customizations and makes your Internet Explorer like a freshly installed version. Follow the steps explained below to reset the IE settings on your computer.

Steps:

1. Start the Internet Explorer.

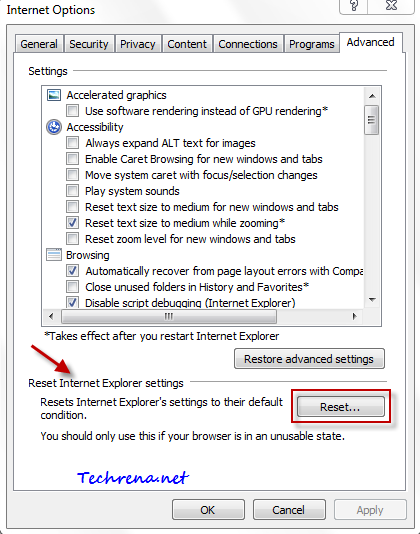
2. Open Internet Options via Alt button> Tools. Go to Advanced tab in the Internet Options.

3. Click on the Reset button available at the bottom of the window to reset your IE settings.

Reset IE settings in Internet Explorer

4. IE will start resetting the settings, wait until it gets finished and click Close in the Reset Internet Explorer Settings dialog box.

Restart your Internet Explorer to see the changes. IE should behave in the usual way from now on.

[How To] Use SFC Scannow Command In Windows 7

Windows 7 logo

SFC (System File Checker) is a very useful command to check the integrity of all the protected system files in Windows 7 and Vista and replaces any corrupt, changed or missing system files (including DLL files) to correct versions (undamaged versions), if possible.

Even though there are several switches available under the SFC command, the sfc scannow is the most used command. If SFC can’t fix the corrupted system files, then you need to consider other options like using a recovery, reinstalling  Windows, restoring from backup, or restoring to an earlier system restore point.

Here is the step-by-step guide on using the SFC /scannow command tool in Windows 7 or Windows Vista:

Steps:

1. Click Start button, type “cmd” in the start button, right-click on the “cmd.exe” and select “Run as administrator” to run the command prompt in elevated or administrator mode.

running cmd as an administrator

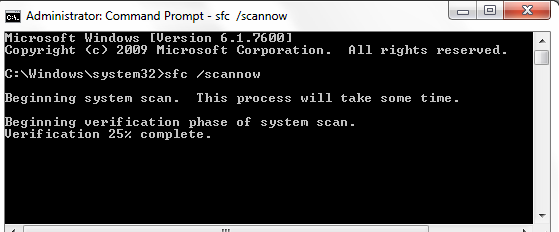
2. Type the following command in the command prompt and hit enter:

sfc /scannow

Sfc /scannow command

3. Now the toll will run a verification of integrity of every protected operating system file. Wait until the system scan is finished. This usually takes 5-10 minutes.

Sfc /scannow command scan progress

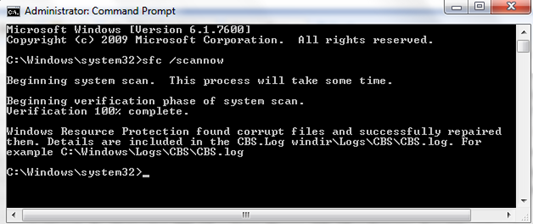
4. When the scan is finished, you will “Windows Resource Protection did not find any integrity violations” message when it doesn’t find any corrupted files.

On the other hand, if it does find any corrupt files, it will automatically (if it’s possible) repair them. Restart your computer once the repairing process by the SFC tool gets over (as indicated in the command prompt). Please note that if the System File Checker (SFC) finds any integrity violations and fixes them, you should restart your computer immediately even if you are not prompted to do so.

Sfc /scannow command scan repair successfull

Run the sfc / scannow command once again (after restarting your PC) to see if all the corrupted system files have been repaired.

The SFC command writes the log to CBS.log file found in C:> Windows > Logs > CBS.

When To Use The SFC Tool ?

When any Windows Resource Protection (WRP) file goes missing or corrupted, your Windows behaves in an odd manner. Windows functions may not work or entire Windows may crash unexpectedly. Run the SFC tool in such situations to repair any missing or corrupted system files.

[How To] Disable All In One SEO Additional Columns From Posts Editing Page

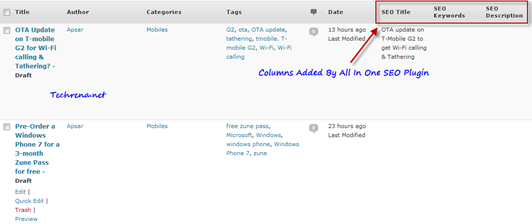
If you have just upgraded the All In One SEO plugin today for your WordPress based blog, you might have noticed three new columns being added to the post editing page (SEO Title, SEO Keywords and SEO Description) as shown below

All in one seo added additional columns

It’s very much annoying as the the post title column gets longer due to this and make it difficult to read it as you need to scroll down. These columns added after upgrading the All In One SEO are not actually needed considering the fact that they take significant amount of your screen space. So I quickly dug into this to find out how we can remove, and realized that it was quite easy after seeing a tweet from Micheal Torbert, the developer of this great plugin. Here is how you can remove the additional three SEO columns in posts editing page (no code modification required):

1. Go to All In One SEO plugin configuration page (Can be found under Settings menu in your dashboard).

All in one seo link in sidebar

2. Look for “Custom Post Types for SEO Column Support” filed in the settings page. By default, the settings would be enabled for both post and page editors as shown:

Custom post types SEO Columns checked in All in One SEO

3. Hold Control key and uncheck the post and page options as shown:

Custom post types SEO Columns unchecked in All in One SEO

4. Click Save the Options and go back and check the post and page editing page in your WordPress dashboard, the extra columns should have been removed now.

[Download] Cumulative Security Update For Internet Explorer KB2360131

Windows Update

Microsoft has released security update KB2360131 to  address the vulnerability that was mentioned in the Microsoft Security Bulletin MS10-071.

The users of Windows Vista and Windows XP have been advised to install the update KB2360131 to address the security issue that could allow an attacker to gain control over a computer running Microsoft Internet Explorer by executing a remote code.

The update has been issued for Internet Explorer 7 and Internet Explorer 8 versions running on Windows XP, Windows Vista. Find the download links added below to download the update patch to keep your computer and Internet Explorer safe from the attackers.

Download Links:

  Windows Vista Windows XP
Internet Explorer 8 x64 (18.2 MB): x86 (9.3 MB) x64 (40.1 MB): x86 (9.9 MB)
Internet Explorer 7 x64 (36.7 MB): x86 (7.6 MB) x64 (14.7MB): x86 (8.8 MB):
     

Microsoft had released similar updates in the past: Cumulative security update for IE.

[Download] Updated Yahoo Messenger For iPhone

Yahoo messenger for iphone

The much talked-about updated Yahoo Messenger app for iPhone is now official, available via Apple’s App Store. The latest version (version 2.0) has included video and voice chat (streaming included) to your friends in Yahoo Messenger over Wi-Fi and 3G on iPhone 3GS and iPhone 4 models. The app however doesn’t support video calling on the iPhone Touch 4G!

The Yahoo Messenger 2.0 iPhone app has been upgraded to work with iOS 4.1.  The new features include IM, SMS messaging and notifications and ability to call your friends who are on Windows Live Messenger. This new version of Yahoo Messenger application for iPhone is touted by some as a real competitor to Apple’s FaceTime.

messenger video chat in iphone

messenger screenshot in iphone

Download:

Visit iTunes App Store page to download this free app for your iPhone now.

If you are using Yahoo Messenger on your Windows PC, read our guide to how to stop it from automatically running at startup.

[How To] Change Desktop Icons For Computer And Recycle Bin

Windows 7 can show desktop shortcuts for any program (you can add as many as you can), but by default shows the following:

Computer, User file’s folder, Network, Recycle Bin (full), Recycle Bin (empty)

default desktop shortcuts

Windows shows some default icons for “My Computer” (Computer in Windows 7) and “Recycle Bin” and other shortcuts on the desktop as shown:

Computer icon in windows 7Recycle bin icon in windows 7

If you want to change these icons and add your own icons, follow these instructions:

Steps:

1. Right-click on empty space and choose “Personalize”:

Personalize in desktop context menu

2. A new Personalization window opens up. Click “Change desktop icons” link in the window.

change desktop icons shortcut in personailzation Windows 7

3. Select the item for which you want to change the desktop icon (example; Computer, Recycle Bin etc., ) and click on “Change Icon”.

desktop icon settings for computer

desktop icon settings for recycle bin

4. In the next step, choose an icon from the list of the icons available already or you can even browse for icons in your computer. You can also create your own icon using the many freeware software available on the internet.

change icon desktop icons

You are done! Check the desktop icon back and it should reflect the change as shown:

computer icon changed

You can change desktop icons for the any of the five items discussed at the beginning of this post. Mean while if you are facing problems with broken icons on your desktop, read this post to fix the broken icons.

[Live] Watch Windows Phone 7 Launch Event

Windows phone logo

Microsoft and AT&T are jointly hosting the major Windows Phone 7 launch event in New York on October 11, 2010. Microsoft CEO Steve Ballmer and the President & CEO of AT&T Mobility and Consumer markets, Ralph de la Vega will be hosting the event to discuss the things that we haven’t yet heard about the Windows Phone 7 (formerly known as Windows Mobile or WinMo)and its availability details.

The features of Windows Phone 7 include:

Live Tiles

Unified Social Media Posting

Lost Phone Tracker

PeopleHub

Office Hub

Marketplace Hub

Bing Search

etc., .

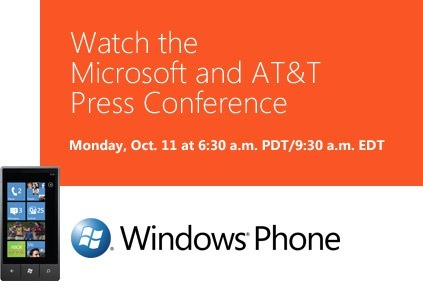
The event will start on Monday, Oct. 11 at 9.30 AM EDT (6.30 AM PDT / 11.30 PM GMT / 19.00 Indian Standard Time). Microsoft will be exclusively telecasting the full event live on the internet (live webcast).

Windows Phone 7 conference live

Watch Online:

Watch the live streaming action from the Windows Phone 7 launch: Link

Meanwhile, get acquainted with all the new promising features in Windows Phone 7: Watch the Windows Phone 7 Video Highlights.

[Tip] Show File Extensions In Windows 7 & Vista

Windows logo

Windows 7 hides the extensions of the files by default to keep t simple. However you can easily know the extension of any file just by looking at its icon. However, it may sometimes can get as bad as it can, suppose an attacker copies an .exe file to your computer and renames it as something catchy like “sensational-pic.jpg.exe”, now as Windows 7 doesn’t show the file extensions, all you will see is “sensational-pic.jpg” (.exe part would be hidden!)which might falsely lead you to think it as a picture and click it all just to run the whatever code the attacker has injected into the program.

And I guess I have convinced to find out a way to show the file extensions in your Windows 7 Smile. That’s why I’m writing a step-by-step tutorial to explain to show the file name extensions that had been set to be hidden by default.

Steps:

1. Open My Computer (Use Alt + E button).

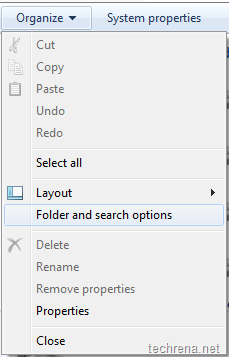
2. Click Organize button, select “Folder and search options from menu”.

Folder search options in windows 7

3. In the Folder Options window, go to “View” tab.

View tab in folder options

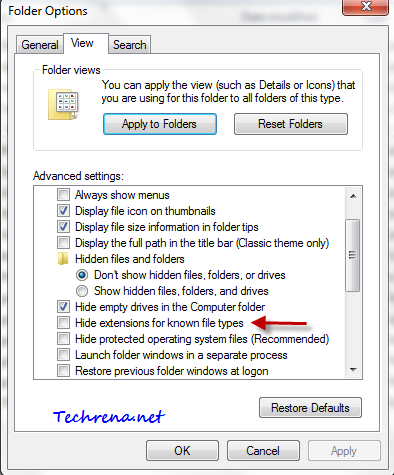
4. Under the View tab, uncheck “Hide extensions for known file types”.Hide extensions for known files under folder options

5. Click Apply to save the settings and then click OK to close the window.

Alright, you have now changed the settings to enable the file extensions. Here is what the change would be like:

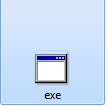
Before:

file_ext_disabled

Guess what type of file it is?

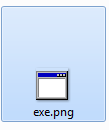
After enabling file extensions:

file_ext_before

It is an image file! It is evident after changing the settings to show the extensions for file types. The only problem that you might face is during renaming the file, except that you shouldn’t be having too many issues with these settings enabled. To hide the file extensions, just check against “Hide extensions for known file types” in the step 4.

[Download] IE8 & IE9 Compatibility View List

Internet explorer logo

Even though we are in the age of Internet Explorer 9 , there are still handful of websites that were designed specifically for use with IE7 (or even IE6!) and which may break when rendered in the Inter Explorer 8.

To solve the issues with such websites, Microsoft has included “Compatibility Mode” in IE8. Whenever the browser finds that the URL entered by the user points to a website that is mostly compatibility with IE7 and older versions, the browser will quickly switch to the Compatibility Mode to render the content as it would be seen in the older versions of the Internet Explorer.

IE8 (as well as IE9) maintains a native list of websites that are to be rendered “Compatibility Mode”. To view this Compatibility view list in your browser, type the following in the address bar:

res://iecompat.dll/iecompatdata.xml (IE8)

File:\\%LOCALAPPDATA%\Microsoft\Internet Explorer\IECompatData\iecompatdata.xml(IE9)

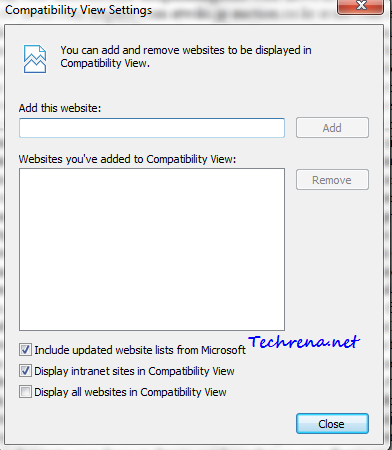
You can also add your own websites  to the list (IE8 or IE9) by clicking on the Alt button > Tools > Compatibility View Settings:

compatibility view settings

Microsoft now and then updates the Compatibility View List by including or removing websites to the list. It is rather surprising to find that websites from Microsoft own domain are featured in the list (Microsoft.com and Live.com). Download the latest Compatibility View lists in (xls format) for IE8 and IE9 from the links given below:

IE8 Compatibility View List (Updated on 04/17/11 – Link expired)

IE9 Compatibility View List