[Download] Internet Explorer 9 Release Candidate

Internet Explorer 9

Microsoft has just released the release candidate version of the Internet Explorer 9 for Windows 7 and Windows Vista operating systems. The first public beta of Internet Explorer 9 was released in September 2010. So that was like nearly five months ago. Microsoft has stated that there were more than 2,000 changes incorporated since the release of IE9 beta. Here are the few new feature improvements in the Internet Explorer 9 release candidate.

>> Improved JavaScript Engine (Chakra) Performance

>> Dynamic GPU Usage

>> Lesser Power Consumption Levels

>> ‘Do Not Track’ feature

Other minor improvements include the increase of temporary internet files size from 50 MB to 250 MB.

Download IE9 RC:

Download the Internet Explorer 9 RC (Build 9.00.8080.16413) online setup (from the below links) which needs an active internet connection to download and install the browser on your Windows.

Windows 7 32-bit

Windows 7 64-bit

Windows Vista 32-bit

Windows Vista 64-bit

For more information on IE9 RC release, read this blog post on official IE9 blog.

[Download] Adobe Flash Player 10.2 With Hardware Acceleration

Adobe Flash Logo

Adobe has released the final version of Adobe Flash Player 10.2, which has been in beta since December last year. Adobe Flash Player 10.2 for Windows, Mac, and Linux has some new cool features and many feature enhancements. The new release is 34 times more efficient than its predecessor.

New features in Flash Player 10.2 include:

  • Stage Video hardware acceleration
  • IE 9 hardware accelerated rendering support
  • Native custom mouse cursors
  • Support for full screen mode with multiple monitors
  • Sub-pixel text rendering

The ones that standout among the rest are the “Stage Video” hardware acceleration and the support for full screen mode while using multiple monitors. The Stage Video hardware acceleration speeds up the video delivery process while watching videos on webpages. According to Adobe, Stage Video hardware acceleration can play most online HD videos with just 1-15% of CPU usage on a MAC or Windows PC. Adobe has also recommended users to watch a suggested 1080p HD video to experience the new video performance enhancements after installing the new 10.2 version of Flash. Flash Player 10.2 allows you to work on your primary computer while watching content in full-screen mode in the secondary monitor.

Download Adobe Flash Player 10.2:

Download the Adobe Flash Player 10.2 from the below direct download links for your MAC, Windows or Linux computer. It’s highly recommended that you uninstall the previous version of the Adobe Flash Player before going ahead with installing 10.2.

Windows (2.7 MB – Windows 7 / Vista / XP / 2008 / 2003)

Mac (5.5 MB – Mac OS X 10.4 – 10.6) Update: Link expired

Linux (4.74 MB )

If you are on Google Chrome, read our guide on how to force Chrome to use Flash Player 10.2 (based on 10.2 beta version, but still works!)

[Download] Google Chrome 9 Stable Offline Installer

Google chrome 9

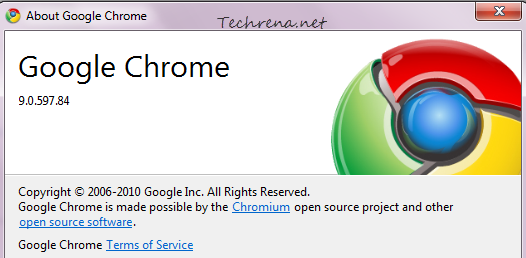
Google Chrome 9 stable version has been released and is coming just after two months of the release of the Google Chrome 8 stable version. Hitting the landmark of version 9.0 (current version 9.0.597.84) is quite a good achievement for the two and half year-old browser from the search engine giant.

The new version includes few enhancements like:

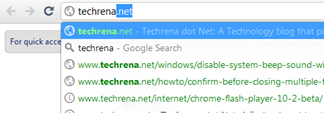
  • Chrome Instant: Courtesy of Google Instant, this new feature in Chrome auto-completes the URL bar with the pages that you visit frequently as soon as you start typing it in the address bar.

Chrome instant demo

  • WebGL: Bings Hardware-accelerated 3D graphics to the Chrome and enables you to experience a rich 3D experiences without needing to install any plugins. Visit the Google’s demo page to test the WebGL capabilities of Chrome browser.
  • Chrome Webstore: The Chrome Webstore (integrated into Google Chrome) has been made available to the users in the United States. Users can quickly access the Chrome Web Store on the New Tab page. (Try Tweetdeck app)
  • About:conflicts: New about:conflicts lets you quickly check for any possible conflicts with third-party software that conflicts with Chrome (Windows only).

Besides these new features, Google Chrome 9.0.597.0 is coming with five important security fixes and Adobe Flash 10.2.

Download Google Chrome 9.0 :

As usual, unless the Google Chrome’s “Auto update silent mode” is disabled, you should automatically get updated to this version if you were using an older one. You can also quickly check for update by going to Wrench > About Google Chrome.

>> Online Installer:

Google Chrome 9 Stable:

Windows (Windows 7, Windows Vista and Windows XP)

Mac

Linux

>> Offline Installer (Full Setup):

Windows (23.96 MB)

Mac (32.35 MB)

Tip: Learn how to make Google Chrome to use Flash Player 10.2

[Tip] Change Wireless Networks Priority In Windows 7

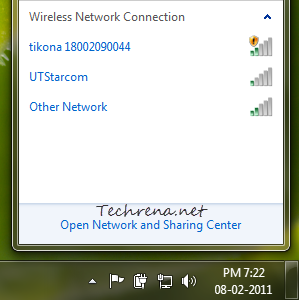
Wireless networks in Windows 7 taskbar

Connecting to a wireless network in Windows 7 is pretty much simple and straightforward compared to the days of Windows XP and earlier operating systems. However if you have more than one wireless network available at your home or workplace, you might want to assign priority to these networks to tell your windows to which it should try to connect first. Al though you can choose to a wireless networks from all of the available wireless networks that appear under the network icon in the taskbar, it would be better if your computer connects to your favored networks automatically. This tutorial explains how you can change the priority or order of wireless networks in Windows 7.

Steps:

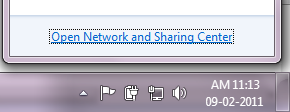
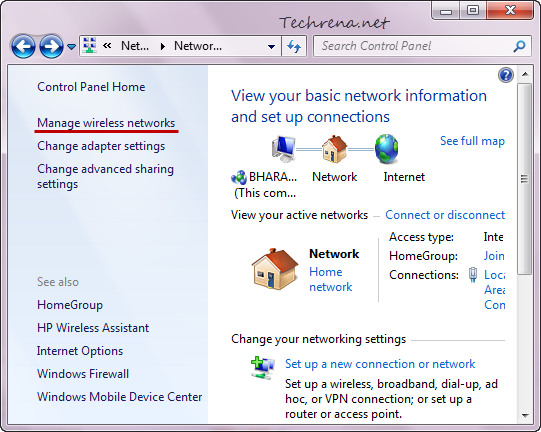
1. Open the Network and Sharing Center either from link in the network icon in the taskbar or from Control Panel > Network and Internet > Network and Sharing Center

Network and Sharing center link at the taskbar

Click on the “Manage wireless networks” link found on the left-hand side pane.

Manage wirelss networks link in the network and sharing center

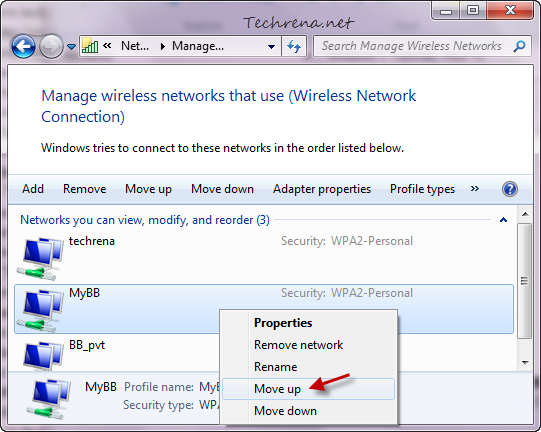
2. In the Manage wireless networks window, right-click on the wireless network for which you want to change priority and you can either move it up (giving more priority) or move it down (lesser priority) depending on your usage.

Move wireless network up in Windows 7

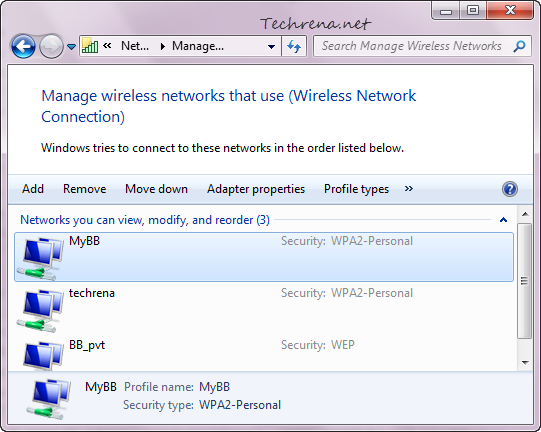
3. Now the order of preference of the wireless networks used by your Windows will be changed.

Wireless-networks-windows-7-priority-changed

You are now done with setting up the priority order for your wireless networks. So from now on, Windows will try to connect to the first one wireless network in the priority list. If it isn’t available, then it will try the next connection and so on. You can also change the settings to not connect to a particular wireless connection automatically.

If you are looking to change the order of priority among the various wired and wireless network cards on your computer, read our popular post on changing the network cards priority order in Windows.

[How To] Delete Cookies In Google Chrome

google chrome logo

This simple step-by-step guide is to teach how to delete individual browser cookies in the Google Chrome browser. Follow the steps carefully to clear or remove individual or all cookies in Chrome.

Steps:

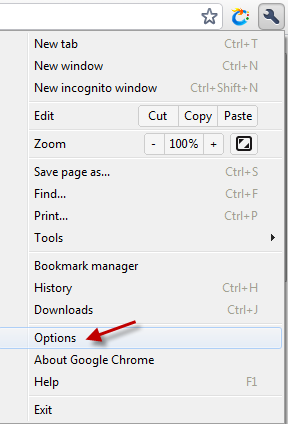
1. Click on the wrench icon Chrome wrench icon tools menu towards the left-hand side of the Chrome window and click “Options” from the list.

Chrome options in the Menu

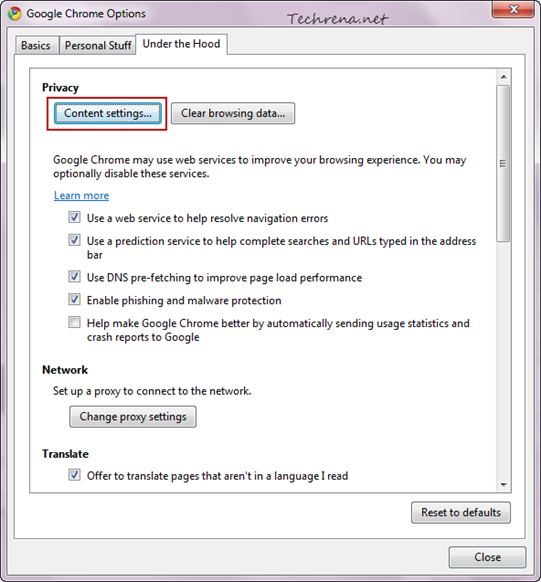
2. And in the “Under the Hood’” tab, click on the “Content settings..” button.

content-settings-chrome-options

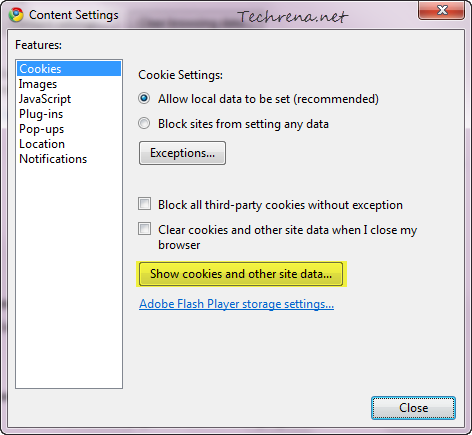
3. Click on the “Show cookies and other site data..” button.

Cookies settings in Chrome content settings

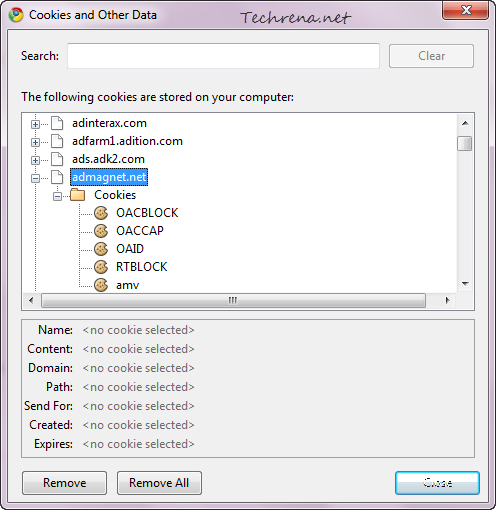
4. Now you will see all the cookies stored for different websites in Chrome

cookies-google-chrome

Select the cookies that you want to delete and click the Remove button delete that particular cookie. To delete all the cookies stored in your browser, click the “Remove All” button. The settings are almost similar on Chrome installed on other operating systems like Mac OS X, Linux etc.

[Tip] Link Google Analytics Profile To Webmaster Tools

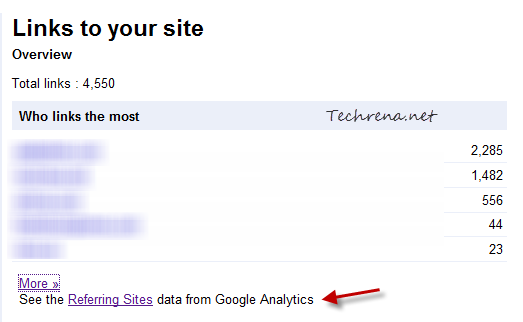
If you own a website or blog and using Google Analytics and Google Webmaster tools services on your site, you can now link both these services to more quicker access within one service to the other. A post on Google webmaster central blog describes that once you link your site’s Google Analytics profile to the corresponding Google Webmaster Tools account, even though you won’t be able to see data sharing like your linked Adsense – Google Analytics account, you can still see some quick links to access few Analytics features right inside the Webmaster Tools. For instance you can now see the referring pages report of the Google Analytics profile from the “Links to your site” page in Webmaster Tools.

Links to site in Google Webmaster Tools

Follow the steps to link the Google Analytics profile of your site to the Webmaster Tools provided you have both of them on the same Google account.

1. Go to Google Webmaster Tools dashboard and locate the site for which you want to link.

2. Click on the “Manage” drop-down button to expand the menu and click on the “Google Analytics profile” link.

google analytics profile link webmaster tools

3. Choose your site’s Google Analytics profile from the list and click the “Save” button.

Link Google Analytics account to GWT

That is it.

Set Up Hotmail Email Aliases

Hotmail logo

An email alias is basically an alternate email address which is mapped to a original and used email address in order to save your email address from spam. If you ever have to share your email address but hesitant to do it for of the fear of spam, having an email address alias could be handy.

Most of the email services allow us to easily generate a dummy email alias by adding a “+” sign to your primary email address. For instance, if your email address is “myemail@hotmail.com” is your primary email address, you could always add a “+” sign to your ID to make it “myemail+newsletters@hotmail.com”. Even though this method works well, one big problem is that one can easily find out your actual primary email address from the structure of this kind of alternative email address. To solve this issue, Microsoft has started to let the users choose completely different set of email addresses as your aliases that can be used to receive emails into your primary email address without anybody knowing a detail about it. Google offers such email aliases for Google Apps user but not for Gmail users. Here is how you can setup an email alias for your Hotmail.

1. Open Hotmail email alias page and log into your Hotmail account using Windows Live ID.

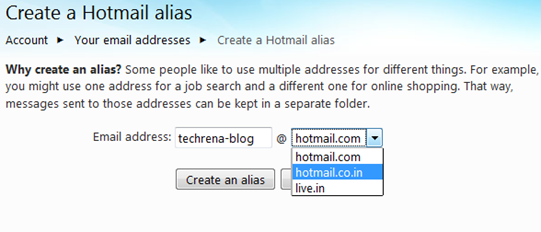
2. You will now be asked to choose an email alias for your existing email, and the it is subject to the availability i.e Hotmail checks whether the ID is available. Choose your desired ID and click “Create an alias” button .

hotmail alias

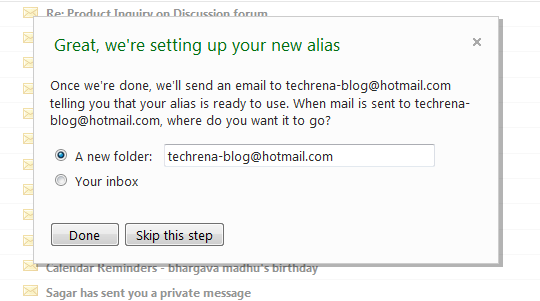
3. If the ID chosen is available, you will be taken to your inbox and will be asked to choose a folder for this alias. You can either choose to receive mails from this email alias directly to your inbox or you can create a new folder to direct the email messages to it.

Hotmail email alias setup

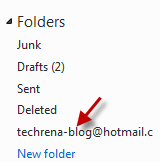
4. You are done. If you had chosen to create a new folder, it will appear in the left-hand side pane.

hotmail alias folder

You can create up to five aliases per year until you reach as many as fifteen aliases in your account.

[via] Windows Live blog

[Download] Windows Home Server 2011 Release Candidate

Windows Home Server

Microsoft has yesterday released the release candidate version of the upcoming Windows Home Server 2011 (WHS 2011) for testers. The product which was codenamed “Vail” during its development was previously in the news because of Microsoft’s surprise and controversial move to not to include the popular Driver Extender (DE) feature in WHS 2011. For starters, Drive Extender was a handy feature in WHS which allowed the users to merge hard drives into a storage pool that made it easy to manage all the drives. Microsoft has decided to drop this feature apparently because it thinks that the drives coming these days are big enough (storage wise) and the users may not go for the drive pooling via Drive Extender. The another limitation in WHS 2011 is that the maximum size of a partition can only be 2TB. To makeup for these limitations, Microsoft has added few new features like Move Folder Wizard which makes you to move data from one drive to another and the other being Shadow Copy which allows you to quickly return to a previous version of existing files.

If you want to test the Windows Home Server 2011, you must sign up for the Windows Home Server Connect Program using a Windows Live ID.

[via]

[Download] Valentine’s Special Windows 7 Themes

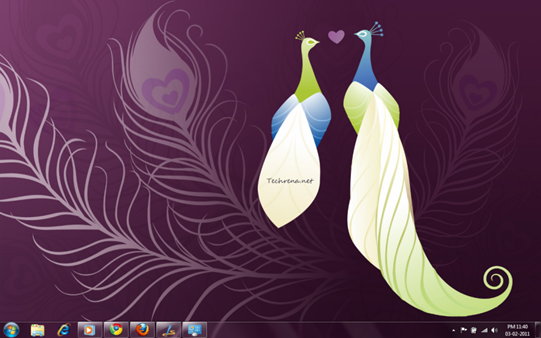
2011 is already a month old and we are into the beautiful month of February. The first thing that comes to the minds of most people when they think about the February is the valentines day. As with Microsoft, the practice of releasing some new free themes for all seasons and important occasions continues and Microsoft has already released a new “Lovebirds” theme for Windows 7 keeping the upcoming 14th February’s valentines day. Lovebirds theme has five beautiful high resolution desktop backgrounds filled with the valentines colors (pink & purple) decorated with flowers, birds, etc.

Love birds windows 7 theme

Download Lovebirds Theme For Windows 7

And by the way, you must also check out the Lacey Hearts Valentines Windows 7 theme (released last year) which still looks great and suits your valentine mood.

Download Lacey Hearts Windows 7 Theme

Search The Internet Right From The Windows 7 Start Menu

start menu internet search

Searching the internet is fun and it would more fun if it could be made easily accessible. We all by default use browsers to search (through the address bar, search box or using the search engine website) the internet. But the modern gadgets like Android phones, tablets and others are coming up with more quicker ways to search right from their home screens. In fact, you will find a Google search box on the homepage of most Android devices. Wouldn’t it be good if we have such quick access to any search engine like Google from our desktop? Of course we have few third party applications like Google Desktop to serve the purpose. If you are on Windows 7, you don’t even need any special software to achieve this. Windows 7’s Start Menu has integrated the web search feature right in it. Let’s see in detail, how to enable and search the internet directly from the Start Menu in Windows 7.

>> Method –1: Using The Registry Editor

This method works on all the different editions of Windows 7 as we make use of the Registry Editor that’s key ingredient of all the different editions of Windows 7.

1. Type “regedit” in the Start Menu and open the regedit.exe from the results under the “Programs” section.

2. Navigate to the following path in the registry editor:

HKEY_CURRENT_USER\Software\Policies\Microsoft\Windows\Explorer

3. Right-click on the right-hand side pane and choose New > DWORD (32-bit) value and name it as “AddSearchInternetLinkInStartMenu”.
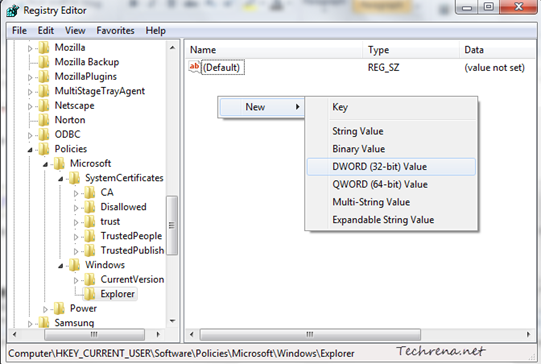
registry editor internet search from start menu key

Adding search internet link in the Start Menu

4. Now double-click on the DWORD and edit the “Value data” filed to “1” and click OK.
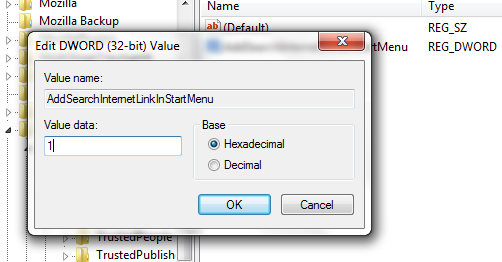
Adding search internet link in the Start Menu key value

Now either log off from your user account and long back in or just restart the “explorer.exe” process from the Task Manager.
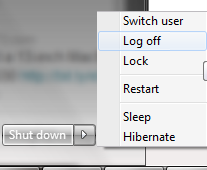
Log off link in the Start Menu

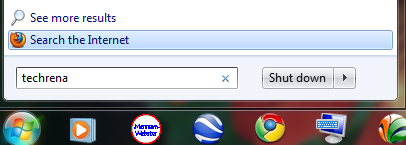
You can now search for anything in the Start Menu and you will see the “Search the Internet” option below the “See more results” link. Clicking on it would open your default browser (Firefox in my case) and search the web using your default address bar search engine for your browser (Google in my case).
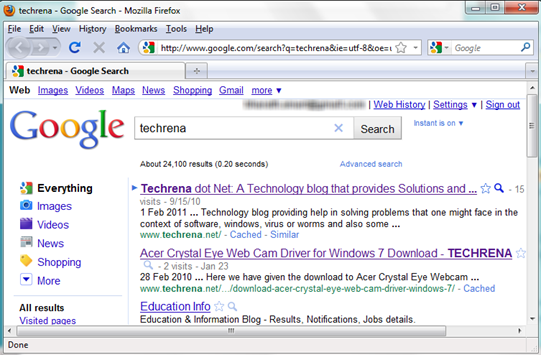
Google search from start menu in Windows-7

To rollback or undo this change, just change the Value data back to “0” or completely delete the DWORD in the step 4.

>> Method- II : Using The Local Group Policy Editor

Local Group Policy Editor (GPEdit, as it is also known as) is not available in the Hone editions of Windows 7. So if you have Windows 7 Professional, Enterprise or Ultimate editions, you can go ahead with this tweak.

1. Type “gpedit” in the Start Menu search and open the “gpedit” from the results under the ‘Programs’ section.
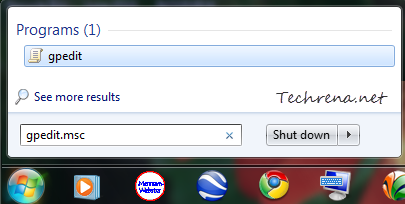
gpedit from start menu search

2. Local Group Policy Editor window will open up.
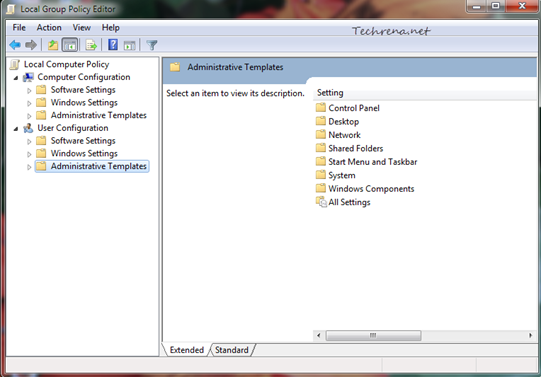
GPEdit overview

Scroll down to “User Configuration > Administrative Templates > Start Menu and Taskbar” and find “Add Search Internet link to Start Menu” entry in the list.
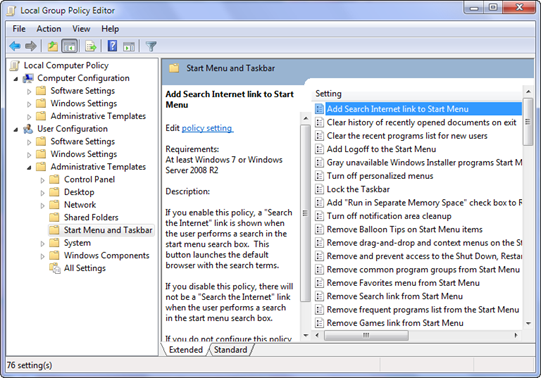
Search Internet Link to start menu in GPEDIT

3. Double-click on it to change the settings. Change the value to “Enabled” and click “OK” button at the bottom to save the settings and close the window.
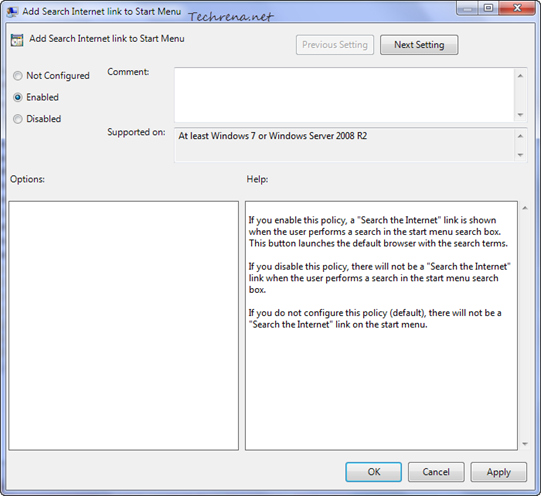
Search Internet link to Start Menu settings

That’s it. As said in the earlier method, either log off and log back into your Windows user account or restart the explorer.exe process from the Task Manager to effect the change. Now you will find a link in the Start Menu itself to search the internet for your keyword/query as shown in the screenshot.