Dell Smoke Android SmartPhone: Features & Specifications

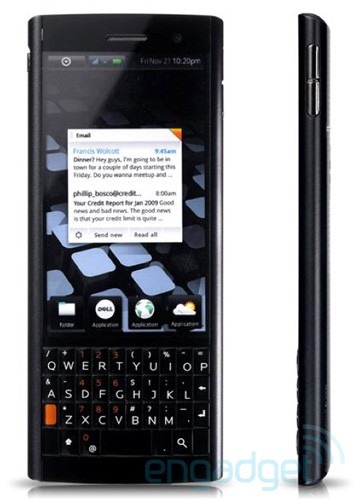
Dell Smoke will offer the consumers with Android at an inexpensive taste. Dell Smoke running Android Froyo with a 2.8-inch QVGA display promises an exciting lower price.

Dell Smoke features a 2.8” QVGA display, Qualcomm MSM7230 processor running Android Froyo at 800MHz, 5-megapixel auto-focus camera, 14.4Mbps HSPA, Wi-Fi, Bluetooth, and dual-microphones for noise canceling technology.

dell_smoke

[Picture Courtesy: Engadget]

You can check out the preliminary features and technical specifications below:

Feature Description
Processor Qualcomm MSM7230 at 800 MHz
Operating System Google Android 2.2
RAM 512 MB
Camera 5 MP Auto Focus and digital zoom, LED Flash
Keypad QWERTY keyboard
Memory 256 MB internal Memory, External: microSD expansion to 32GB
Display Multi-touch screen TFT 262k colors
2.8 inch, Resolution 320 x 240
Network GSM850, GSM900, GSM1800, GSM1900, UMTS850, UMTS1900, UMTS2100
Data Connectivity CSD, GPRS, EDGE, UMTS, HSDPA, HSUPA, USB 2.0, Bluetooth 2.1+ EDR
Wi-Fi 802.11b, 802.11g
GPS, AGPS, QuickGPS, Geotagging
Battery 1170 mAh Li Ion
Audio 3.5 mm Output, Stereo Mic, Loud Speaker
Noise Reduction Dual-Mic noise canceling Technology

Pricing and Availability

Dell Smoke is scheduled to be release at January 2011. Smoke is the code name and may subject to change. The pricing is yet to be announced. It is expected that the price of this device will be affordable.

Dell Looking Glass At A Glance: Preliminary Specifications & Release Date

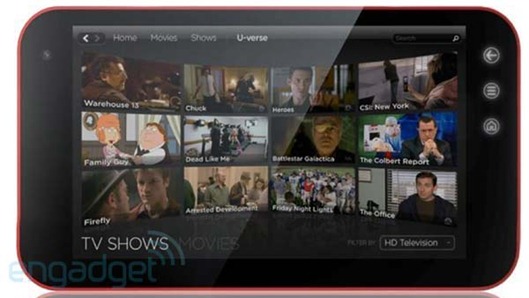
Dell’s new Looking Glass is a seven-inch tablet which will run on Android and will be powered by a Tegra 2 processor.

dell_looking_mirror

[Picture: via Engadget]

Running Android 2.1 on a Tegra 2 processor will feature an optional TV tuner and a 1.3 megapixel camera. The RAM size is 4GB, with another 4GB of flash for storage and an SDHC slot supporting up to 32GB of expansion.

A detailed pre-release specification can be seen below:

Feature Description
Operating System Google Anroid 2.1
Processor nVIDIA Tegra 2 250
Random Access Memory (RAM) 4 GB
Display TFT 162K Colors
7 ” Diagonal
800 x 480 Resolution
Dimensions 130 x 198 x 12.75 mm
Weight 500 grams
Memory Internal: 4GB
External: SDHC up to 32 GB supported
Audio External Stereo Speakers
3.5 mm jack output
Wireless (Wi-Fi) 802.11b, 802.11g, 802.11n
USB USB 2.0 with 480Mbit/s speed
Bluetooth Bluetooth 3.0
GPS-Services Assisted GPS, QuickGPS, Satellite-Navigation
Camera 1.3 MP with 1x digital zoom
Battery 2100mAh

Release date and Pricing:

There will be some delay in the release of the Dell Looking Glass as Dell is planning to add some exciting gaming features to utilize the nVIDIA processor and compete Apple’s iPad. However it is expected to be release in November 2010.

The pricing details are also not available as of now. We may expect it at the time of official launch of Dell Looking Glass.

Delete Hiberfil.sys from Windows 7, Vista & XP By Disabling Hiberation

hibernate

Running out of space in C Drive?

If you are running out of space in C drive and if you don’t want to delete or move any data from it, you can probably try these two things:

1. Disable System restore or delete the restore points.

2. Delete hiberfil.sys file from your hard disk.

HIBERFIL.SYS is a Windows system file managed by Windows for the purpose of Hibernating the system. Hibernation mode of Windows allows you to completely save the current process and power off your computer where the system will not require any power. During Hibernation the system will write the complete status and process of your computer and save it in the hard disk which is the hiberfil.sys.

While you start your computer, the system loads the status from the hard disk which was written in hiberfil.sys file.

HIBERFIL.SYS reserves around 2.5 GB in Windows 7 and Vista. And it takes 512 MB in Windows XP.

Important Note: You can delete hiberfil.sys only if you do not want to use the hibernation feature. Even if you delete the file you can still use the sleep mode. If you want to see the hiberfil.sys file in your C drive then you need to show system hidden files.

hiberfil_sys

How to delete HIBERFIl.SYS file from the your drive?

As hiberfile.sys is a system file we cannot delete it directly. So in order to delete it we need to disable the Hibernate feature in Windows.

Disable hibernation mode in Windows 7 and Vista:

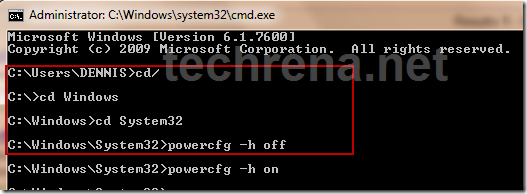
Open Command Prompt. Press Start + R. Type CMD and press Enter.

Type the following commands and Press Enter after each command:

cd/
cd Windows
cd System32
powercfg -h off

It will look like:

cmd_disable_hibernate

To turn on the Hibernate feature Type:

powercfg –h on

Disable hibernation mode in Windows XP:

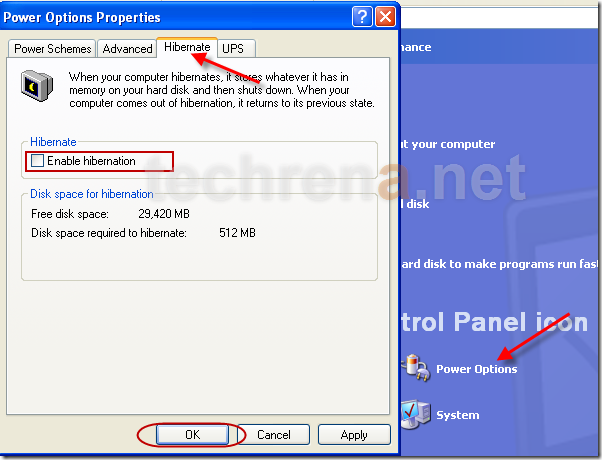
In Windows XP it is easy. Follow the instruction below:

Open Start menu, Go to Control Panel. In control Panel, go to Performance and maintenance. Then Click Power Options

In power options windows, go to Hibernate Tab. Uncheck Enable hibernation and press OK.

disable_hibernate_xp

If you want to re enable hibernation, then check the check box and press OK.

Now after performing the steps, if you check your C drive, you will find that the hiberfil.sys file is gone.

Hope you have got some free space at least for now 🙂

Think Before Using USB Flash Drives To Run Applications or OS: Advisory

I am writing this post on an advisory note. With the extensive use of USB flash driven in our day to day activities, now we have been aiming to make even our Operating System(OS) portable by installing it in a USB Flash Drive and carrying around in our pocket. Moreover we can run applications such as Mozilla, Anti Viruses etc. from a USB pen drives. Here I am going to explain, why you need to think twice before using your USB Flash Drive to run an Operating System from it.

Why you should think twice before using a USB Flash Drive to run an OS or applications for prolonged period?

All flash memory devices can sustain only a limited number of write and erase cycles before failure. While running a normal OS or an Application from a Flash drive, the system will write and erase a huge number of files and data in the flash drive. With prolonged use, the write/erase cycles of your flash drive may come to an end and may eventually fail.

The write/erase cycle performed while running an Operating System(OS) such as Windows XP or 7 will be very much more than what we can perform manually, by copying and deleting data. So this should be a consideration as it may make your flash drive run out of Write/erase cycles much faster than expected.

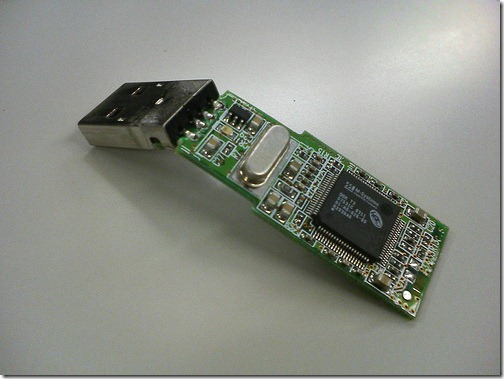
a failed usb flash drive

Another usage of USB is Windows ReadyBoost. Windows 7 and Vista can make use of a USB flash drive as a cache memory to improve the performance.  In this case also the cycles are be used a high rate.

Points to be Noted:

  • Flash memory devices have a limited number of write and erase cycles before failure
  • Running an OS or an Application from a Flash drive will write and erase a huge number of files or data in the flash drive per second.
  • Running an Operating System(OS) will perform these cycles much more than what we can perform manually
  • Prolonged use will make your flash drive run out of write/erase cycles and may eventually fail much before expected

How to address this issue?

To address this, as well as space limitations, some developers have produced special versions of operating systems such as Linux in Live USB or portable applications such as Mozilla Firefox designed to run from flash drives. These are typically optimized for size and configured to place temporary or intermediate files in the computer RAM rather than store them temporarily on the flash drive.

Compared to other portable storage devices such as external hard drives, USB flash drives still have a high price per unit of storage. But Hard drives have a higher minimum price.

Alternatives:

  • Run applications or OS which are configured  for Flash Drive use only
  • For Prolonged usage, try buying an external Hard Drive
  • If you are using your USB Drive as a Cache device to improve performance, why not upgrade your RAM size?

Notes:

1. Manual usage of your USB Drive will take years to use up the Write/erase cycles available, so no need to worry.

2. Most Failures in USB Memory Devices are due to wear and tear

MyWebSearch Adware: Instruction to Completely Remove My Web Search Toolbar

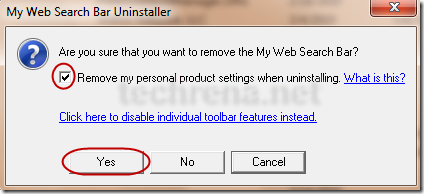
my_web_search_uninstaller

MyWay Searchbar commonly known as MyWay Speedbar, MyWay Search Assistant, MyWebSearch, and MyWeb Searchbar is toolbar allows us to query Google, Ask.com, and Yahoo! search engines. The program were classed as adware by some websites and anti-malware applications, although they claimed not to have the adware function. The MyWay Searchbar is currently described by Sunbelt Labs as a Potentially Unwanted Program. [Source: wikipedia.org]

MyWebSearch installed on my system without permission:

How I got MyWebSearch installed on my computer without actually installing it? This happened when I was chatting with a friend in Gtalk. I received a chat as:

You just received a smiley! Go to http://buddies.smileycentral.com/ to see it!

I was curious and clicked it. Then I later found out that it had installed MyWebSearch without my consent. This is only one way of getting infected. There are lots of others also.

Why MyWebSearch is potentially unwanted?

  • My Web Search installs its own programs without any permit.
  • It is difficult to completely remove this program.
  • Even if it is removed from the Add/Remove program, the registry values still remain and tries to run.

How to find out MyWebSearch installed or not?

  • Add ons appear in Browsers like Mozilla/Internet explorer
  • Add ons can also be found in Messengers like Gtalk
  • Unwanted pop ups may come up during internet usage.

How to Remove MyWebSearch Completely from your Computer?

Step 1: Remove the program from Add/Remove programs:

Go to Start Menu –> Control Panel –> Add/remove Programs or Uninstall a program

Search for MyWebSearch and uninstall all the programs shown.

control_panel_remove_mywebsearch

my_web_search_uninstaller

After removing the program, restart the your system.

Step 2: Use HiJackThis to remove the unwanted registry entries and running programs of My Web Search:

HiJackThis is a freeware which can scan your registry for unwanted entries. It is a stand alone program and  doesn’t require installation.

Download HiJackThis v 2.0 : http://www.techrena.net/downloads/HiJackThis_v2.exe

Size: 1.2 MB

Scan your System with the program. Remove the following entries if present:

Click Here to Open The text file containing the entries.

See the image below to see hot to remove the entries: (Click to Enlarge)

fix_registry_hijackthis

Step 3: Remove the My Web Search registry Entries present in the windows registry:

Download the BAT file from the link below:

http://www.techrena.net/downloads/remove_my_web_search.bat

Double click on remove_my_web_search.bat. It will open Command Prompt. While running the commands the command prompt will ask for confirmation to delete the entries. Press Y and enter every time it asks.

confirm_delete_cmd

Ignore if it tells cannot find the value in the path. It is because the values are already been removed.

Now you have successfully completed removing My Web Search bar components from your system.

Note:

1. In order to perform all these actions and  commands you need to have Administrator privilege.

2. If your registry editor is disabled, you cannot perform theses actions. You can refer: How to enable Registry Editor (REGEDIT) to enable it.

HP Pavilion DM3-1005AX Entertainment Notebook PC Review Price and Specifications

hp_logo

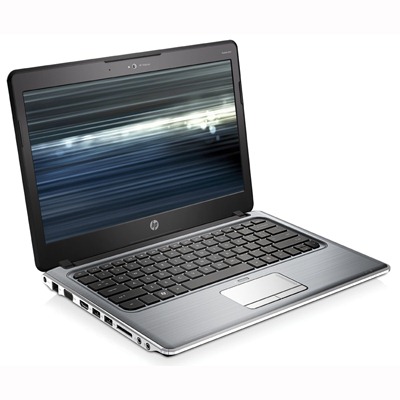
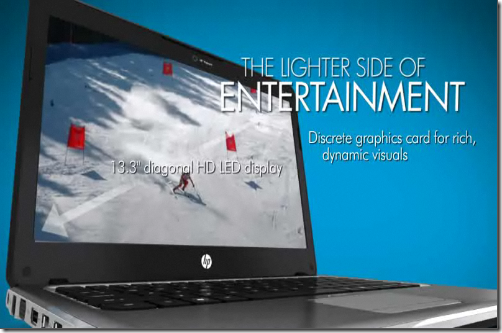
The HP Pavilion dm3-1005AX Entertainment Notebook PC is a thin and light laptop featuring AMD Athlon Neo X2 Dual Core Mobile processor with a 13.3 inch High-Definition LED display and weighing only 1.91kg.

HP-Pavilion-dm3-1005ax

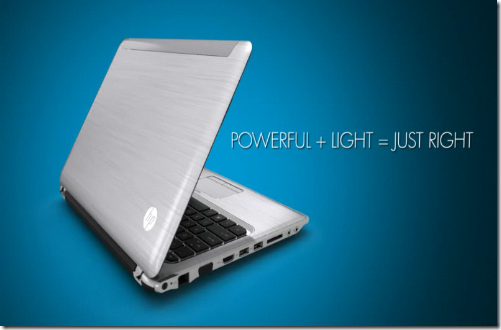
Belonging to the ULV(ultra-low voltage processor) computers category, HP Pavilion dm3 has a rich and slim design with fingerprint resistant brushed aluminum screen lid.

hp_dm3_1005ax_light

You can check out the full features and specifications of dm3-1005AX as follows:

Features Description
Operating system Genuine Windows® 7 Home Premium 32-bit
Processor AMD Turion™ Neo X2 Dual-Core Mobile Processor for Ultrathin Notebooks L625
1.60 GHz, 1 MB L2 Cache, Up to1600 MT/s system bus running at AC/DC mode 18 watt
Memory (RAM) 4096 MB (2 x 2048 MB) DDR2 533 MHz
Hard Disk 500 GB SATA Hard Disk Drive 7200 rpm
Display 13.3” High-Definition HP LED BrightView Widescreen Display
1366 x 768 Screen Resolution
Graphics card ATI Mobility Radeon™ HD 4330 Graphics With 512 MB dedicated memory
Ports 4 USB 2.0, 1 HDMI, 1 VGA port, 1 RJ-45, 1 headphone-out, 1 Microphone in
Card Reader 5-in-1 integrated Digital Media Reader for Secure Digital cards, MultiMedia cards, Memory Stick, Memory Stick Pro, or xD Picture cards
Web Cam HP Webcam with Integrated digital Microphone
Speakers Altec Lansing speakers
Touchpad Touch Pad with On/Off button and dedicated vertical Scroll Up/Down pad
Keyboard Full size chicklet keyboard
Connectivity and Networking LAN: Integrated 10/100BASE-T Ethernet LAN
WiFi:    802.11b/g WLAN
Bluetooth® wireless networking
Weight 1.91 kg (Will vary by configuration)
Dimension 32.6 cm (L) x 23.0 cm (W) x 2.43 cm (min H) / 3.13 cm (max H)
Warranty 1 year, parts and labor
Power Supply 65 Watts AC Power Adapter
Battery 6-cell Lithium-Ion (Li-Ion) battery
Color Available Brushed Aluminum

* No internal DVD Drive

hp_dm3_1005ax

But now a days, what we also consider the most other than performance and design is the battery life. The included 6-cell Lithium-Ion battery will have a life of around 1 hour 30 minutes at high performance settings and under high usage. It may last  up to 2.5 hours in power optimized mode and when the usage is low.

Pros:

  • Good performance
  • Thin and light
  • Stylish
  • Value for money

Cons:

  • Low Battery Life
  • Tacky Touchpad

The price of the laptop is $ 1,499 in the US and Rs 44,990(INR) in India. For a slim, good performance, and a stylish design laptop, the ULV HP Pavilion dm3-1005AX can be a right choice at the right price.

Sony Ericsson Zylo with Walkman: Full Specification, Pics and Review

sony-ericsson-logo

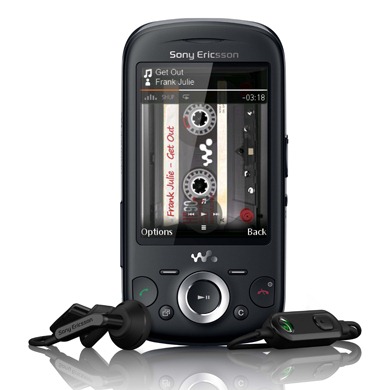
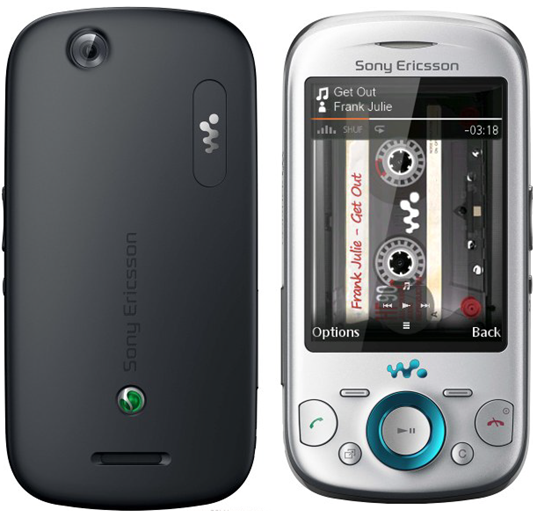
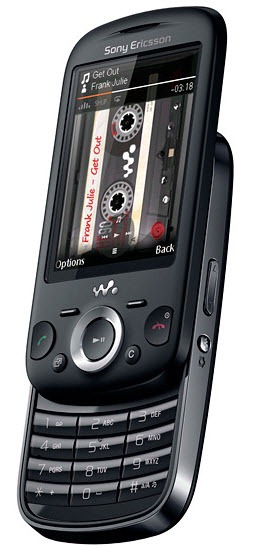
Sony Ericsson has launched Sony Ericsson Zylo with Walkman. Sony Ericsson Zylo is an affordable Walkman phone without compromising any features. Sony Ericsson Zylo will provide the best music experience which we expect from every Walkman phone. Moreover, other than music Zylo will also feature social networking like Twitter, Facebook etc. Another key function available is TrackID which allows users to access the name and artist of a track they hear playing wherever they are.

sony-ericsson-zylo

So if you want to catch up with friends at just a touch of a button while still listening to your favorite music on the Walkman player, Zylo is the best at affordable price.

Check out the full specifications and feature of Zylo below:

Feature Details
Networks UMTS HSPA 900/2100
GSM GPRS/EDGE 850/900/1800/1900
UMTS/HSPA 2100
GSM GPRS/EDGE 850/900/1800/1900
Camera 3.2 megapixel camera
2x digital zoom
Geo tagging, Photo feeds, Photo fix, Send to web (photos and videos), Video recording
Music Album art, Automatic playlist creation, Bluetooth™ stereo (A2DP), Clear bass, Clear stereo, PlayNow™, SensMe™, Shake control, TrackID™, Walkman™ player, Walkman™ styles, MP3/AAC/AAC+/eAAc+/WMA/FLAC
Web Access NetFront™ web browser, Bookmarks, Google™ Search, Web feeds
Communication Facebook™ application, Speaker phone, Twitter™ application, Vibrating alert, Video calling (main camera)
Messaging Conversations, Email, Microsoft® Exchange ActiveSync®, Instant messaging, Picture messaging (MMS), Predictive text input, Sound recorder, Text messaging (SMS)
Design Auto rotate, Gesture control, Picture wallpaper, Wallpaper animation
Entertainment 3D games, FM radio with RDS, Java, Media browser, Music call
Music Genie, Video streaming, Video viewing, Walk Mate, YouTube™
Organizer Alarm clock, Calculator, Calendar, Flight mode, Notes, Phone book, Stopwatch, Tasks, Timer
Memory Phone memory: Up to 260 MB
Memory card support: microSD™, up to 16 GB
Dimensions Size: 103 x 52 x 11.5 (16) mm
Weight: 115 grams
Display 262,144 colour  TFT
2.6 inches
240 x 320 pixels (QVGA)
Scratch-resistant
Connectivity Bluetooth™ technology
Modem
Synchronization
USB mass storage
USB High Speed 2.0 support
Colors Available Jazz Black, Chacha Silver, and Swing Pink

sony-ericsson-zylo

The phone will be available in Market regions like US, UK, India etc. from Q3 2010. The price has not been announced yet. It will be updated as soon it is announced.

sony_ericsson_zylo_black

You can watch the Promo Video of Zylo below.

How to Remove Alureon rootkit To avoid BSOD Crashes in Windows

Windows Update

This is a very important note for all the Windows users especially 32-bit, that before installing the security updates that Microsoft Windows had released last week, you check if the malware known as Alureon Rootkit is present or not and remove it using the Microsoft Windows Malicious Software Removal Tool.  If the malware is present in your system and if you happen to install the security update (KB977165) then there is a high possibility that Windows may crash and it may show only a blue screen during startup (Blue Screen Of Death BSOD).

Alureon Rootkit or Win32/Alureon.gen causes problems with the way Microsoft’s patches interact with the kernel, which has led the company to include a package detection logic that prevents the installation of the security update if the rootkit is present on 32-bit systems.

Windows Crash Reported after installing Security updates:

Windows systems crashed during the latest Microsoft security update last week. According to Microsoft this happened because the systems were infected with a rootkit program that made changes to the operating system kernel and it was not due to the update patches.

“The restarts are the result of modifications the Alureon rootkit makes to Windows Kernel binaries, which places these systems in an unstable state,” Mike Reavey, director of the Microsoft Security Response Center, wrote in a blog post. “In every investigated incident, we have not found quality issues with security update MS10-015.”

Download:

Microsoft Windows Malicious Software Removal Tool

Remove Alureon rootkit To avoid BSOD Crashes in Windows

Install Portable Antivirus on a USB Flash Drive or an iPod

clamwin_portable

What will happen if your System is infected with viruses and the Antivirus you had installed failed to protect? In several cases, the virus may also disable any anti virus programs that you may try to run to disinfect.

Can we use a portable anti virus program which is installed in a USB Flash drive to scan our computer? The answer is a definite Yes! This is an easy way to disinfect an infected computer using a USB disk or your iPod.

ClamWin has come up with such an anti virus application. ClamWin Portable is a popular ClamWin antivirus packaged as a portable app, so you can take your antivirus with you to scan files on the go. You can place it on your USB flash drive, iPod, portable hard drive or a CD and use it on any computer, without leaving any personal information behind.

See the details below to install the free anti-virus in your portable USB device.

Requirements:

Windows XP, Vista or 7 Operating System

USB Flash Drive, Disk with Minimum 30MB free space

Step 1: Download ClamWin Portable from the link below:

Size: 6MB

Link: Click here to Download ClamWin Portable 0.95.3

Step 2: Connect your USB device. Then go to the downloaded file. Double click on the exe file.

Step 3: Start the installation process. Select the correct location where the application is to be installed. Then click on Install.

choose_location_clamwin]

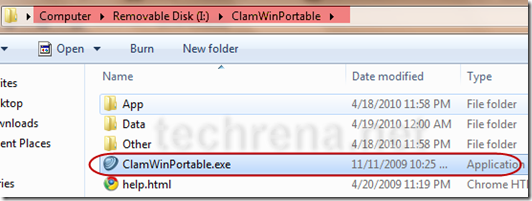
Step 4: Now after successfully installing the application, go to the location where you have installed it. Double click on ClamWinPortable.exe to start the application.

start_clamwinportable

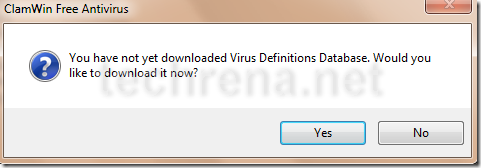
Step 5: On first startup it will ask you to download the Virus Definition database. Click on yes.

download_virus_definition_database

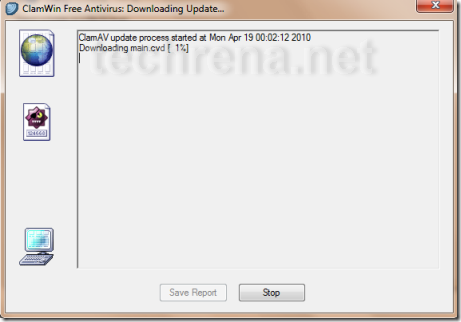
Step 6: Now it will download the update. It may take a few minutes. Note that without downloading the database update the anti-virus is useless.

Downloading_update

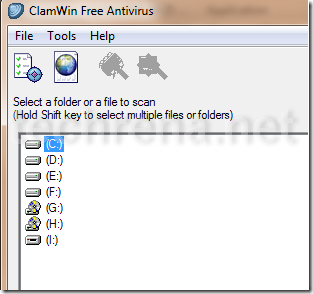
Step 7: Now you can select the drive to scan.

ClamWin_free_antivirus

Now you can easily disinfect any computer. But make sure that the virus definition database is up to date.

How to Create a Password Reset USB Disk in Windows 7 And Vista

Have you ever faced a problem of forgotten password in your Windows PC? If yes better have a backup plan now itself. Here we are going to tell you, how you can reset your Windows password using a reset password disk. This feature is available in Windows 7 and Vista only.

You can backup your user identity in a USB disk and use the disk for resetting your Windows user password in the future in case you have forgotten it. For this purpose you need not use a high capacity USB drive. You can either use your old USB which are considered obsolete or too small in size like 128MB or buy a small capacity one at lower cost. This is because the reset file if very small and you need to store the USB device in your locker or any other safer place.

Requirements:

A USB Flash Drive(Any size)

Windows 7 or Vista Operating System

Important: Once a password reset disk has been created, no matter how many times the password has been changed after that, you can reset the password using the Disk any number of times. In order to avoid misuse of the device, keep it in a safe place.

Password Forgotten Before Creating the Password Reset Disk?

Follow this link: Reset Windows XP, Vista, 7 Password Using USB Drive or CD

Follow the steps to create a Password Reset disk using Windows Forgotten Password Wizard:

Step 1: Connect the USB Flash Drive to your PC.

Step 2: Open Start Menu, click on Control Panel. In Control Panel go to:

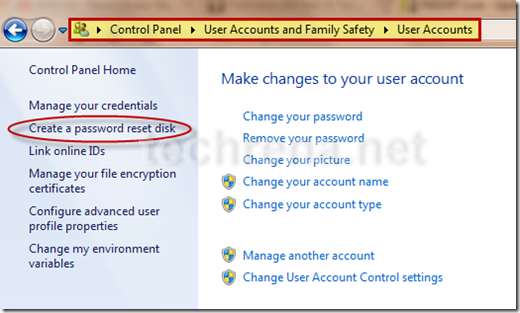
Control Panel—>User Accounts and Family Safety—>User Accounts

Step 3: In the left pane of User Accounts, click on Create a password reset disk.

User_accounts

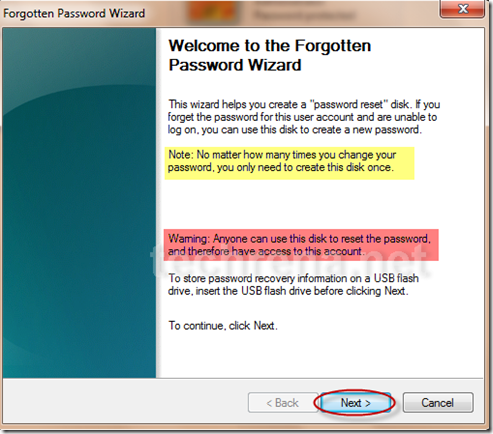
Step 4: Now in the Forgotten Password Wizard, read the Important notes and warnings and Click on next.

forgotten_password_wizard

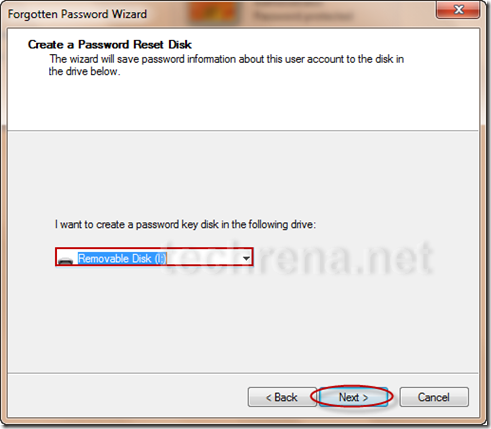
Step 5: It will ask you for the USB drive letter in which you want to store the password reset file. Select the correct drive and click on Next.

select_drive_forgotten_password_disk

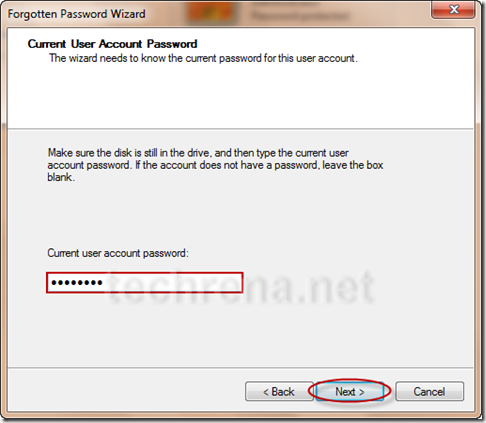
Step 6: Now it will ask for the current password. Enter the correct password and click next.

enter_current_password

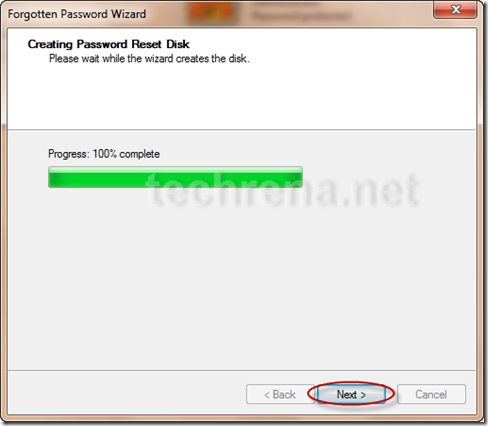
Step 7: Once it completes the creation process, click on finish.

create_password_reset_disk

What you have to do when you have forgotten your password?

Now if you have forgotten the password, you can use the Reset disk. When Windows asks you for the login password, plug in your Password Reset Disk and wait for a while. Try entering any wrong password. Now below the password field, a link as Reset Password… will come up. Click on it and enter a new password.

Note: If you do not have a Password Reset Disk, you can try: Reset Windows XP, Vista, 7 Password Using USB Drive or CD