[Tip] Sort A List Alphabetically In MS Office Word 2007 & 2010

Microsoft Office 2010

Recently I was working on a big list of words that are to be sorted alphabetically for easy use. I was checking various online sources . Yes, there are online tools available to just to that. But if you have Microsoft Office Installed on your Windows, it’d be a better way to accomplish this task. Microsoft Word can sort data according to various criterion and here we’ll just try to know how to sort the data alphabetically. Advanced users of Microsoft Office should well be aware of this but if you are a starter probably you should read the following guide to learn how you can do it in Microsoft Word 2010 or MS Word 2007.

1. Open the Microsoft Word application.

2. Paste the list that you want to sort in the new document.

List in Microsoft Word 2010

3. Select all the words using CTRL + A

Select the whole list in Office 2010

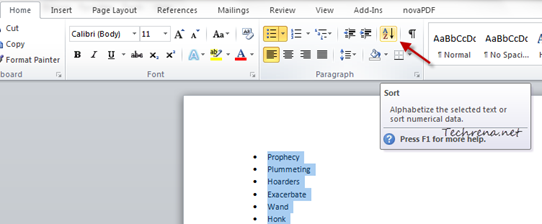
4. Now find a small sort icon Sort icon in Word 2010in the Paragraph group under the “Home” tab. Click on the icon.

Sort list in MS Office Word 2010

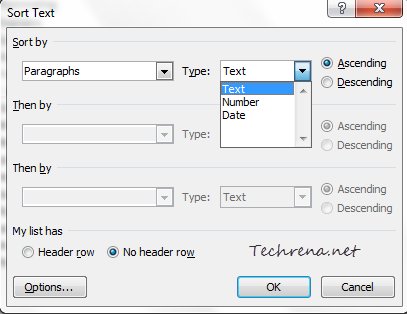
5. A new dialog box will appear inside the Word application window. Choose “Text” option from the dropdown list under the Type and choose “Ascending” radio button. Click OK.

Sort Text Dialog box in Word 2010

That is it. Your list is now sorted alphabetically as you can in the screenshot below:

Sorted list in Word 2010

[Tip] Remove Skype Icon From Windows 7 Taskbar

skype logo

If you are using the latest version of Skype on your Windows 7 machines, you might now be very aware of the fact that Skype pins itself to the Windows 7 taskbar.

skype icon in taskbar

This is a bit annoying as you don’t want Skype to reside in the taskbar and occupy the useful space. If you are wondering how can this be removed from your taskbar, this is what you have to do:

1. Click on the Skype taskbar icon and sign into your Skype account.

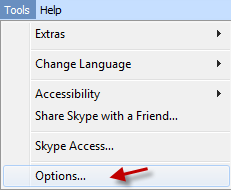
2. Click on the “Tools” menu and choose “Options” from the list.

skype options in the tools menu

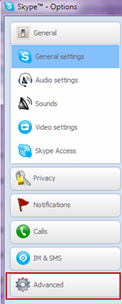
3. Click the “Advanced” button under Skype options.

Skype options list

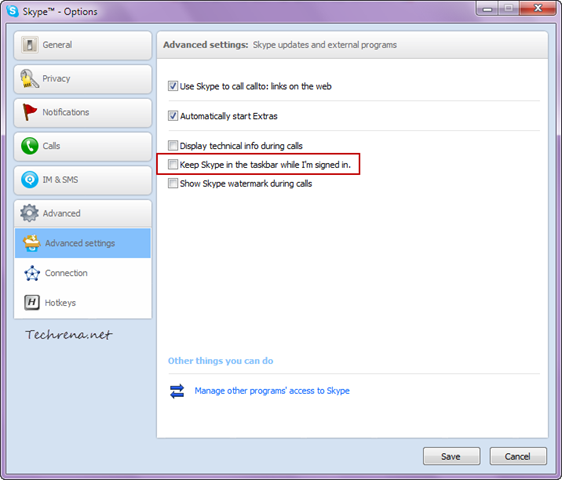
4. Under the “Advanced Settings”, uncheck against “Keep Skype in the taskbar while I’m signed in”.

Skype options advanced settings

5. Click the “Save” button to save settings and close the window.

That is it! Now, close the Skype window and it should disappear from your taskbar as well.

No Skype taskbar icon

[Tip] Reset Internet Explorer Settings

Internet explorer logo

If you have been using Internet Explorer (IE7, IE8 & IE9) for long, it’s quite obvious that you might have added many customizations, add-ons etc. You have become its master, it does what you instruct. But a day comes where the scene goes out of your hand, Internet Explorer does respond and behaves in an unexpected manner. Doesn’t open the websites, throwing errors at your face which you never want to see like “Internet Explorer has “encountered a problem and needs to close” or “ Visual C++ “runtime error” has occurred in Iexplore.exe”, it either stops responding or even worse, it crashes! Whatever may be the cause of these errors, they are really annoying. The first thing that you should do in such a situation is to disable the add-ons that are known to cause these problems. Even though, this may solve the issue for now, the ideal option however is to reset the IE settings. This will automatically deletes all the add-ons and customizations and makes your Internet Explorer like a freshly installed version. Follow the steps explained below to reset the IE settings on your computer.

Steps:

1. Start the Internet Explorer.

2. Open Internet Options via Alt button> Tools. Go to Advanced tab in the Internet Options.

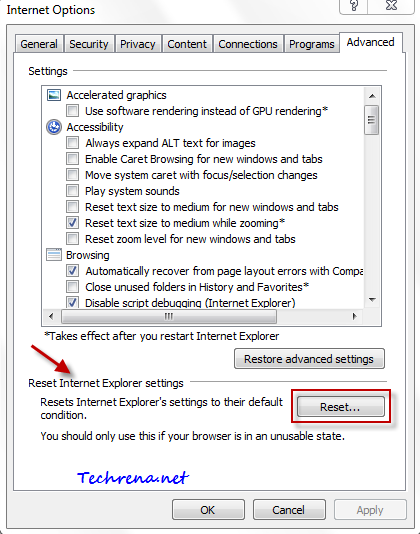
3. Click on the Reset button available at the bottom of the window to reset your IE settings.

Reset IE settings in Internet Explorer

4. IE will start resetting the settings, wait until it gets finished and click Close in the Reset Internet Explorer Settings dialog box.

Restart your Internet Explorer to see the changes. IE should behave in the usual way from now on.

[How To] Turn Off Facebook Group Notifications

facebook logo

We have just covered a tutorial on how to get started with the Facebook revamped groups features. Even though they are good if we consider the fact that you will get notifications whenever a member of your group perform actions like someone ‘Adds you to a Group’, ‘Posts on the wall of one of your group’, ‘Makes you group admin’ etc. But if the group that you have joined has huge number of active users and this can generate too many annoying notification mails. If you want to get a way around to block all these annoying notifications from groups, follow this step-by-step guide:

Disable Notifications For Individual Groups:

1. Go to the group page for which you want to turnoff notifications.

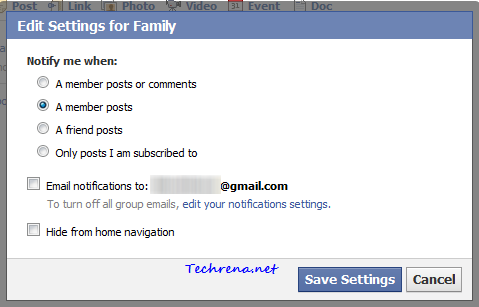
2. Click “Edit Settings” button Edit settings of groupfound on the top left.

3. In the popup window, uncheck “Email notifications to:..” and click “Save Settings”.

Edit group settings

[You can also visit this groups notifications settings page to quickly disable settings for individual groups.]

This will stop all notifications being delivered to your email for that particular group.

Disable Notifications For All Groups:

If you think that you have had enough with the annoying notifications and want to disable all such notifications from all the groups for which you are a member, follow these instructions:

1. Go to this Facebook notifications page. (You can also get to this page via > Account> Account Settings and choose “Notifications’ tab.

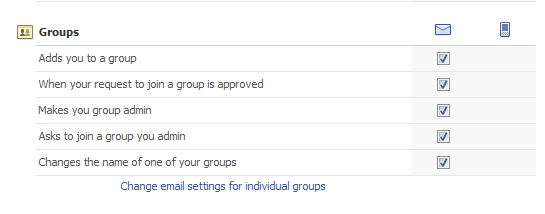
2. Under the groups section, you will find “Groups” section displaying all your current notification preferences.

Edit groups notification settings

Uncheck against all the options to completely disable notifications from all the groups you are part of.

That is it. You will no longer receive notifications from Facebook groups.

[Tip] Find The Version Of Microsoft Silverlight Installed On Your Browser

Microsoft Silverlight is a web application framework developed by Microsoft. This framework is intended for developing interactive client side web applications. It gets installed as a browser plug-in and runs the applications that are developed using this Silverlight framework. It was initially introduced in 2006 as a competitor to Adobe Flash technology. Silverlight 3.0 was released in 2009 and the most recent version Silverlight 4.0 was released in early 2010.

Installing Silverlight is as necessary as to install Adobe Flash on your computer. Websites developed based on Microsoft Silverlight will not render properly. However Silverlight nowadays gets installed smoothly, many times you might not even have noticed that it was installed on your PC. However, it is always a good practice to be aware of the version of the Silverlight installed on your computer. You can do it in many ways, let’s see all the possible methods to check the version of Silverlight:

1. Checking Silverlight Version Online:

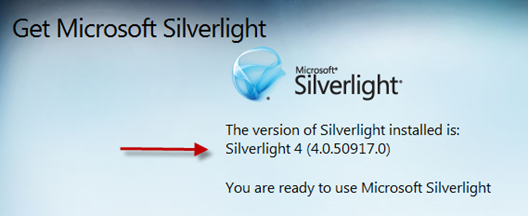
Point your browser to http://www.microsoft.com/getsilverlight, and wait a few seconds until the page shows the version of Silverlight installed as shown:

Silverlight version check web

As you can see, the page shows that I have Silverlight 4 (4.0.50917.0) installed on my computer.

2. Checking Through Registry Editor:

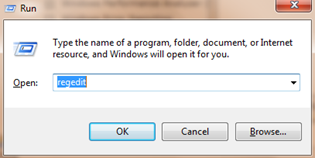
Press Start Button + R to open Windows Run too. Type “regedit” and press OK to open the Registry Editor.

regedit via run command

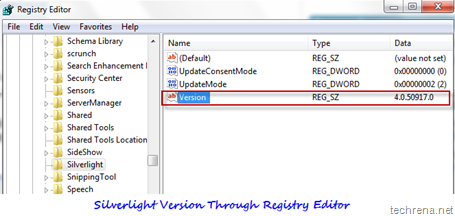
Go to

 HKEY_LOCAL_MACHINE> Software> Microsoft> Silverlight

and look for the entry “Version” on the left pane. Note down the data value shown against it. It is the version of the Microsoft Silverlight installed on your computer.

Silverlight version via regedit

As you can see, Registry Editor is also showing the version of the Silverlight as 4.0.50917.0, which is also the same as we got using the first (web) method.

3. From The Installation Folder:

Go to the folder where Silverlight got installed. Usually this will be located at:

C:> Program Files> Microsoft Silverlight

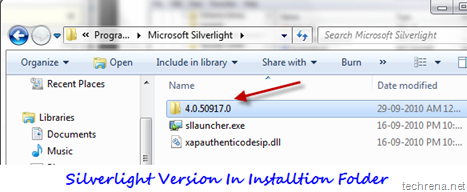
You will find a folder in this directory, whose name is the version of the Silverlight installed:

Silverlight version check through installtion folder

And again, as you can see the folder’s name is 4.0.50917.0, which once again confirmed that I indeed have the Silverlight version 4.0.50917.0 installed on my computer.

If you still need more ways to find out, you can check the version of the Silverlight installed under the browser plugins: (Firefox, Chrome..)

Firefox:

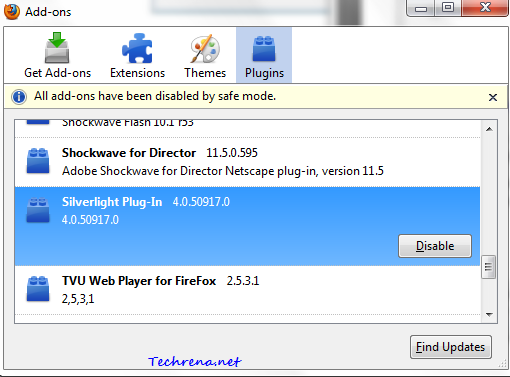
Go to Tools > Add-ons  and click “Plugins” tab.

Silverlight version installed through firefox

In Google Chrome:

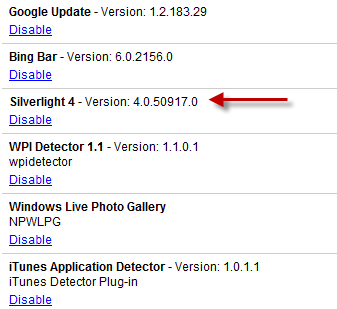
Type about:plugins in the address bar to see all the plugins installed. Look for Silverlight entry in the list:

Silverlight version chrome

If you liked this post, you might also want to check the version of the .NET framework installed on your computer.

[Tip] Swap Stop And Refresh Button Position In IE9

IE9 beta logo

We have been covering a lot of articles about Internet Explorer 9 beta which is refreshingly new and offering seamless integration with Windows 7. In this post, we have come up with a tutorial on how to move the Stop and Refresh button to the left of the of the address bar in IE9.

Internet Explorer until now used to show the Stop and Refresh buttons on the immediate right to the address bar. The same has been followed in IE9 as well. But Microsoft was smart this time and decided to give the users the flexibility of choosing the position of these button in their IE9. You might very well be knowing that Mozilla Firefox and Google Chrome does show these Stop and Refresh buttons towards the left of the address bar (immediate left before the address bar), as shown here:

Firefox:

stop and refresh in firefox

Chrome:

Refresh button in chrome

[In Google Chrome, you will only see either one of the Stop or Refresh buttons at any instant. While the page is loading, Stop button is shown and the Refresh button takes its place as soon as the page gets loaded completely.]

If you are an avid user of Firefox and Chrome and want these Stop And Refresh buttons in the same as way as in Firefox and Chrome, follow the instructions shown:

IE9 stop and refresh button intial position

Steps:

1. Open the Internet Explorer 9

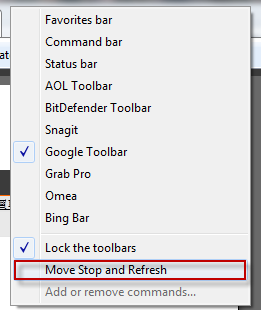
2. Right-click on the IE9 tab bar and choose “Move Stop and Refresh”.

Move stop and refresh in IE9

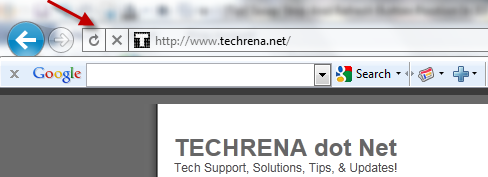
3. That is it! You can now see the Stop and Refresh buttons appearing towards the left of the address bar as shown:

stop and refresh right of the address bar in IE9

It’s that easy! For more tips on IE9 and Windows, subscribe to Techrena.net feeds via Email or follow @techrena or become a fan of Techrena.net at facebook.com/techrena.

[Tip] Prevent Programs From Changing Default Search Engine In IE9

IE9 beta logo

Once you have set a default search engine in your browser, it should remain as it is, right ? But it’s not always like that some programs can easily change your default search engine in your default browser just by adding some keys to your windows registry. It has always been a big problem. Imagine like you install a program like Yahoo Messenger (changes default search engine to Yahoo) or Windows Live Essentials (changes default search to Bing), are just examples of such programs. Even though many of these programs do prompt you when they are going to change your browser (Internet Explorer here), we can hardly notice it as it’ll be asked during the program installation and most of the time we does this in a hurry without exploring all the options provided during the installation.

In this post, I’m going to guide you about how to prevent programs from changing your default search engine in case of the Internet Explorer 9.

1. Open the Internet Explorer.

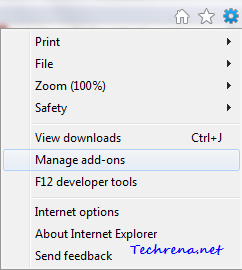
2. Click  on Tools icontools in IE(Found on the top right corner of the window).

3. Select “Manage add-ons” from the menu items.

Tools menu IE9

Alternative you can access the same settings from the “Tools” sections in the IE9 menu bar.

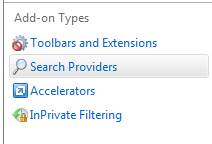
4. In the Manage Add-ons window, click “Search Providers” in the left pane.

Manage addons in IE9 left pane

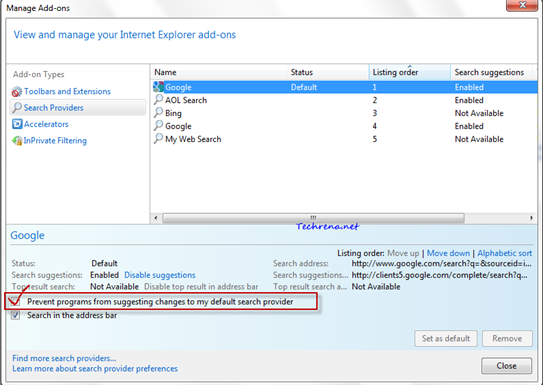
5. Select your default search engine (Google in my case), you will find an option “Prevent programs from suggesting changes to my default search provider”. Check against it and close the window.

Manage Search Providers in Manager Add-ons IE9

That is it. Now your default search engine in IE9 (& IE8) can’t be changed by any program. You might also want to read how to change the address bar search provider in Firefox.

[How To] Disable Session Restore In Firefox

firefox logo

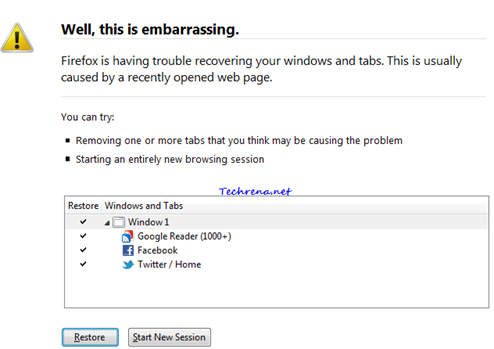
Firefox has a pretty useful “Session Restore” feature that lets you recover the opened sites when the browser crashes all of a sudden. In the latest version (Firefox 3.5+), Firefox has even allowed the users to restore only a certain number of tabs that were open just before the Firefox had crashed.

Session restore prompt in firefox

Even though highly useful and recommended, you might want to disable this feature for your very own reasons. With a little bit of effort, session restore can be disabled altogether from Firefox.

In this tutorial, let us see how to disable the session restore feature in Firefox via Firefox configuration settings page.

Steps:

1. Launch Firefox.

2. Type about:config in the address bar and press enter.

3. Accept the warning (This might void your warranty..) and proceed to the next page (click I’ll be careful, I promise!)..

This might void your warranty

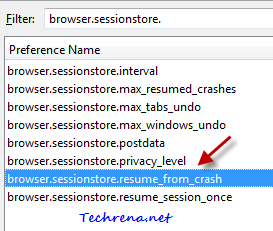
4. Type “browser.sessionstore” in the Filter and look for the entry “browser.sessionstore.resume_from_crash”.

session restore firefox settings

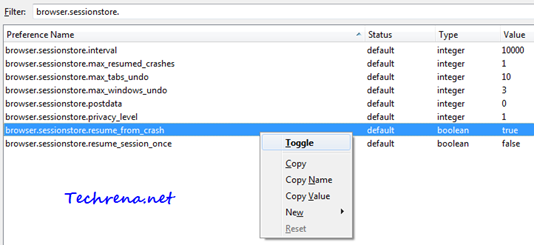
5. By default, the boolean value will be “true”. Right-click on the entry and choose “Toggle” to set the value to “false”. Close and restart the Firefox.

Browser session restore settings in firefox

Now you have disabled the Session Restore feature in Firefox. You will not be asked to restore the last opened tabs after the browser crash, instead the homepage will be opened.

[Tip] Clear Cookies And Cache For A Particular Domain In IE9

Internet Explorer 9

Microsoft’s latest innovation Internet Explorer 9 is slowly turning out to be the best ever browser that the Redmond based software giant has ever produced. With all the positive reviews creeping in from most of the users and experts, IE9 can now be viewed as the browser that will dominate the internet in the upcoming years. If you haven’t explored IE9 fully, yet there’s absolutely no reason why you should start doing it right away now.

There’s one useful feature in IE9 that most of us might not be aware of. Until now to delete cookies in the browser, we needed to delete the entire browser cache, in the same way, to delete cookies, we had to delete all the stored cookies. It’s not the same anymore with IE9. Thanks to IE9 developer tools, you can now clear cookies or clear cache for a particular single domain in Internet Explorer 9. It can be done if you follow the steps briefed below:

1. Open the Internet Explorer 9.

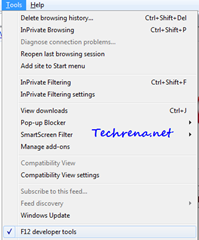
2. Press F12 to open the Developer tools. You may also access this via Tools (by pressing ALT) > F12 developer tools menu item.

Developer tools menu item

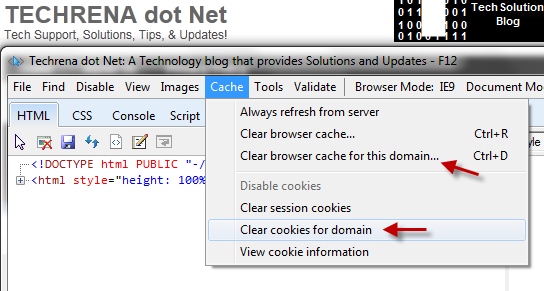
3. In the developer tools, you will see two options:

i) Clear cache for this domain

ii) Clear cookies for domain

Clear cookies and cache for this domain in IE9

These two options are very much handy especially if you are a developer.

Disable Internet Explorer First Run Welcome Screen Pop Up

When you install Internet Explorer 8 or IE9 and launch it for the first time (or even when you reset the settings), you might have noticed the Set Up Windows Internet Explorer 8 (applies to Internet Explorer 9 as well) screen (Tour and RunOnce) appears asking you to go through a few steps to change the configuration of the search and accelerator settings.
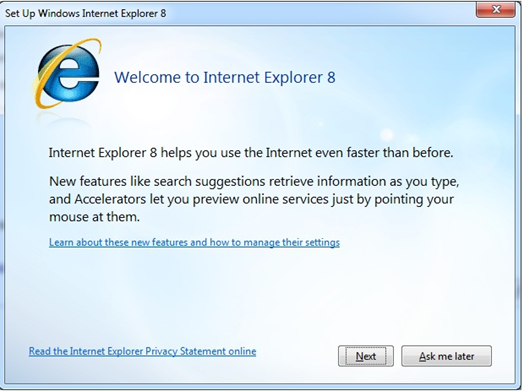
IE8 Set Up Welcome Screen

You might not want to see this popup every time you install IE (IE8 or IE9) or reset settings in IE. Unfortunately Microsoft hasn’t made it easier to disable this initial set up. However there are workarounds to achieve the same.

In this post, I’ll discuss about different methods to disable this initial set up popup:

Method-1: Using Group Policy Editor:

If you are using Professional, Ultimate or Enterprise versions of Windows 7 or Vista, you can tweak Group Policy Editor (gpedit) to disable the initial set up for Internet Explorer 8/9.

1. Press Start button + R and type “gpedit.msc” in the text field and press Enter to launch the Group Policy Editor.

2. In the left pane, expand User Configuration, then find and expand Administrative Templates, next find Windows Components under it and expand it. Then finally find “Internet Explorer”, click on it.

So the path would be: User Configuration> Administrative Templates> Windows Components> Internet Explorer

4. On the right pane, find “Prevent performance of First Run Customize settings” and double click on it. A new settings window will open up.
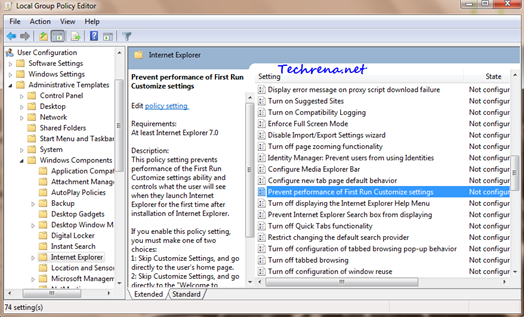
IE settings in GPEDIT

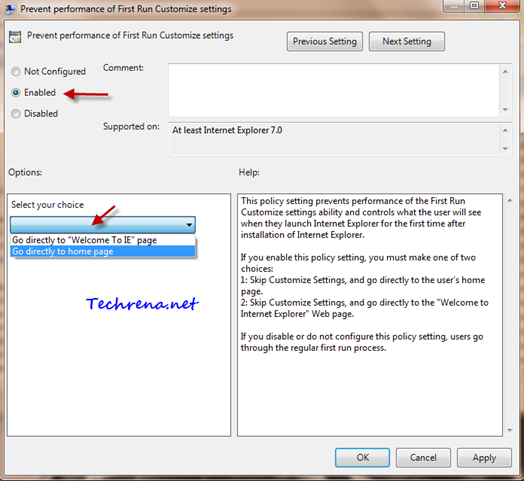
Prevent Performance of First Run Customize settings

5. Set the value to “Enabled” and then go for the options section. You will have two options from the dropdown menu:

i. Go directly to “Welcome To IE” page

ii. Go directly to home page

Select the first option (i) to skip the IE first run Customize Settings and go directly to your home page.

Select the second option (ii) to skip the IE first run Customize Settings and and go to the “Welcome to Internet Explorer” page directly.

6. Click Apply to save the settings then click OK and close the Group Policy Editor window.

Method-2: Using Registry Editor:

Warning: Using Registry Editor to modify Registry settings without much knowledge is deemed dangerous as it may cause some serious problems. Proceed to the Registry Editor at your own risk.

1. Press Start button + R to open run command dialog box. Type “regedit” and press OK to open the Registry Editor.

2. Before we work further, save a backup of the Registry Editor. Go to File > Export and save the .reg somewhere on your Hard disk or USB disk drive.

3. Navigate to the following path carefully in the Registry Editor:

HKEY_LOCAL_MACHINE\>Software\>Policies\>Microsoft\>Internet Explorer\>Main

4. Right click on the right pane and select New > DWORD (32-bit) Value.
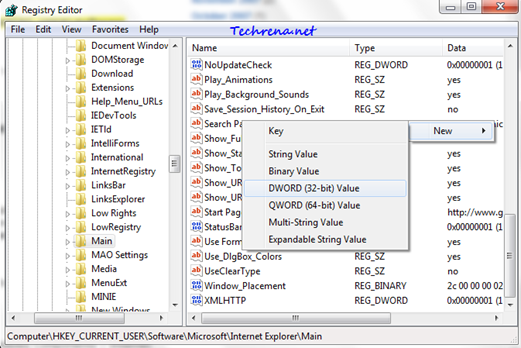
IE8 regedit

5. Give it a value DisableFirstRunCustomize as shown:

DisableFirstRunCustomize

6. Now right-click on it and choose “Modify”.

DisableFirstRunCustomize modify

7. Modify its DWORD (32-bit) Value to “1” from “0” and click OK.
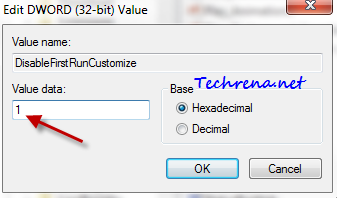
DisableFirstRunCustomize edit DWORD

8.Exit the Registry Editor.

Note: If you follow the Group Policy Editor method, the settings will be applied to all the users accounts, where as if you follow the Registry Editor method, the settings will effect only the currently logged in user account.