Enable Reading Levels In Google Search

Google reading level is a feature that lets you adjust the reading level in Google search results so that you get the most appropriate results based on your reading level so that you get webpages that you can read and understand easily. To get a better understanding, consider the scenario which Google mentioned in the help article (linked at the bottom of the post) about the reading level: A student or second-language learner might need a webpages more of basic reading levels when compared to a research scholar who might want to webpages of advanced reading levels. If you think, reading level matters for you, here’s how you can change

Go to Google homepage and click on the “Advanced Search” link found next to the search bar.
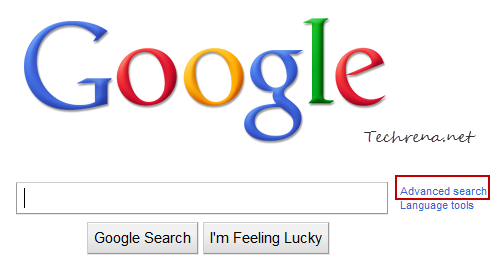
Advanced search link in Google

Locate the “Reading level” settings in the advanced search page:
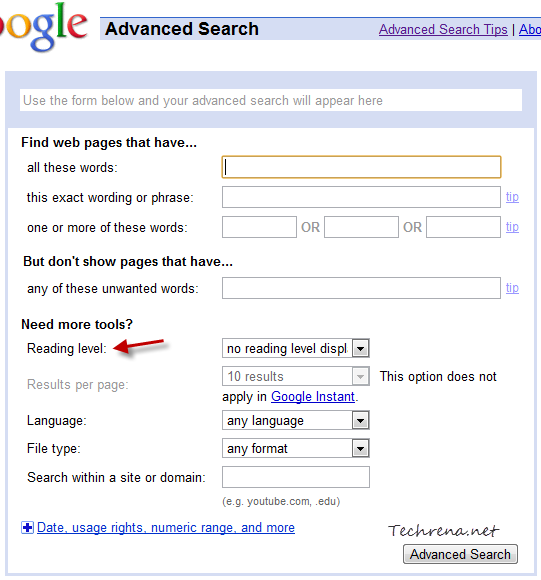
Advanced search options in Google

Basically there are three reading levels to choose from: Basic, Intermediate and Advanced.

reading level options

You can either choose one of the three levels or you can also choose “annotate results with reading levels” and the reading level of the webpages will be displayed in the search results as shown:
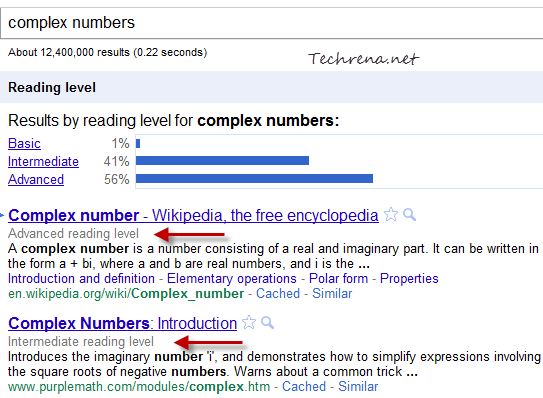
reading levels in Google search

You can then choose to read the webpages that are at your desired reading level.

These reading levels have been compiled by based on data provided by number of teachers hired by Google for the same purpose.

Source: Google Help article

The US National Broadband Map

National broadband map

You are moving to a new place in the United States and are in need of getting a new internet connection but not sure about who provides the best internet (better term may be ‘faster internet’) ?
No more worries, we now have a solution in the form of the ‘National Broadband Map’ here. It came from none other than the Federal Communications Commissions (FCC) of the Obama administration.

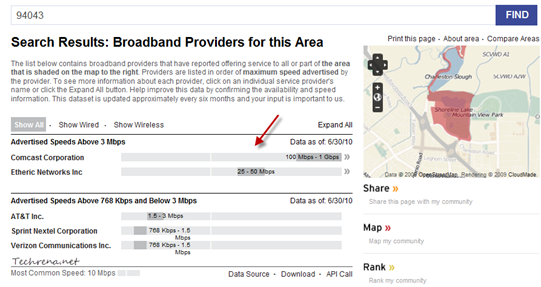
The National Broadband map for the United States (developed by the National Telecommunications and Information Administration) is a national broadband map containing data for thousands of broadband providers with more than 25 million searchable records and the results will be delivered in a map. You just have to key in your ZIP code or even street name along with ZIP code for even better localized result. The National Broadband map will then show you all the different Internet Service Providers along with the actual speeds that they are offering in your area.

National broadband map USA

As you can in the screenshot above, I have around five different broadband providers to choose from for my query (ZIP Code 94043 in California) and you can see that Comcast is the fastest broadband provider in this area when compared to Etheric Networks (which is also offering decent speeds), AT&T, Verizon and Sprint. You can quickly get to know about availability of a particular ISP in your area (anywhere in the United States), or compare the available providers without needing to enter their websites or view the overall broadband connectivity map of the U.S.

Visit National Broadband Map

[via]

[Tip] Import Delicious Bookmarks To Google Bookmarks

Delicious to Google Bookmarks

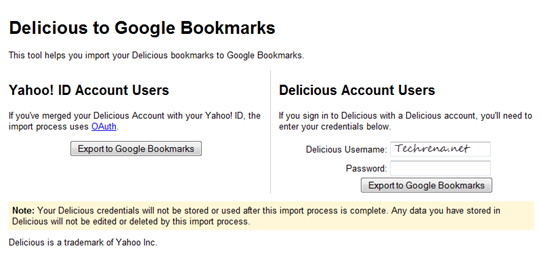
Delicious, the popular social bookmarking service was in news in December 2010 when Yahoo said that it would ‘sunset’ the bookmarking web service which made the users think that Yahoo was trying to shut down the service. Later it turned out to be a rumor when Yahoo! clarified that it wouldn’t be shutting down the service but they would be selling Delicious. And so many Delicious importers uprose ever since the ‘sunset’ rumors surfaced. Now it’s Google’s turn! Google has launched a new Delicious Bookmark importer service to enable the Delicious users to import their bookmarks to the Google’s own bookmarking service. The usage is straightforward:

1. Login to your Google account and open this Delicious import page.

Delicious to Google Bookmarks import

2. Just provide your Delicious login credentials or login through your Yahoo! account in case if you have merged your Delicious account (the importer uses the oAuth process in this case).

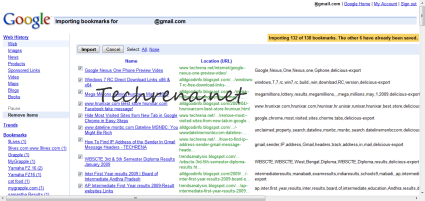
Delicious Bookmarks Imported To Google Bookmarks

Select the ones that you want to import and click the “Import” button and that is it. You should now have all of your Delicious bookmarks (favorites) in your Google Bookmarks.

[Tip] Disable The New Photo Viewer In Facebook

Facebook logo

Facebook has recently introduced a new Photo Viewer (called ‘Photo Theater’) last week. It has become a topic of debate among the Facebook users since then with most of them not supporting the initiative from Facebook to introduce the new theater version of the Photo Viewer. The new Photo Viewer is all about popup slideshow covering up almost the entire Facebook page in black background. If you are one of those that doesn’t like this annoying Photo Viewer, you might want to disable it and revert back to the good old Facebook Photo Viewer. These are the set of workarounds to get rid of the new Facebook Photo Viewer.

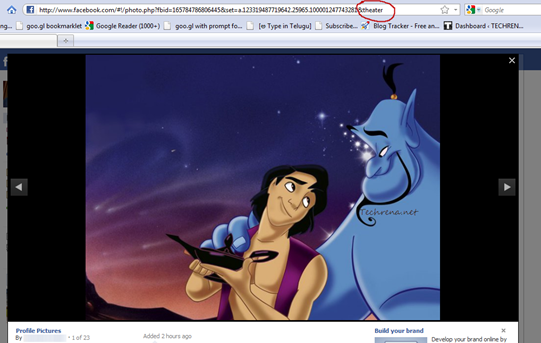
Facebook new photo viewer

Using F5:

Facebook appends the URL of a photo in Facebook with this “&theater” parameter to the URL to trigger the new Photo Viewer instead of the old one (You can manually delete the “&theater” tag from the URL and hit enter to load the photo in the old viewer). But it is found that refreshing the page loads the same photo in the old Photo Viewer. So all you have to do is to press F5 button and the photo should load again in the old Photo Viewer instead of the new one and you will see the rest of the photos in the album in the old Photo Viewer. However, this is not a permanent solution, and you might want to automate the things for you, and this is why you should scroll down to the next workaround.

Facebook old photo viewer

Using Browser Extensions:

If you are using Firefox, you should first install the Greasemonkey add-on and then use the following Facebook Photo Theater Killer script. This script works in Google Chrome too. Alternatively, if you are on Google Chrome, you can install Revert Facebook Photo Viewer extension for this purpose.

[Tip] Hide Your Facebook Updates From Specific People

Facebook logo

Facebook can be a place for lot of fun.  It has some annoyances too. It all depends on how you use it. Have you ever wondered whether you can post a private post or status update on your post that appears only to certain people and is hidden from other friends? Advanced users of Facebook might very well be aware of how to do this. But if you are relatively new user or never had a clue that such a feature existed in Facebook that allows to set a private post or status update on your wall, read the following guide to quickly learn how to do this:

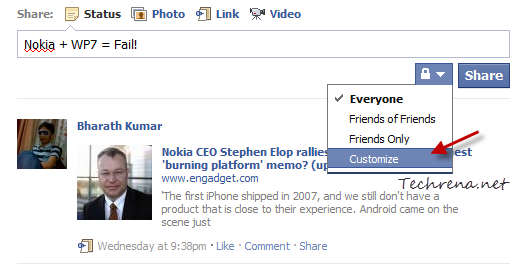
1. Login to your Facebook account, and start post your status update. Click on the small “Padlock” button that is placed just before the “Share” button.

Facebook private status update

Click on the “Customize” button that appears in the dropdown menu list.

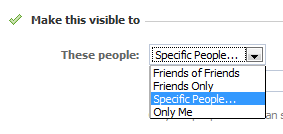
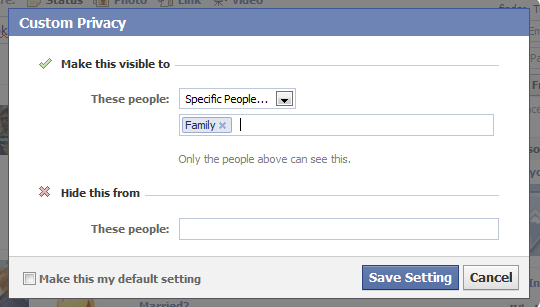
2. In the next window, you will be presented with privacy options for your current status update. As you want only specific people to see your status update, choose “Specific People” from the list under “Make this visible to”.

Facebook status update to specific people

3. You can either choose your friends from Facebook manually or you can create custom friends lists to choose from. To create a friend list quickly, go to your Facebook friends edit page and create a list with your specific friends. If you had already done that, you must now be able to choose a list by typing in the name of the list.

Facebook post visibility

4. Now your status update will only be visible to the people from your chosen list. Or if you want status update to be hidden from few selected friends of yours, you need to enter the names of those friends or friend list under “Hide this from” as in the previous case.

Facebook status update privacy

Click the “Save Setting” button once you are done. Your status update will now be visible to specific people or friends and will be hidden from other friends. You may also check the “Make this my default setting” option to set it as your default setting for other future updates.

[Download] Internet Explorer 9 Release Candidate

Internet Explorer 9

Microsoft has just released the release candidate version of the Internet Explorer 9 for Windows 7 and Windows Vista operating systems. The first public beta of Internet Explorer 9 was released in September 2010. So that was like nearly five months ago. Microsoft has stated that there were more than 2,000 changes incorporated since the release of IE9 beta. Here are the few new feature improvements in the Internet Explorer 9 release candidate.

>> Improved JavaScript Engine (Chakra) Performance

>> Dynamic GPU Usage

>> Lesser Power Consumption Levels

>> ‘Do Not Track’ feature

Other minor improvements include the increase of temporary internet files size from 50 MB to 250 MB.

Download IE9 RC:

Download the Internet Explorer 9 RC (Build 9.00.8080.16413) online setup (from the below links) which needs an active internet connection to download and install the browser on your Windows.

Windows 7 32-bit

Windows 7 64-bit

Windows Vista 32-bit

Windows Vista 64-bit

For more information on IE9 RC release, read this blog post on official IE9 blog.

[Download] Adobe Flash Player 10.2 With Hardware Acceleration

Adobe Flash Logo

Adobe has released the final version of Adobe Flash Player 10.2, which has been in beta since December last year. Adobe Flash Player 10.2 for Windows, Mac, and Linux has some new cool features and many feature enhancements. The new release is 34 times more efficient than its predecessor.

New features in Flash Player 10.2 include:

  • Stage Video hardware acceleration
  • IE 9 hardware accelerated rendering support
  • Native custom mouse cursors
  • Support for full screen mode with multiple monitors
  • Sub-pixel text rendering

The ones that standout among the rest are the “Stage Video” hardware acceleration and the support for full screen mode while using multiple monitors. The Stage Video hardware acceleration speeds up the video delivery process while watching videos on webpages. According to Adobe, Stage Video hardware acceleration can play most online HD videos with just 1-15% of CPU usage on a MAC or Windows PC. Adobe has also recommended users to watch a suggested 1080p HD video to experience the new video performance enhancements after installing the new 10.2 version of Flash. Flash Player 10.2 allows you to work on your primary computer while watching content in full-screen mode in the secondary monitor.

Download Adobe Flash Player 10.2:

Download the Adobe Flash Player 10.2 from the below direct download links for your MAC, Windows or Linux computer. It’s highly recommended that you uninstall the previous version of the Adobe Flash Player before going ahead with installing 10.2.

Windows (2.7 MB – Windows 7 / Vista / XP / 2008 / 2003)

Mac (5.5 MB – Mac OS X 10.4 – 10.6) Update: Link expired

Linux (4.74 MB )

If you are on Google Chrome, read our guide on how to force Chrome to use Flash Player 10.2 (based on 10.2 beta version, but still works!)

[Tip] Link Google Analytics Profile To Webmaster Tools

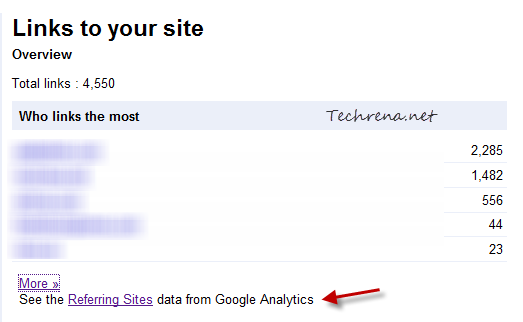
If you own a website or blog and using Google Analytics and Google Webmaster tools services on your site, you can now link both these services to more quicker access within one service to the other. A post on Google webmaster central blog describes that once you link your site’s Google Analytics profile to the corresponding Google Webmaster Tools account, even though you won’t be able to see data sharing like your linked Adsense – Google Analytics account, you can still see some quick links to access few Analytics features right inside the Webmaster Tools. For instance you can now see the referring pages report of the Google Analytics profile from the “Links to your site” page in Webmaster Tools.

Links to site in Google Webmaster Tools

Follow the steps to link the Google Analytics profile of your site to the Webmaster Tools provided you have both of them on the same Google account.

1. Go to Google Webmaster Tools dashboard and locate the site for which you want to link.

2. Click on the “Manage” drop-down button to expand the menu and click on the “Google Analytics profile” link.

google analytics profile link webmaster tools

3. Choose your site’s Google Analytics profile from the list and click the “Save” button.

Link Google Analytics account to GWT

That is it.

Set Up Hotmail Email Aliases

Hotmail logo

An email alias is basically an alternate email address which is mapped to a original and used email address in order to save your email address from spam. If you ever have to share your email address but hesitant to do it for of the fear of spam, having an email address alias could be handy.

Most of the email services allow us to easily generate a dummy email alias by adding a “+” sign to your primary email address. For instance, if your email address is “myemail@hotmail.com” is your primary email address, you could always add a “+” sign to your ID to make it “myemail+newsletters@hotmail.com”. Even though this method works well, one big problem is that one can easily find out your actual primary email address from the structure of this kind of alternative email address. To solve this issue, Microsoft has started to let the users choose completely different set of email addresses as your aliases that can be used to receive emails into your primary email address without anybody knowing a detail about it. Google offers such email aliases for Google Apps user but not for Gmail users. Here is how you can setup an email alias for your Hotmail.

1. Open Hotmail email alias page and log into your Hotmail account using Windows Live ID.

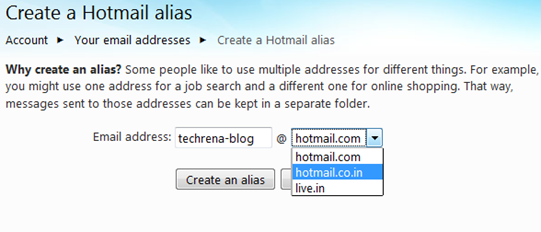
2. You will now be asked to choose an email alias for your existing email, and the it is subject to the availability i.e Hotmail checks whether the ID is available. Choose your desired ID and click “Create an alias” button .

hotmail alias

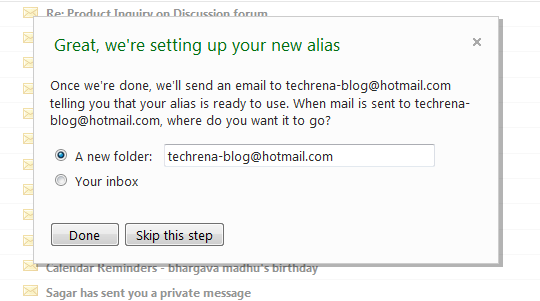
3. If the ID chosen is available, you will be taken to your inbox and will be asked to choose a folder for this alias. You can either choose to receive mails from this email alias directly to your inbox or you can create a new folder to direct the email messages to it.

Hotmail email alias setup

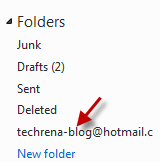
4. You are done. If you had chosen to create a new folder, it will appear in the left-hand side pane.

hotmail alias folder

You can create up to five aliases per year until you reach as many as fifteen aliases in your account.

[via] Windows Live blog

Solve YouTube Rebuffer Problem When You Switch To Full Screen Mode

YouTube video resolutions

YouTube lovers on slower internet connection are very much disappointed by a recently changed settings that went into live in the video sharing site. The new settings (known as Auto HD) force the video to re-buffer from the beginning when you switch to full screen mode when watching a video. Just imagine a situation where you load a full video in normal mode in 360 pixels resolution. Now you wanted to watch it in full screen, the video switches from 360p to 480p automatically and starts buffering from the starting point again! Very annoying, isn’t it? Not so much when you are on a high speed internet connection, but if you are on a slow connection, you have every reason to feel so. Though YouTube doesn’t really offer any fix for this, we have few tricks which can solve this issue for you.

Method-1: Changing Settings In Your YouTube Account

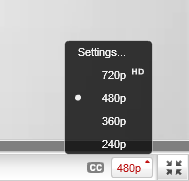
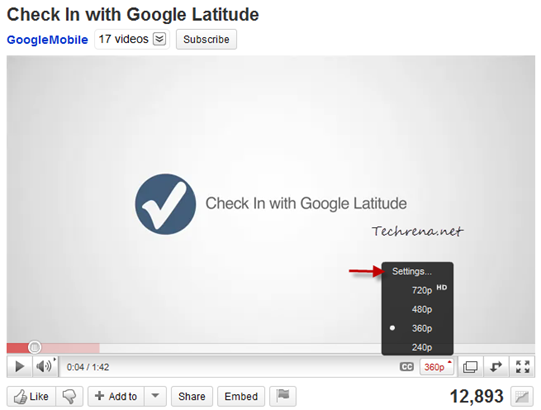
Click on the “Settings..” link found atop when you click on the video resolution (240p, 360p etc.) button.

YouTube video resolution settings

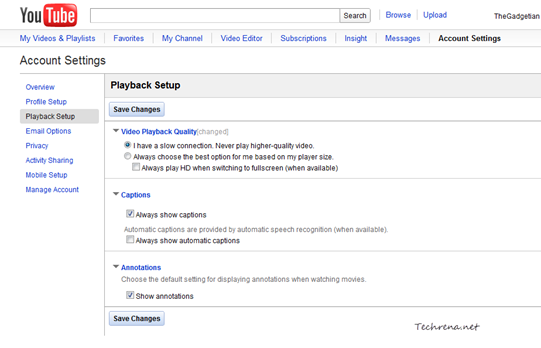
If you are already having an YouTube account, sign in to the account and go to your YouTube account settings page, where you’ll find settings for “Video Playback Quality”. Choose the first option “I have a slow connection. Never play higher-quality video.” and click the “Save Changes” button at the bottom of the page.

YouTube video playback quality settings in account

Now, videos will never get into the higher resolution mode when you switch to the full screen mode. On the downside, this method only works when you play the videos while you are logged into your YouTube account.

Method-2: Using GreaseMonkey Script

Install GreaseMonkey add-on for Firefox and restart your browser. If you are on Google Chrome you need not install any extension.

Install this GreaseMonkey script (YouTube Auto Buffer & Auto HD & Remove Ads) in your Firefox or Chrome browsers and it will take care of the rest. Now test the script by playing and switching any YouTube video into full screen. The problem should have been fixed now!