Automatically Log On To A User Account In Windows 7

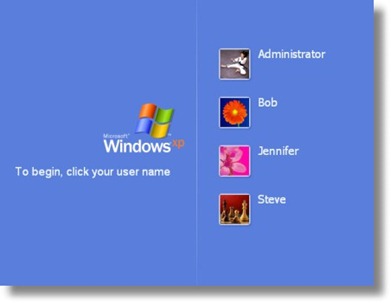
Windows welcome screen with multiple user accounts

Windows 7 by default will ask you to select your user account manually from welcome screen (log on screen) to log on to that particular account. If you have multiple user accounts, but use only one main account most of the time, you may want to save some time by letting your Windows automatically logged on to your default account rather than choosing the account manually.

This tutorial helps you to enable “Automatically Log on” feature in your Windows 7. Follow the steps outlined below to enable this feature on your Windows 7 system.

Steps:

1. Click on Start button, enter netplwiz in the search box and hit the Enter key, or open the netplwiz from the results under Programs category. This will open Advanced User Accounts section from the Control Panel items.

Windows_search_netplwiz

Windows_search_netplwiz_results

2. The Users tab may look like as shown in the below screenshot :
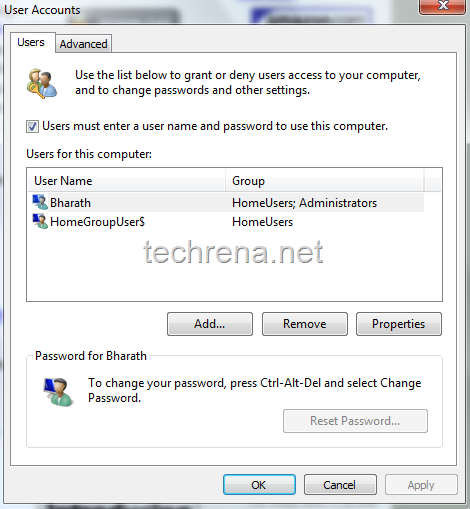
Windows user accounts

3. Now uncheck “Users must enter a user name and password to use this computer” and click Apply. You will be asked to confirm user name and password.

You can set up your computer so that users do not have to type a user name and password to log on. To do this, specify a user that will be automatically logged on below:

Just leave the password field blank if the user account doesn’t have a default password associated with it.
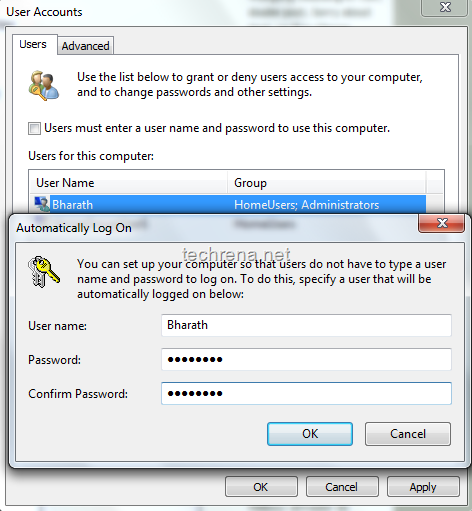
Automatically log on in Windows 7

4. Click OK and close the window.

From now on, you will be automatically logged on to Windows without manually selecting the user account.

For more tips on Windows 7, you can subscribe to Techrena.net’s RSS feed via email.

Note:

This method works well on Windows 7 as well as on Windows Vista.

You may not want to select this on a public computer for security concerns.

Stop Yahoo Messenger From Automatically Starting Up With Windows

Yahoo messenger icon

Yahoo Messenger is the most widely used chat program in many parts of the world to send and receive instant messages, pictures, and other files among users.Yahoo Messenger by default starts automatically at start up.But you may want to run it only when you need by preventing it from auto start up and thus speeding up your Windows boot time.This is can be accomplished by changing a small settings in the Yahoo Messenger program.Follow the steps briefed below:

Steps:

1. Launch Yahoo Messenger and sign into it using your username and password.

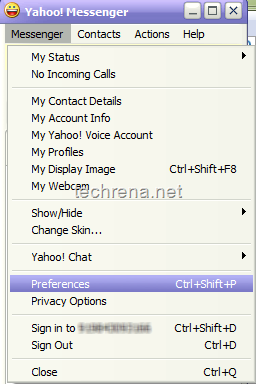
2. Open Preferences from the Messenger menu.

Yahoo_msgr_menu

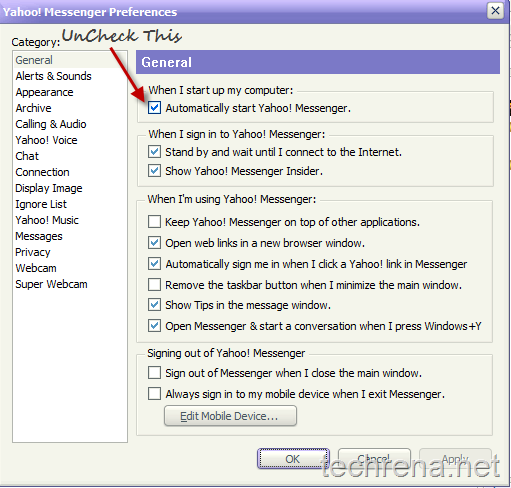
3. Under Yahoo Messenger Preferences window, click on the category General and checkout the options in the right pane.

Yahoo_messenger_prefrences

4. Uncheck against “Automatically start Yahoo! Messenger”.Click OK and close the Messenger.

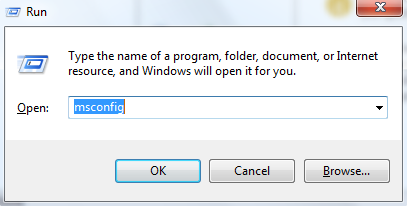
5. Press Start + R button to open Run command and type msconfing and click OK.

msconfig run command

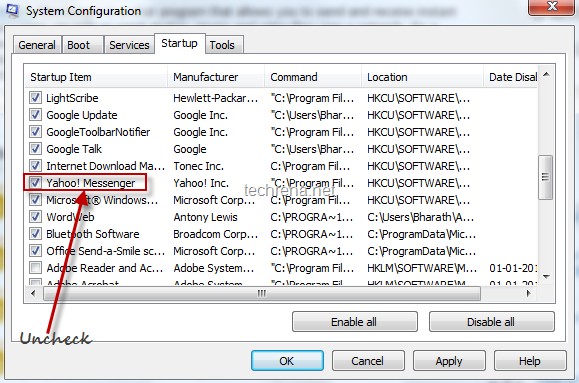
6. Under the Startup tab, uncheck against Yahoo Messenger.Click OK and close the System Configuration window.

Yahoo Messenger entry in Sytem configuration (msconfig)

This prevents Yahoo Messenger from starting automatically with Windows startup.

Create Hibernate Shortcut For Windows

hibernate windows

Previously we have posted about how to create shutdown desktop shortcut for Windows.If you have liked it but want similar desktop shortcut to Hibernate the Windows too, go ahead and follow the steps outlined below.

Steps:

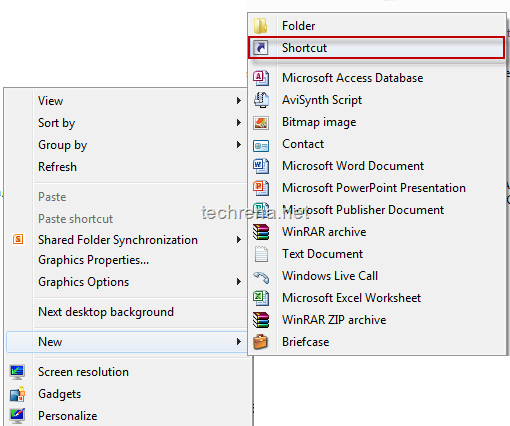
1. Start creating a new desktop shortcut by right-clicking on the desktop and selecting “Shortcut” from the context menu.

create new shortcut

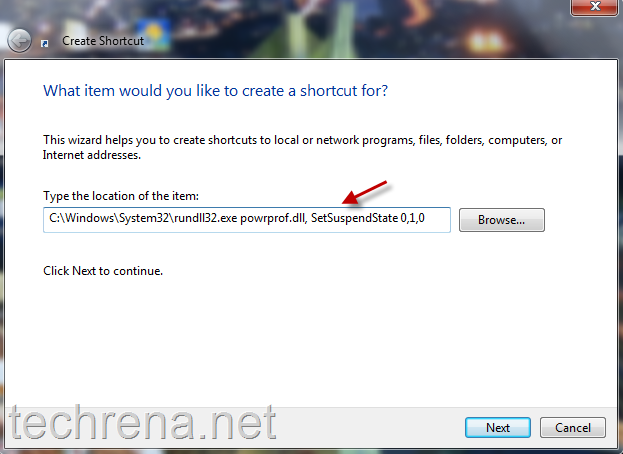
2. In the next step, you will be asked to type the location of the item for which you want to create shortcut.

Just type

C:\Windows\System32\rundll32.exe powrprof.dll, SetSuspendState 0,1,0

notepad_command

in the space and click Next

setup shortcut for hibernate

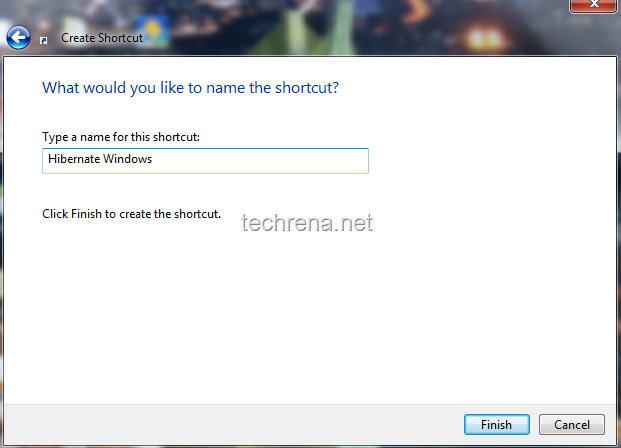
3. In the next step give your desired name for the shortcut like “Hibernate Windows” or “Shortcut for Hibernation” or whatever you like.Click Finish to finalize the wizard.

rename hibernate windows shortcut

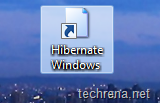
4. Now you can find the shortcut for Hibernating windows as shown below.

Hibernate windows shortcut

5. You can now start using the desktop shortcut for hibernation created above or you can go for customizing the icon of the shortcut to match its purpose.

Use the following path to look for icons

%SystemRoot%\system32\SHELL32.dll

icons_notepad_scriptchange shortcut icon

Choose the suitable icon and now you are done with creating the shortcut.

customize Hibernate windows shortcut icon

This tutorial has been tested on a Windows 7 machine and worded fine.You may also want to read about how to enable and disable the Hibernation in Windows.
Compatibility View List Update For Internet Explorer 8 – KB982632

Internet explorer logo

A new update KB982632 available for download for systems running Windows operating system.

This new update targets Internet Explorer 8 compatibility view list.Compatibility View List update helps the browser to load the websites designed for older browsers better in the Internet Explorer 8.To use this update effectively, you should select “Include updated website lists from Microsoft” option under Compatibility View Settings in Internet Explorer.

Windows Update

Download KB982632:

The update KB982632  was released on May 25, 2010 for systems running Windows 7, Windows Vista, Windows XP and Windows Server 2003.

Windows 7 – Windows6.1-KB982632-x86.msu

Windows Vista – IE8-Windows6.0-KB982632-x86.msu

Windows XP – IE8-WindowsXP-KB982632-x86-ENU.exe

Also read about the latest update KB981793

Disable Write Protection On USB Disk Drive

windows 7 usb logo

If you have an USB disk drive (Mass storage/ flash drive), sometimes you might have faced problems while copying (writing) data to your USB disk with either of the following error messages being returned.

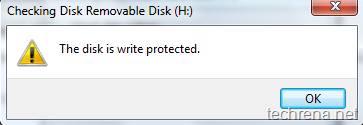
“The disk is write protected.

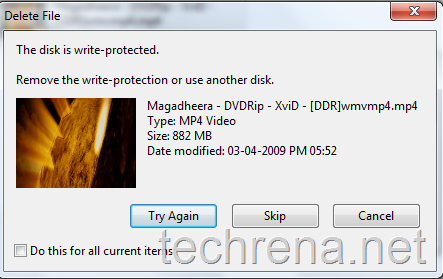
The media is write-protected.

Remove the write-protection or use another disk.”

the disk is write protected

write protected usb disk

This means that your USB disk drive is write-protected so you will not be able to download the files from the USB disk nor you will be able to copy the files into the USB drive.

There is a registry hack available to disable or remove this write-protection on the USB disks and flash key drives.

1. Open registry editor via regedit run command.

2. Navigate to the following key:

HKEY_LOCAL_MACHINE \ SYSTEM\  CurrentControlSet \ Control

write_protection_reg_key

3. Create a new key named as StorageDevicePolicies.

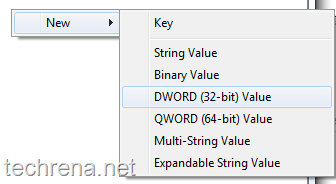
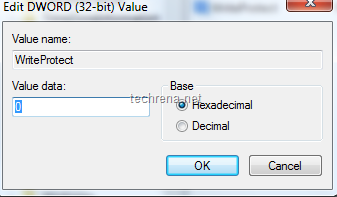
4. Right-click on the right side pane, select DWORD (32-bit) value naming it as WriteProtect.

edit DWORD value

5. Double click on WriteProtect, and set its Value data to 0 (for removing write protection).

edit DWORD value

You may also be interested in reading reset windows password using USB.

Note:

As you are working with registry editor, it is always recommended that you save a backup of your registry.

If you want to disable write access to USB disk drive (flash drive), just set the WriteProtect value data to 1.

Microsoft Windows Update KB981793

Windows logo

Microsoft has released update KB981793 (on Monday, 24th May 2010) for Windows (including Windows 7) systems categorized as “Important update” for all Windows running computers titled as May 2010 cumulative time zone update for Windows operating systems.

DST worldwideWindows 7 clock

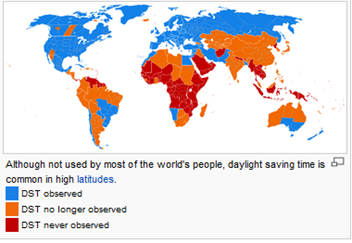
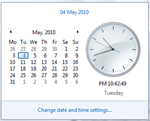
This latest update addresses the fix for changes in various time zone data to accommodate recent changes to daylight saving time (DST) in several countries since the last Windows cumulative time zone update KB931667 and adjusts your computer clock according to the changes.

DST changes since the last Windows cumulative time zone update:

Fiji, Morocco, Pacific SA, Paraguay – DST change

Bangladesh – Cancelled DST

Syria – Created a new UTC +2 Damascus time zone

The Update is available for the following Operating Systems:

Windows XP (SP2 & SP3) –

Windows Server 2003

Windows Vista or Windows Server 2008

Windows 7 or Windows Server 2008 R2

This updates installs the files Tzchnage.dll, Tzchnage.exe, Updspapi.dll in case of Windows XP and Windows Server 2003; Tzres.dll, Tzupd.dll.mui & Tzupd.exe for Windows Vista and Windows 7 based systems.

KB981793 Direct Download Links:

Windows 7

Windows Vista

Windows XP

[How To] Disable Restart Your Computer Notification After Installing Windows Update

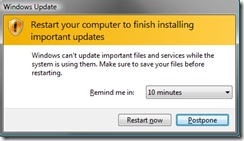
Microsoft Windows automatic updates provides maximum protection against latest security threats and fixes bugs discovered later. Well it is advisable to enable automatic updates or at least install them manually whenever any new update is released. The only annoying thing about Windows Automatic Updates is that it starts displaying a notification to restart your system in regular intervals once it finishes installing the updates.

This notification is even more annoying in Windows XP where we don’t have the option of increasing the time interval.

Windows_XP_Restart Windows-7-restart

Now we can disable this notification. The methods are given below:

1. By using Local Group Policy Editor (gpedit.msc)

Note: Local Group Policy Editor which is not available in Home versions of Windows

Open Local Group Policy Editor. Press Start + R, Type gpedit.msc and Enter.

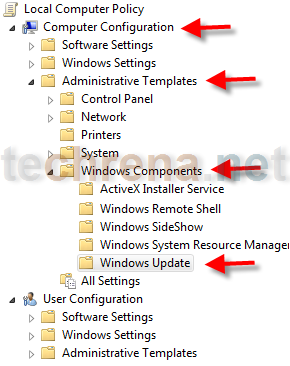
Now go to in the left pane :

Computer Configuration—>Administrative Templates—>Windows Components—>Windows Update

Windows_update

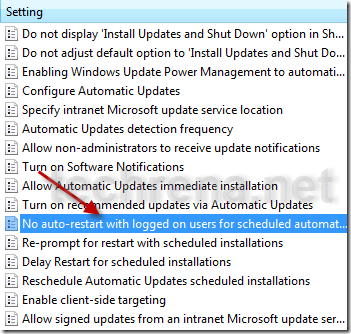
In the Right Pane Double Click on:

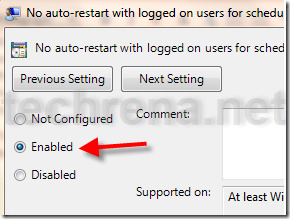
No auto-restart with logged on users for scheduled automatic updates installations

no_auto_restart

Click on Enabled and press OK.

enable_no_auto_restart

Now the notification has been disabled permanently.

2. By using wuauserv command

Note: This method is applicable for all versions of Windows XP, Vista and Windows 7.

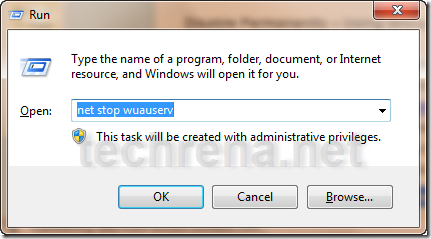
Press Start + R, Type net stop wuauserv and Enter.

net_stop_wuauserv

Stopping_windows_update_service

It will stop the Windows Update service for the current session. It will start again after the system restarts. It is important to note that you have to use this command only after Windows has finished installing the updates and when it starts notifying to restart. Do not stop the service while installing the updates.

If you want to start the service Type net start wuauserv and Enter.

This method stops the notification temporarily, only for the current session.

We hope that now you will not have to press restart later again and again and get hold of the annoying message.

You can subscribe to our RSS feed via email for more tutorials under Windows.

[How To] Copy A File Or Folder Path To Clipboard Without Any Software

Windows7_Logo

Are you using any third party software or any registry hack to copy the path of any file or folder in windows? Do you know that Windows 7 allows you to copy the full path of any file right from the context menu itself? Here’s how you can do this:

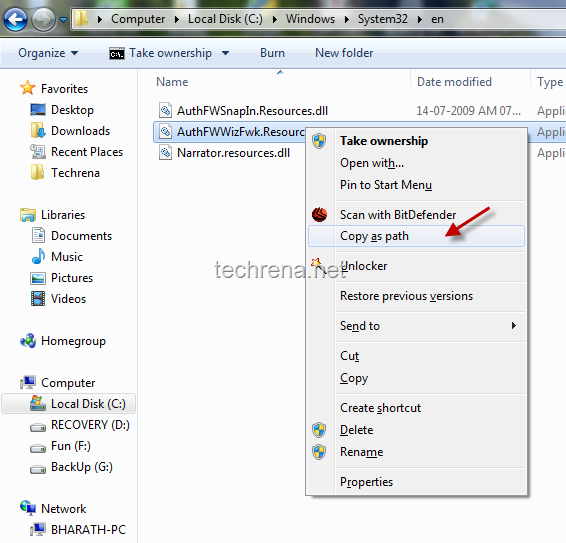
Use Shift + Right-Click on any file or folder and you will find “Copy as path”.

Copy as path in windows

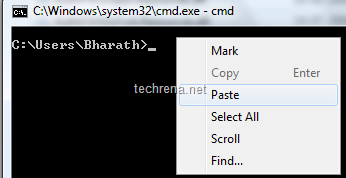
You can now use the copied file path from the clipboard anywhere including in a command prompt DOS window:

paste file path in cmd

file path copied in cmd

This is very helpful if you are using some commands via the Windows command prompt (DOS windows) that needs the full path of the files on which the DOS commands are used.

Hope this tip helps you.You may also subscribe to our RSS feed via email for more tutorials under Windows 7.

Add Or Remove Items From Windows Context Menu

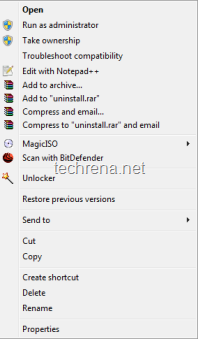
messy windows context menu

Context Menu appears when you right-click on any Windows folder or a file.When you install programs, it is very common that they fight with each-other to occupy the content menu.This context menu list will just keep on increase as you install new programs in your PC.But it is very unlikely that you use all such programs from the context menu, then why have it there? It is very annoying in such cases and you might want to get rid of all such menu items.Read on to get the possible solutions..

Using Registry Editor:

You need to find two items in registry editor which pops up by typing Regedit in your run command area.

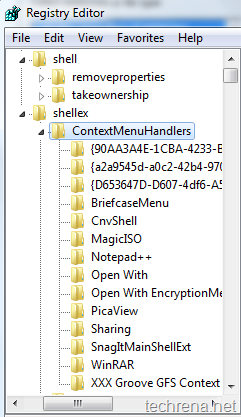
In the registry editor, find the following items:

HKEY_CLASSES_ROOT\Directory\shell

HKEY_CLASSES_ROOT\Directory\shellex\ContextMenuHandlers

Shell Context Menu Handlers in regedit

As shown in the above diagrams, you will find most of your context menu items under shellex, which you can edit to hide or disable.

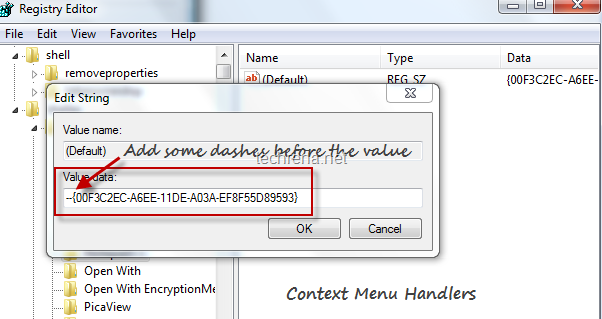
Regedit shell context menu handlers

To hide any context menu item, just right click on the key> choose Modify data?> just add some dashes before the Value data filed, this will hide that particular item for appearing in the context menu handlers.

Well, working with registry values is always going to be dangerous particular if you edit some other key values instead of the correct one.So I always prefer using simple programs available for obtaining the same result in a easier way.

ContextEdit:

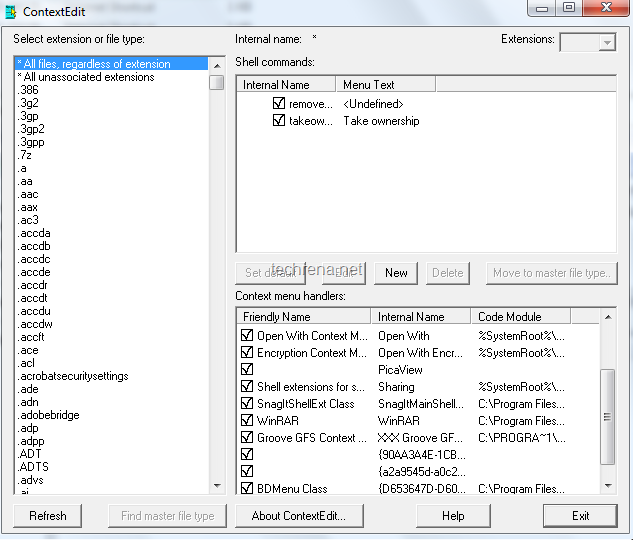
ContextEdit displays list of static context menu handler items that appear when you right-click on any folder or file.You can easily disable them by unchecking against it.

ContextEdit

Download ContextEdit (487 KB)

FileMenu Tools:

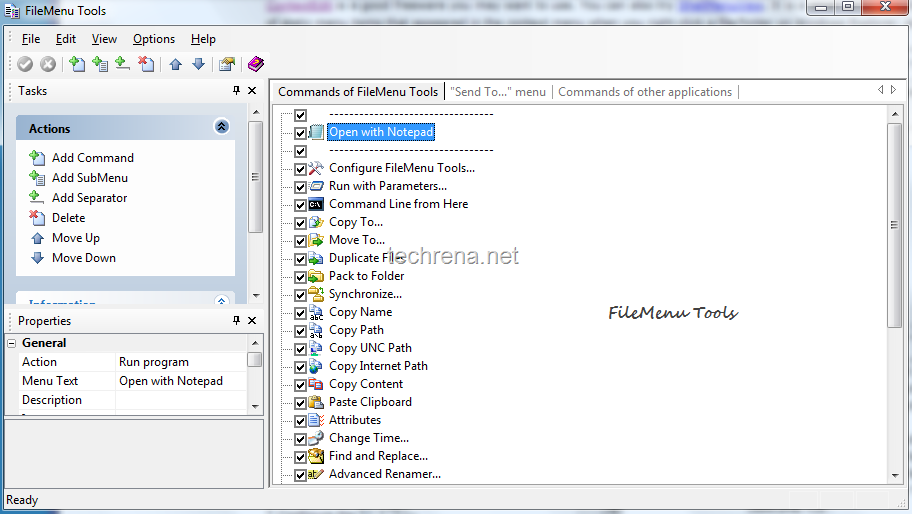
FileMenu Tools, is another great free utility which allows you add, delete or manage the context menu items, you can even choose move a particular context menu item down (or up).

FileMenu tools

Download FileMenu Tools (7.4 MB)

Download Microsoft Windows Malicious Software Removal Tool KB890830

microsoft Windows Malicious Software Removal Tool

The Microsoft Windows Malicious Software Removal Tool May 2010 edition is available for download now. This tool can detect and remove prevalent malicious software like Blaster, Sasser, and Mydoom.

It is advisable that everyone who uses Windows to install this update. This Update is applicable to Windows 2000, Windows 7, Windows Server 2003, Windows Vista, and Windows XP.

Windows Malicious Software Removal Tool – May 2010 (KB890830)

Download size: 1.2 MB (Through Windows Update)

Update type: Important

After the download, this tool runs one time to check your computer for infection by specific, prevalent malicious software (including Blaster, Sasser, and Mydoom) and helps remove any infection that is found. If an infection is found, the tool will display a status report the next time that you start your computer. A new version of the tool will be offered every month. If you want to manually run the tool on your computer, you can download a copy from the Microsoft Download Center(Link Given Below), or you can run an online version from microsoft.com. This tool is not a replacement for an antivirus product. To help protect your computer, you should use an antivirus product.

You may need to restart your computer for this update to take effect.

Manual Download from Official Microsoft Site:

Download size: 9.7 MB

Download: Click Here (From Official Site) – Update: Link expired

Also read about Windows Malicious Software Removal Tool KB890830 for April 2010, and you may also want to read about other updates released by Microsoft in May 2010: KB978542, KB978213.